
A DIY Alkalinity Test: By Randy Holmes-Farley
Alkalinity is one of the most important measurements that a reef aquarist can make. It can become rapidly depleted in many aquaria, requiring frequent measurement in order to maintain stable levels.
While hobby test kits for alkalinity can be simple to use, some aquarists find them either tedious to perform, expensive, or of questionable accuracy. This article details how one can perform DIY alkalinity tests that do not involve visualizing color changes, should be appropriately accurate, and can be less expensive than most alkalinity test kits.
In order to perform this test, you will need the following items, which I will discuss in detail later in the article
1. A calibrated pH meter
2. Containers or scales to accurately measure liquid volumes or weights
A. A method to measure a larger volume, such as 1 cup, 2 cups or 1 L of aquarium water
B. A method to measure smaller volumes of a few mL (a syringe from an existing kit can be a good choice)
3. A standard acid that can be purchased online.
In short, the test simply involves adding the acid to a sample of aquarium water until the pH reaches 4.5. Then we can look up the alkalinity based on how much acid it took for that amount of aquarium water. This addition is exactly what typical test kits do, except we replace the color changing dye with a pH meter, and we bypass the middle man.
Before we get to the test details, let’s review some background on alkalinity itself.
What is Alkalinity?
If all you want to do is run the test, skip down to “The DIY Test Method: Step by Step”.
Along with calcium, many corals use “alkalinity” to form their skeletons, which are comprised primarily of calcium carbonate. It is generally believed that corals take up bicarbonate (HCO3–), convert it into carbonate (CO3—), and then use that carbonate to form calcium carbonate skeletons. That conversion process is shown as:
HCO3– CO3— + H+
Bicarbonate Carbonate + proton (same as H+, which is released from the coral)
To ensure that corals have an adequate supply of bicarbonate for calcification, aquarists could just measure bicarbonate directly. Designing a test kit for bicarbonate, however, is somewhat more complicated than for alkalinity. Consequently, the use of alkalinity as a surrogate measure for bicarbonate has become standard practice in the reef aquarium hobby.
So, what is alkalinity? Alkalinity in a marine aquarium is simply a measure of the amount of acid (H+) required to reduce the pH to about 4.5, where all bicarbonate is converted into carbonic acid (H2CO3) as follows:
HCO3– + H+ H2CO3
The amount of acid needed is equal to the amount of bicarbonate present, so when measuring alkalinity with a titration-type test kit (one where you carefully add a reagent of known concentration in measured steps, like drops from a syringe), you are “counting” the number of bicarbonate ions present. It is not, however, quite that simple since some other ions also take up acid during the titration. Both borate and carbonate also contribute to the measurement of alkalinity, but the bicarbonate dominates these other ions since they are generally lower in concentration than bicarbonate. So knowing the total alkalinity is akin to, but not exactly the same as, knowing how much bicarbonate is available to corals. In any case, total alkalinity is the standard that aquarists use for this purpose.
Our DIY test method also involves a titration: we take some aquarium water and carefully add a measured amount of an acid until the pH reaches 4.5. By measuring the the amount of acid used, we can then calculate the alkalinity.
Unlike the calcium concentration, it is widely believed that certain organisms calcify more quickly at alkalinity levels higher than those in normal seawater (the normal alkalinity of seawater is approximately 7 dKH). This result has also been demonstrated in the scientific literature, which has shown that adding bicarbonate to seawater increases the rate of calcification in some corals. Uptake of bicarbonate can consequently become rate limiting in many corals. That is, coral skeleton formation can only proceed as fast as the coral is able to take up bicarbonate from the water. This may be partly due to the fact that the external bicarbonate concentration is not large to begin with (relative to, for example, the calcium concentration, which is effectively about 5 times higher).
For these reasons, alkalinity maintenance is a critical aspect of coral reef aquarium husbandry. In the absence of supplementation, alkalinity will rapidly drop as corals use up much of what is present in seawater. Water changes alone are usually insufficient to maintain alkalinity unless there is very little calcification taking place (for example, in fish-only systems, or those with little or no calcifying corals or coralline algae). Most reef aquarists try to maintain alkalinity at levels at or slightly above those of normal seawater (~7 dKH), although exactly what levels different aquarists target depends a bit on the goals they have for their aquaria.
Interestingly, because some corals may calcify faster at higher alkalinity levels, and because the abiotic (non-biological) precipitation of calcium carbonate on heaters and pumps also rises as alkalinity rises, the demand for alkalinity (and calcium) rises as the alkalinity rises. So an aquarist generally must dose more calcium and alkalinity EVERY DAY to maintain a higher alkalinity (say, 11 dKH) than to maintain 7 dKH. It is not just a one-time boost that is needed to make up that difference. In fact, calcification gets so slow as the alkalinity drops below 6 dKH that reef aquaria rarely get much below that point, even with no dosing: natural calcification has nearly stopped at that level.
In general, I suggest that aquarists maintain alkalinity between about 7 and 11 dKH (2.5 and 4 meq/L; 125-200 ppm CaCO3 equivalents). Many aquarists growing SPS corals and using Ultra Low Nutrient Systems (ULNS) have found that the corals suffer from “burnt tips” if the alkalinity is too high or changes too much. It is not at all clear why this is the case, but such aquaria are better served by alkalinity in the 7-8 dKH range.
As mentioned above, alkalinity levels above those in natural seawater increase the abiotic precipitation of calcium carbonate on warm objects such as heaters and pump impellers, or sometimes even in sand beds. This precipitation not only wastes calcium and alkalinity that aquarists are carefully adding, but it also increases equipment maintenance requirements and can “damage” a sand bed, hardening it into a chunk of limestone. When elevated alkalinity is driving this precipitation, it can also depress the calcium level. An excessively high alkalinity level can therefore create undesirable consequences.
I suggest that aquarists use a balanced calcium and alkalinity additive system of some sort for routine maintenance. The most popular of these balanced methods include limewater (kalkwasser), calcium carbonate/carbon dioxide reactors, and the two-part/three part additive systems.
For one-time alkalinity corrections, aquarists can simply use baking soda (sodium bicarbonate) or washing soda (sodium carbonate; baked baking soda) to good effect. The latter raises pH as well as alkalinity while the former has a very small pH lowering effect. Mixtures can also be used, and are what many hobby chemical supply companies sell as “buffers”. Most often, sodium carbonate is preferred, however, since most reef tanks can be helped by a pH boost.
The DIY Test Method: Step by Step
This test involves four simple steps:
1. Buy a standard acid.
2. Measure out some aquarium water. Use any volume you can measure accurately. A cup is fine.
3. Add the standard acid to the aquarium water slowly until the pH reaches 4.5, keeping track of the amount of standard acid used.
4. Calculate the alkalinity from the volumes of aquarium water and standard acid used.
Step 1: The Standard Acid
We will need a 0.1 N standard acid for this test. The acid should be hydrochloric (HCl) or sulfuric. The designation 0.1 N means 0.1 “normal” which, in the case of hydrochloric acid, is exactly the same as 0.1 M where the M means molar concentration. In the case of sulfuric acid, 0.1 N = 0.05 M (since sulfuric acid has two protons), so if you use sulfuric acid, be sure it is 0.1 N rather than 0.1 M.
Such an acid can be purchased online from many retailers, but some of the more chemically oriented companies may not sell any chemical to individuals. However, others will sell and ship this material, and it can be found on eBay and on other retailer’s web sites. Google shopping currently has some hits for 0.1 N HCl, and at least one of these seems to sell to individuals. The current price is about $22 including shipping for 32 ounces, which can be enough for more than a hundred alkalinity tests (and may be the only cost of such testing).
Alternatively, you can buy 1.0 N acid, and then dilute it by a factor of 10 by adding 1 part of the acid to 9 parts of RO/DI water. Buying the stronger acid and diluting it yourself will likely be much cheaper per test, but introduces another potential source of error. If you purchase 1 N acid, be careful with it. It is ten times stronger than the 0.1 N acid. Always use protective eye-wear and gloves when handling strong acids.
The amount of 0.1 N acid used in this test will depend on the volume of the aquarium water titrated. The more accurately you can measure the volumes (or weights) of the aquarium sample and the standard acid, the more accurate the results will be. If you use 1 L of aquarium water, it will take 25 mL of titrant (the standard acid that is being added) to reach pH 4.5 when the water has a natural seawater level of alkalinity (2.5 meq/L or 7 dKH). So if you bought 1 L of standard acid, that will be enough to do 40 measurements on 1 L of aquarium water, or 80 measurements on 500 mL of aquarium water, or 160 measurements on 250 mL of aquarium water, etc.
So for most aquarists, purchasing 1 L or 32 ounces of standard acid (0.1 N) seems to be a good way to start.
Step 2: The Aquarium Sample
As mentioned above, the water sample can be of any convenient size. Use whatever you can measure most accurately, recognizing that smaller volumes will give more tests per bottle of standard acid. Accurate measurement of liquid volumes can be difficult, even in a lab. The very best methods involve either a good quality scale to weigh the sample, or a “volumetric flask” (a weird flask with a big ball on the bottom a long and very skinny neck, with a single volume measurement indicated on the neck). Few hobbyists will have such a flask, but many may have digital kitchen scales which would be a good choice. Second best method for volume measurement would be a graduated cylinder, but again, few hobbyists have those.
Then we come to measuring cups. Despite the fact that they are intended for dry measurement, I expect the best bet is a standard stainless steel cup that holds 1 cup exactly to the brim. Fill it exactly the the brim, and then collect all the water into another container to do the acid addition and pH measurement. If you want, the little tank water that remains in the metal cup can be rinsed into the test container with a small amount of RO/DI: the volume does not really matter at this point, only the amount of “alkalinity” that came from the tank. Be sure to rinse the measuring cup well as seawater easily corrodes most metals.
If using a clear glass liquid measuring cup, be sure to fill it so the bottom of the meniscus lines up with the 1 cup (or whatever volume you are using) measurement line. The meniscus is the edge of the liquid where it creeps up the sides of the cup. Ignore the creep, and look to the flat part of the top of the water (which is at the bottom of the curved meniscus).
In two tables at the end of this article, I show data for DIY alkalinity tests using volumes of 1 cup (236.6 mL), 250 mL, 2 cups (473.2 mL), 500 mL, and 1 Liter. You can use any volume you want. Just scale the results accordingly, which happens automatically if you use equations 1 or 2 to get the alkalinity answer instead of the tables. You can also see the potential error that being off by 13 mL in the sample volume measurement makes to the result by seeing the difference between 1 cup and 250 mL in Tables 1 or 2 (which, IMO, is well within what most aquarists require).
As mentioned above, weight is a good way to measure water volume if you have a good scale. If you think it accurately reads to within 1 gram, it is good enough for the aquarium water sample volume. If you use 250 g, being off by 1 gram is only an error of 0.4 %, or, for example, it might give a final answer of 8.00 dKH when the actual reading was 7.97 dKH.
There is a minor correction you should make when using a scale to measure the volume of seawater since 1 mL of seawater weighs a bit more than 1 gram. It will be close enough for any marine sample if you divide the weight you measure by 1.026 to get the volume. So 1,026 grams of aquarium water is 1,000 mL or 1 L. Likewise, aim for 256.5 grams for 250 mL or 513 grams for 500 mL.
Step 3: The pH Meter and The Acid Addition (a.k.a. the Titration)
The pH meter for this test should be calibrated. Optimally it should be calibrated at pH 4 and pH 7, but using pH 7 and pH 10 will be acceptable because the exact pH that you stop adding acid is not too critical. As I will show below with a sample titration for my aquarium water, the pH changes from pH 5 to pH 4 with only a small amount of acid, so you probably cannot stop at exactly pH 4.5 anyway (unless you are very careful and adding very small amounts at a time), and the alkalinity difference between any values in the mid pH 4’s is minimal. Alkalinity kits using dyes also likely do not change at exactly pH 4.5.
Now you need to add the acid to the aquarium sample. Add the acid slowly near the endpoint, but you can rapidly add to just short of the endpoint if you want. For example, if you think the alkalinity is 7 dKH, you can add a volume of standard acid equivalent to 6 dKH all at once.
Swirl or stir the sample between additions and wait for the pH to stabilize (it should only take a few seconds, but longer is fine). Don’t worry about the hundredths place in the reading. For example, think about pH 5.3, not pH 5.32.
When the pH gets to the low 5’s, go more slowly as you’ll hit the endpoint very soon.
The exact endpoint is about pH 4.5 (it varies a tad with the actual alkalinity). Note the volume added and the pH at each step as you go through the 4’s. It may go by in a flash, but since it didn’t take much acid to drop through the 4’s, it doesn’t change the apparent alkalinity much.
Step 4: Calculation of the Alkalinity
Take the volume of acid you added when the pH was closest to 4.5, and use one of the equations below to determine the alkalinity (depending on which units you want to get the answer in).
Equation 1: Alkalinity (meq/L) = [volume of acid added added (mL)/Volume of tank sample (mL)] x 100
Equation 2: Alkalinity (dKH) = [volume of acid added added (mL)/Volume of tank sample (mL)] x 280
For example, if you added 20 ml of 0.1 N acid to get to the endpoint using 500 mL of aquarium water, the alkalinity would be 11 dKH (which is (20/500)x280 = 11 dKH).
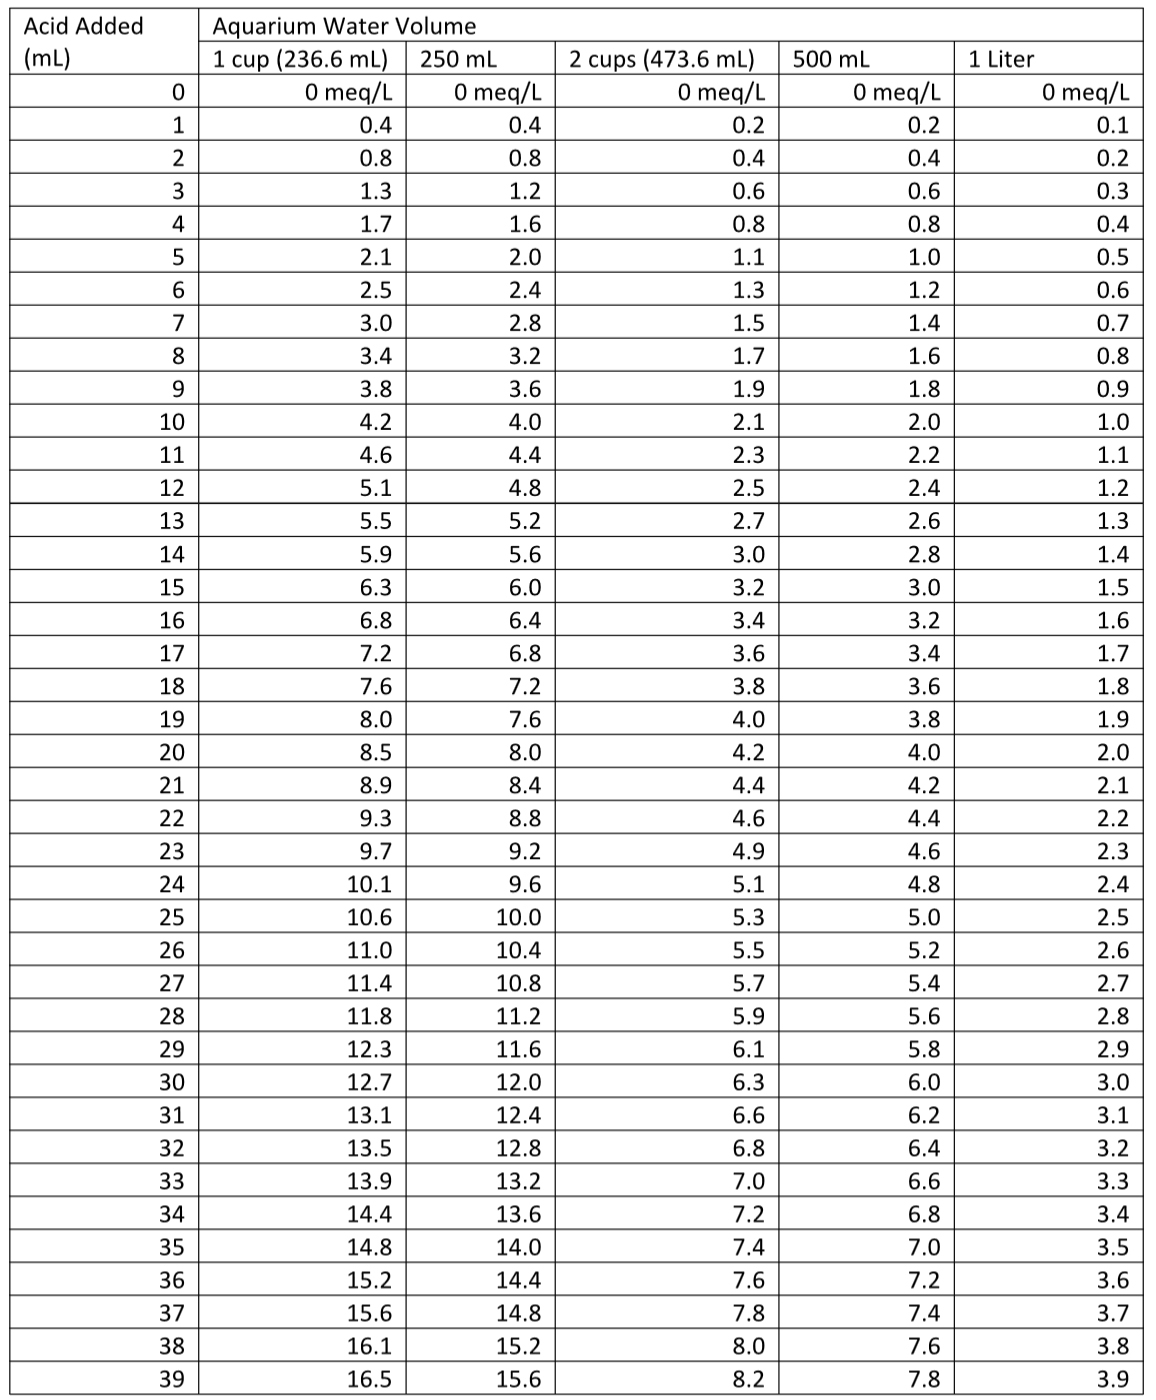
I have included two tables at the end of the article (Table 1 (in dKH) and Table 2 (in meq/L)) for those who worry that they may be using the equations wrong, but you can get more precise calculations from the equations when the volume added doesn’t exactly match a table entry.
Discussing the Test
Note: This discussion explains the test in more detail. It is not necessary to read it or understand it to run the test.
Figure 1 shows the change in pH when I added 0.1 N hydrochloric acid (HCl) to my aquarium water.
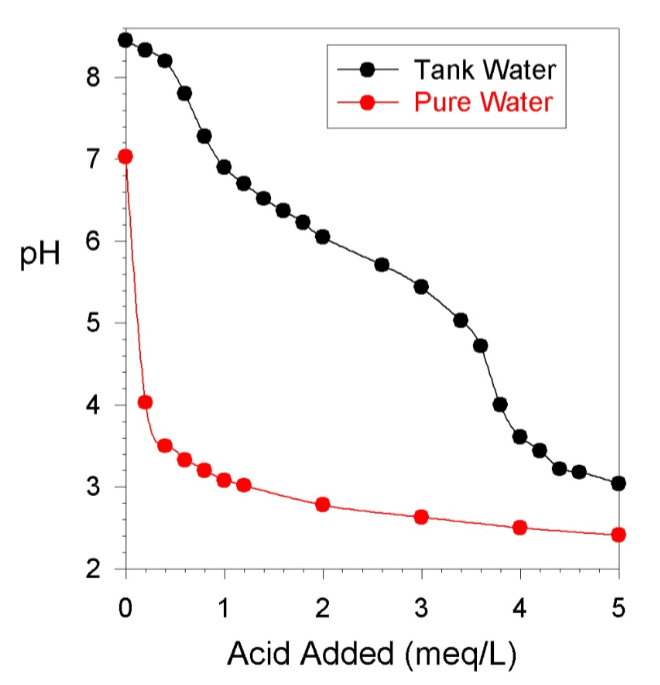
Figure 1. A pH titration of pure water and water from my reef aquarium using 0.1 N HCl.
As can be seen in Figure 1, the pH drops as the acid is added. The x-axis is in meq/L = milliequivalents of acid added per liter of aquarium water. Our 0.1 N acid has 0.1 milliequivalents of acid in each milliliter. The data in Figure 1 can be generated on any volume of aquarium water. If the test used 1 liter of aquarium water, then to get to 4 meq of acid added per mL of aquarium water, we would have added 40 mL of standard acid. The endpoint at pH 4.5 is reached in Figure 1 (black line) with about 37 mL (3.7 meq/L) of acid added, which gives an alkalinity of 3.7 meq/L or 10.4 dKH. For the pure fresh water sample (red line), it has no alkalinity, and so dropped past the endpoint with my first small volume of acid added.
Summary
This test may initially seem complicated, but it is really quite easy and after doing it a few times, it will seem second nature. The results should be at least as accurate as most hobby tests which try to do the same thing on a tiny scale. It should also be significantly less expensive than many test kits.
Good luck with it. If you have questions about the DIY Alkalinity test, or any other Reef Chemistry questions, you can find me at Reef2Reef in the Reef Chemistry forum.
Happy Reefing!
Table 1. Alkalinity (in dKH) as a function of standard acid added to reach the endpoint in the given volume of aquarium water.
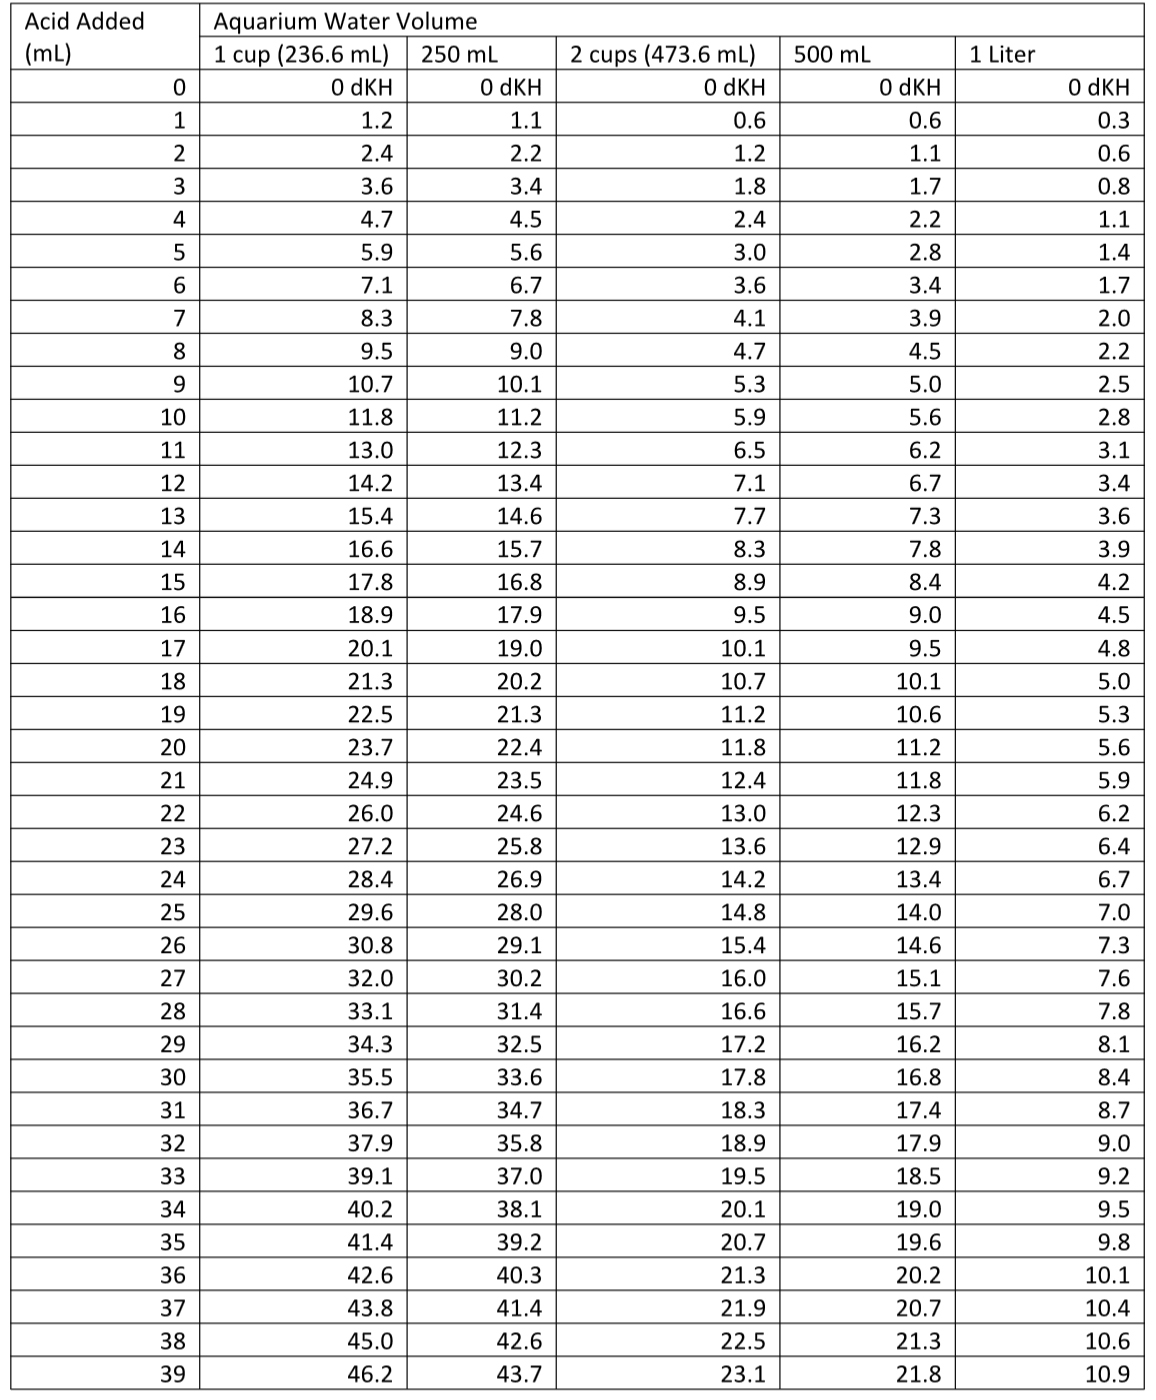
Table 2. Alkalinity (in meq/L) as a function of standard acid added to reach the endpoint in the given volume of aquarium water.
For more DIY topics and ideas please visit our DIY forum here.
Comments are closed.