NeverlosT's 140g Cube in Paradise

NeverlosT

SPS nut
View Badges
Joined
Feb 28, 2011
Messages
1,070
Reaction score
950
Location
San Luis Obispo, California
Rating - 0%
0   0   0
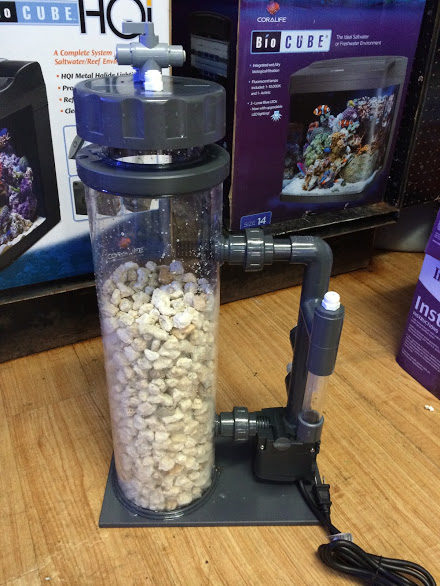
Hello All, I wanted to share the build that my girlfriend and I have been working on for the last few months. It all started with a trip to our LFS to buy a 10g refugium for our 60 gallon cube, and one thing led to another...

IMG_0336.JPG


We still rent a place out here, so 140 was probably already larger than we should have gone, but it was a great deal and we have no plans to move anytime soon.

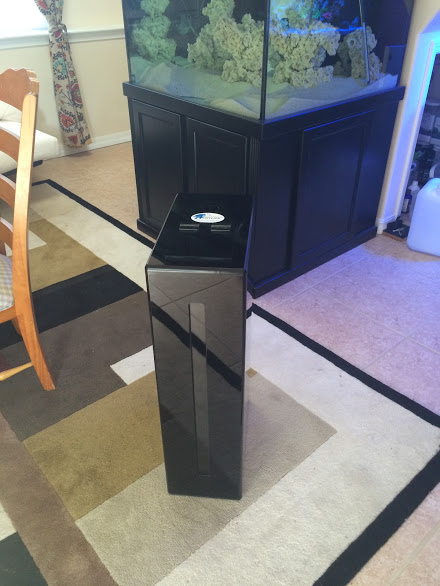
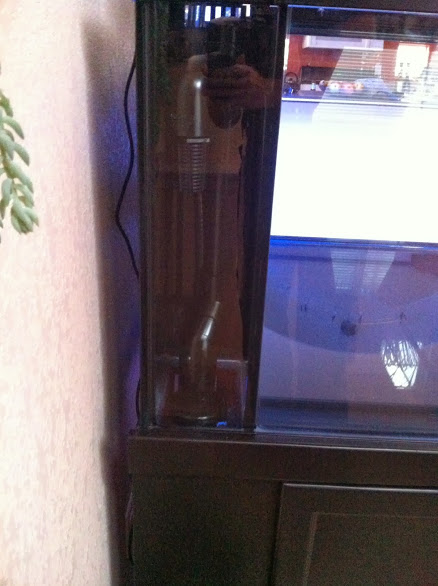
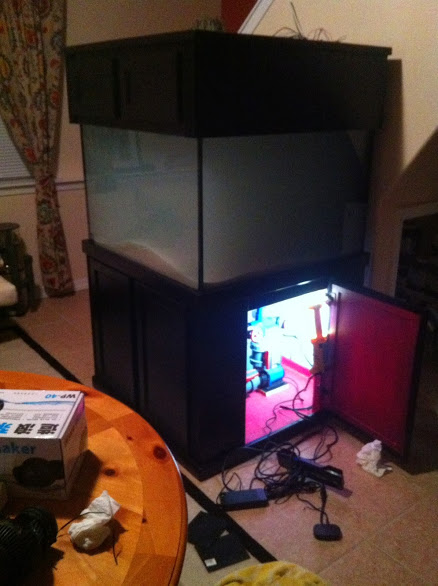
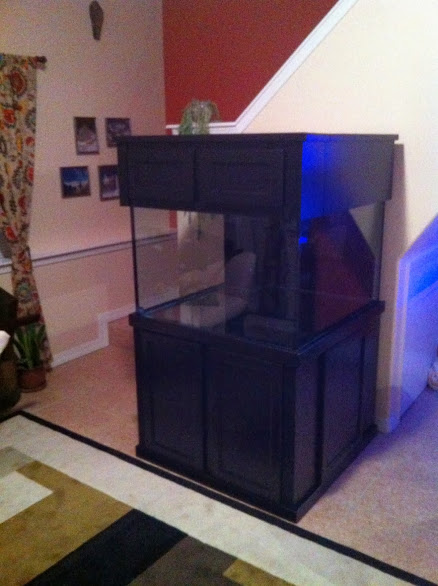
Here she is in her new home:
IMG_0337.JPG


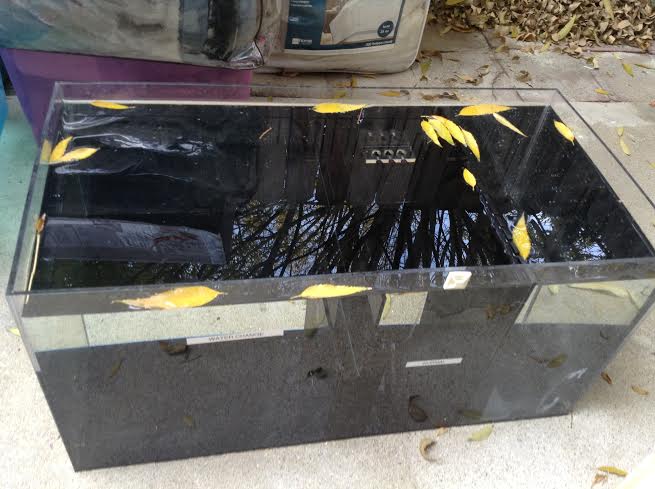
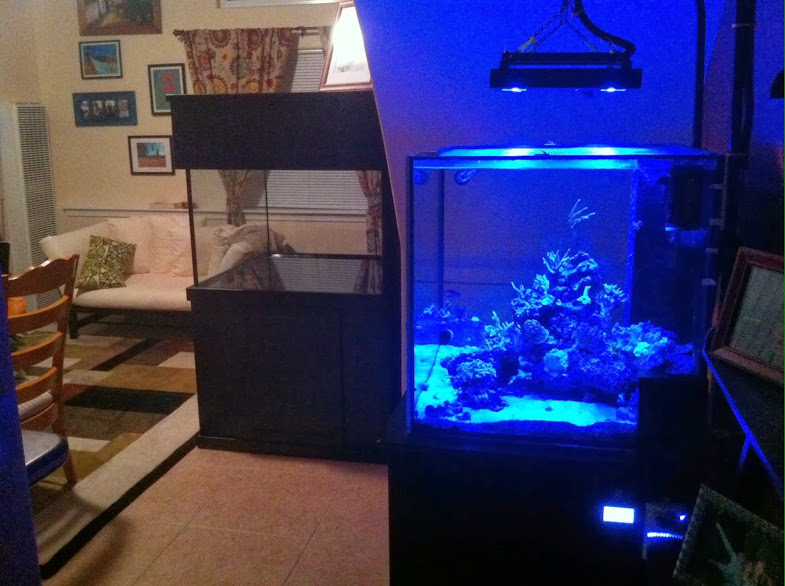
And with the old tank for comparison:

IMG_0338.JPG


Yup. So my buddy at the shop said "Why are you going to spend money to get a little more water volume and a refugium. You are going to want a bigger tank... THIS is a bigger tank!".

He was right, good thing my lady is pretty darn understanding!
 
OP
OP
NeverlosT

NeverlosT

SPS nut
View Badges
Joined
Feb 28, 2011
Messages
1,070
Reaction score
950
Location
San Luis Obispo, California
Rating - 0%
0   0   0
So the 140G Visio came home, the dimensions are 36"x36"x24" so not a "perfect" cube, but reaching the bottom at 36" deep would be tough.
The old tank had AI Vega Color Lighting, I was never satisfied with how it grew SPS, so the new system got this...

IMG_0339.JPG


36" ATI Dimmable Sunpower (8x39W). Originally ordered a 24" but changed it at the last minute after making sure that a 36" would fit (it does, but it is close, you want to provide room around the unit for cooling).
 
OP
OP
NeverlosT

NeverlosT

SPS nut
View Badges
Joined
Feb 28, 2011
Messages
1,070
Reaction score
950
Location
San Luis Obispo, California
Rating - 0%
0   0   0
The next topic was the stand. I have seen too many stands with water damage and I always was jealous of the stands that had built in "spill basins" because we all know that at some point, someday... water is going to spill in the stand or something is going to leak.

The stand was open at the back, so I cut, painted, and mounted a short plywood panel to complete the "tub". Then the base was siliconed. While I was at it, I siliconed all of the screw heads in the stand so that they wouldn't eventually rust.

IMG_0340.JPG

IMG_0341.JPG
 
OP
OP
NeverlosT

NeverlosT

SPS nut
View Badges
Joined
Feb 28, 2011
Messages
1,070
Reaction score
950
Location
San Luis Obispo, California
Rating - 0%
0   0   0
RedGard Waterproofing

The next step was to coat the entire inside of the stand in "Redgard" which is a construction tool used to waterproof walls behind shower installations. My buddy Mark suggested the stuff and it was a great idea. It paints on pink (mild panic moment) but then dries red. It was not what I would call an easy application, but it got done and several coats and an entire gallon of Redgard, the stand was waterproof. It is basically a liquid rubber which solidifies and creates a waterproof membrane, it should work to dampen vibrations too.

IMG_0342.JPG


You know how when your skimmer barfs it soaks whatever is above it? Well, I hope my skimmer wont barf, but if it does, the top of the stand is waterproof, and that will ensure a strong support for the tank in years to come.

IMG_0344.JPG


The look once it was pretty dry:
IMG_0345.JPG
 
OP
OP
NeverlosT

NeverlosT

SPS nut
View Badges
Joined
Feb 28, 2011
Messages
1,070
Reaction score
950
Location
San Luis Obispo, California
Rating - 0%
0   0   0
Thanks Texas, I am going to post whenever I get time, slowly bringing the thread up to the current time. A lot of lessons were learned and a lot of cool gear was acquired, so I am going to try to pass along that experience in coming posts. I've been reefing for about 15 years now on and off, and really wanted to do it right this time. I have a regret or two, but overall, things have turned out great. Thanks for the comment!
 
OP
OP
NeverlosT

NeverlosT

SPS nut
View Badges
Joined
Feb 28, 2011
Messages
1,070
Reaction score
950
Location
San Luis Obispo, California
Rating - 0%
0   0   0
Took a swing at google sketchup to figure out how big a sump I could fit and get some plumbing ideas worked out. While this isn't how it all ended up, it is how I figured out how it would be eventually and it showed me how much room I would have for peripherals.

Screen+Shot+2013-12-12+at+11.11.21+PM.png


Screen+Shot+2013-12-17+at+11.00.30+PM.png
 

Longnose Hawkfish

Valuable Member
View Badges
Joined
Sep 5, 2013
Messages
1,489
Reaction score
61
Location
Lodi
Rating - 0%
0   0   0
Wow that looks awesome! :) what program did you use to design the tank and sump in the last pictures?
 

Longnose Hawkfish

Valuable Member
View Badges
Joined
Sep 5, 2013
Messages
1,489
Reaction score
61
Location
Lodi
Rating - 0%
0   0   0
Wow... If only I would have read. Google sketch up. :p silly me. I can't wait to see it up and running! :)
 

revhtree

Owner Administrator
View Badges
Joined
May 8, 2006
Messages
47,758
Reaction score
87,109
Rating - 100%
1   0   0
Well thought out so far! Looking forward to this build!
 
OP
OP
NeverlosT

NeverlosT

SPS nut
View Badges
Joined
Feb 28, 2011
Messages
1,070
Reaction score
950
Location
San Luis Obispo, California
Rating - 0%
0   0   0
dosing rant

Thanks Rev and Longnose!

So one big problem that I had with my last system was dosing, and maybe this is because I had largely used Calcium reactors before that. I disliked how the proportions could easily be messed up, if one of the pump heads got stuck on "manual" you were in the fast lane to an ALK swing, and the only way to know that you are dosing too much is that for some reason you can't get your levels as high as you want them, and oh by the way your pumps/UV sterilizer/sump floor are coated in CA precipitate.

Check this out and tell me if you think the UV was accomplishing a lot with this solid coating on the Quartz tube:

14+-+27


What it is supposed to look like:
14+-+26


What came off:
14+-+25


So I wanted to go back to having my CA/ALK/Mg and trace elements largely added all at once and in the correct proportions, and what better way to do that than melting old coral skeletons that already contain those components (for the most part) and adding that effluent to the tank! Wait, that there is a CA reactor! So I went into research mode and settled on a ReefDynamics CMR250E. The build quality is outstanding, all top notch parts, PVC welded by hand in socal, and lots of features.

I have owned GEO, I have owned PM, and Korallin, and this unit is superior to all of them in features and quality. You pay for it a bit, but in this case, you get what you pay for.

Calcium Media Reactor Model 250E
14+-+23


It took a bit to get to me, and I am not a patient man, but once I got it and worked with it a bit, all was forgiven and I am glad that I waited.

While I am on that front, I also purchased a used Aquarium Plants CO2 Regulator (I will not use another one, for a bit more money, that thing is unbeatable), and a 5lb CO2 tank. Well, the Reg turned out to be broken, which I found out after waiting all this time for the Reactor :cry: and I decided to just drop the dough for a new one, and a 20lb CO2 tank. Luckily, the seller of the bad unit agreed to refund me, so it'll be ok.

If you are in the market for a CO2 regulator and want to be able to control bubble size, delivery, heck, everything, go with this guy. It is spendy, but man is it worth it, and if you use good check valves, it'll last for ages.

CarbonDoser Electronic Co2 Regulator

A
lso, when you pay for CO2 at airgas or wherever, check your bill. Almost half of the bill is usually the "filling fee" and a small amount is the gas itself. If you can fit a 20lb cylinder somewhere, you will have to fill it VERY rarely, will pay that filling fee much less frequently. So by using a larger tank, you pay for the gas more than the filling, and the larger canister will pay for itself within a couple years in saved filling costs (not to mention in convenience of not having to fill it often!).
 
OP
OP
NeverlosT

NeverlosT

SPS nut
View Badges
Joined
Feb 28, 2011
Messages
1,070
Reaction score
950
Location
San Luis Obispo, California
Rating - 0%
0   0   0
Skimmer choice

Another big decision component was the skimmer.

I have owned several ReefOctopus units as my last few (SSS versions and INT, 1000 and 2000 size), and they worked well. However when I would visit my LFS (or any of a number of LFS in this area), I would see the ReefDynamics units and man did I get bubble envy. We are talking the smallest bubbles that I have seen in a skimmer and I have seen a lot. :nerd:

I looked at many other units, and considered several, but the quiet Ehiem pump, the PVC welds, the product support, the bubble quality and design, they had me sold. My wallet was not excited, and my patience was put hard to the test again since I ordered over the holidays, but I was eventually rewarded with one incredible skimmer.

I opted for this one, the INS180E (the E stands for the ehiem pump, it costs more, but is quieter and I think works better).

INS180E Protein Skimmer w/ Ehiem Pump

You will see some pics of mine shortly, but man, it works well. I believe in feeding a tank healthily (probably more than most) and I think that a healthy refugium and a good skimmer are the path to success if you like to feed.
 
OP
OP
NeverlosT

NeverlosT

SPS nut
View Badges
Joined
Feb 28, 2011
Messages
1,070
Reaction score
950
Location
San Luis Obispo, California
Rating - 0%
0   0   0
Sump, ATO Reservoir

Heres a bad shot of the skimmer in the sump, and a shot of the sump that I picked up used in LA. I brought it north and we drilled it at Tropics in SLO for the Fuge and Return bulkheads...

2014-02-25


Heres a picture of the Advanced Acrylics sump pre-drilling when it was being tested to show that it held water and leaves. You can see the fuge area on the right, the return area in the middle, and the skimmer area on the left. It is 36"x16"x16 and fits in the stand like a glove. Even has probe holders.

8_I7eyoic-Pusf70QaUbsjRwbxTFv_SK0ob7nK3kR4k=w655-h489-no


Don't worry about Advanced Acrylics though, they may not have gotten my benjamins for the sump, but I needed an ATO reservoir and they stepped up like champions.
14+-+28


15 Gallon ATO Res with a viewing port and top door. 3/8" acrylic. The work was very clean and the tank evaporates A LOT in this climate, so 15G was worth it.
 
OP
OP
NeverlosT

NeverlosT

SPS nut
View Badges
Joined
Feb 28, 2011
Messages
1,070
Reaction score
950
Location
San Luis Obispo, California
Rating - 0%
0   0   0
Return Pump, Powerheads, plumbing begins....

So originally on this build the main return was to be a DC controllable pump. I picked up a DC12000 along with two WP40s which would provide flow for the tank.

I was going DC to try and realize some power savings, since I could control it with my Apex, and since it was small and pretty quiet. I was going to run it externally, but had heard that it was ok to do so.

So I picked her up and plumbed it in. Also in this picture is the manifold that I designed and built. It has 5 outlets, the manifold itself is all 1.5" PVC and the outputs are sized as needed. The outputs were planned to feed:

1. The tank
2. The Refugium
3. The Carbon Reactor
4. The GFO Reactor
5. The Calcium Reactor

I didn't want any superfluous pumps in this system, which was the reason for such a complex manifold. I have also absolutely had it with crappy ball valves from Home Depot, so everything on this system was going to be run off of top of the line gate valves, ball valve unions, and a great check valve union combination. I also wanted to paint it a snazzy color to set the plumbing off from the red stand inside. I give you Plumbing Version 1.0:

IMG_0362.JPG


All piping is blue under the tank, and black above the tank bottom and in the overflow, here is the durso for example:

IMG_0351.JPG


And installed:
IMG_0354.JPG


Using the 45 degree angle connectors allows me to run a larger durso (1.5") without interfering with the walls of the small overflow. I employed a large strainer to keep any stray snails or what have you out of there.

Here is the drain headed into the sump and the return (sorry for the blurry picture):

IMG_0357.JPG
 
OP
OP
NeverlosT

NeverlosT

SPS nut
View Badges
Joined
Feb 28, 2011
Messages
1,070
Reaction score
950
Location
San Luis Obispo, California
Rating - 0%
0   0   0
SeaSwirl

I decided to use a SeaSwirl for the main return to randomize flow a bit. I must say I am glad that I did. It is a really cool piece of kit and it works great. It is kind of funny because Ed (SeaSwirl creator) and I got off on the wrooooong foot, but we patched things up and his support has been terrific. Since the installation, I had some questions and a minor issue, he answered them all and even sent me a spare motor just in case I had any issues so that I wouldn't suffer downtime. I highly suggest his products.

1" ModelHere is mine all plumbed in:

IMG_0355.JPG


Mind as well mention here that I drilled the hood and installed some computer case fans too. ATI isn't thrilled about their fixtures being installed inside hoods, but as long as you have some powerful fans cooling it, they run fine. I ran some tests with mine inside and outside of the hood and it got to the same temp either way with the fans running in the hood.

Sea Swirl and Fans:

IMG_0358.JPG
 
OP
OP
NeverlosT

NeverlosT

SPS nut
View Badges
Joined
Feb 28, 2011
Messages
1,070
Reaction score
950
Location
San Luis Obispo, California
Rating - 0%
0   0   0
Water time!

Then it was time to get the tank wet and check for leaks. I did this first all with RO/DI water and I am glad that I did. That was a smart move. What was NOT a smart move was adding sand without rinsing it. That was a dumb move. Behold the results:

IMG_0363.JPG


What was also silly that some of you may have noted is that my drain enters the sump (splashy splashy) right in front of the GFCI outlet that will power the tank. No goodness. So I decided it was time to take the heat gun and try my hand at bending acrylic. I think I did OK! I made a filter sock holder and a splash guard for the back of the sump in no time. Only a few minor burns and a little cursing.

IMG_0365.JPG


IMG_0371.JPG


See how the filter sock looks full of "stuff" in that last photo? That is quilt Badding. If you have silt problems, stuff a sock with that padding and it will filter out even the finest sediment. two days and three or four sock changes and the tank was clear as a bell. The splash guard will also catch the drips anytime I undo the unions beneath the tank interface. Cool!
 

Rock solid aquascape: Does the weight of the rocks in your aquascape matter?

  • The weight of the rocks is a key factor.

    Votes: 9 8.1%
  • The weight of the rocks is one of many factors.

    Votes: 41 36.9%
  • The weight of the rocks is a minor factor.

    Votes: 33 29.7%
  • The weight of the rocks is not a factor.

    Votes: 27 24.3%
  • Other.

    Votes: 1 0.9%
Back
Top