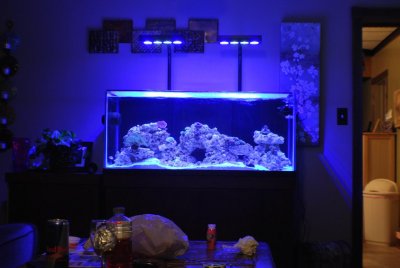
Tank looks great. Love the side control panel. where do you plan on putting ato container. Dosing container. Are you going through the wall. My tank evaps 10 gallons a week. I had to build another stand next to it to hold ato dosing containers. One thing i wish i did though is the ex overflow. Hate the space it takes up. Your going to love the tank.

Navigation
Install the app
How to install the app on iOS
Follow along with the video below to see how to install our site as a web app on your home screen.
Note: This feature may not be available in some browsers.
More options
You are using an out of date browser. It may not display this or other websites correctly.
You should upgrade or use an alternative browser.
You should upgrade or use an alternative browser.
My dsa neo 105 build!
- Thread starter HtfdWhaler
- Start date
- Tagged users None


Great build I too was wondering about the ato container. I also turned my trigger sump around so the skimmer was on the left return on the right fuge is now in the front and I use it for frags. The control panel is a great idea too! Look forward to seeing it up and running.
Tank looks great. Love the side control panel. where do you plan on putting ato container. Dosing container. Are you going through the wall. My tank evaps 10 gallons a week. I had to build another stand next to it to hold ato dosing containers. One thing i wish i did though is the ex overflow. Hate the space it takes up. Your going to love the tank.
Beautiful setup!! Lifereef makes great sumps, also the plumbing looks clean. Well done!! I was contemplating doing an external pump as well.

nova65ss Do you have pics of the trigger sump set up. That sounds like a good idea, I'm interested.Great build I too was wondering about the ato container. I also turned my trigger sump around so the skimmer was on the left return on the right fuge is now in the front and I use it for frags. The control panel is a great idea too! Look forward to seeing it up and running.
As for my ATO i ordered a slim ATO reservoir from advanced acrylics, only 4 inches wide. It is on the way, should be arriving on monday or tuesday. Pics coming soon. I plan on putting it in the left side compartment. Also plan on ordering a "slim" dosing container from them as well.
I went external to keep the heat out of the tank. This was my first build and wanted to avoid costly mistakes. So far so good. Almost ordered non reef tank. But trying to get a ghost overflow from reef savvy was impossible. So just went with the internal. Wish i had waited because it took me another six months to get water in the tank. But i took advantage of the time and cycled my dry rock in a rubbermaid for 6 months while getting everything together. Was the best thing i did. No major algea outbreaks and was able to stock my tank quickly with no problems.

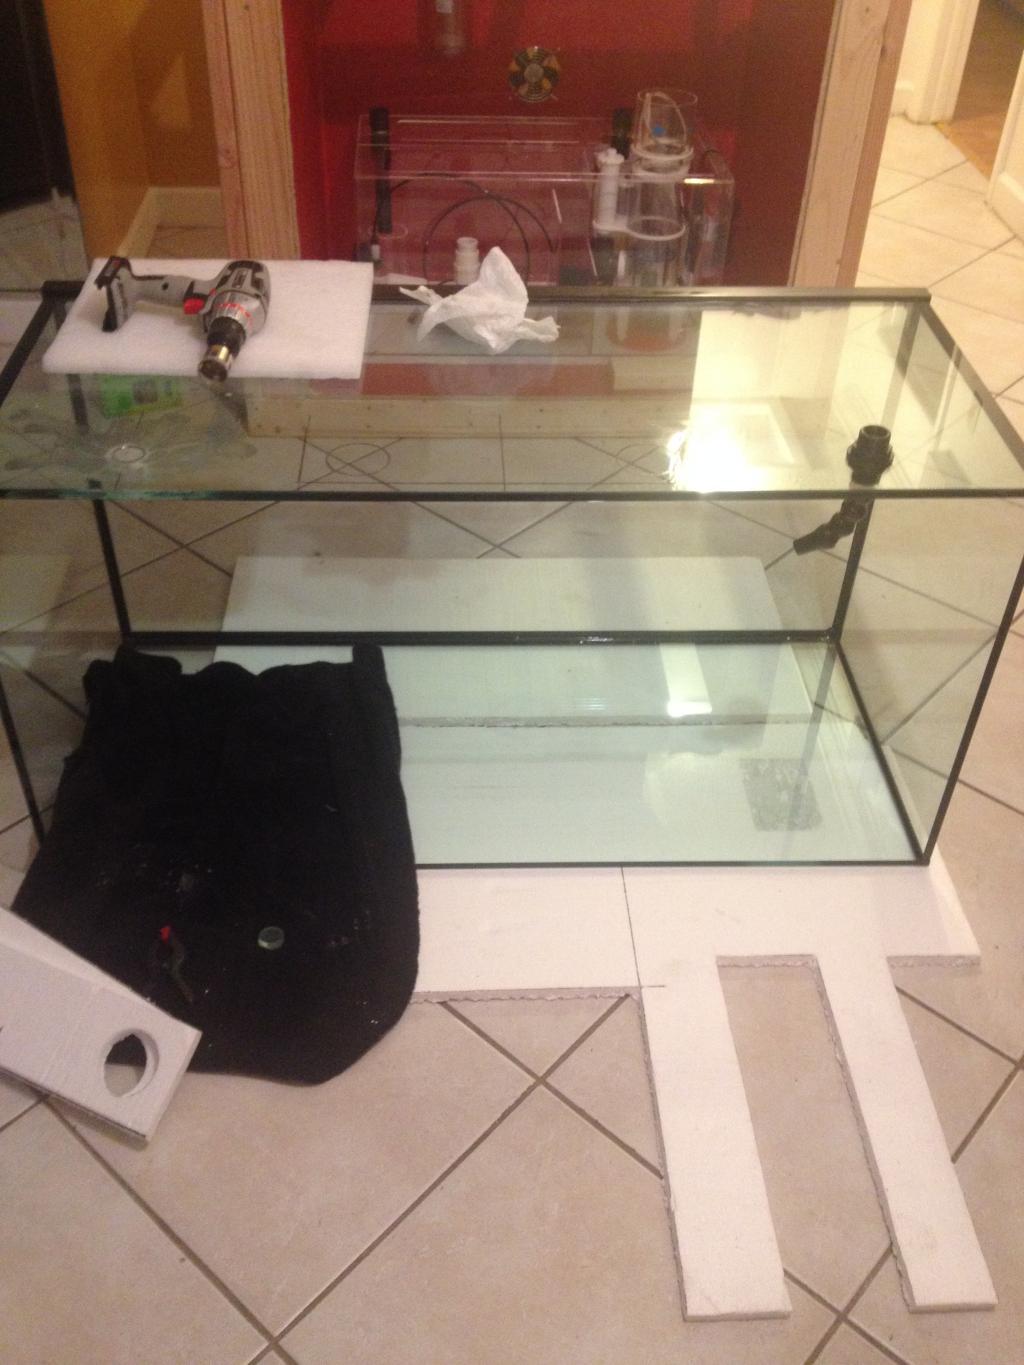
Got a couple things done yesterday..
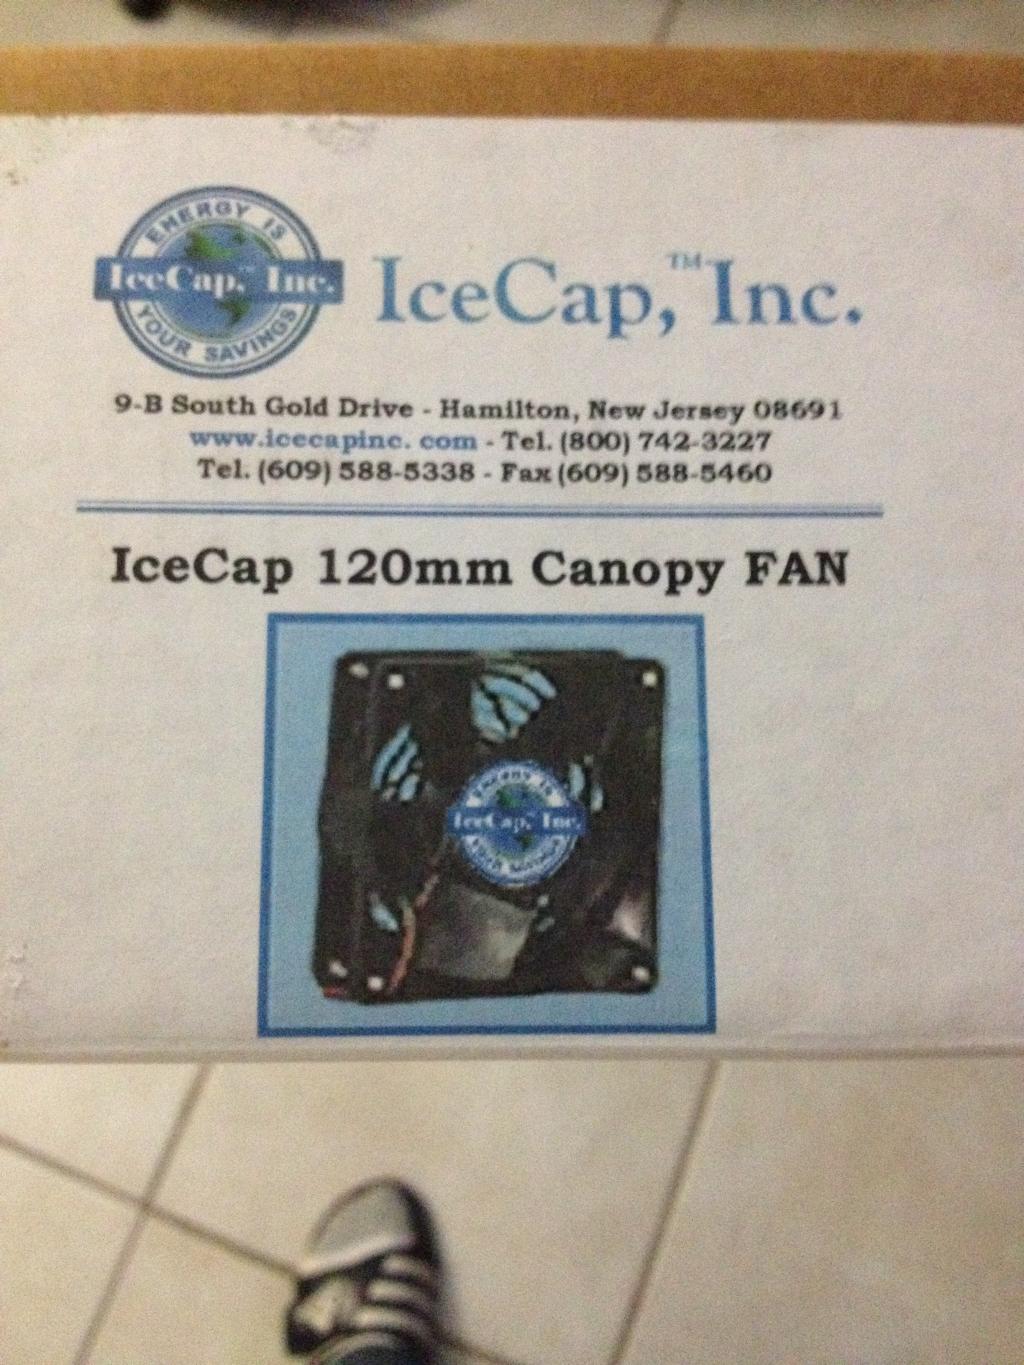
First of all, I picked up this fan from a local reefer for $10. It has variable speeds and thermostat, so it turns up and down depending on the temperature. Also it's extremely quiet. Great Fan!! Point is to keep the humidity and heat produced from sump down. Went ahead and installed that.
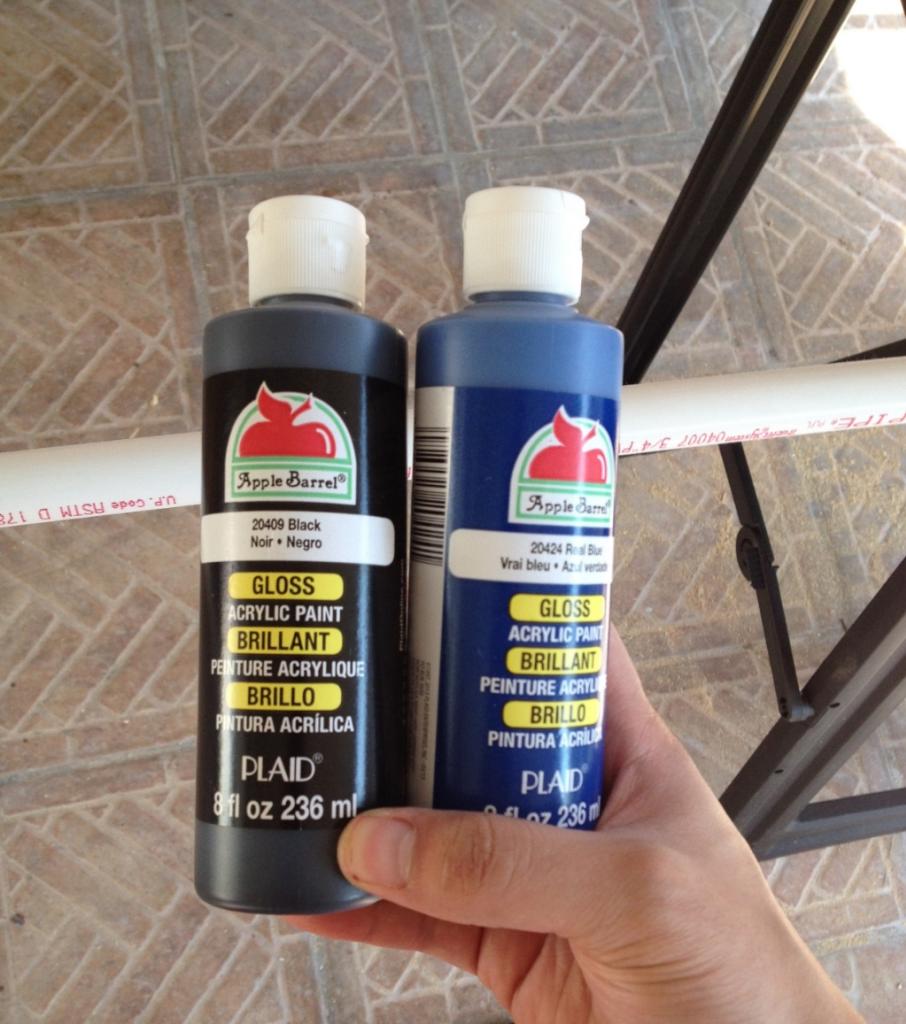
Went ahead and bought the paint for the back glass panel and for the plumbing. The black is for the glass, the blue is for the return plumbing. The overflow plumbing I think I will do yellow.
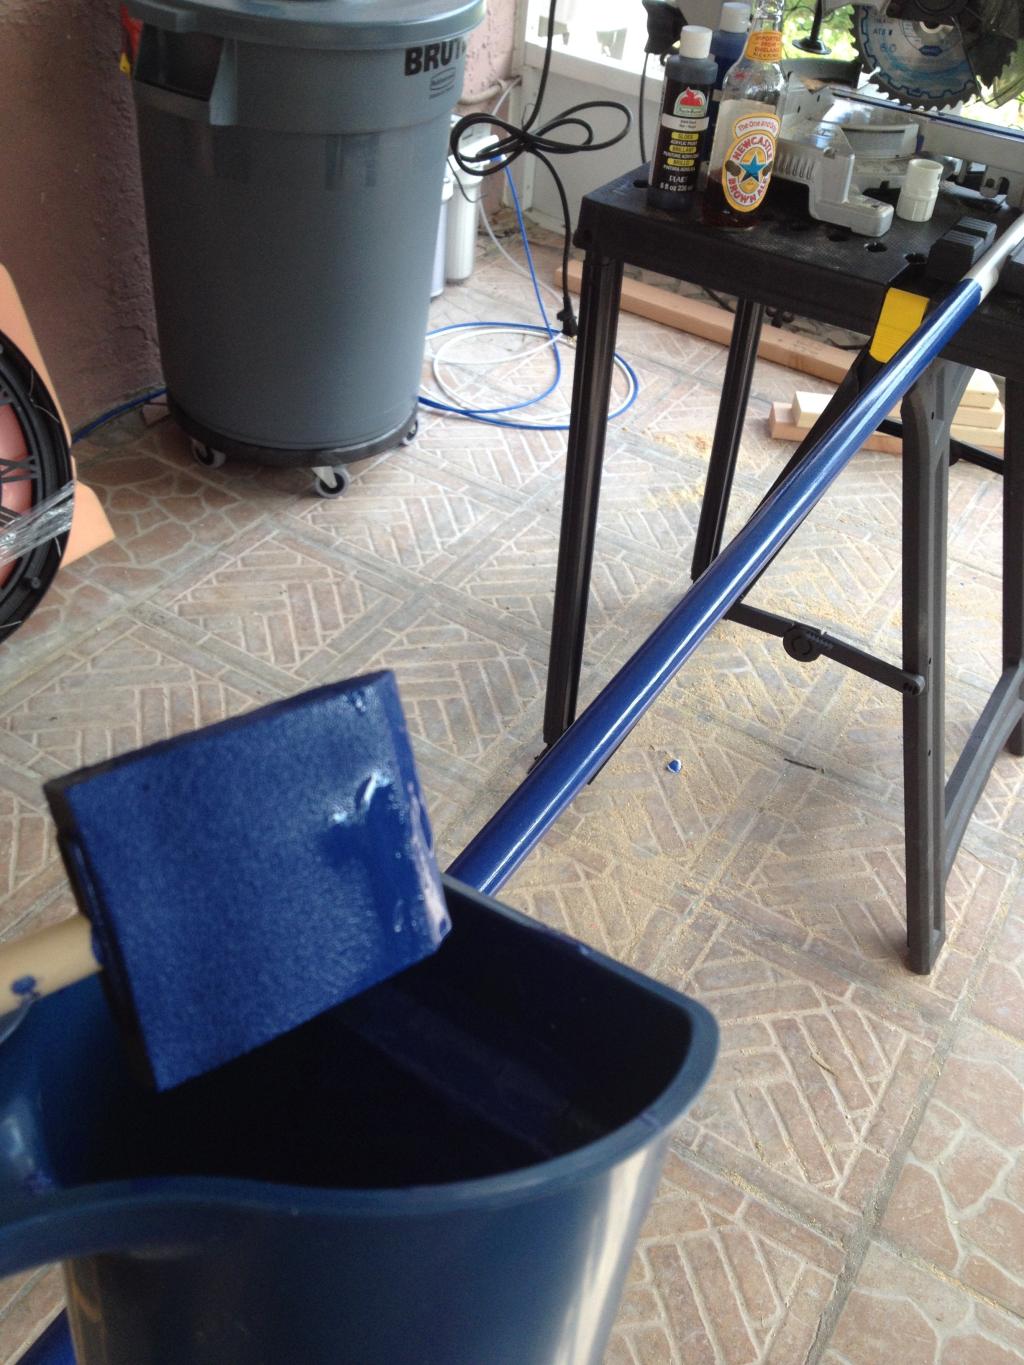
Stayed away from the spray cans, they make a mess and I could never get an even coat without leaving drip marks on the paint. This paint I bought at walmart for $4.
Ordered a DIY LED strip from ebay ($15) for inside the stand. I think it will have a cool look with all the colors. (Hopefully be here on wednesday)
started painting the pipes, I am pleased with the color.
First of all, I picked up this fan from a local reefer for $10. It has variable speeds and thermostat, so it turns up and down depending on the temperature. Also it's extremely quiet. Great Fan!! Point is to keep the humidity and heat produced from sump down. Went ahead and installed that.


Went ahead and bought the paint for the back glass panel and for the plumbing. The black is for the glass, the blue is for the return plumbing. The overflow plumbing I think I will do yellow.
Stayed away from the spray cans, they make a mess and I could never get an even coat without leaving drip marks on the paint. This paint I bought at walmart for $4.
Ordered a DIY LED strip from ebay ($15) for inside the stand. I think it will have a cool look with all the colors. (Hopefully be here on wednesday)

started painting the pipes, I am pleased with the color.

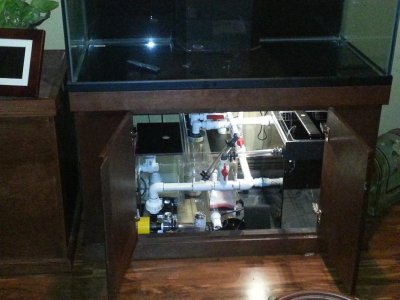
Here ya go one when it was 1st setup.
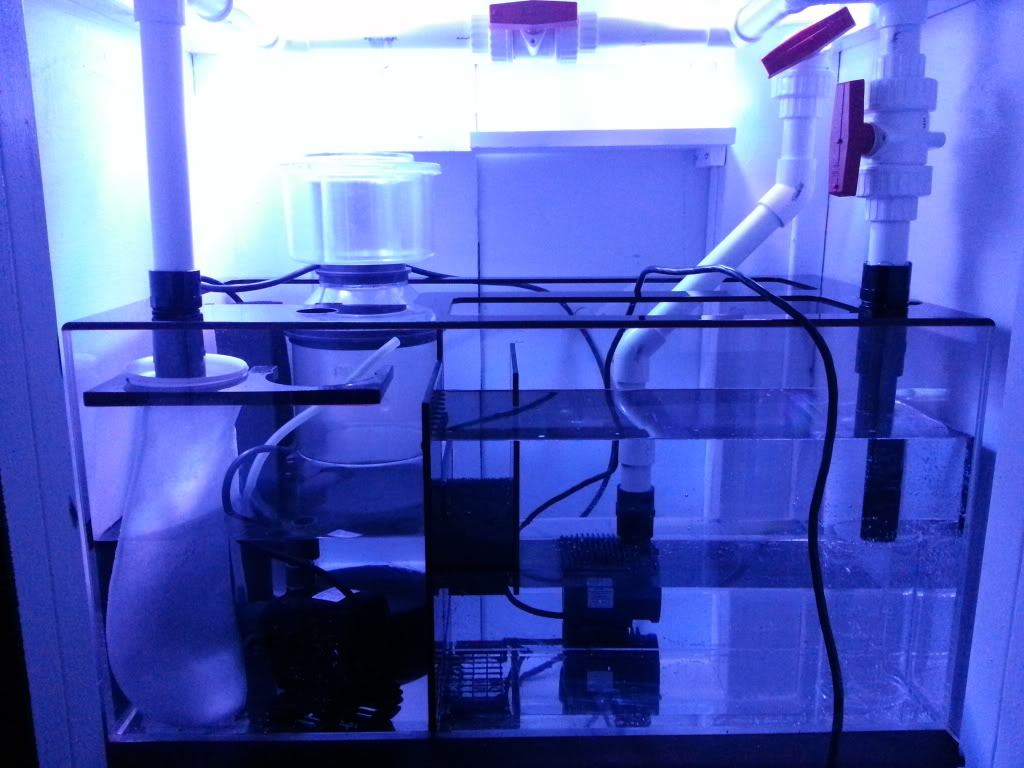
Thanks for the pic!!
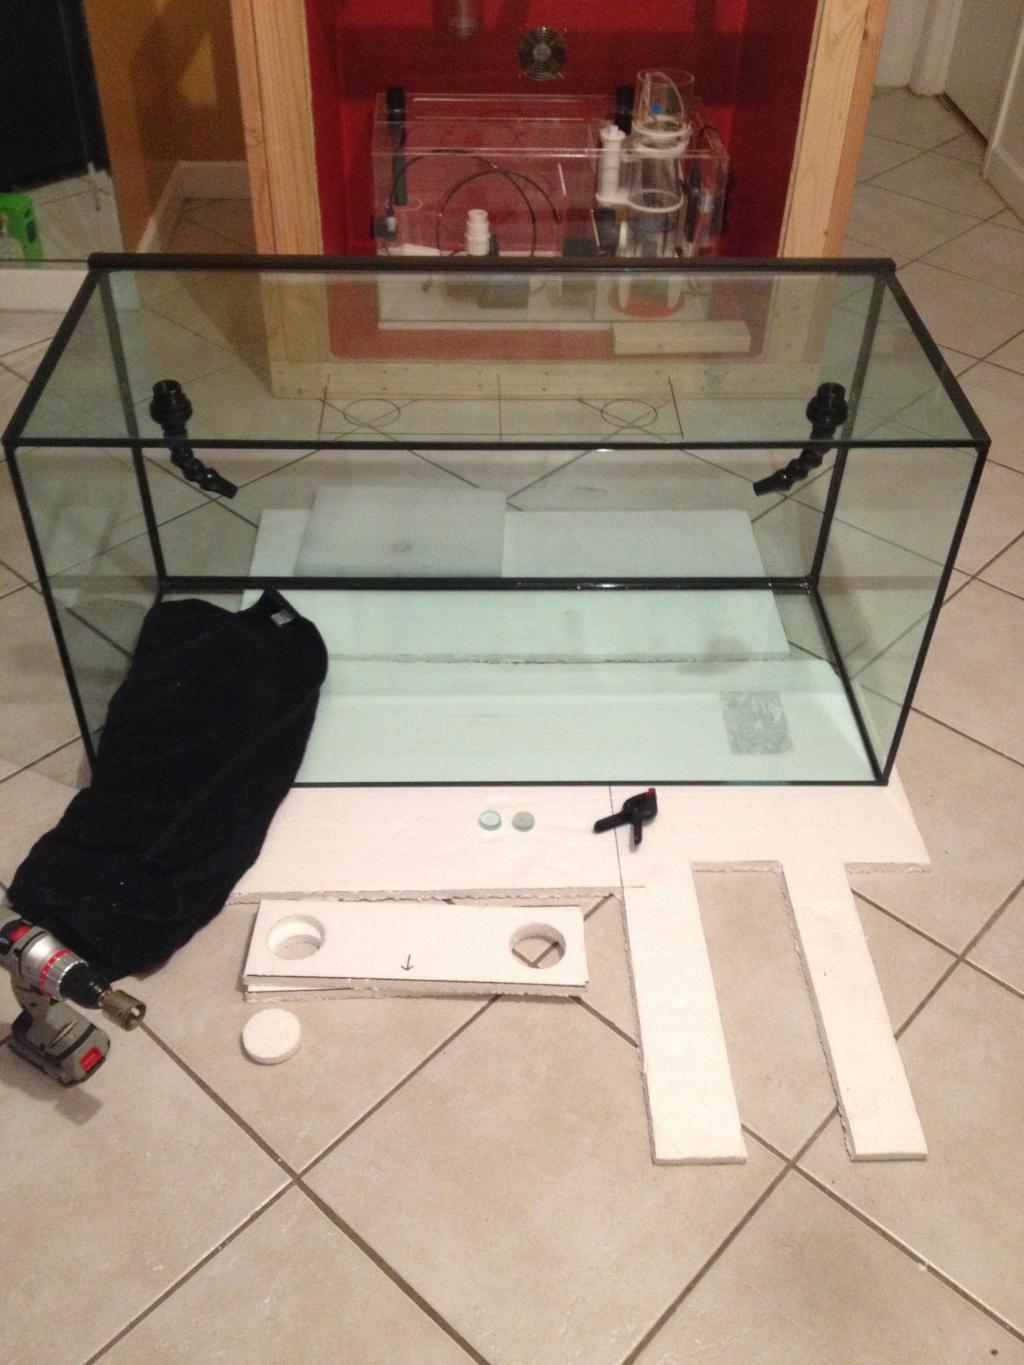
Just an update.. I got a few things in, i was waiting on.
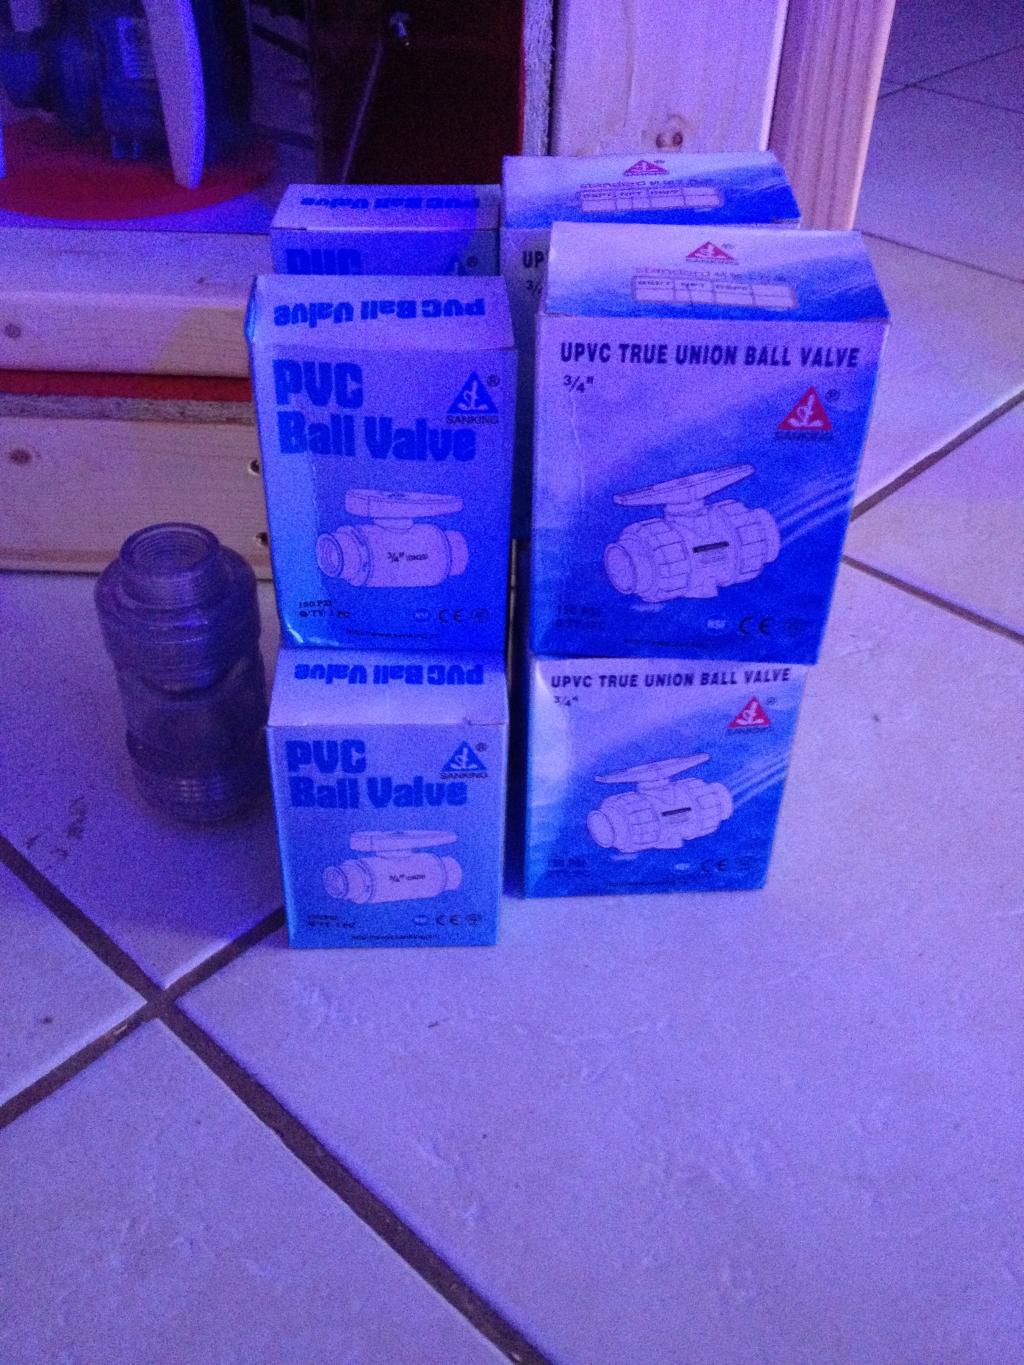
First, I got some plumbing parts delivered. True union ball valves, ball valves and check valve. Ordered them from pvcfitingsonline.com. Cheapest I could find online. I must say these valves are in my opinion 100Xs better than the ones at Home Depot. You can turn the valves smoothly, no force needed. The ones from HomeDepot you need the strength of Hulk to turn. So I'm happy with my purchase will do business with them again.
Got my diamond drill bits in from BRS. Ordered 3/4 bit for return and 3 inch for overflow. That a few other small things to take advantage of the special they had for free shipping for $50 bucks or something like that.

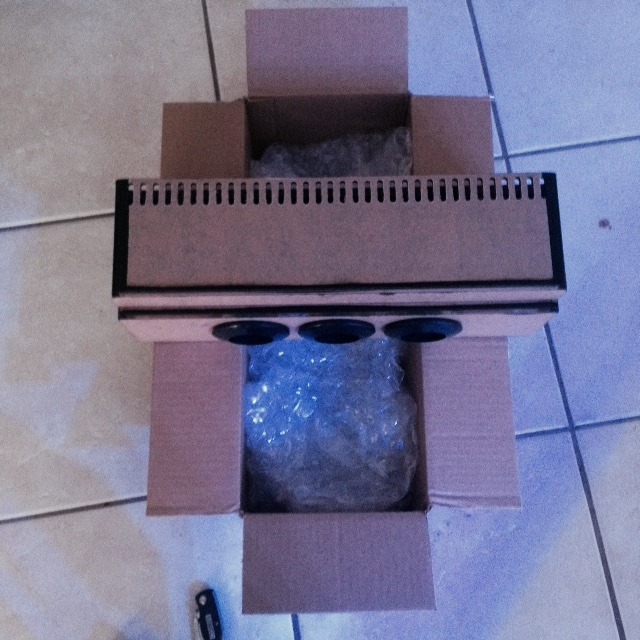
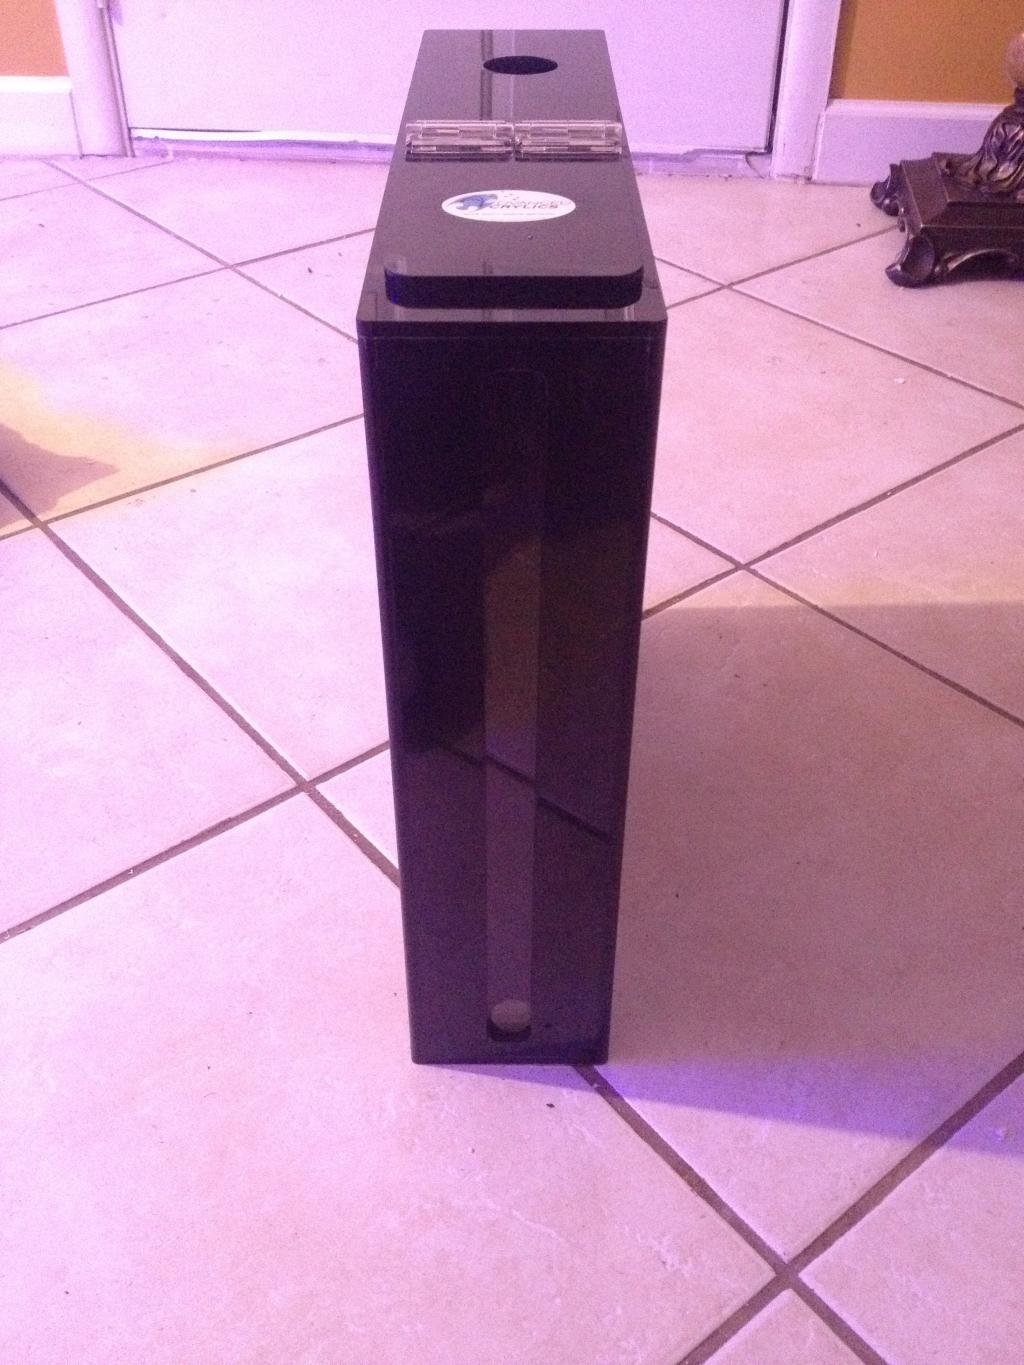
My overflow came in as well. Again I ordered it from ebay marinemodular. Very well packaged, well built and sturdy. I love it!
Fitted the external part of overflow to get some measurements.
So with the overflow and drill bits in hand, I decided to go to work. I must say, I was scared to death being that this would be my first time actually drilling into glass. What better way to learn, than drill a tank that you just payed $600+ for right?
Well said a little quick prayer and went on with it.
Pic of first hole drilled and working on the next one! Ok, for those who are on the fence and scared to death like I was. Relax! It's easier than you think, actually wasn't hard at all.
Both 3/4 inch holes drilled for the return. Then the battery on my drill died, so decided to finish tomorrow. Also will paint back panel!! Happy with the progress so far..
First, I got some plumbing parts delivered. True union ball valves, ball valves and check valve. Ordered them from pvcfitingsonline.com. Cheapest I could find online. I must say these valves are in my opinion 100Xs better than the ones at Home Depot. You can turn the valves smoothly, no force needed. The ones from HomeDepot you need the strength of Hulk to turn. So I'm happy with my purchase will do business with them again.

Got my diamond drill bits in from BRS. Ordered 3/4 bit for return and 3 inch for overflow. That a few other small things to take advantage of the special they had for free shipping for $50 bucks or something like that.

My overflow came in as well. Again I ordered it from ebay marinemodular. Very well packaged, well built and sturdy. I love it!

Fitted the external part of overflow to get some measurements.

So with the overflow and drill bits in hand, I decided to go to work. I must say, I was scared to death being that this would be my first time actually drilling into glass. What better way to learn, than drill a tank that you just payed $600+ for right?
Well said a little quick prayer and went on with it.
Pic of first hole drilled and working on the next one! Ok, for those who are on the fence and scared to death like I was. Relax! It's easier than you think, actually wasn't hard at all.

Both 3/4 inch holes drilled for the return. Then the battery on my drill died, so decided to finish tomorrow. Also will paint back panel!! Happy with the progress so far..


Thanks for posting the info on the overflow. That's exactly what I have been looking for.
No problem!!
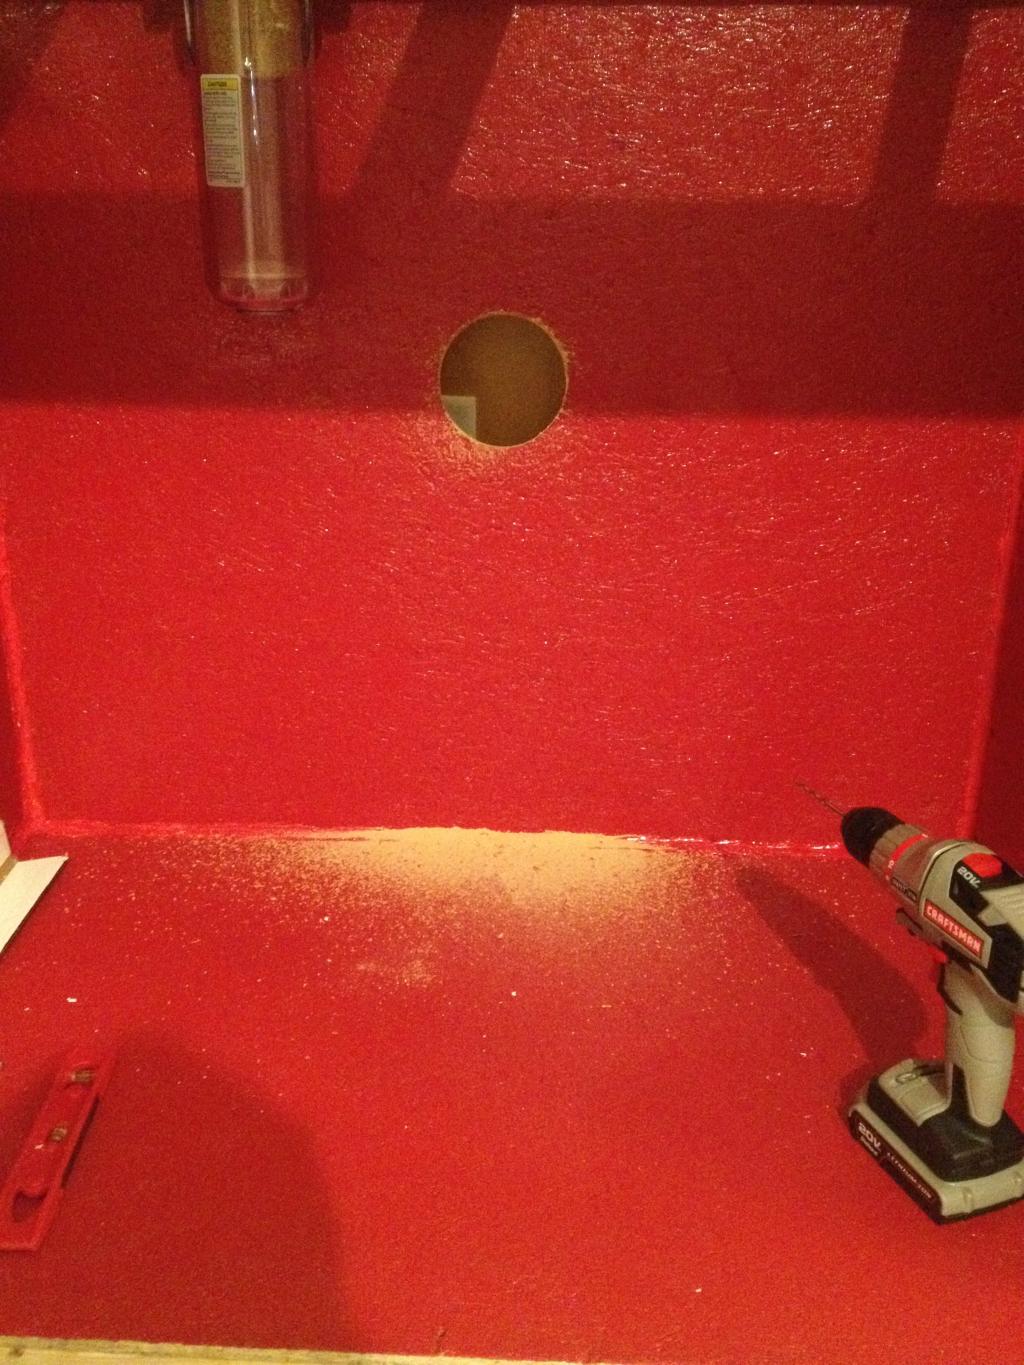
Update: Yesterday, I finished drilling the holes and painting back panel. Here are some pics.
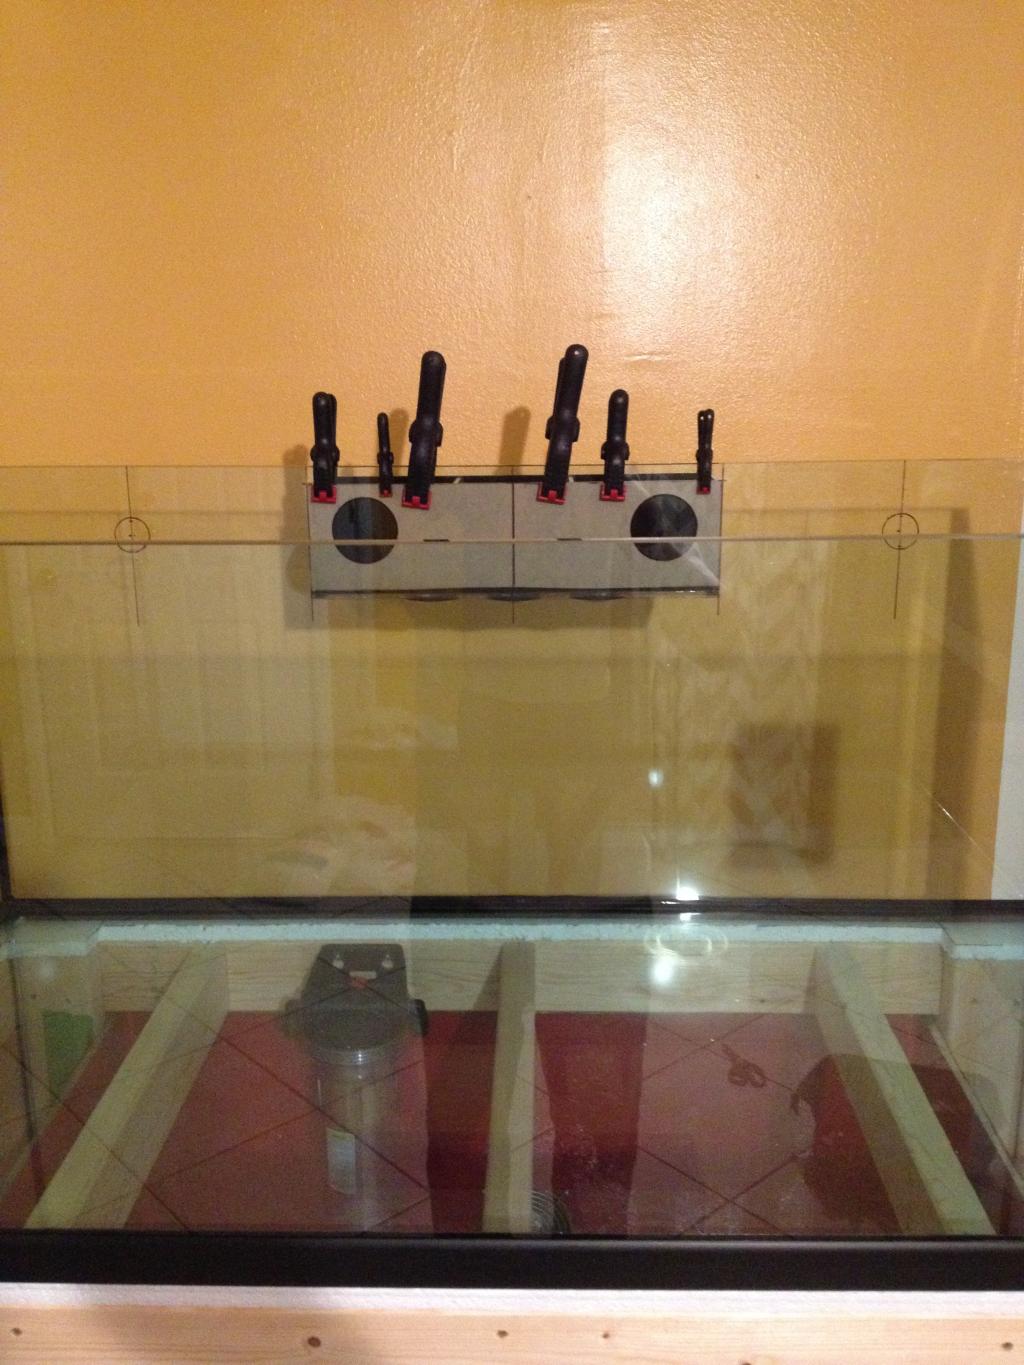
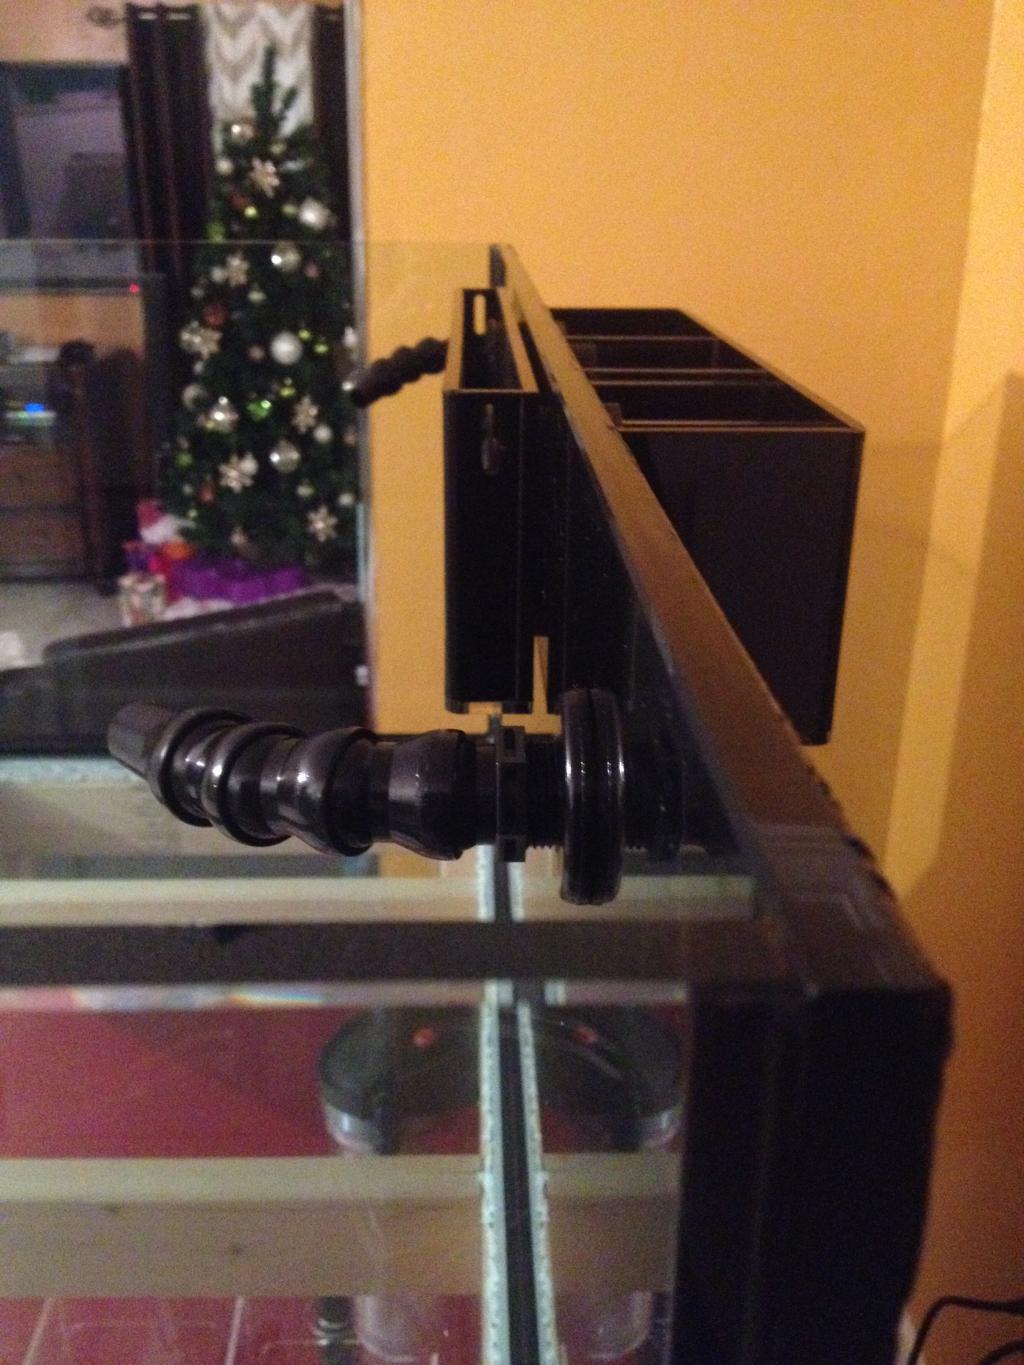
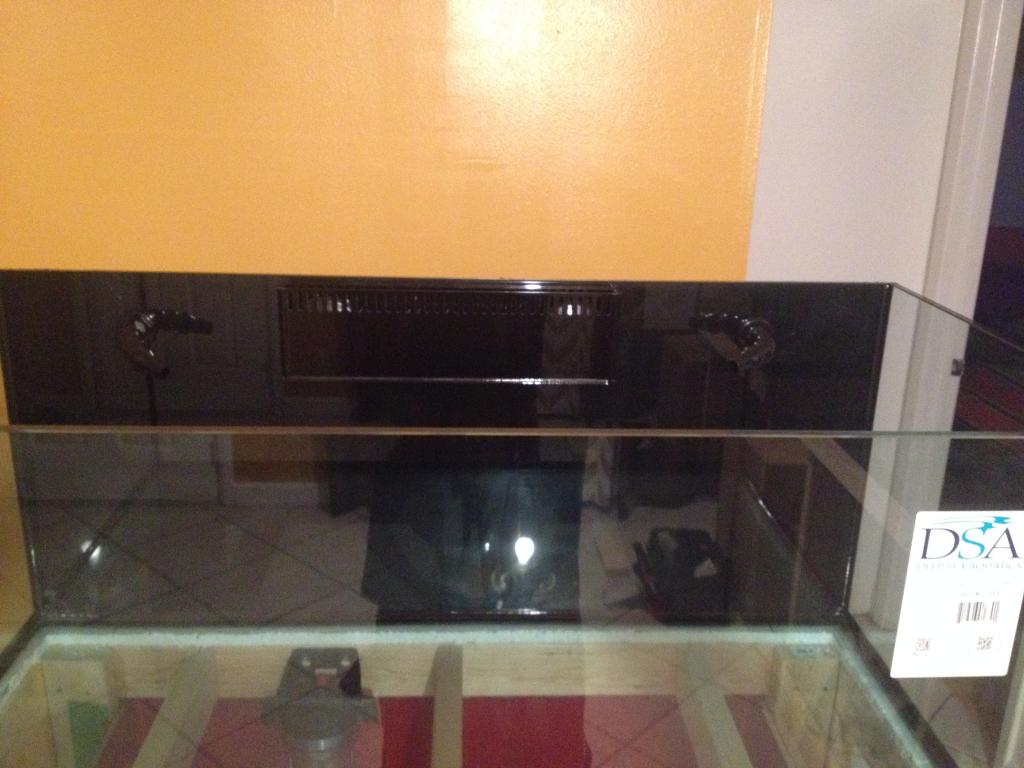
Pic of tank with all 4 holes drilled. The 2 outside holes are 3/4 inch for return and 2 inside holes are 3 inch for overflow.
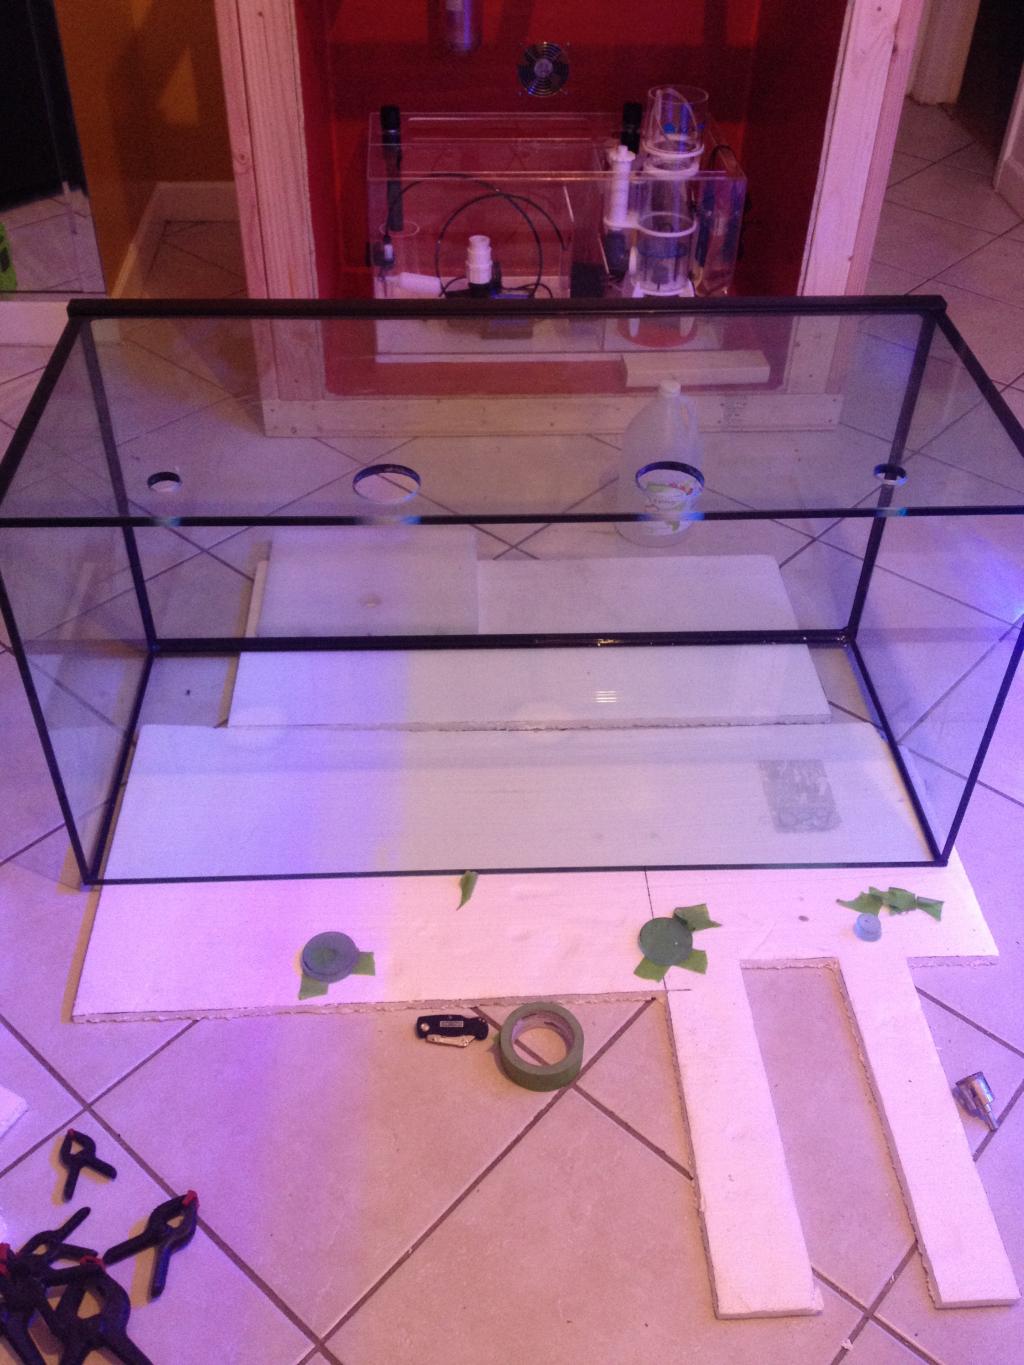
Tank is taped up, all prepped for paint!
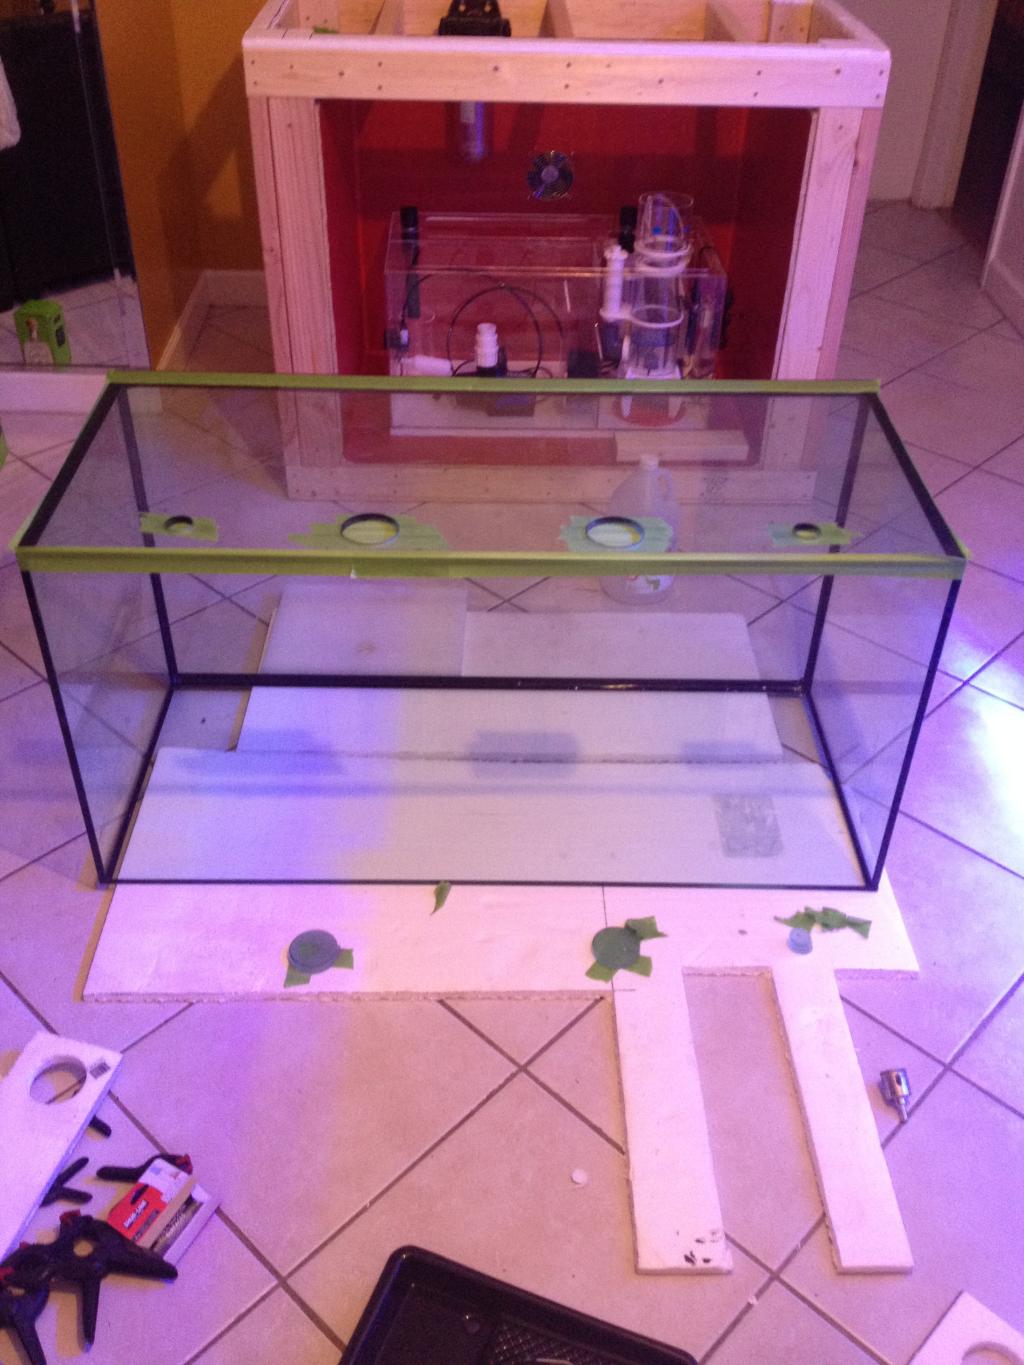
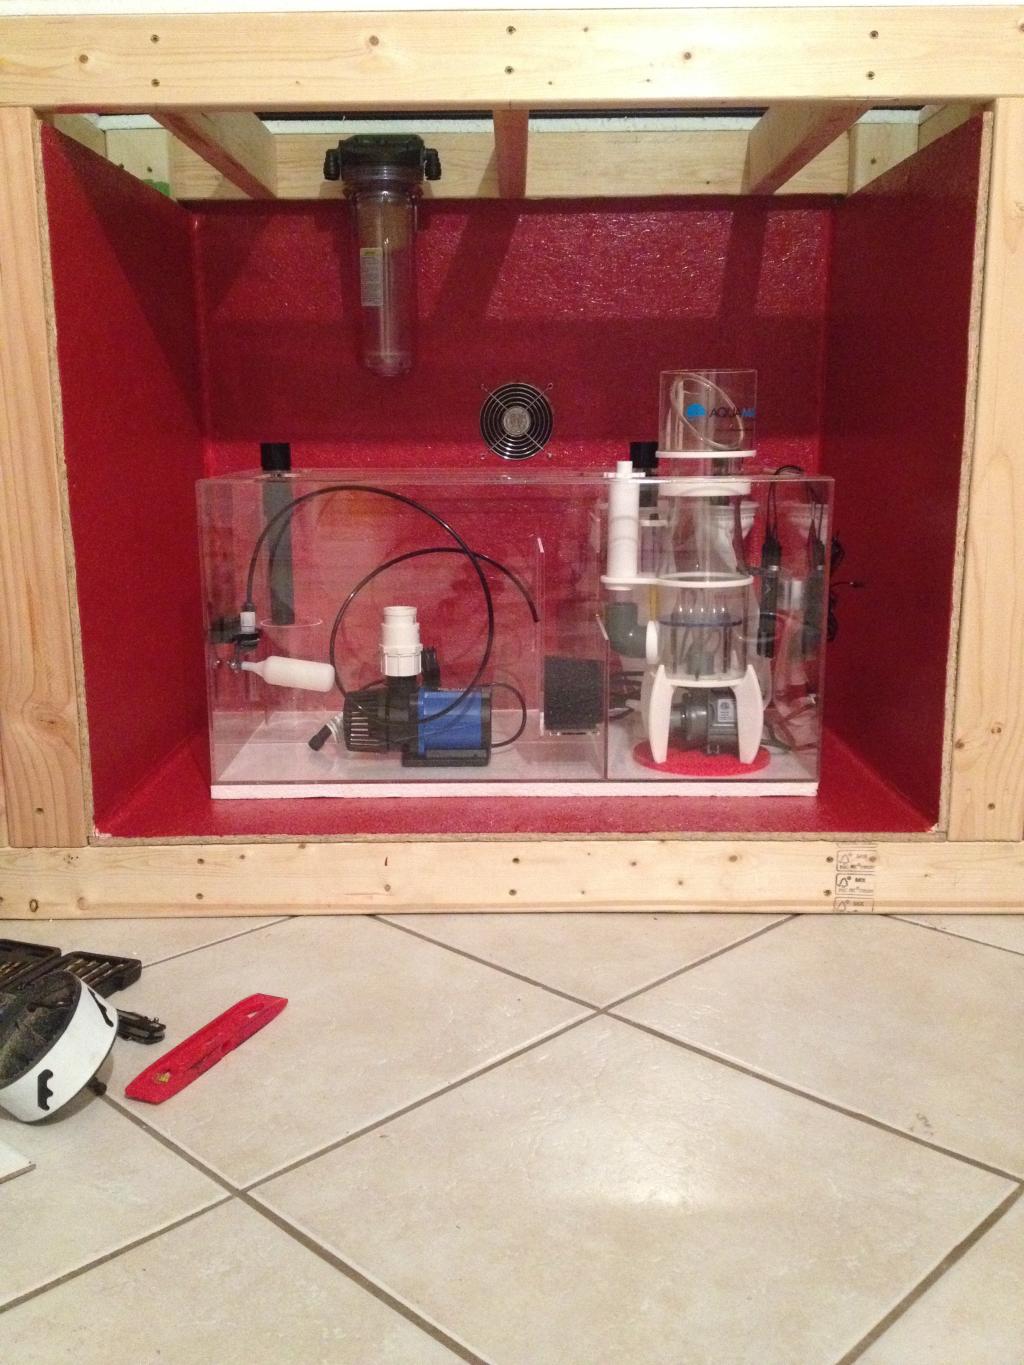
Pic of tank after paint dried with overflow and returns.
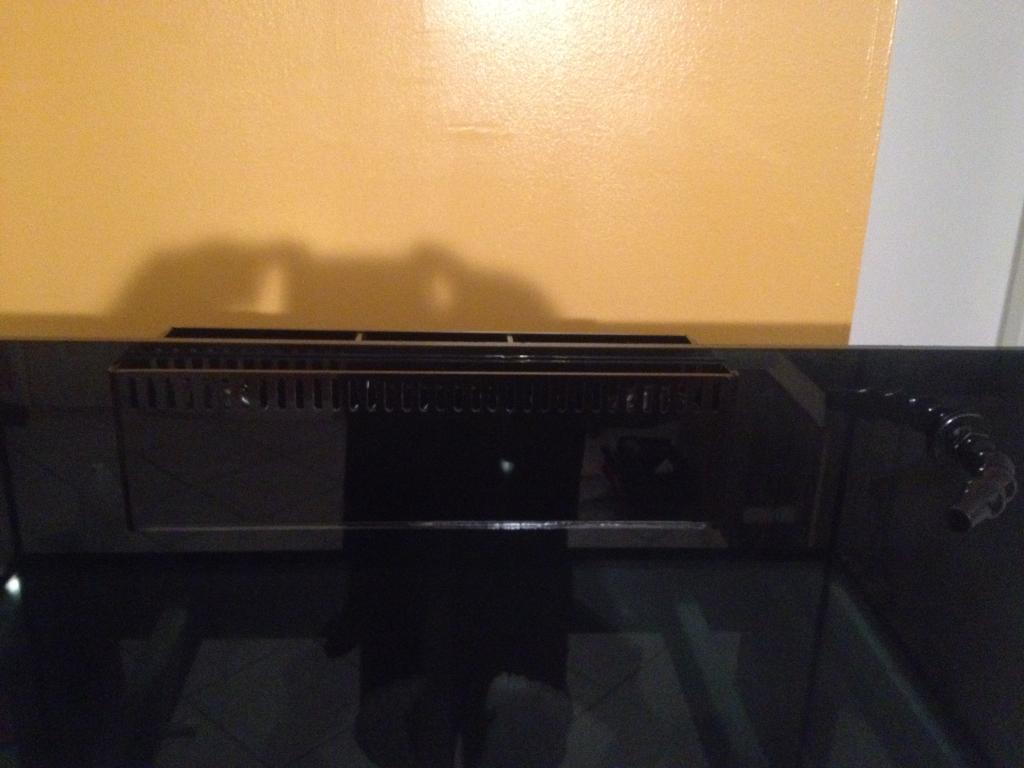
Side shot, so you can see how slim the overflow is.
Very pleased with overall look. If I had to paint again, I would use an oil based paint for the back panel next time. The acrylic paint was not sticking well to the glass. I had to apply several coats to get an even color.
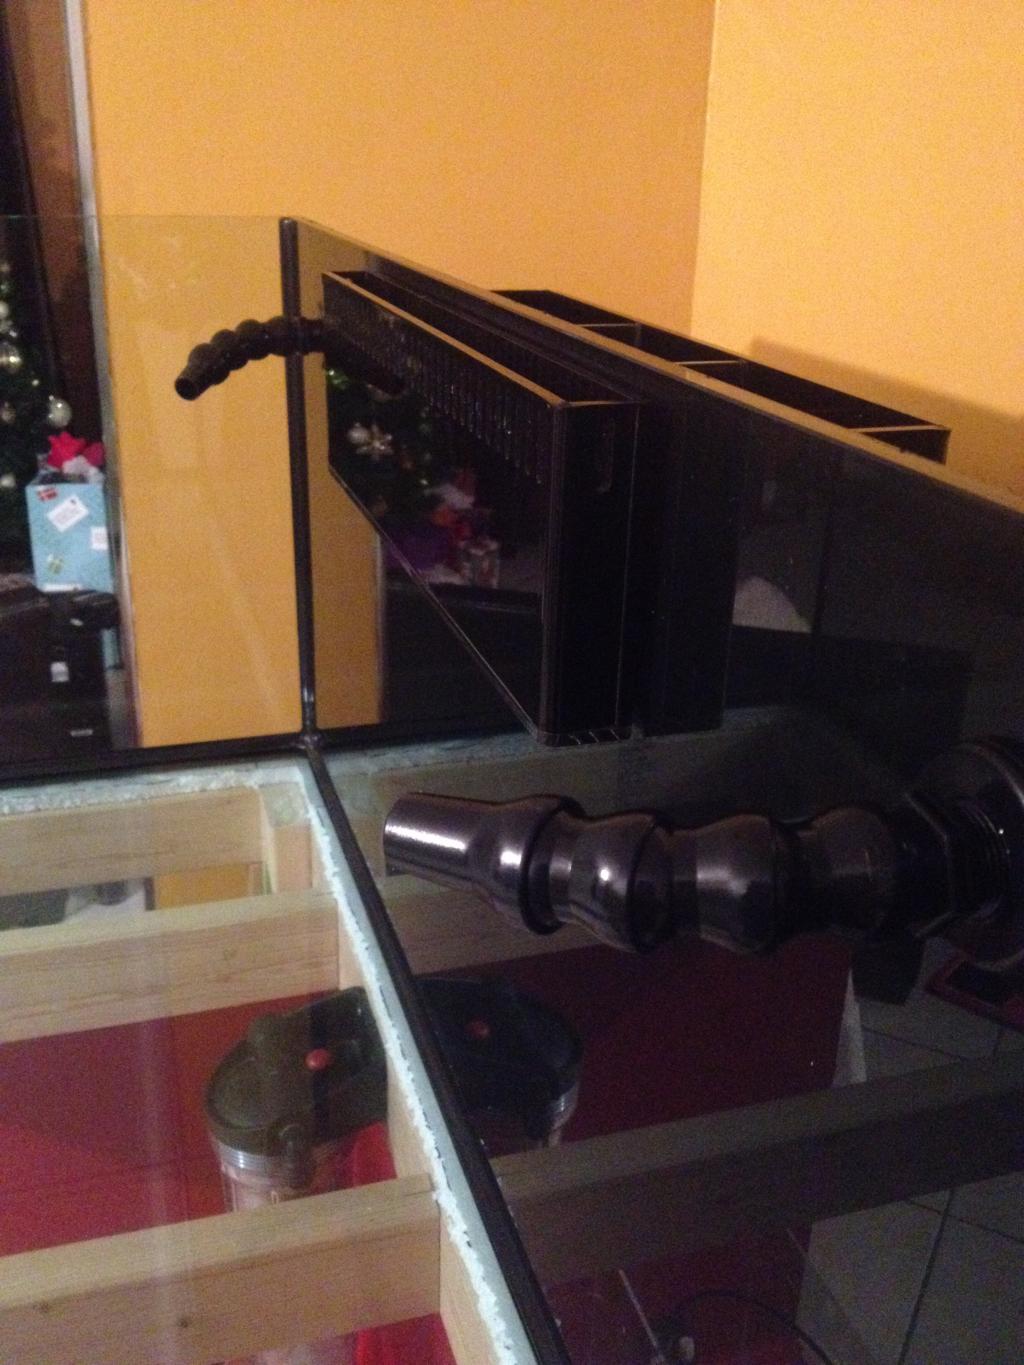
Front shot..
Yesterday I received my ATO container from Advanced Acrylics. It holds 5 gallons of water. I ordered the slim desing (4 inches wide) so it can go on the left side of the stand, outside of the sump chamber. The ATO container will be hidden in stand and will be directly fed from my RODI unit. I will post pics when I set up. I will later also order my dosing container from Advanced Acrylics to match the ATO container and will be hidden as well on shelf above the ATO container.
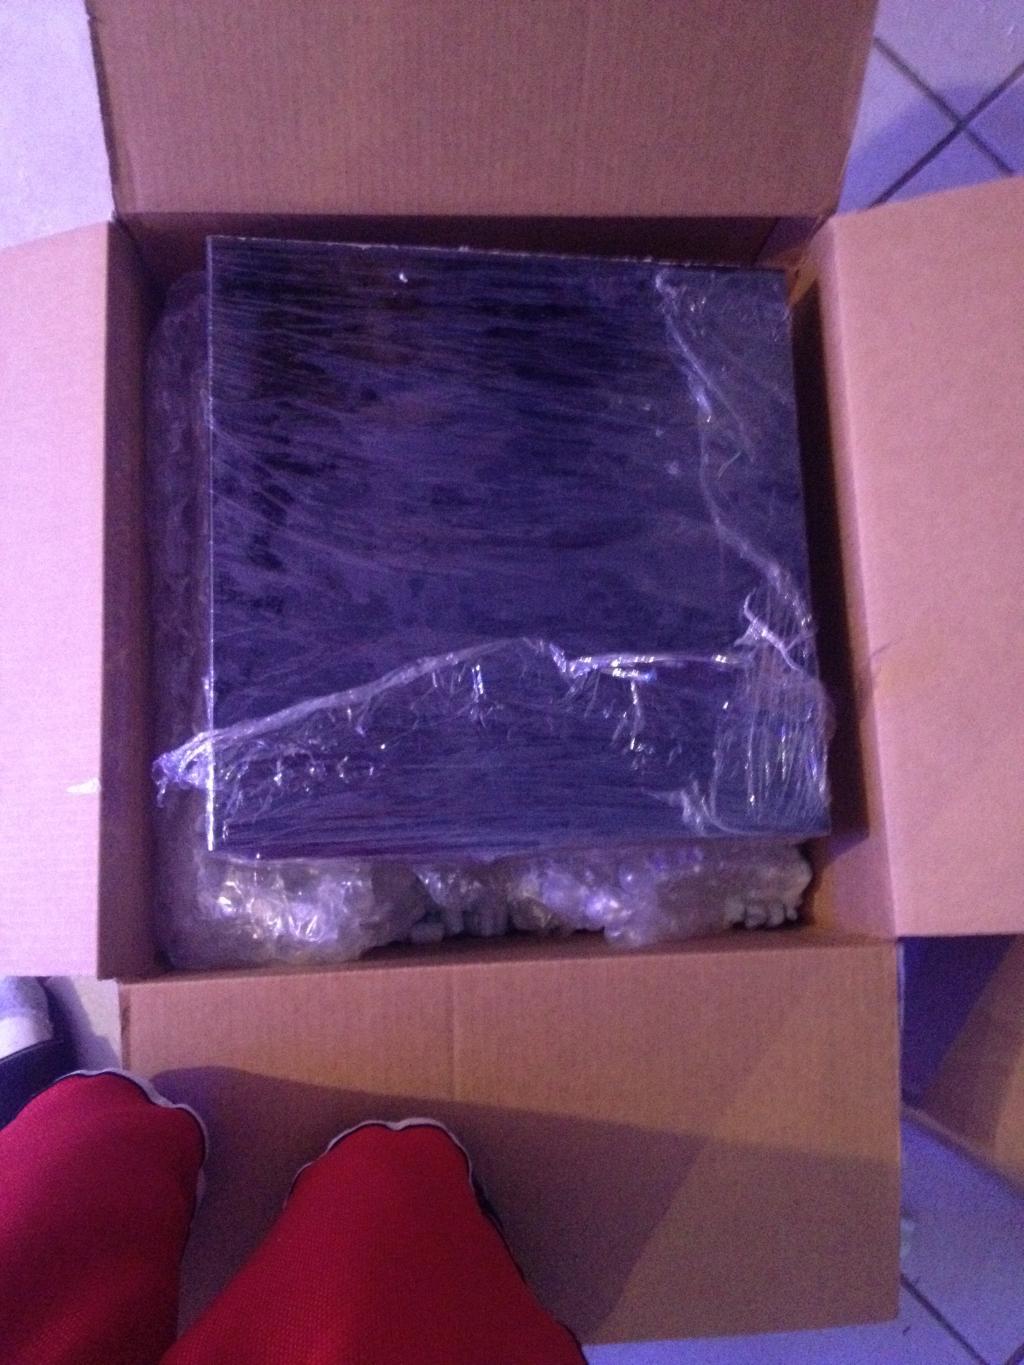
packaging out the box
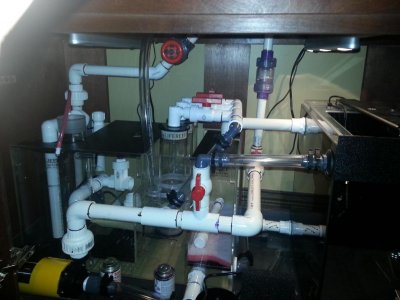
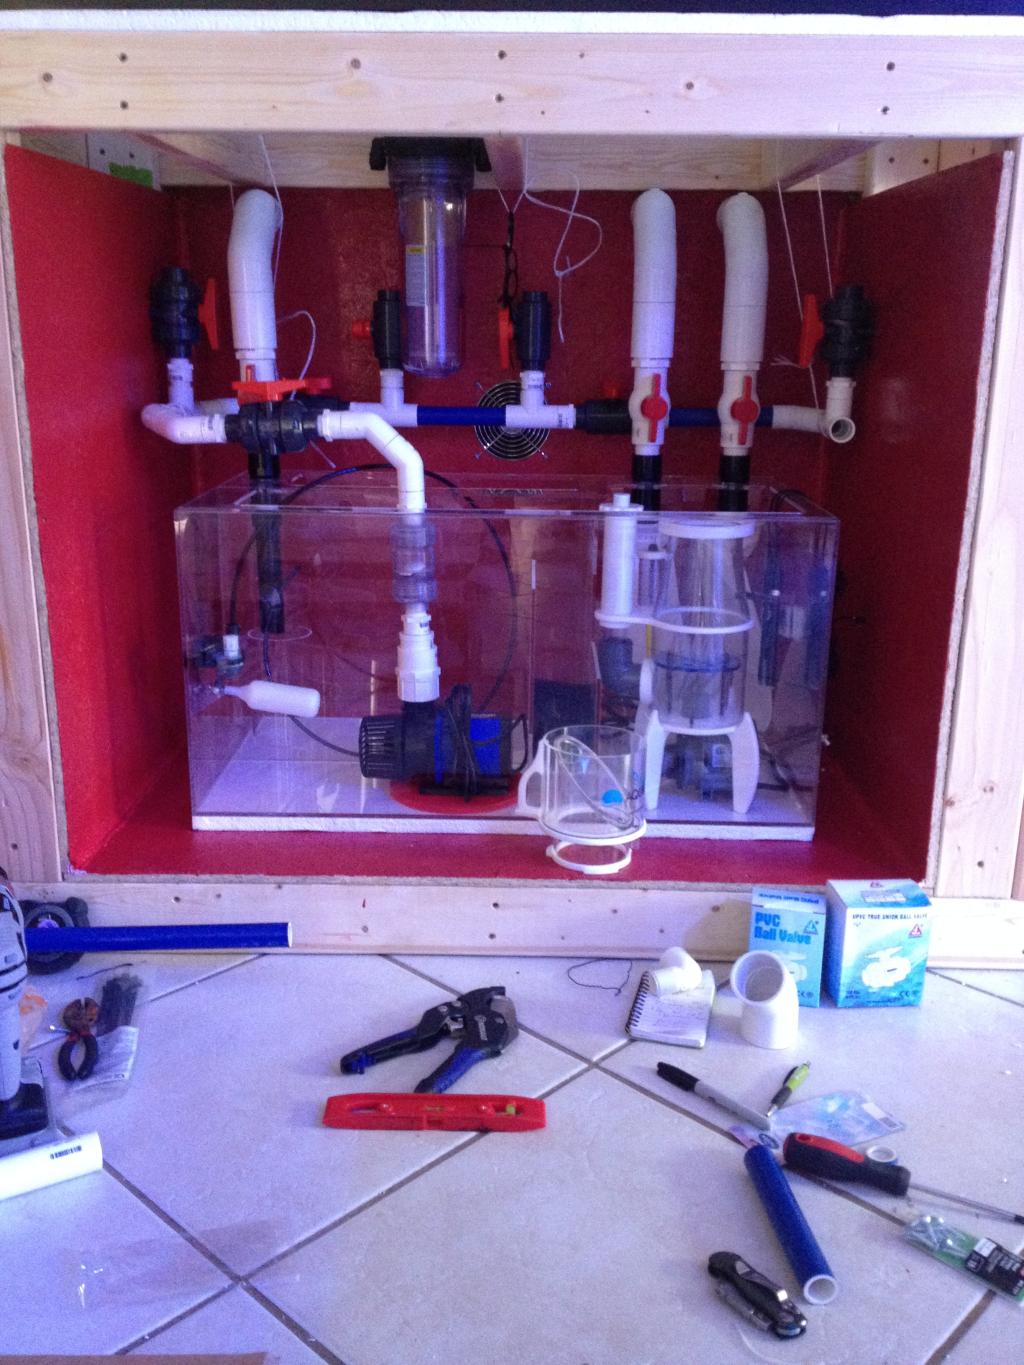
Today after all the gifts were opened, I decided to play with my fish tank. (That's what my fiance calls it when she sees me working on the tank). Started working on some of the plumbing. Dry fitting some things, so I can get an idea of how it will be set up.
This is roughly how it's going to look. The return will be feeding 2 BRS reactors. Will leave room to grow, in case I want to do bio pellets or UV in the future. Will also have a valve setup to siphon water out and feed water when it's time to do water changes easily. I am going to paint the return lines blue and drain lines yellow. I ran out of fittings, so tomorrow I will visit home depot and pick up the rest of the fittings I need. Maybe start gluing some things possibly paint also.
Pic of tank with all 4 holes drilled. The 2 outside holes are 3/4 inch for return and 2 inside holes are 3 inch for overflow.

Tank is taped up, all prepped for paint!

Pic of tank after paint dried with overflow and returns.

Side shot, so you can see how slim the overflow is.

Very pleased with overall look. If I had to paint again, I would use an oil based paint for the back panel next time. The acrylic paint was not sticking well to the glass. I had to apply several coats to get an even color.

Front shot..

Yesterday I received my ATO container from Advanced Acrylics. It holds 5 gallons of water. I ordered the slim desing (4 inches wide) so it can go on the left side of the stand, outside of the sump chamber. The ATO container will be hidden in stand and will be directly fed from my RODI unit. I will post pics when I set up. I will later also order my dosing container from Advanced Acrylics to match the ATO container and will be hidden as well on shelf above the ATO container.
packaging out the box


Today after all the gifts were opened, I decided to play with my fish tank. (That's what my fiance calls it when she sees me working on the tank). Started working on some of the plumbing. Dry fitting some things, so I can get an idea of how it will be set up.
This is roughly how it's going to look. The return will be feeding 2 BRS reactors. Will leave room to grow, in case I want to do bio pellets or UV in the future. Will also have a valve setup to siphon water out and feed water when it's time to do water changes easily. I am going to paint the return lines blue and drain lines yellow. I ran out of fittings, so tomorrow I will visit home depot and pick up the rest of the fittings I need. Maybe start gluing some things possibly paint also.


Looks good. Are you going with sand or are you going to be painting the bottom of the tank?
Thanks, I will be doing a light sand bed just for aesthetics.
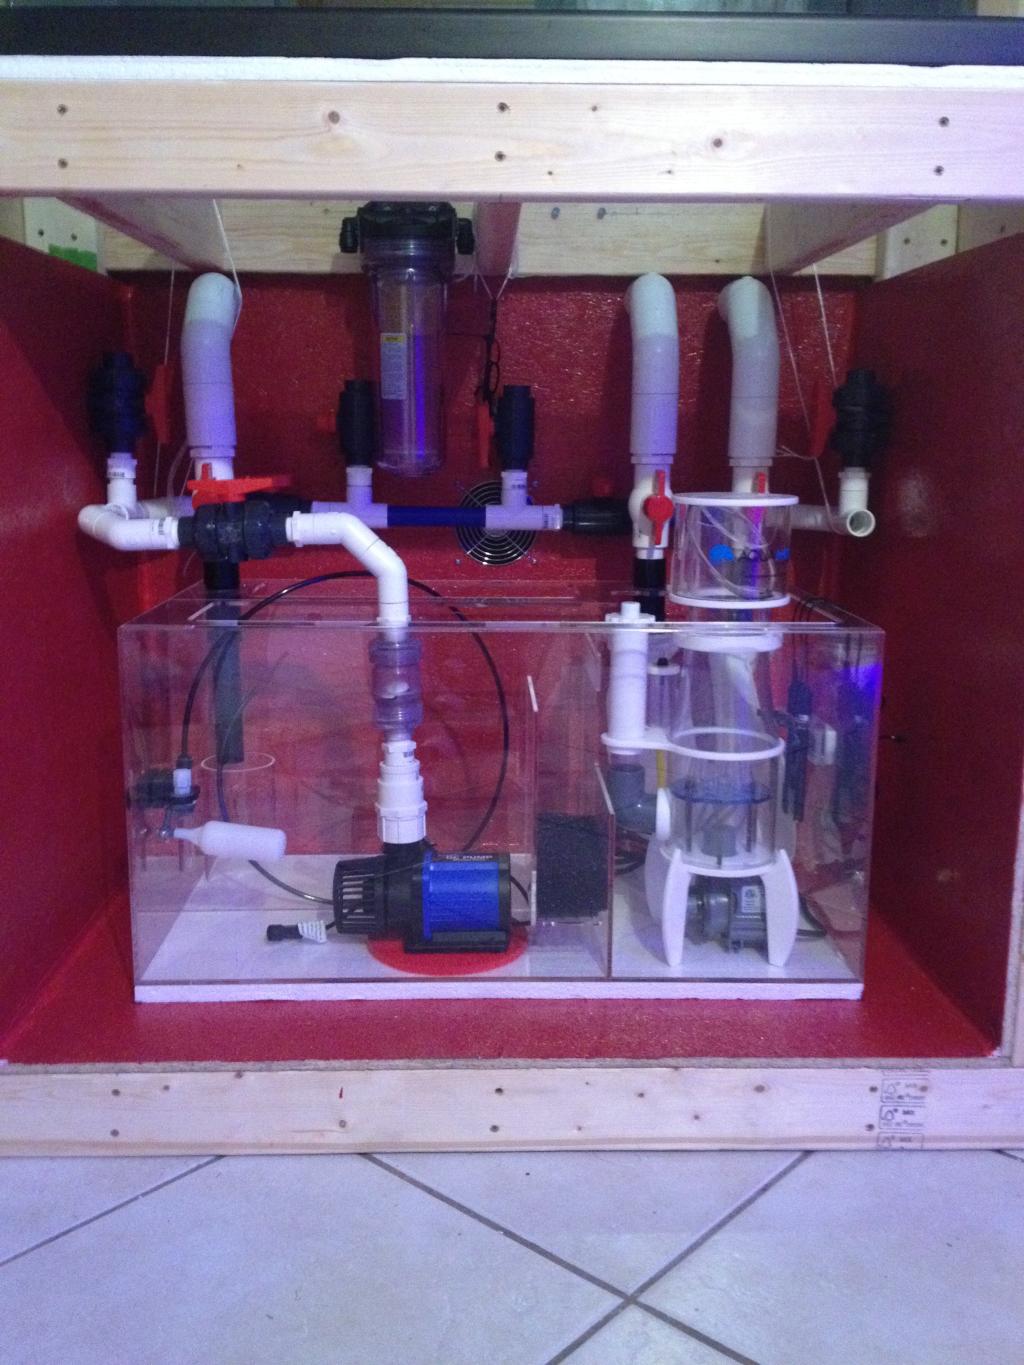
Update: Ok got all the plumbing assembled and glued in. I must say that the plumbing is by far the most challenging part of this build thus far. I got very frustrated and almost said the hell with it and went wit a hose. Maybe it's just the lack of experience, but the measuring, dry fitting, priming, painting, gluing. Then things weren't fitting right, I glued the wrong pieces!! Stupid glue dries too fast!! LOL..I want to say i spent around 20 hrs on the plumbing WAY LONGER THAN ANTICIPATED.. Also the costs!!! The fittings for 1 1/2 PVC are expensive! I want to say it costs me around $200 to plumb this system. I WOULD OF SPENT $20 ON HOSES!
There are still some minor adjstments that still need to be made, like output hoses for reactors. Also need to add a hose fitting at the end to make water changes easy. I would say it's 90% done
Installed an LED Strip.
After all the frustration, telling my wife I was going to sell the tank, finally finished that part of the build and I must say I'm very happy with the look. Thank god that's over and done with.
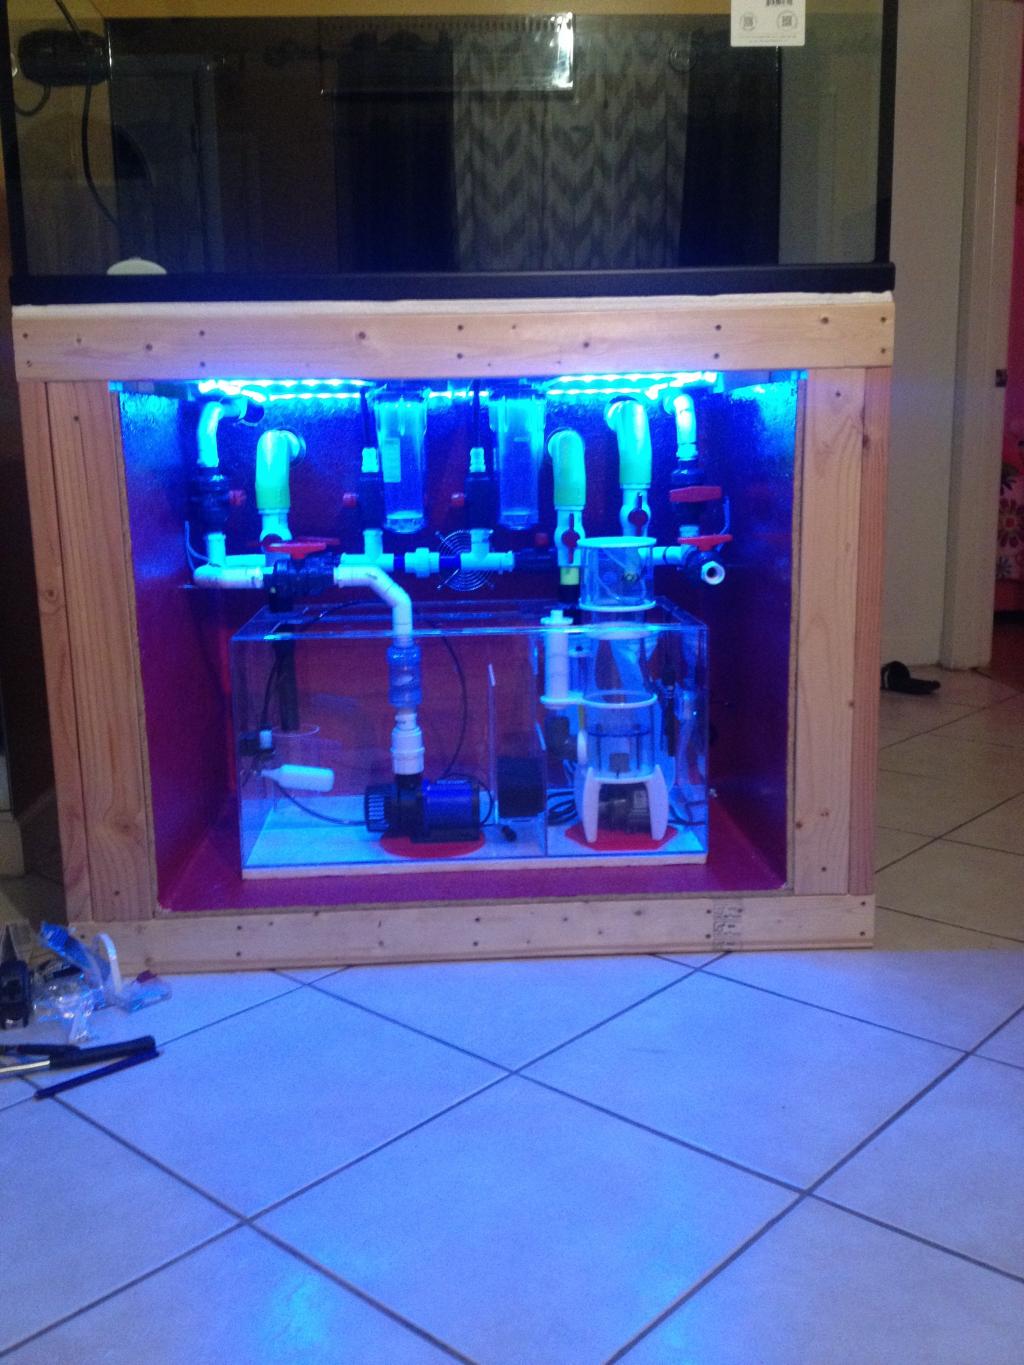
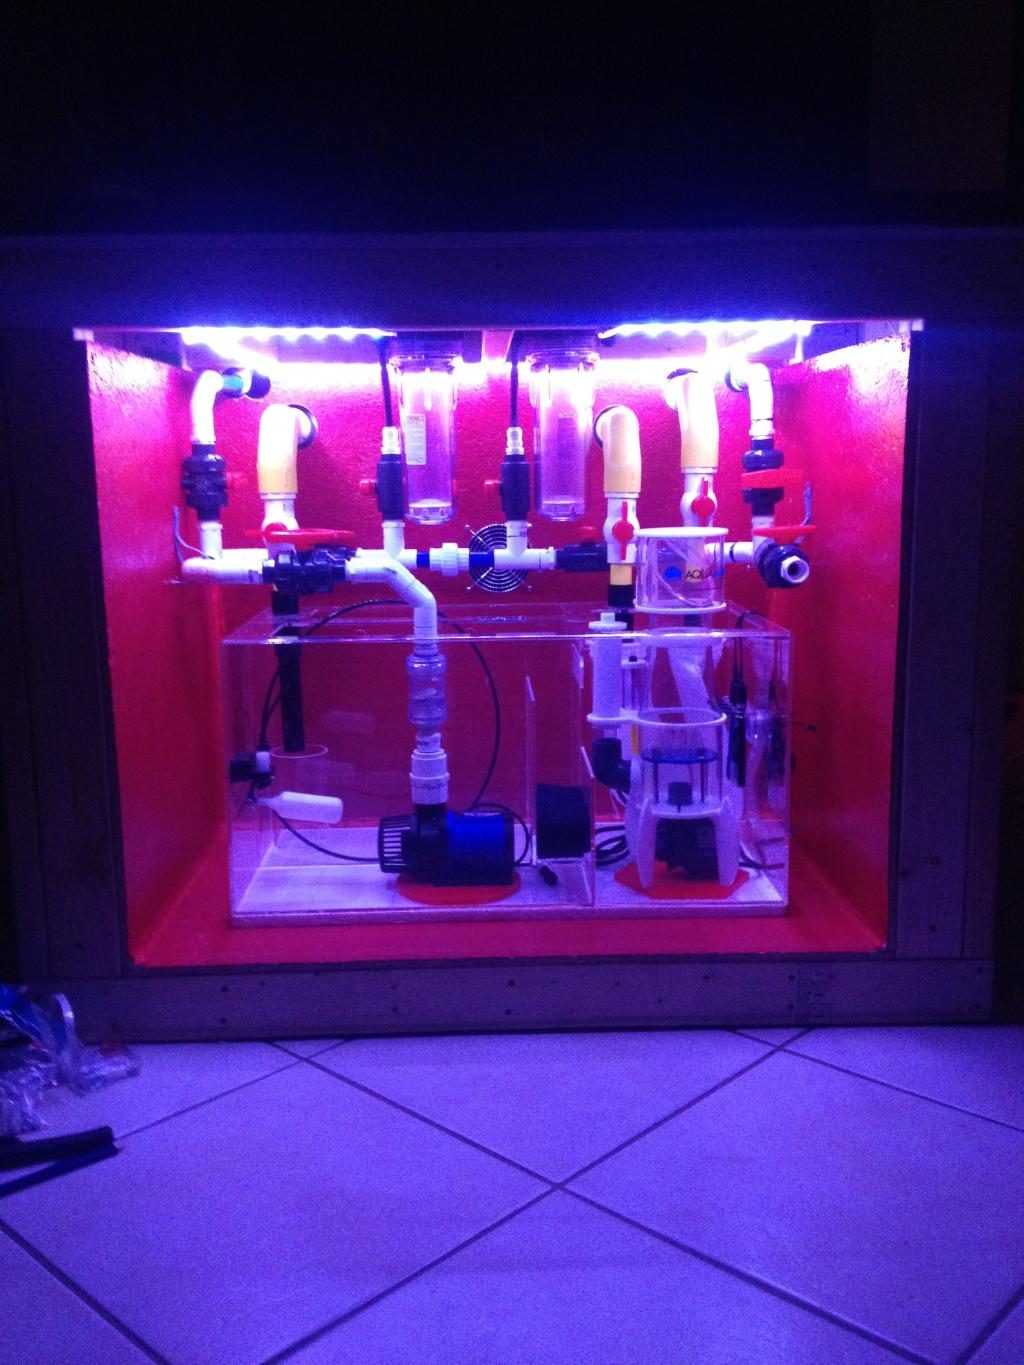
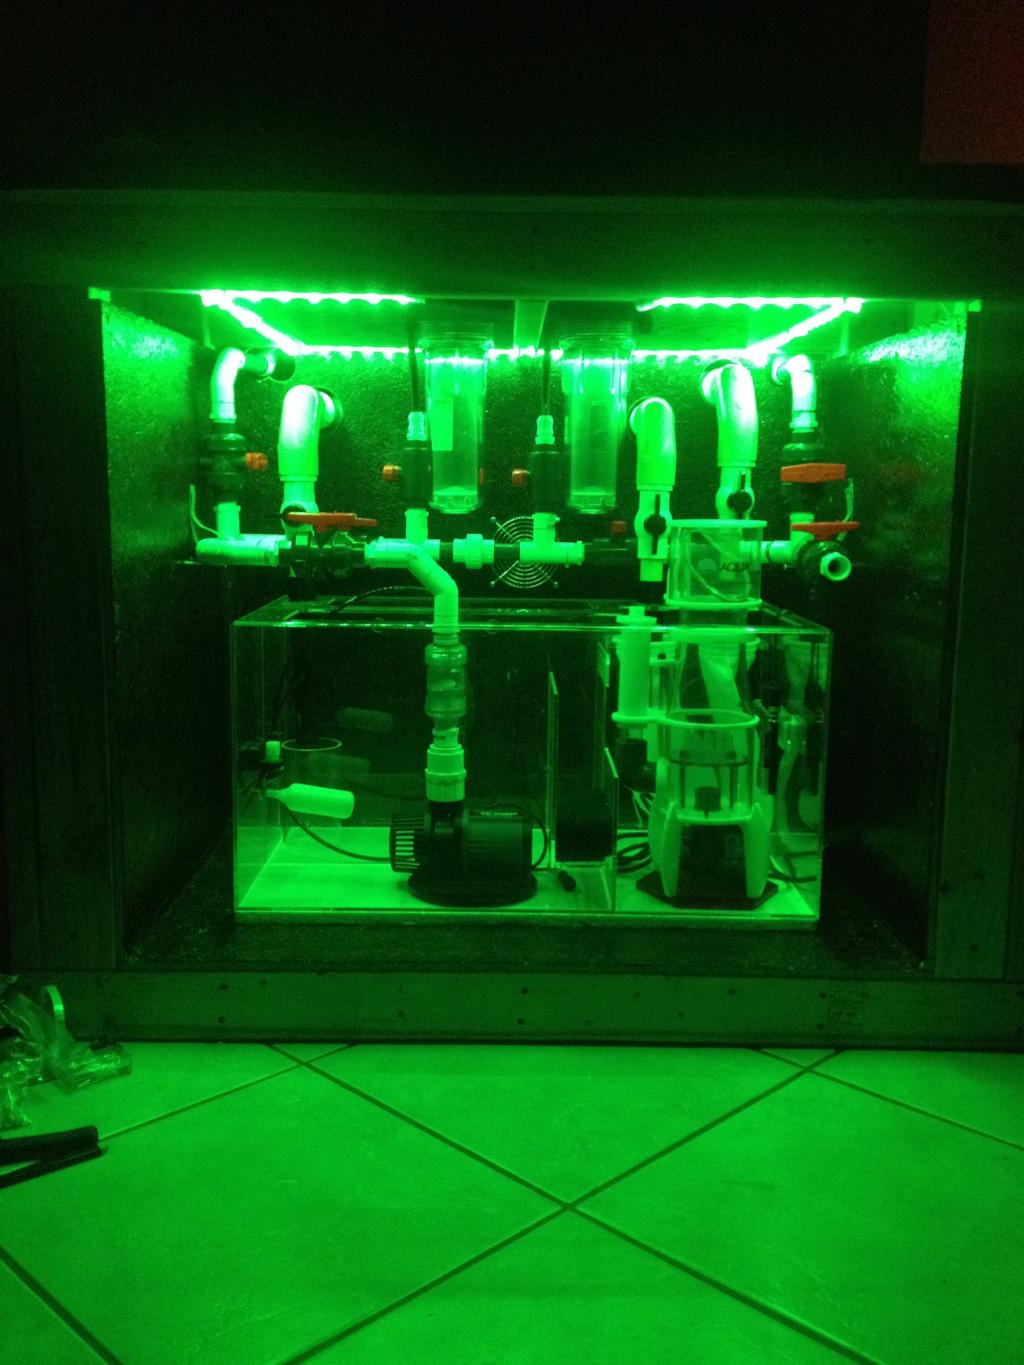
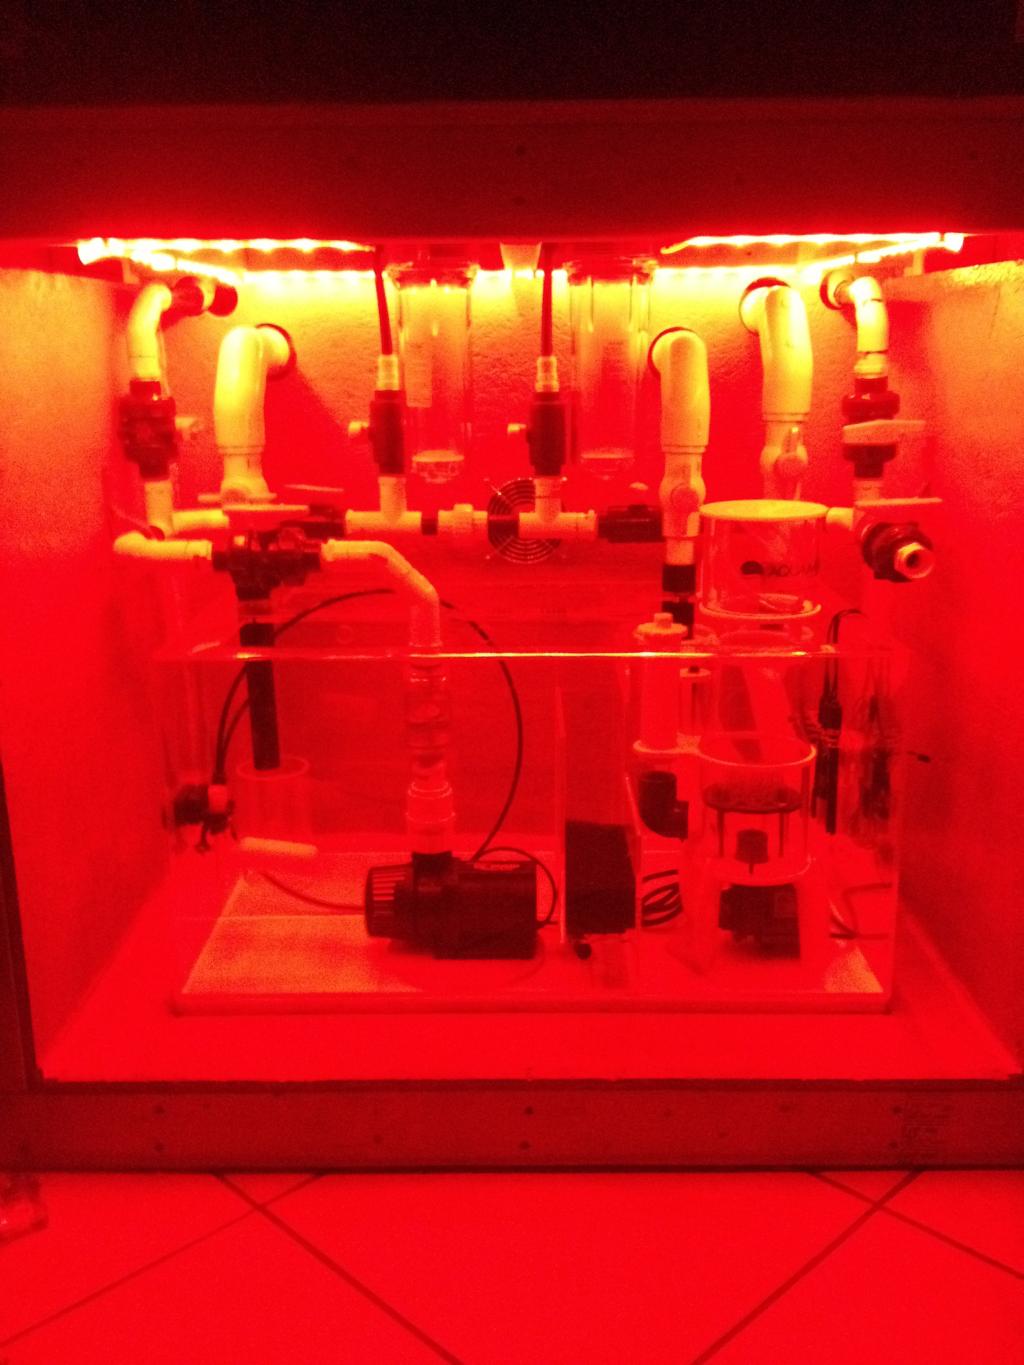
Then playing around with the colors, don't know which color I will stay at..

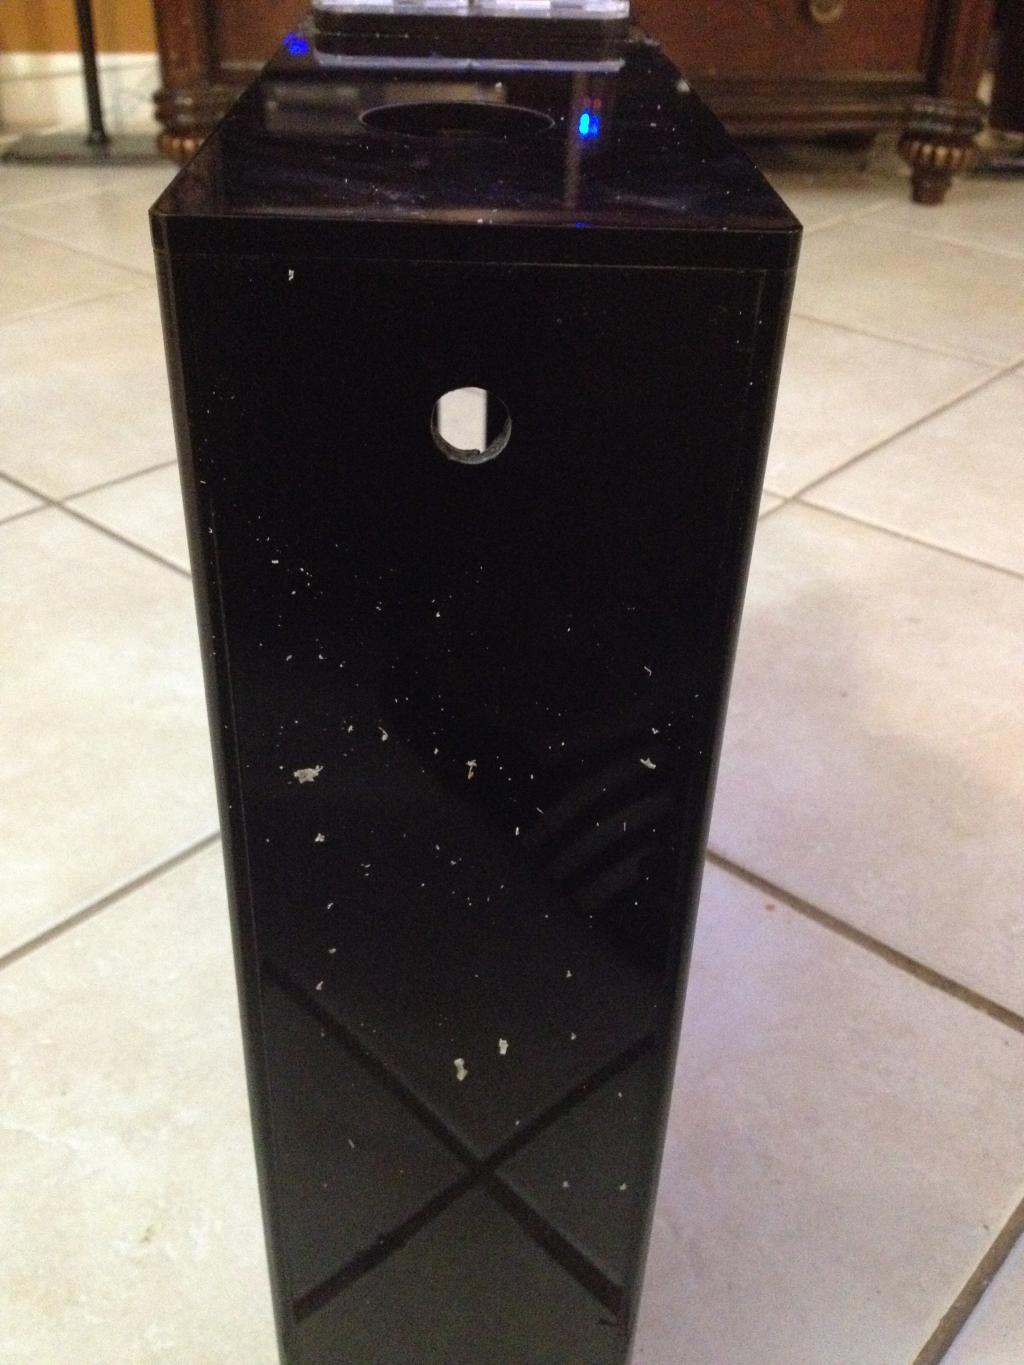
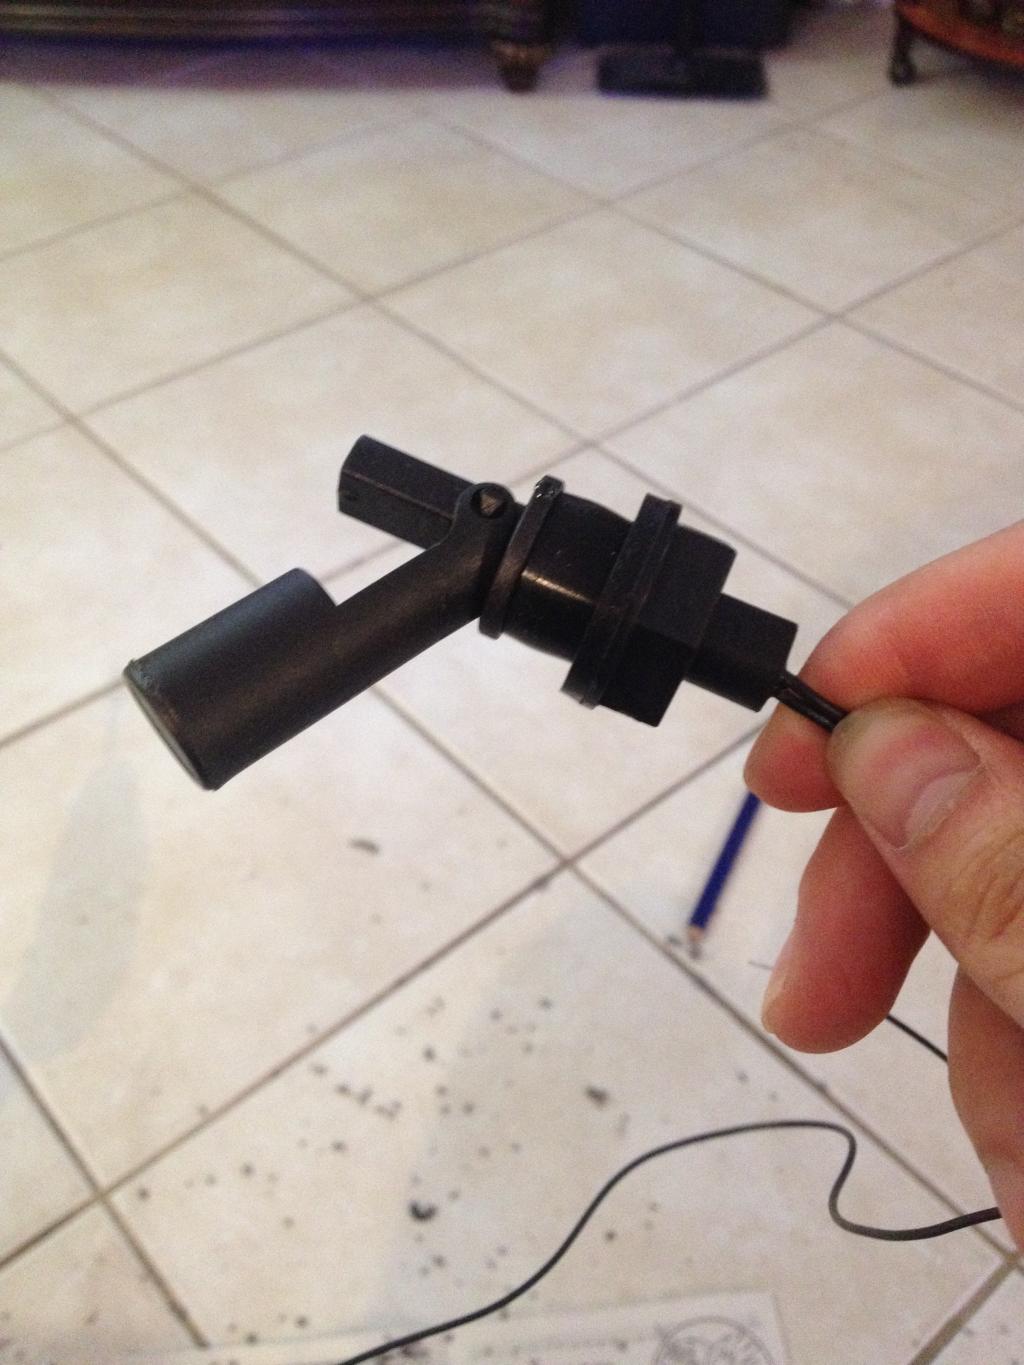
In middle of all the frustration, I decided to take a break from the plumbing and the modifications needed to the ATO reservoir. I drilled 2 holes in it, 1/2 hole for float valve and 3/4 hole for 3/8 inch tubing bulkhead.
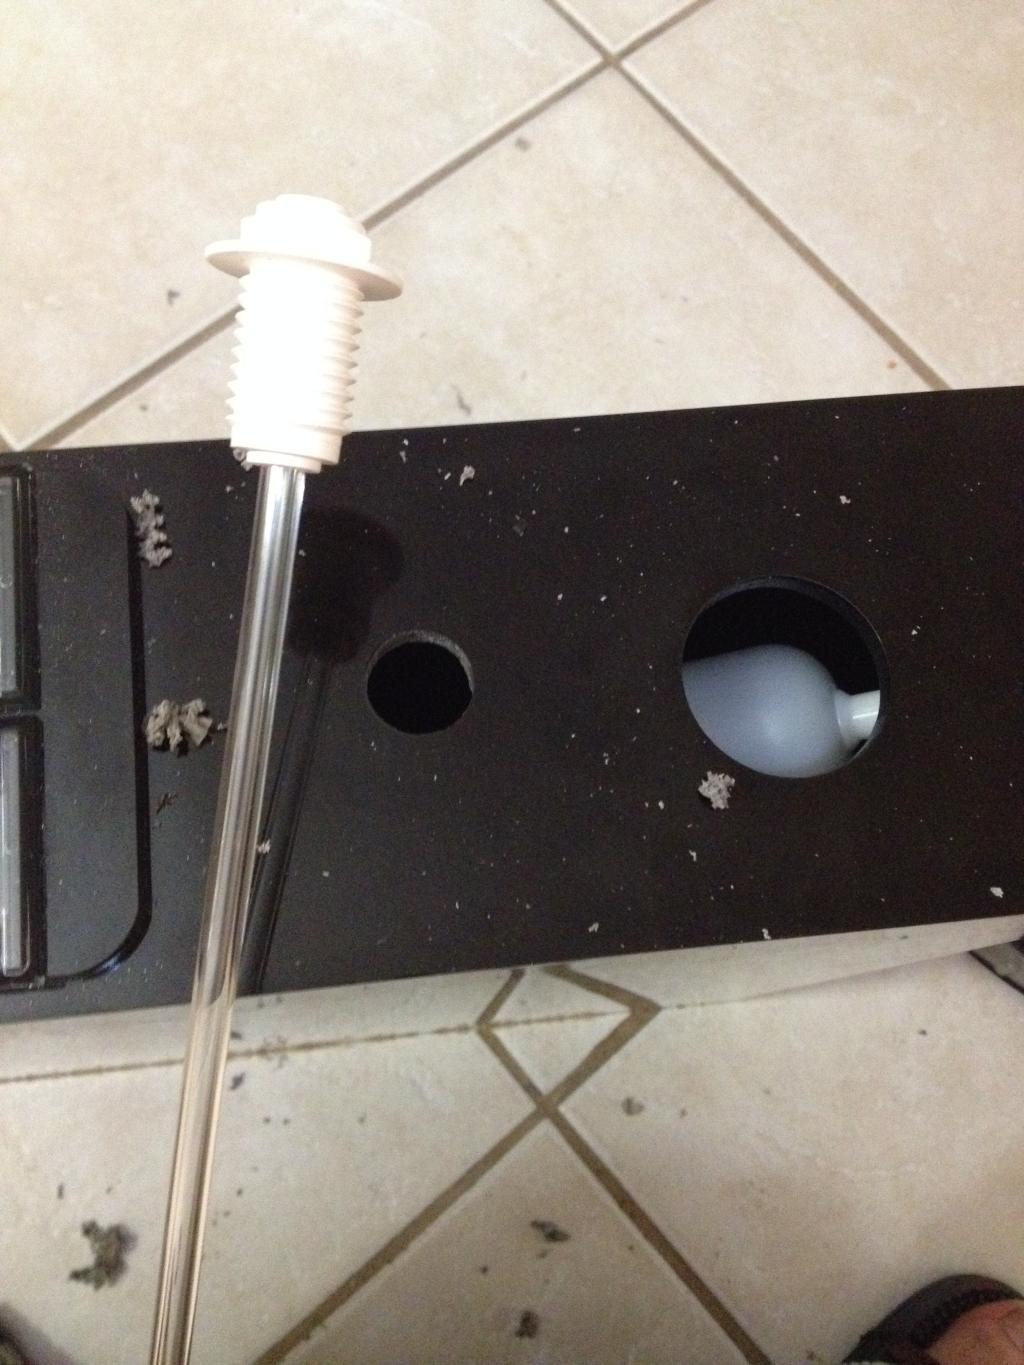
This is float valve installed.
This is 1/2 hole drilled for the float valve.
3/4 inch hole drilled on top for the bulkhead.
This reservoir will be hook up to my RODI unit. More pics when I install the whole set up.
There are still some minor adjstments that still need to be made, like output hoses for reactors. Also need to add a hose fitting at the end to make water changes easy. I would say it's 90% done
Installed an LED Strip.
After all the frustration, telling my wife I was going to sell the tank, finally finished that part of the build and I must say I'm very happy with the look. Thank god that's over and done with.

Then playing around with the colors, don't know which color I will stay at..


In middle of all the frustration, I decided to take a break from the plumbing and the modifications needed to the ATO reservoir. I drilled 2 holes in it, 1/2 hole for float valve and 3/4 hole for 3/8 inch tubing bulkhead.
This is float valve installed.

This is 1/2 hole drilled for the float valve.

3/4 inch hole drilled on top for the bulkhead.

This reservoir will be hook up to my RODI unit. More pics when I install the whole set up.

The plumbing looks awesome. The only thing I can't figure out is where the outputs of the media reactors will end up going. I guess you will just have straight flex tubes going back down to the sump?
Color-wise, I like the red personally ...
Color-wise, I like the red personally ...
The plumbing looks awesome. The only thing I can't figure out is where the outputs of the media reactors will end up going. I guess you will just have straight flex tubes going back down to the sump?
Color-wise, I like the red personally ...
Thanks!!
Yes, for the output on the reactors I am going to have a tube going back into each filter sock to pick up any debris from reactors. Will get a pic once it's up.
On the color, the red is nice.
small update:
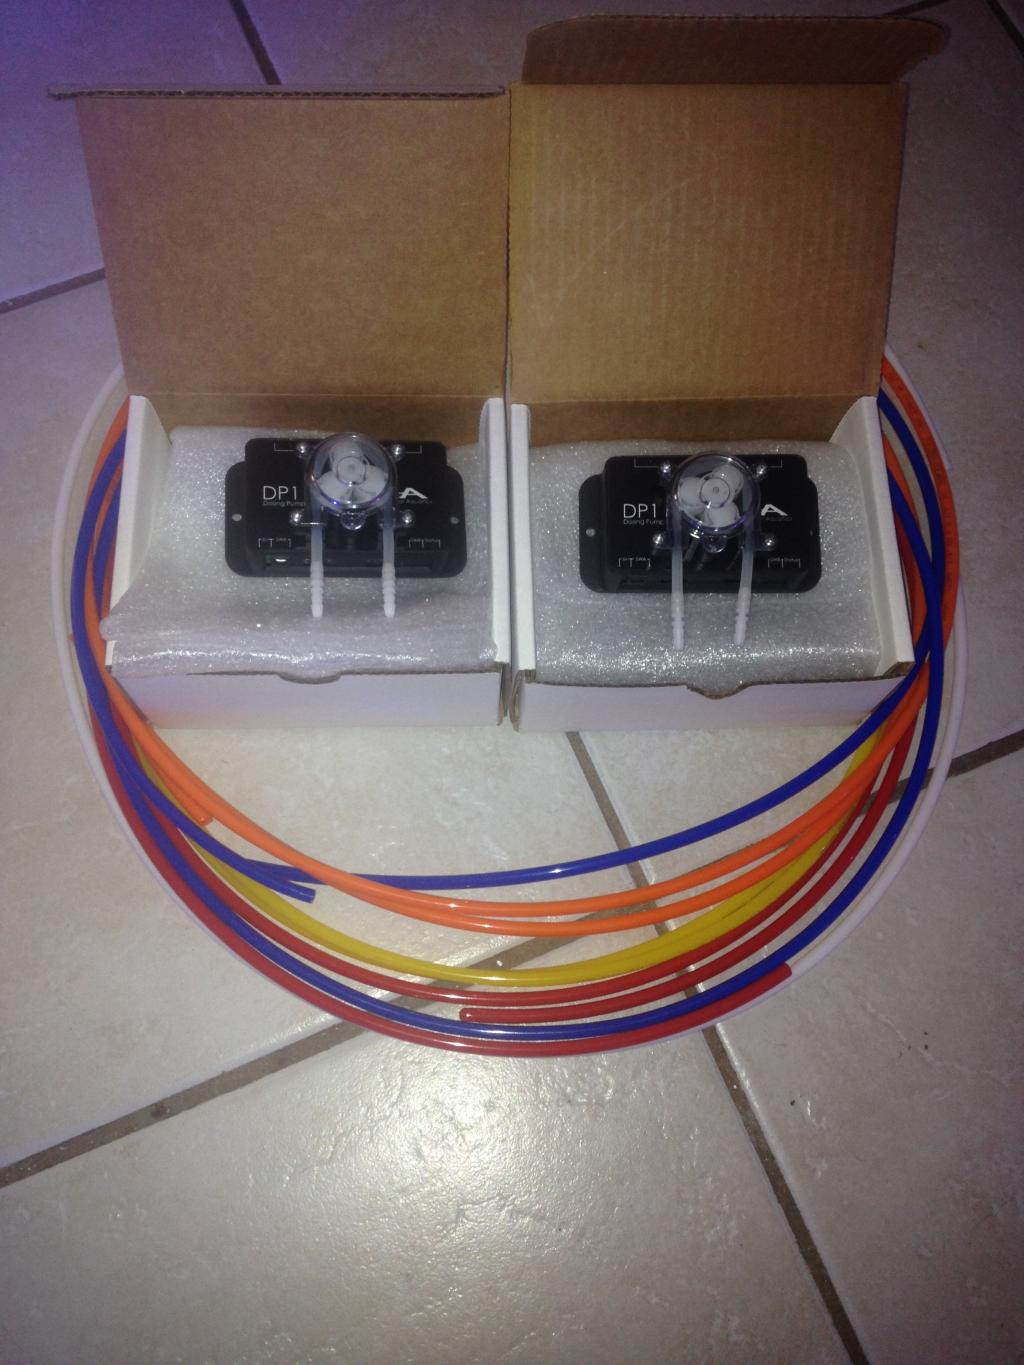
received some different color tubing, 2 more DP-1 pumps to dose Alk and Calc. In my previous tank Mag was consumed at a very slow rate, so at this point I feel I can manually dose it. I don't think it's worth the extra $90 for another DP-1. If I get tired of dosing it then I might consider ordering one. At this point I have 3, the other is for my ATO.
Also I ordered an Avast probe/tubing holder for dosing tubes. Now I am just wating on custom dosing container from advanced acrylics, should be getting that soon. After setting that up it would complete the dosing part of this project.
New DP-1s and 1/4 tubing. Different colors for each pump..
Avast holder

Some of the wiring done.
Still don't know for certain if I am going to leave the DP-1 pumps there. I am a bit concerned that they may leak and spill onto one of the surge protectors.

received some different color tubing, 2 more DP-1 pumps to dose Alk and Calc. In my previous tank Mag was consumed at a very slow rate, so at this point I feel I can manually dose it. I don't think it's worth the extra $90 for another DP-1. If I get tired of dosing it then I might consider ordering one. At this point I have 3, the other is for my ATO.
Also I ordered an Avast probe/tubing holder for dosing tubes. Now I am just wating on custom dosing container from advanced acrylics, should be getting that soon. After setting that up it would complete the dosing part of this project.
New DP-1s and 1/4 tubing. Different colors for each pump..

Avast holder


Some of the wiring done.
Still don't know for certain if I am going to leave the DP-1 pumps there. I am a bit concerned that they may leak and spill onto one of the surge protectors.


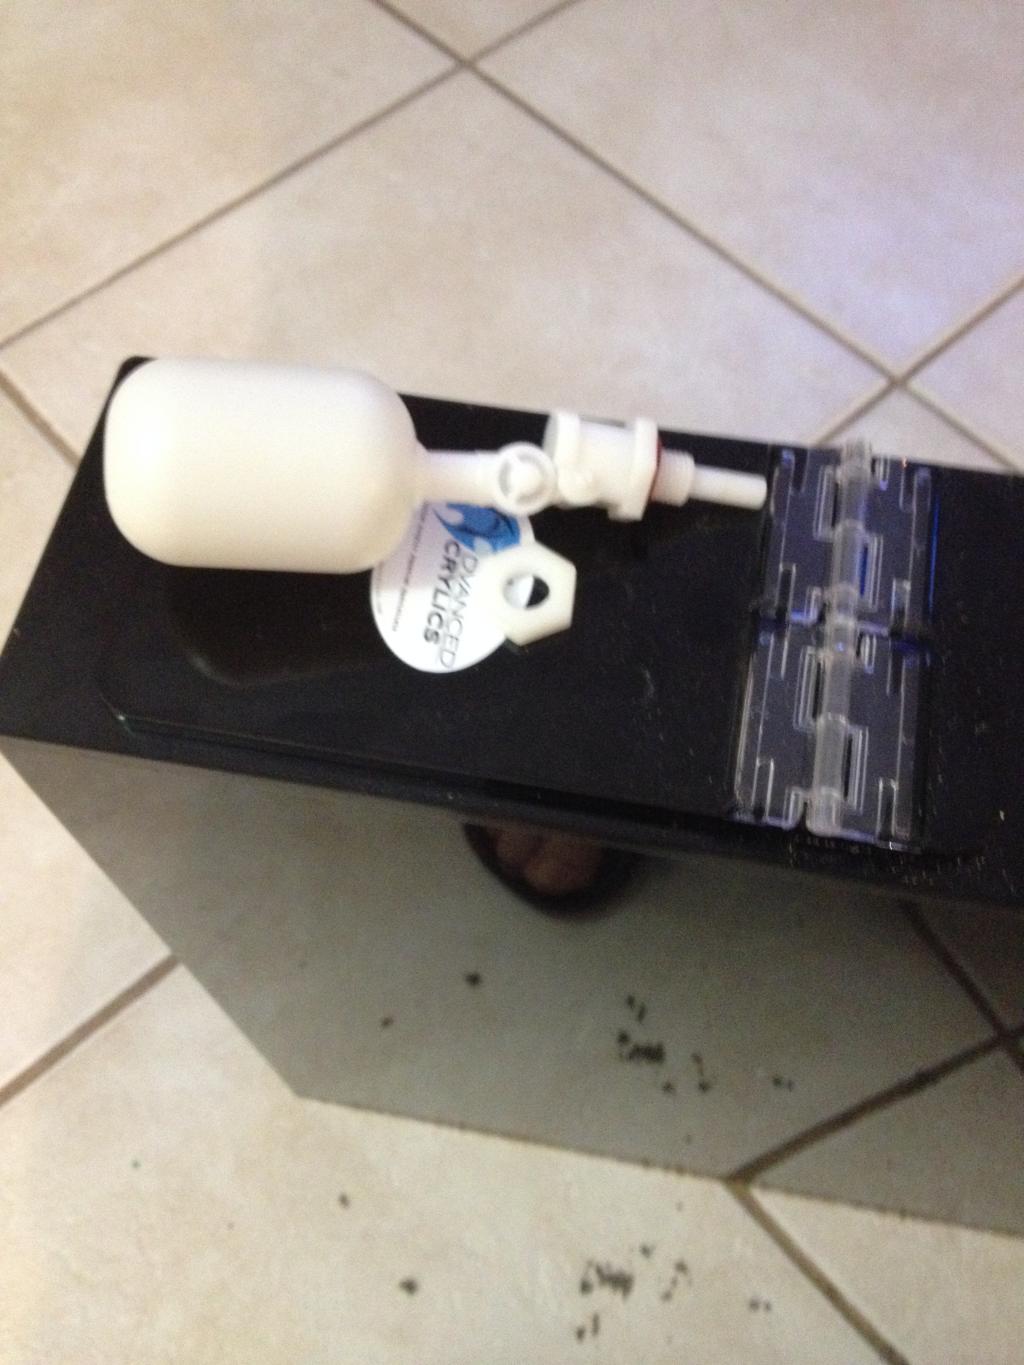
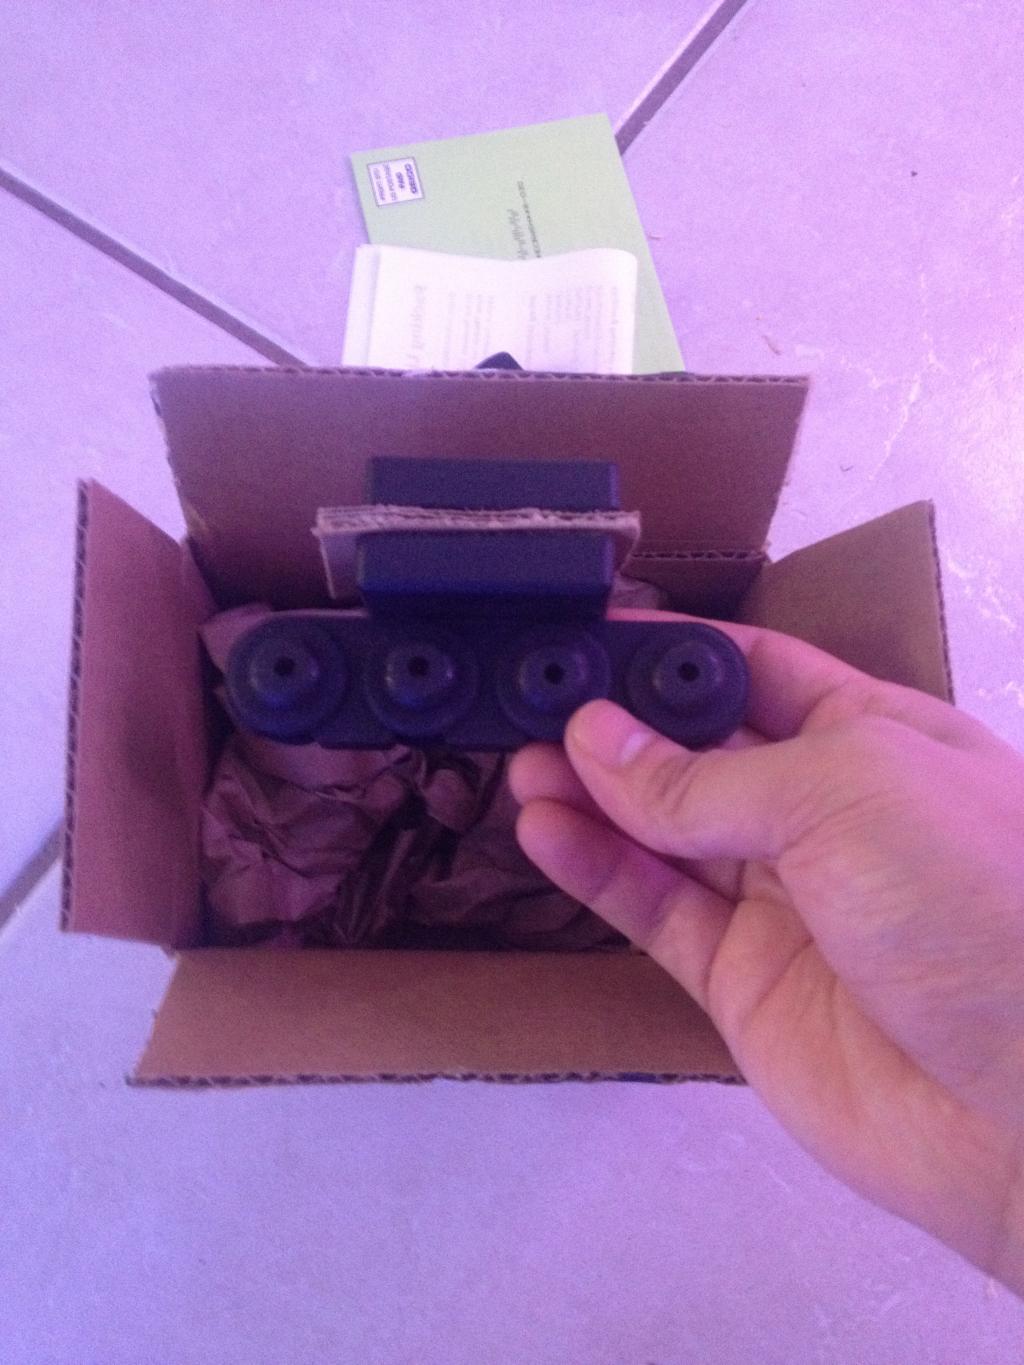
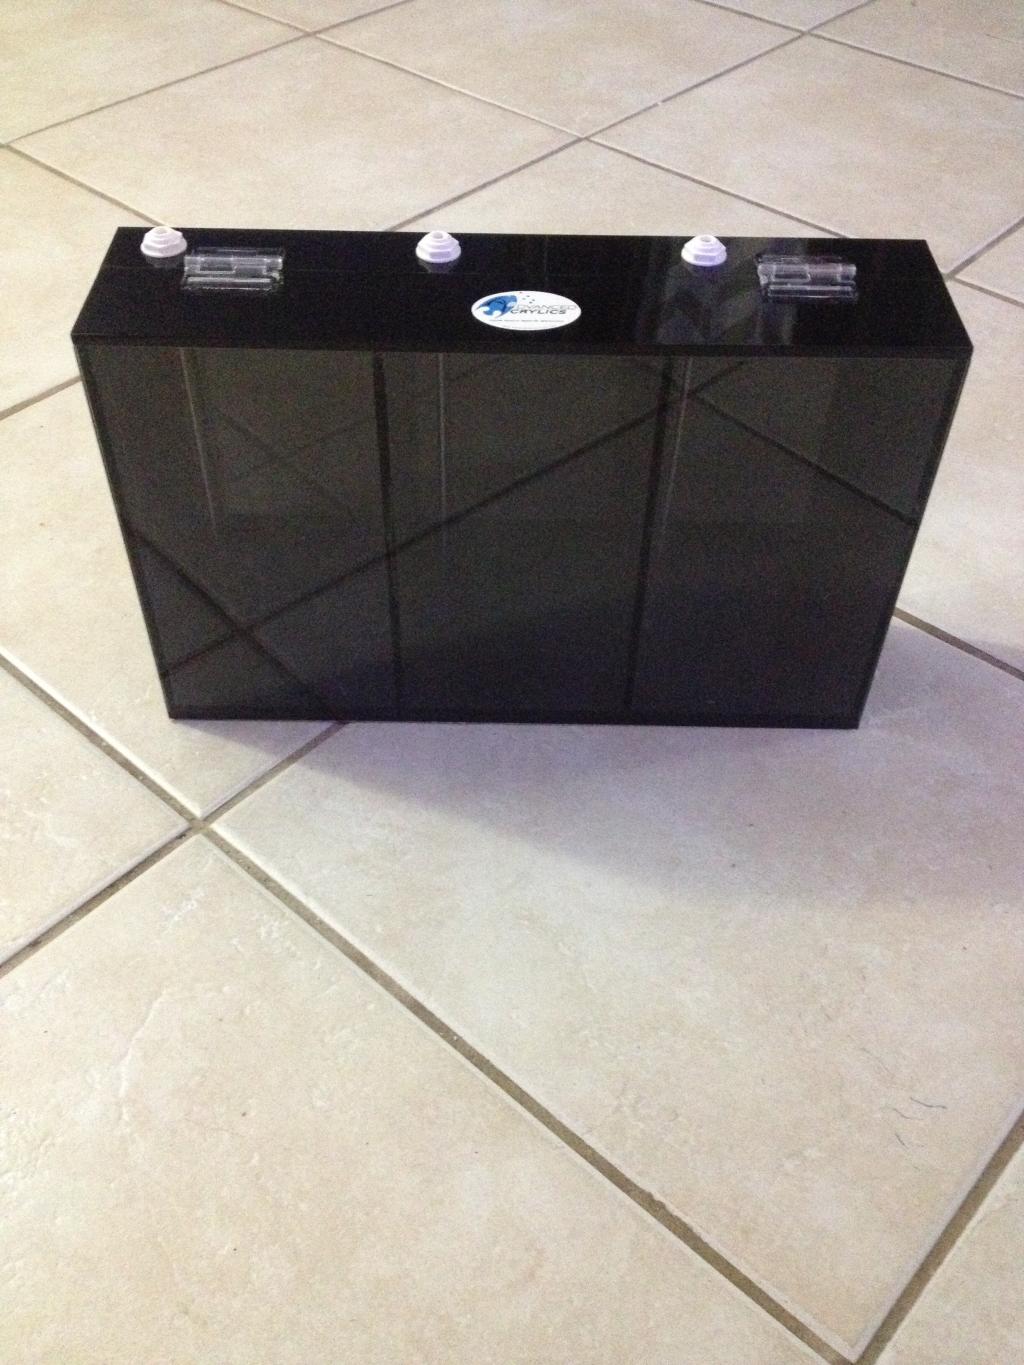
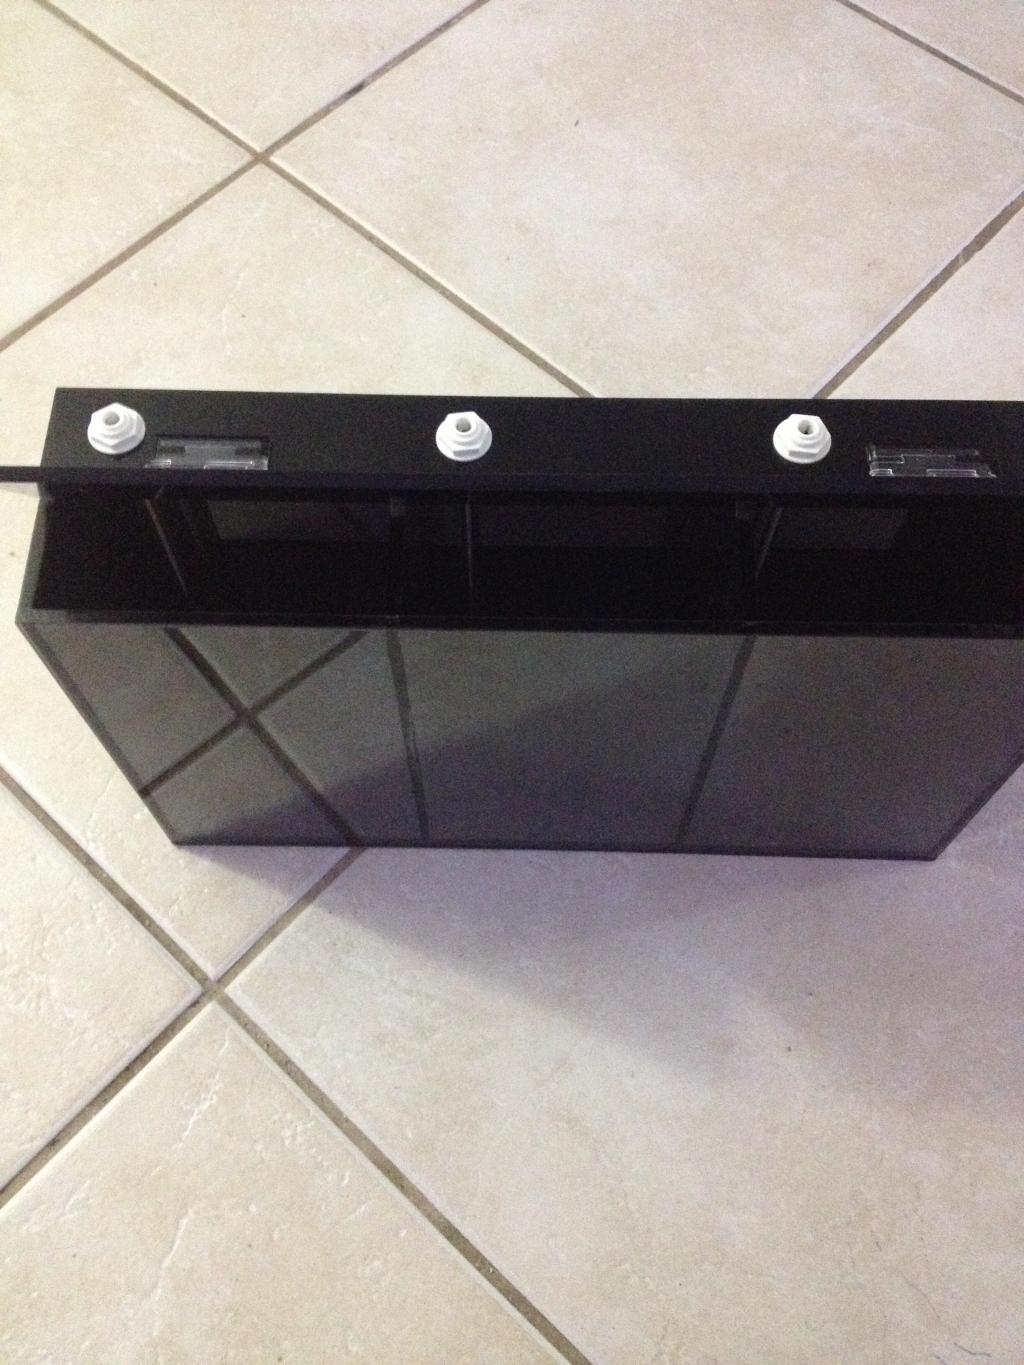
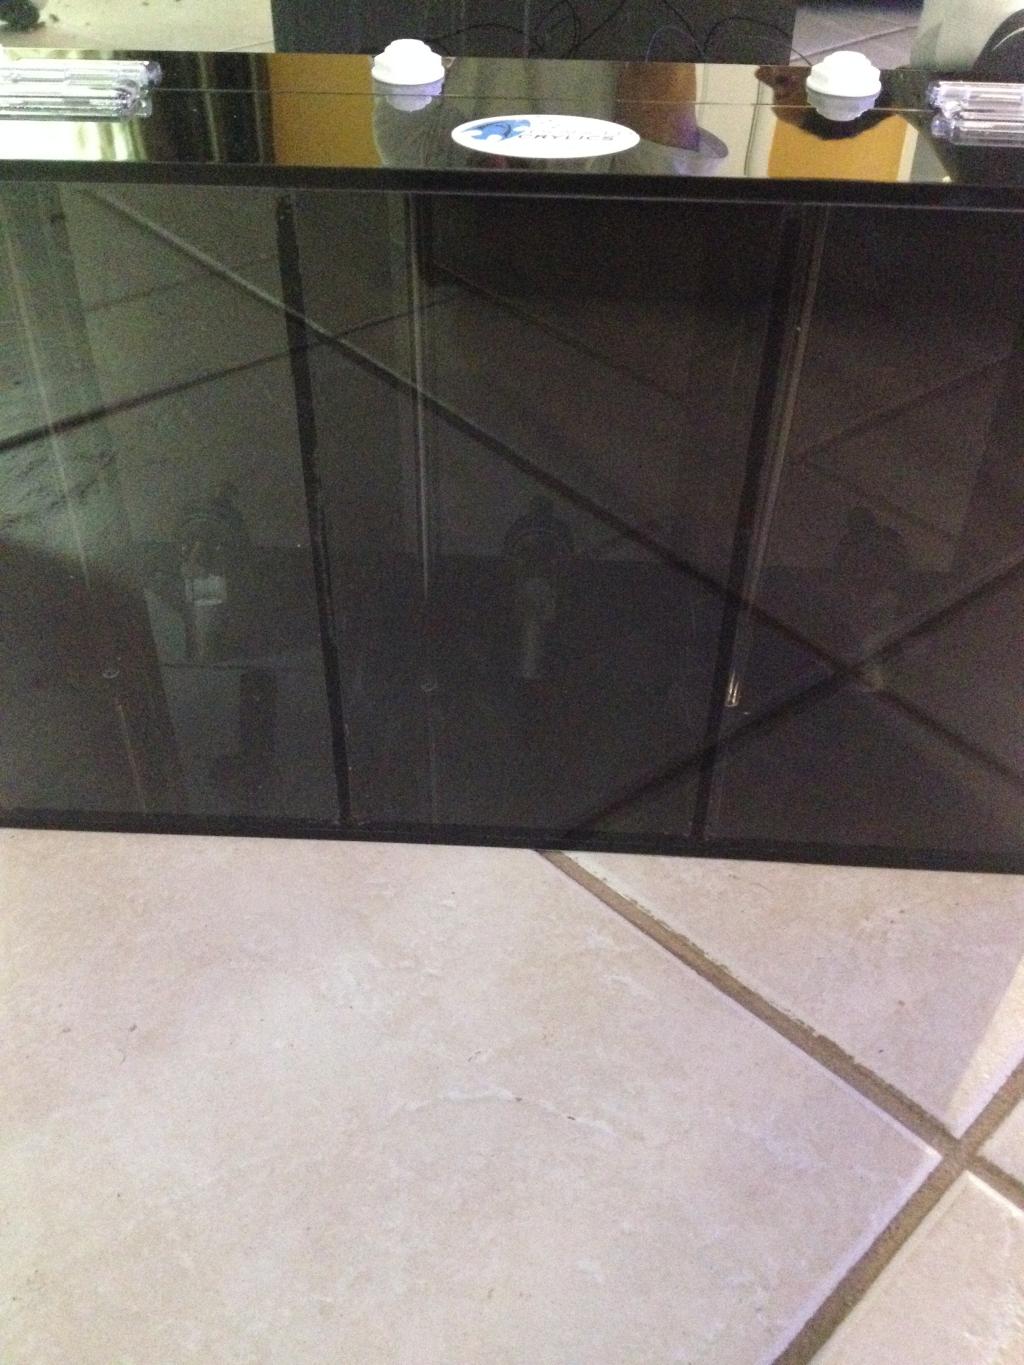
update: I received my dosing container from advanced acrylics. Needed custom dimensions so it can be concealed along with my ATO container on left side of the stand behind a door that I will be installing.
Some pics:
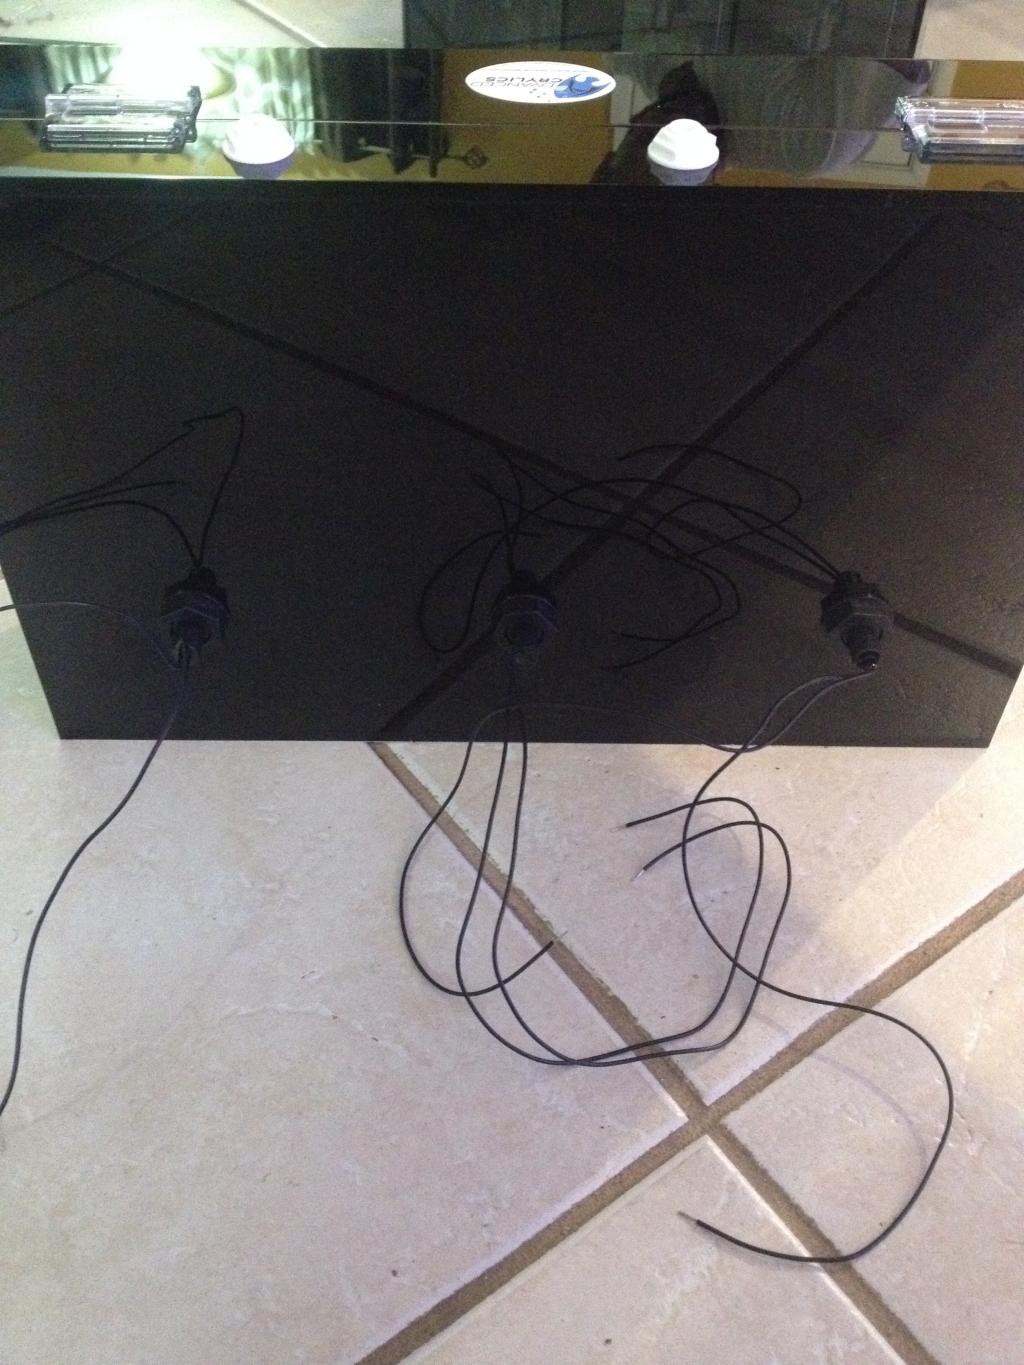
Ordered 3 horizontal float switches to install inside the dosing container. These switches will be wired to my reefkeeper and set to an alarm so I can know if I am running low on fluids without actually looking. (cheap great upgrade)
Drilled holes
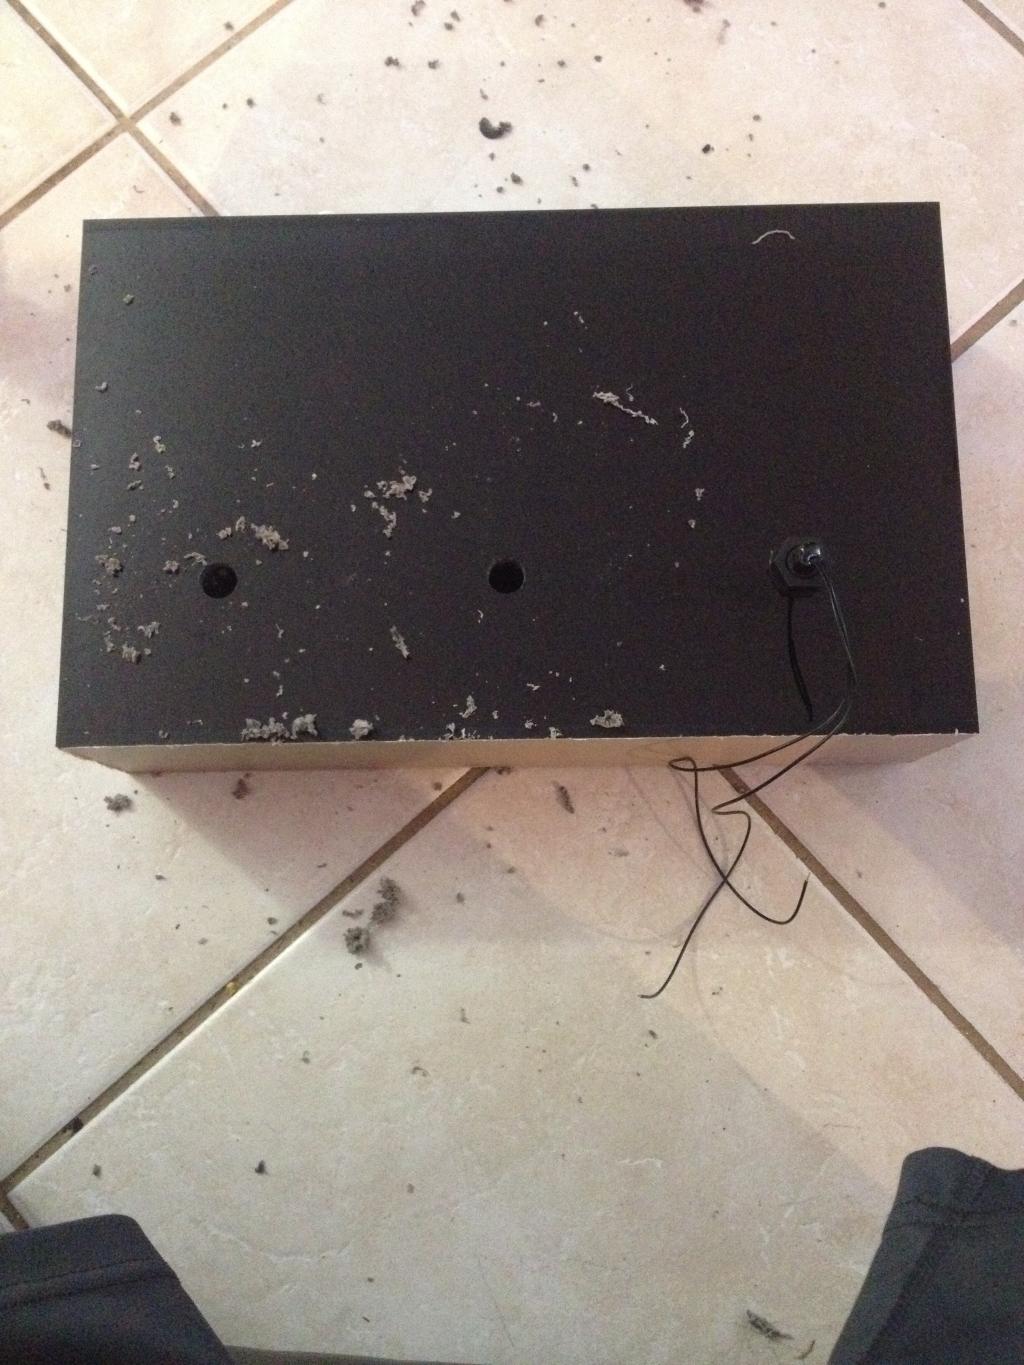
finished product
front panel is see through
Tomorrow I think I am going to install all the tubing for ATO and dosing.
There is one more thing I am contemplating, How the heck am I going to hang the darn radions. There isn't many choices out there for me that I personally like. So it looks like I am going to have to cough up the 200 bones for the ecotech mounts. I have the hanging kit now, but not a fan of the fact that I cant hide the power cord. (like the clean look)
After that I am pretty much done with all the hardware and will proceed to skinning the stand and putting doors. (Let see how that goes)
Followed by aquascape and sand. Dry rock I already have, dry sand I have to buy. I am thinking tropic eden reef flakes or carib sea fiji pink.
Followed by H2O!!
Some pics:


Ordered 3 horizontal float switches to install inside the dosing container. These switches will be wired to my reefkeeper and set to an alarm so I can know if I am running low on fluids without actually looking. (cheap great upgrade)

Drilled holes

finished product

front panel is see through

Tomorrow I think I am going to install all the tubing for ATO and dosing.
There is one more thing I am contemplating, How the heck am I going to hang the darn radions. There isn't many choices out there for me that I personally like. So it looks like I am going to have to cough up the 200 bones for the ecotech mounts. I have the hanging kit now, but not a fan of the fact that I cant hide the power cord. (like the clean look)
After that I am pretty much done with all the hardware and will proceed to skinning the stand and putting doors. (Let see how that goes)
Followed by aquascape and sand. Dry rock I already have, dry sand I have to buy. I am thinking tropic eden reef flakes or carib sea fiji pink.
Followed by H2O!!
Last edited:
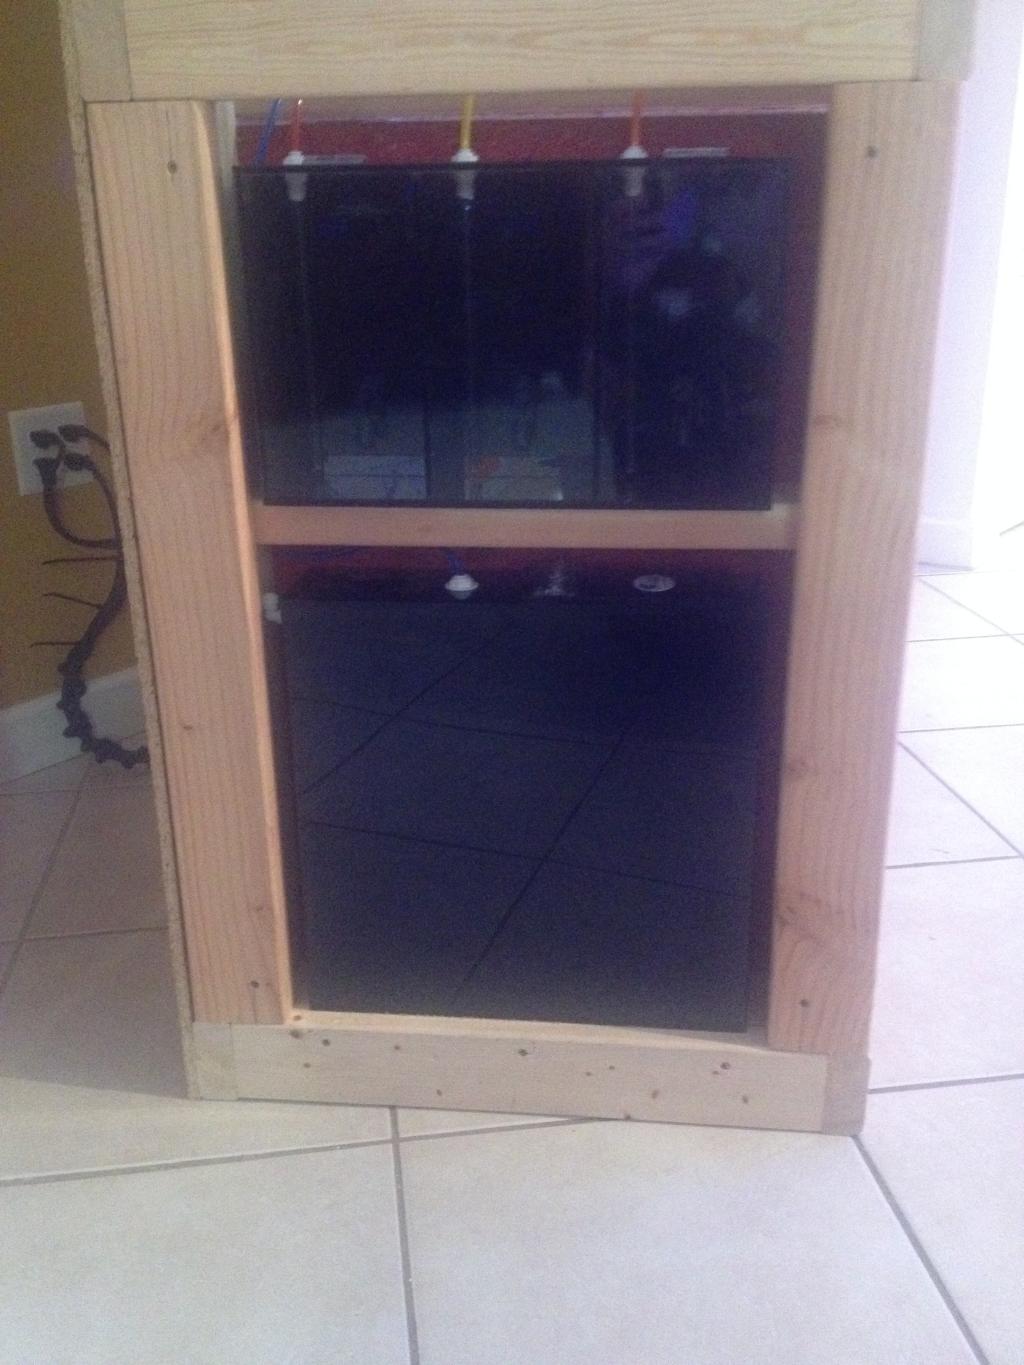
Update: So this it what the left side of the stand looks like. On the top is the dosing container and bottom is ATO reservoir. It will be covered with a door so I can access when needed.

Similar threads
- Replies
- 28
- Views
- 321
- Replies
- 8
- Views
- 93


