My dsa neo 105 build!

HtfdWhaler

Community Member
View Badges
Joined
Oct 30, 2014
Messages
74
Reaction score
0
Location
Hartford, CT
Rating - 0%
0   0   0
First of all thank you for taking a minute of your time to take a look at my build.

I am starting this thread to document my new build. I recently moved to Tampa from Hartford, CT for those that didn't know. I been in this hobby for about 2 years, I am far from an expert, advice and ideas are appreciated. I am excited to finally get this thing going. I will be taking my time with this, I am in no rush..

For a while I have been slowly acquiring equipment for my build.

Some equipment I am reusing from my previous tank, some is new.

List of equipment so far.

DSA NEO 105. I was going to go with a custom 90 gallon tank but after getting quotes, everyone was around $1500 or more for exactly what i wanted which is out of the budget at the moment. I decided to go with the NEO 105 ,48x24x21 non drilled because i do not like the reef ready tanks for $630. I get the 24 inch depth which i like although I miss out in the height, i get to drill it my self to my liking.

2Xs radion gen 2 pro with reeflink (plan on upgrading to gen3 pros in future)

2Xs MP40 WES

Sump is a trigger systems 30 elite

Skimmer is aqua maxx ConeS CO-1 rated for 175g (plan on upgrading for coneS CO-2 depending on how the CO-1 handles the bio load)

ReefKeeper Elite with 3xs PC4s, net mod (for wireless), sl2 (to monitor salinity, ph and temp)

Avast ATO hooked up to Reefkeeper

For dosing I will be trying the Digital Aquatics DP-1 pumps also hooked up to reefkeeper

Return pump i will be trying the Jaebo DC-600 (max is about 1500gph, don't know if this will be enough because it will also be used to run a manifold to my reactors, I might have to go with the DC-900)

2Xs BRS deluxe reactors for GFO and Carbon

100 lbs of reefrocks that i won at CMAC raffle

I think that's all i have so far.

I ordered my overflow. My next purchases will be Diamond drill bits, plumbing parts, wood to make stand, and black paint to paint back of tank.


Now for some pics


The wall where tank was going had no power outlets. I am far from an electrician but i managed to install and dual gang box with GFC. For my first time messing with electricity the hardest part was running the line to the attic and working in there, It had to be about 120 degrees in there.


My daughter when the sump came in, also plugged in the subwoofer to make sure the new outlet works. LOL


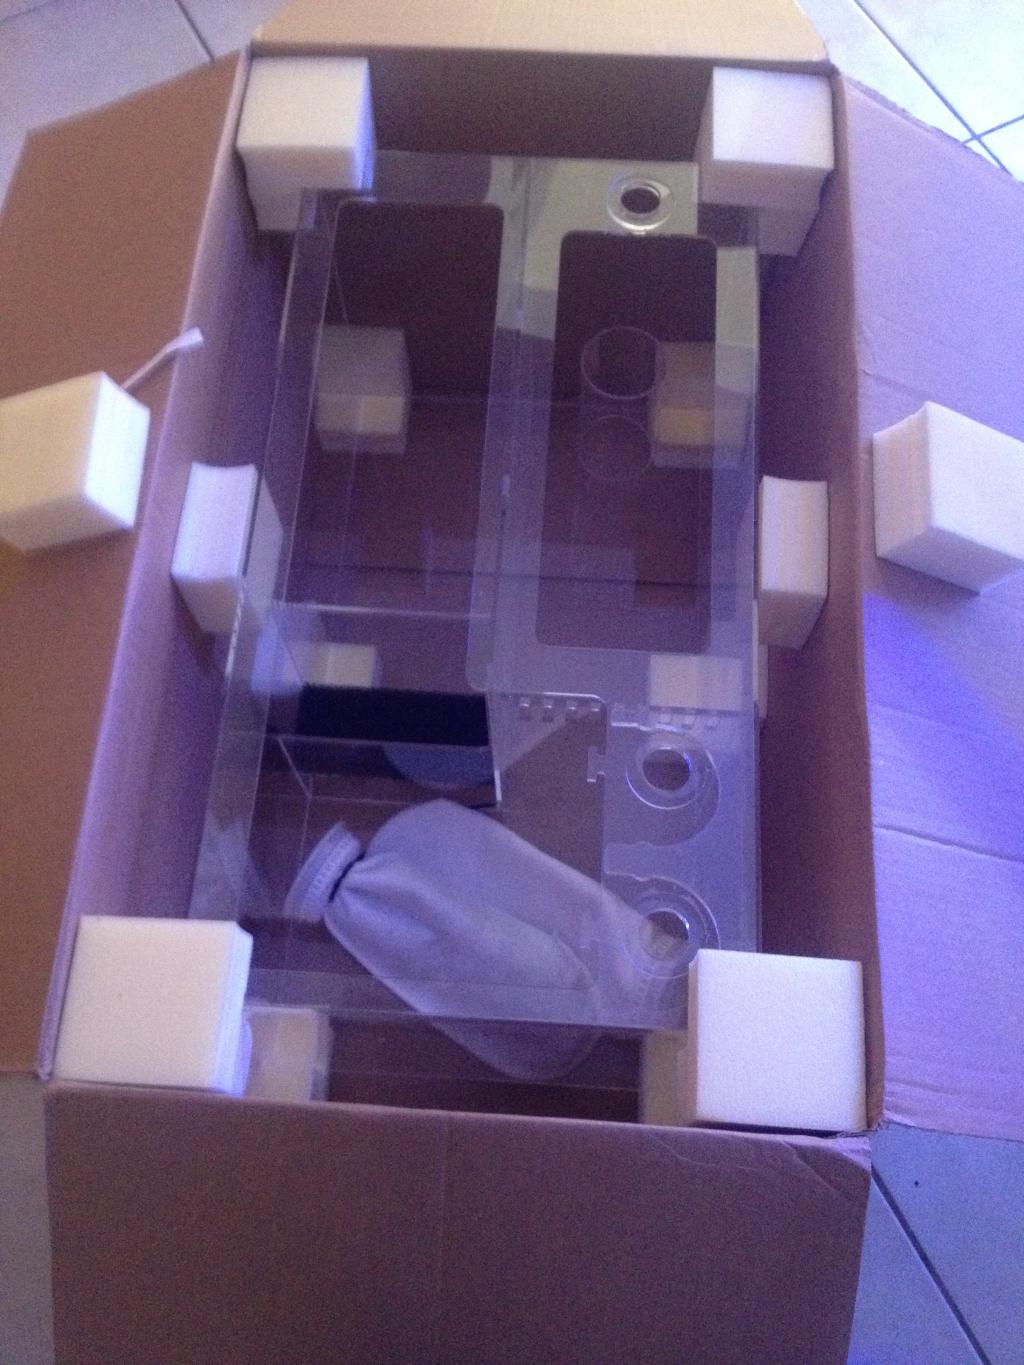
Pics of the sump packaging


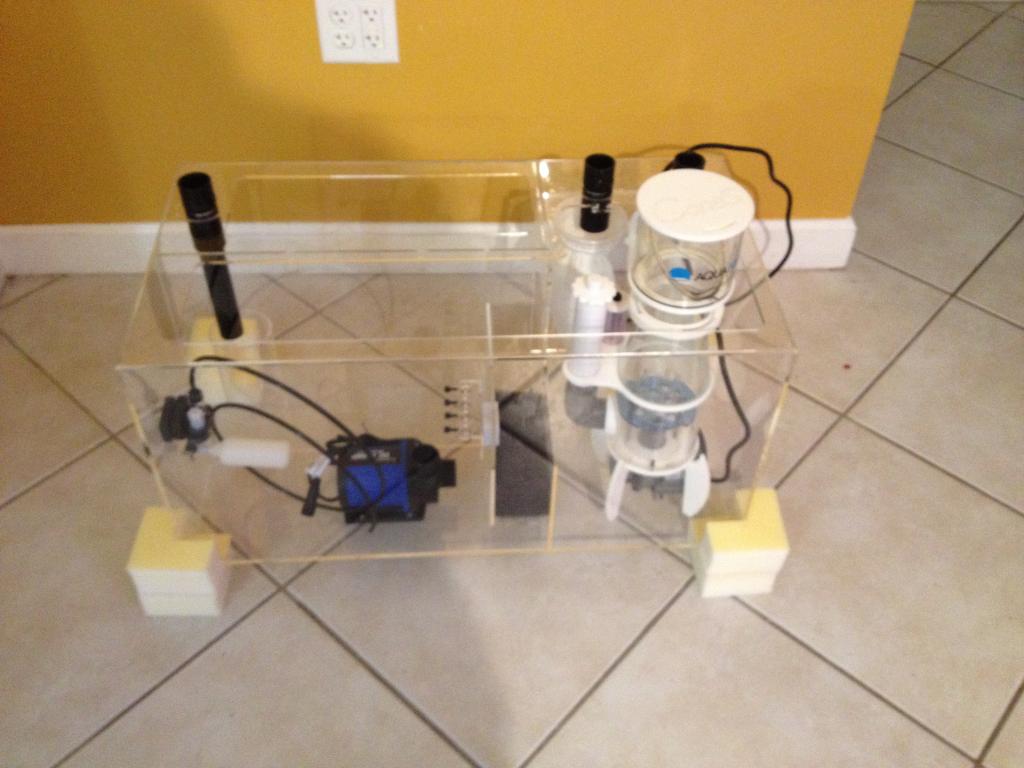
No stand, just dry fitting everything


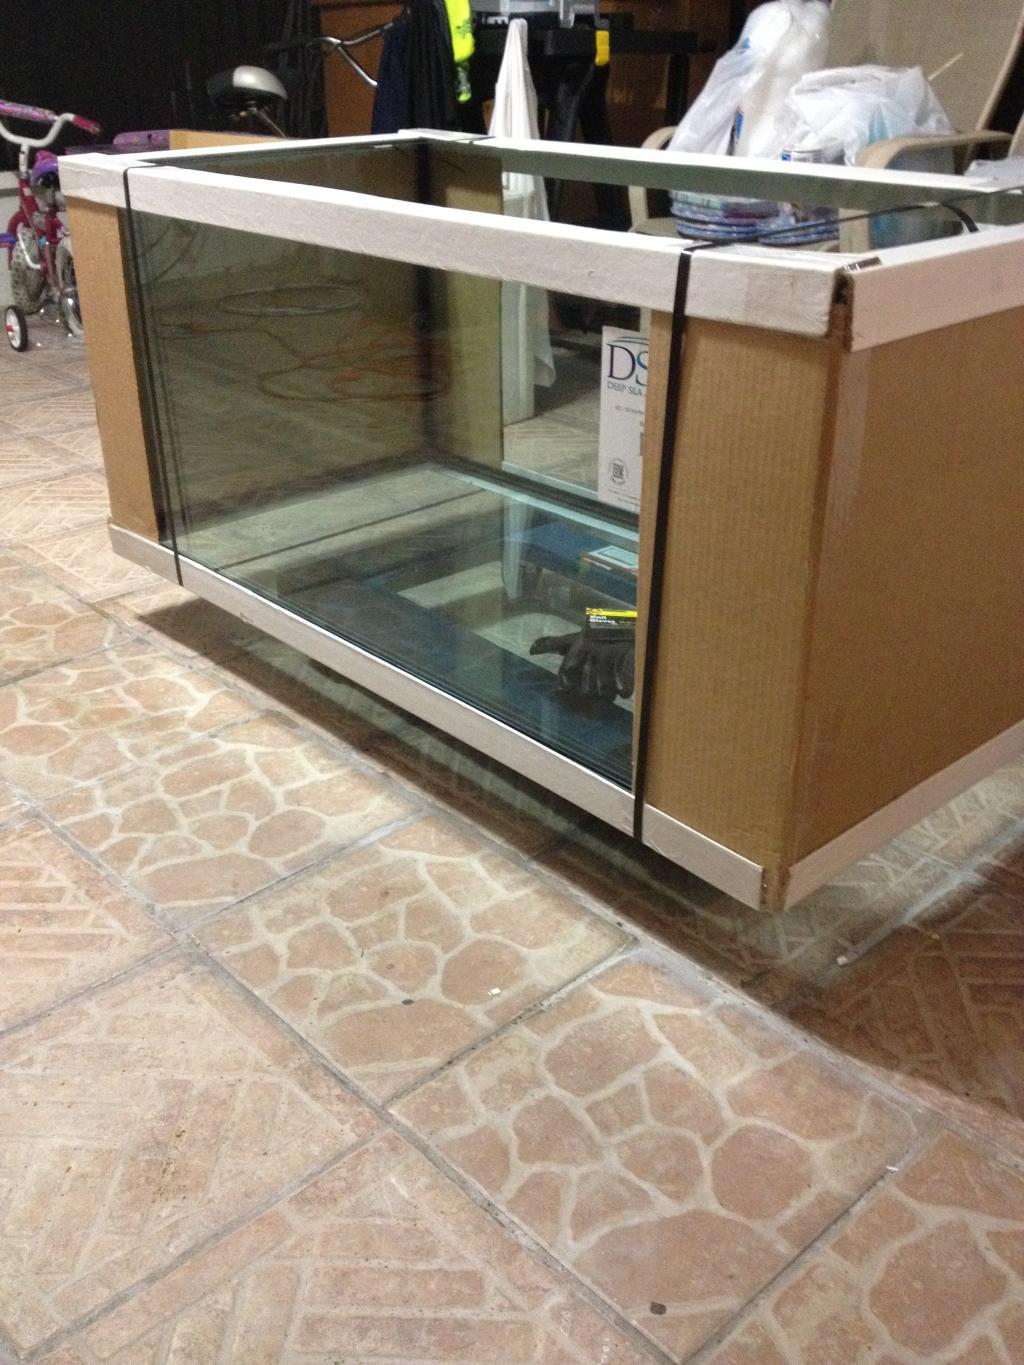
Went to pick up the tank today from LFS, beats paying shipping.


Received this in the mail today. I ordered just one pump for my ATO, If I like how it works I will be ordering 3 more for alk, calc, mag.


Now to build the stand, I am pretty much ok with the frame my issue is dressing it. The lady of the house is not ok with an ugly piece of furniture in the living room and I don't have any cabinetry experience. If anyone has a link to a thread or video on how to dress the stand with moldings and doors please pm me. Again the frame is easy, I have not been able to find anything on how to dress the stand step by step.

Thanks for your time.
 

Vaiodude

Well-Known Member
View Badges
Joined
Jan 19, 2014
Messages
945
Reaction score
634
Location
Connecticut
Rating - 0%
0   0   0
Wow you didn't waste anytime after the move getting the new tank project started. So far the build looks great. I look forward to seeing the progress!
 

fishroomlady

2500 Club Member
View Badges
Joined
Mar 3, 2013
Messages
2,628
Reaction score
106
Location
Milford, OH
Rating - 0%
0   0   0
everything is looking and sounding like it's going to be a really nice setup! kudos to you for the electrical work given your lack of experience - impressive!
 
OP
OP
H

HtfdWhaler

Community Member
View Badges
Joined
Oct 30, 2014
Messages
74
Reaction score
0
Location
Hartford, CT
Rating - 0%
0   0   0
Thanks everyone for the interest!

Some progress

I started working on the frame for the stand. I got most of it done, need to head back to HD to buy more 2x4s to finish reenforcing it, might buy some plywood for the back panel as well. As it stands now the dimensions are 42x24x38. I wanted a tall stand because I wanted the tank to be eye level from standing, because I don't sit to look at the stand and find myself bending to look at most peoples' fish tanks when i visit. Also I'd like to have as much room as possible in the stand.

With that said, after starring at it for about half an hour, I think it's TOO tall so I'm thinking of shaving 2 inches off the height tomorrow to make it an even 3 feet. So at the moment it's a total of a little more than 59 inches with tank and stand VS. 57 inches.

I know what you're thinking "2 inches is nothing, who cares?" that's what my Fiance said.

FYI the tank is rimless and I will not be doing a canopy. I Also had to keep in mind that I didn't want to make it so tall that I can't get the top down view.

Anyways some pics


OP
OP
H

HtfdWhaler

Community Member
View Badges
Joined
Oct 30, 2014
Messages
74
Reaction score
0
Location
Hartford, CT
Rating - 0%
0   0   0
While at walmart I picked two silicone pads for $4. I plan on putting them under return and skimmer to help dampen vibration and sound. Goal is to make the system 100% silent. Plus i like the red color.


This is what the frame looks like when finished


The tank has a bottom trim and raised bottom so I put foam where it will be resting to cover up any imperfections in the stand. The stand was level but just in case. Cut plywood for inside of stand. Pic for reference


So this is where I am at now. Placed the tank on the sand to get a visual, I am pretty pleased with the look. Cut a piece of foam out for under the skimmer because it is rimless acrylic. I bought the foam at home depot, 10x4 sheet for 8 bucks i think.


This weekend I hope to silicone seams inside the stand and paint it with some type of waterproof paint. Next week I plan on probably dressing the stand. Get the "control panel" done. Hopefully I get my overflow box in too so I can begin the plumbing.

Thanks,
Manny
 

Vaiodude

Well-Known Member
View Badges
Joined
Jan 19, 2014
Messages
945
Reaction score
634
Location
Connecticut
Rating - 0%
0   0   0
Looking good! That stand looks to be really well built and sturdy! What type of overflow are you going to be using?
 

banjowalker

Active Member
View Badges
Joined
Nov 10, 2014
Messages
143
Reaction score
0
Rating - 0%
0   0   0
I ordered this over flow, I love the slim design. Takes almost no space in the display.


I've never seen that slimline overflow. I'm loving the look. You did a really good job on your stand as well. My dad and I built a stand for a 55 gal when I was younger and wired a junction box integrated with the stand so it was completely clean looking. We also put wood paneling (like you would use on a wall in the older days lol) around the frame of the stand and made a very clean look. We also used very small moulding and went around all the seams. This finished the stand off prefectly. I can't wait to see your setup finished! I am a noob, but I have alot more experience building stuff outside of the fish hobby haha. Good look and I will be following along
 

c_healy

Valuable Member
View Badges
Joined
Apr 2, 2013
Messages
1,633
Reaction score
1,380
Location
Bluffton, SC
Rating - 0%
0   0   0
Build is looking great so far.

But before you go any farther I would consider removing the inside "skin" and only skinning the outside. This will leave you with a lot more room inside the stand for plumbing, reactor, dosers, or any other equipment you may want to add on.

With it being skinned on the inside like that you will be very limited on space.

Just something to consider, I also wouldn't use press board and go with oak, pine, or even sanded ply if you plan on painting it. It will give a much more clean, finished look.


Look forward to seeing this build progress. Where did you get the sump from btw?
 
OP
OP
H

HtfdWhaler

Community Member
View Badges
Joined
Oct 30, 2014
Messages
74
Reaction score
0
Location
Hartford, CT
Rating - 0%
0   0   0
I've never seen that slimline overflow. I'm loving the look. You did a really good job on your stand as well. My dad and I built a stand for a 55 gal when I was younger and wired a junction box integrated with the stand so it was completely clean looking. We also put wood paneling (like you would use on a wall in the older days lol) around the frame of the stand and made a very clean look. We also used very small moulding and went around all the seams. This finished the stand off prefectly. I can't wait to see your setup finished! I am a noob, but I have alot more experience building stuff outside of the fish hobby haha. Good look and I will be following along

The junction box integrated with the stand is a great idea! I'm a noob when it comes to carpentry. I can do the simple stuff. Youtube helps a lot. LOL.
 
OP
OP
H

HtfdWhaler

Community Member
View Badges
Joined
Oct 30, 2014
Messages
74
Reaction score
0
Location
Hartford, CT
Rating - 0%
0   0   0
You can get those overflows on eBay from Modularmarine. Looks like their pics.

Yes, I ordered on ebay from Modularmarine. I should have mentioned that in the post. LOL. It's been 4 days since I placed order and they have not sent me any tracking info. I might shoot them an email on Monday.
 
OP
OP
H

HtfdWhaler

Community Member
View Badges
Joined
Oct 30, 2014
Messages
74
Reaction score
0
Location
Hartford, CT
Rating - 0%
0   0   0
Build is looking great so far.

But before you go any farther I would consider removing the inside "skin" and only skinning the outside. This will leave you with a lot more room inside the stand for plumbing, reactor, dosers, or any other equipment you may want to add on.

With it being skinned on the inside like that you will be very limited on space.

Just something to consider, I also wouldn't use press board and go with oak, pine, or even sanded ply if you plan on painting it. It will give a much more clean, finished look.


Look forward to seeing this build progress. Where did you get the sump from btw?

Thanks for the Tip. I may have to consider this, it is a tight space in there. As far as the plywood, I went with the cheap stuff for inside and back panel, the exterior will be red oak or pine.

I bought the sump from Premium Aquatics during black Friday Sale. It was 15% off with free shipping. I can't remember exact price, I want to say $240 ish.
 
OP
OP
H

HtfdWhaler

Community Member
View Badges
Joined
Oct 30, 2014
Messages
74
Reaction score
0
Location
Hartford, CT
Rating - 0%
0   0   0
Not much progress. I'm still waiting on a few shipments to move forward. I did manage to paint the inside on the stand. I was going to go with white paint, but while at home depot I decided that I didn't want to spend almost 25 bucks on a quart of paint!! So I came across the clearance section and saw a Gallon of red gloss exterior waterproof paint for $4 bucks, so said the heck with it! LOL.. I bought a 12 pack with the money I saved to go with the paint session.

Not too fond of the red paint, ehh whatever, it works. Not gonna bother changing it. Maybe red will grow on me. Goal was to make the wood water and moisture resistant for spills and leaks.

Maybe I will paint the plumbing blue. I think it will make the red look better..


Also started playing around with what is going to be my "control panel", likely this will all change. Missing a few modules and MP40s. I just wanted to get a visual of my idea.This is to the right of the tank, and will also be covered with a door once skinned.


More than just hot air: Is there a Pufferfish in your aquarium?

  • There is currently a pufferfish in my aquarium.

    Votes: 32 17.6%
  • There is not currently a pufferfish in my aquarium, but I have kept one in the past.

    Votes: 31 17.0%
  • There has never been a pufferfish in my aquarium, but I plan to keep one in the future.

    Votes: 33 18.1%
  • I have no plans to keep a pufferfish in my aquarium.

    Votes: 78 42.9%
  • Other.

    Votes: 8 4.4%
Back
Top