Questions about my DIY acrylic frag tank

chopper320

Active Member
View Badges
Joined
Feb 27, 2014
Messages
161
Reaction score
299
Location
Indiana
Rating - 0%
0   0   0
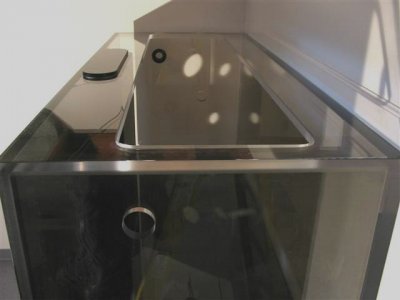
This is my first attempt at building anything like this. I'm working on building a small acrylic frag tank (20" x 16" x 6"). I had the 1/2" cast acrylic cut with a router at the acrylic shop and sanded the edges down with a sanding block.

Last night I welded the sides together with Weldon 3 using the pin method and ran into a couple of issues.

First on one of the seems I got a couple of bubbles that I couldn't get out and also each end of that same seem didn't seem to take the cement all the way. Where the rest of it turned clear as the cement went in there is about a 1/8" area that didn't turn clear no matter how much cement I was squirting in. Are these concerns and if so, is there a way to remedy them?

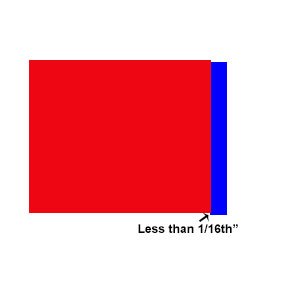
Also, on one of the sides, the edges were shifted very slightly so they are mis-aligned by less than 1/16". I'm guessing when I sit the sides on the bottom panel there will be the slightest gap between the wall and the bottom. I've attached an image to show what I mean. Is there a way to make this work?

Thanks!
 

Attachments

  • example.jpg
    example.jpg
    6.5 KB · Views: 753
OP
OP
chopper320

chopper320

Active Member
View Badges
Joined
Feb 27, 2014
Messages
161
Reaction score
299
Location
Indiana
Rating - 0%
0   0   0
I don't know how to edit my post but somehow I posted this pics twice. The first one is rotated wrong. That is the sides sitting on the base so you can see the gap between the pieces. I would guess it's about 1/32". The 3rd picture is just showing a closeup of where the panels connect so you can get an idea of what I'm talking about.

The 2nd picture is showing the edge of the seem that wouldn't seem to take the cement right as well as the bubbles that formed.
 

KorD

Valuable Member
View Badges
Joined
Feb 11, 2014
Messages
1,365
Reaction score
932
Location
Northern Texas
Rating - 0%
0   0   0
a little miss aligned is not the biggest problem.. you will not have a lot of water pressure pushing to worry as if it was a 50gal tank.

The main problem is going to be the bubbles... it would give you a nice leak once you go and water test it.. I had this problem on my first tank I built. I then threw it out and started over.. I hope someone chimes in with a better way to fix the problem, but I found out you really cant start over once it is welded together.
 

Skydvr

Well-Known Member
View Badges
Joined
Apr 28, 2014
Messages
575
Reaction score
279
Rating - 0%
0   0   0
That's why people recommend getting some scraps to practice with. Make several practice runs to get things down. (I know, does nothing to help you now)

I know some people have used thicker weld-on to run a bead similar to what you would do with silicone on a glass tank. Not sure if this would work for you in this case, hopefully someone with more experience can weigh in on that.

If you know someone with a router table setup, they may be able to trim that down for you. It is hard to tell how much that offset really is. closer to 1/16 is probably too much, but 1/32 or 1/64 might not need any rework. How thick are those panels?

EDIT: Never mind, just scrolled back up and saw that it is 1/2". It looks like the inner edge of the offset is closer to 1/32 and the outer edge is closer to 1/64 (using a ruler up against the computer screen and scaling things down)
 
Last edited:
OP
OP
chopper320

chopper320

Active Member
View Badges
Joined
Feb 27, 2014
Messages
161
Reaction score
299
Location
Indiana
Rating - 0%
0   0   0
Yeah I watched a million videos and tried it on some really thin acrylic I had laying around and it seemed easy enough. I'm still not even sure what happened with the bubbles. The Weldon seemed to go in really well and then when I pulled the pins out and it dropped down, as it set up those tiny bubbles formed. On the end where you see the big spot it seemed like the Weldon would not fill in that spot. I kept squirting it and it wouldnt get better and I decided to pull the pins out before it got too late.
 

TJ's Reef

Valuable Member
View Badges
Joined
Oct 26, 2013
Messages
2,454
Reaction score
289
Location
Everett, WA
Rating - 0%
0   0   0
Not to bad of start in fabrication so you should feel pretty good about it overall. The corner is a typical problem with having the piece shift at the end of the cut on a table saw or possibly even the router tilting a fraction and can be filled with the #3 or 4 or 16 even. After finishing all welds and while tank is upright alternately tilt to the front, right, back and left and run a line/bead of solvent into corner seams to fill. This should take care of all the inside areas of concern and may even fill in some of the closer air pockets/bubbles. On the corner you could also lay tank on side/end taping off area a bit and fill with #16 solvent as well. Once filled with pretty colorful Coral Frags the only one to notice these small imperfections will be you...lol


Cheers, Todd
 

KorD

Valuable Member
View Badges
Joined
Feb 11, 2014
Messages
1,365
Reaction score
932
Location
Northern Texas
Rating - 0%
0   0   0
The corner vice is a nice tool.. I used it about three weeks ago when I built my nano tank.
I picked up two of them from home depot for something like $15 total.
 
OP
OP
chopper320

chopper320

Active Member
View Badges
Joined
Feb 27, 2014
Messages
161
Reaction score
299
Location
Indiana
Rating - 0%
0   0   0
Not to bad of start in fabrication so you should feel pretty good about it overall. The corner is a typical problem with having the piece shift at the end of the cut on a table saw or possibly even the router tilting a fraction and can be filled with the #3 or 4 or 16 even. After finishing all welds and while tank is upright alternately tilt to the front, right, back and left and run a line/bead of solvent into corner seams to fill. This should take care of all the inside areas of concern and may even fill in some of the closer air pockets/bubbles. On the corner you could also lay tank on side/end taping off area a bit and fill with #16 solvent as well. Once filled with pretty colorful Coral Frags the only one to notice these small imperfections will be you...lol


Cheers, Todd

Which solvent would you use to run down the seems after it is all welded together? What should I use for the edge with the 1/32" gap?

You're right. I'm not as worried about the cosmetic issues for my first build. I just want to get it to the point that it will hold water. LOL
 

TJ's Reef

Valuable Member
View Badges
Joined
Oct 26, 2013
Messages
2,454
Reaction score
289
Location
Everett, WA
Rating - 0%
0   0   0
With the tank tilted to keep the solvent where you want it #3 or #4 will work fine in penetrating any voids in the inside welds. Just leave it on angle long enough to set up a bit before tilting another direction. I'd carefully apply #16 to the larger gap and is capable of easily filling 1/8" gaps. For the #16 an easy way to apply for your particular need is to use a 5-10 ml syringe (like those in Test kits), draw back 2-3 ml and place tip to inject into gap for a nice clean job. This a one time disposable tool though, though pretty cheap.

Cheers, Todd
 

cpt

Active Member
View Badges
Joined
Apr 8, 2013
Messages
182
Reaction score
0
Location
Grand Junction CO
Rating - 0%
0   0   0
the weld on #3 #4 are a solvent not a cement and once the bond has set there is no refilling the gaps with those products. I am wondering how long you let the solvent set in the bond gap before releasing for compression, that is the key, once the 2 acrylic faces start to melt/gel slightly then you release the pins to create the joint compression, if the joint is unsatisfactory pull apart and resand and start over. don't overshoot with solvent, if the solvent drips off essentially the drip will vent/pull extra solvent with it until the liquid pressure is equalized partially draining your bond area, apply just enough to fill the joint void, not flood it. flooding the area will scorch/melt the polished face leaving an undesirable finish. unfortunately you maybe past this point. also if you end up scrapping this build and need to start over, I'd suggest having the acrylics company saw cut the acrylic, it will be cheaper and your sanding the edges anyway. good luck

I would also like to add you'd possibly need a braced top as a 50 gal is roughly 400lb of water, and although 1/2 seems sturdy once its filled you'll see significant expansion on the walls which equals large amounts of stress throughout the tank eventually leading to joint separation
 

Attachments

  • 111_1119.jpg
    111_1119.jpg
    34.2 KB · Views: 1,008
Last edited:
OP
OP
chopper320

chopper320

Active Member
View Badges
Joined
Feb 27, 2014
Messages
161
Reaction score
299
Location
Indiana
Rating - 0%
0   0   0
This isn't 50 gallons. It should be less than 10gallons total.

The acrylic shop didn't charge for the cuts. I'm not even positive what they used to cut it but they had it pretty smooth.

I may have jumped the gun pulling the pins but I was using weld-on 3 and I was worried about not going fast enough.

It seems like I'm getting mixed opinions on whether this is usable. Not sure which direction to go with this at this point.
 

cpt

Active Member
View Badges
Joined
Apr 8, 2013
Messages
182
Reaction score
0
Location
Grand Junction CO
Rating - 0%
0   0   0
ha my bad, yup I definitely just scanned your initial dims, and saw someone throw out 50 gal somewhere, so that being said you could treat your joints as if you were siliconeing a corner, Weldon #16 and #53 would work great for that application, probably tape the edges and wear gloves, my bad again i'll be more diligent when reviewing posts, I was defiantly treating it as a 50+ system. your lil tank'll make it
 
OP
OP
chopper320

chopper320

Active Member
View Badges
Joined
Feb 27, 2014
Messages
161
Reaction score
299
Location
Indiana
Rating - 0%
0   0   0
ha my bad, yup I definitely just scanned your initial dims, and saw someone throw out 50 gal somewhere, so that being said you could treat your joints as if you were siliconeing a corner, Weldon #16 and #53 would work great for that application, probably tape the edges and wear gloves, my bad again i'll be more diligent when reviewing posts, I was defiantly treating it as a 50+ system. your lil tank'll make it

No problem! I appreciate you helping me out! One more question. On the edge with the 32nd" gap should I even try to use the weldon 4 first or will it just run right thru that gap? If it is sealed with just the Weldon 16 will that be good enough?

Thanks for helping a newbie with acrylic out!
 

TJ's Reef

Valuable Member
View Badges
Joined
Oct 26, 2013
Messages
2,454
Reaction score
289
Location
Everett, WA
Rating - 0%
0   0   0
The #16 will fill the gap nicely and be just fine structurally on that size of tank. By titling tank like I mentioned above will keep the #16 in the corner/seam and away from running across finished face and crazing it.


Cheers, Todd

P.S. Forgot to mention that I was born a Hoosier..... lol Columbus IN, Vernon County
 
Last edited:

Algae invading algae: Have you had unwanted algae in your good macroalgae?

  • I regularly have unwanted algae in my macroalgae.

    Votes: 49 35.3%
  • I occasionally have unwanted algae in my macroalgae.

    Votes: 29 20.9%
  • I rarely have unwanted algae in my macroalgae.

    Votes: 11 7.9%
  • I never have unwanted algae in my macroalgae.

    Votes: 10 7.2%
  • I don’t have macroalgae.

    Votes: 36 25.9%
  • Other.

    Votes: 4 2.9%
Back
Top