redfishbluefish
Stay Positive, Stay Productive
View Badges
Staff member
Super Moderator
Reef Squad
Partner Member 2024
Excellence Award
Article Contributor
NJRC Member
Hospitality Award
My Tank Thread
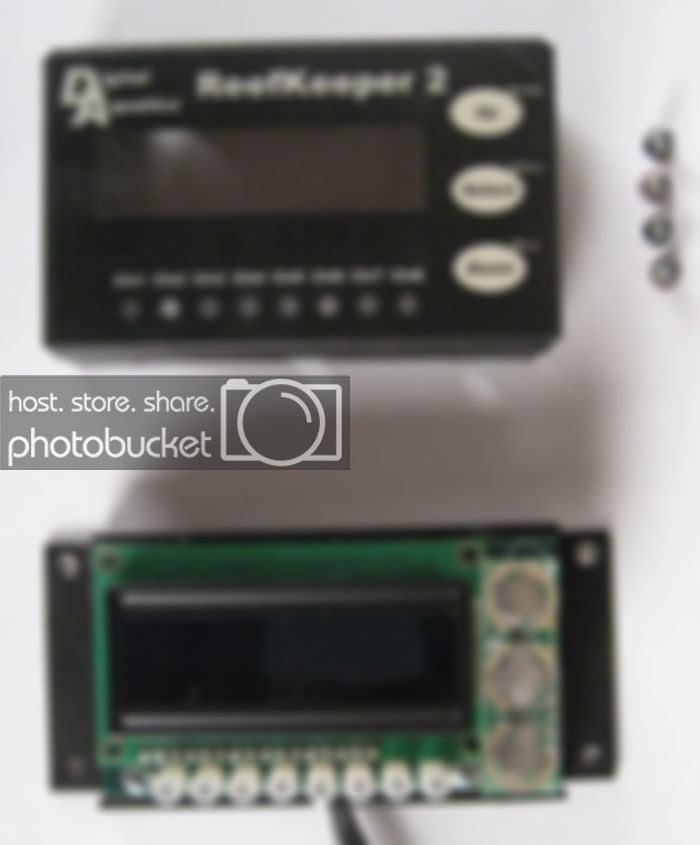
I'm a ReefKeeper II fanatic....I have four of them. They are no longer being made/sold but I like the simplicity of the ReefKeeper II.....no smart phone connectivity. You can be an idiot and still be able to program them....unlike Apex (and others) where you need to know some fancy-pants coding. Did I mention I'm old (and an idiot), and can't be bothered with programing my aquarium control.
I've had RKII's since entering the saltwater hobby in 2007. One of the first units I purchased eventually had issues with the display getting very dim. You could still see it, but only when it was in total darkness. The controls to increase or decrease the display brightness didn't do anything. So I returned this unit to Digital Aquatics for a new display.....for $50 plus shipping. They told me at the time that they literally only had a few displays left, and once gone, they would no long offer support to RKII's. Today, they no longer offer any support for RKII owners.
Fortunate for me (and others) someone came up with a DIY fix for a dimmed display on the RKII. Here are the two links I used to fix my most recent problem with a dimmed display. Note that the first link to RC with Rockstar was the most beneficial link with the intial info to do this fix. The second link offered info about disabling different pins to allow adjusting the intensity of the display. I still haven't decided which one I'm going to be using.....disabling pin 3 like Rockstar or pins 2 and 11 like Chrishew. Here are the two important links to this fix.
ReefCentral Rockstar Link (Primary Link with pertinent information)
The Reefers Lounge Chrishew09 Link (Secondary link with info about alternate pin information)
To disassemble and unsolder the unit, I used the first link from Rockstar. Here are my experiences on the disassembly / unsoldering of the unit.
First need to unscrew the four phillips head screws to open up the head unit.
Once you've pulled off the cover you'll see the electonics. This is held to the back plate of the unit by the two silver colored screws to the left and right of the LED array. Simply unscrew these two phillips screws to expose the electonics in all its glory.

I ordered the new display unit from New Haven Display for $11.50....with shipping it was around $18. I ordered THIS unit....NHD-0216HZ-FL-YBW-C. Note that this new display is NOT the typical blue display, but is green. The blue display is not available...the original OEM supplier refused to sell the blue display to consumers. But I'm sort of excited to see this new color for the display....it's different.
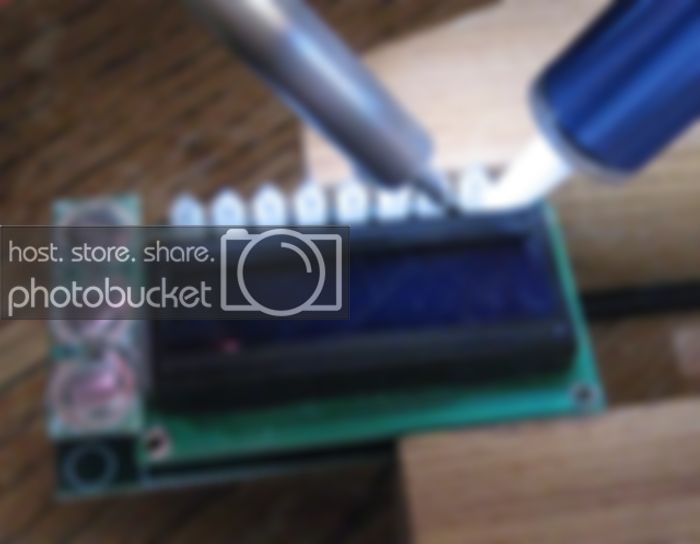
What needs to be done is to unsolder the old display unit (16 pins) and resolder the new unit in. To do this the best way is to use a solder iron with a thin pin-point tip and a solder sucker. This solder sucker stuff was new for me and I've found that the best way was to first melt the old solder and then quickly put the entire sucker over the melted solder and "suck" it up. You can actually see the pin open up and free of solder. I also clamped the board in a wood clap to hold the whole thing steady while trying to clean up the old solder.
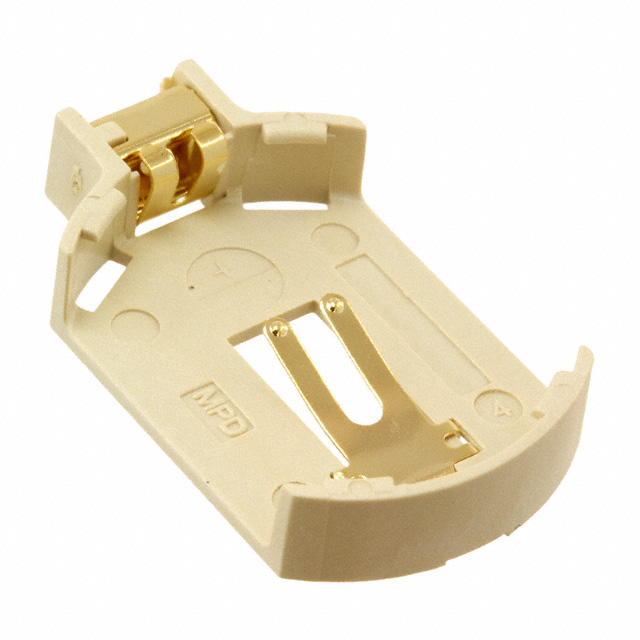
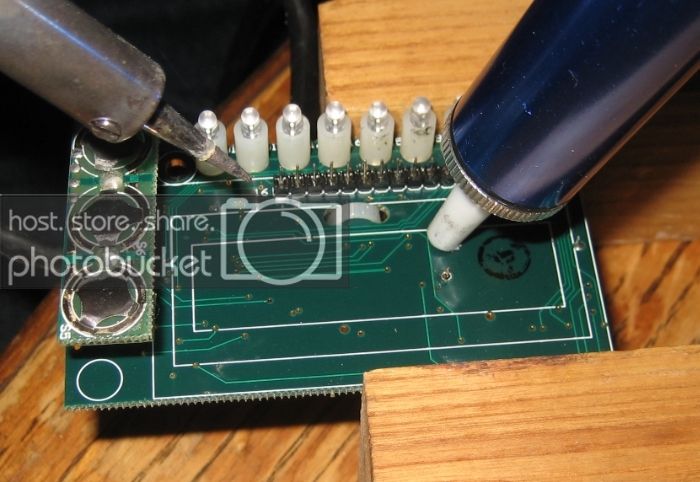
This took about 20 - 25 minutes to free up the old display and pull it off. Since I had this thing opened up, I wanted to do one more thing.....replace the welded back-up battery with a simply battery holder. For the life of me I can't understand why DA welded in the back-up battery. It's a standard CR 2032 button battery...but it is literally welded in place. Just to clarify, this thing is welded...not soldered. Soldering would not be good for the battery....or you...it could explode. Welding requires a pinpoint spot welder....that no one has. So what I wanted to do is to simply put in a standard holder to allow simple changes of the battery....like it should have been from day one! Here you can see the display removed, exposing the prongs where the solder sucked is being used to remove the welded battery from the board.
But here is where I'm now stuck. I was hoping I could have shown the entire fix, but the battery holder is holding me up. The holder can not be thicker than a quarter inch...these are termed low profile battery holders, and are available....but more difficult to find. I made my trip to Radio Shack with no success. My on-line search found THIS holder....but more difficult to find a supplier. So this is were I'm stuck right now. Will have to continue tomorrow to find a low profile battery holder.
Once I find the battery holder, I'll continue with my experiences and show the fixed ReefKeeper II.
I've had RKII's since entering the saltwater hobby in 2007. One of the first units I purchased eventually had issues with the display getting very dim. You could still see it, but only when it was in total darkness. The controls to increase or decrease the display brightness didn't do anything. So I returned this unit to Digital Aquatics for a new display.....for $50 plus shipping. They told me at the time that they literally only had a few displays left, and once gone, they would no long offer support to RKII's. Today, they no longer offer any support for RKII owners.
Fortunate for me (and others) someone came up with a DIY fix for a dimmed display on the RKII. Here are the two links I used to fix my most recent problem with a dimmed display. Note that the first link to RC with Rockstar was the most beneficial link with the intial info to do this fix. The second link offered info about disabling different pins to allow adjusting the intensity of the display. I still haven't decided which one I'm going to be using.....disabling pin 3 like Rockstar or pins 2 and 11 like Chrishew. Here are the two important links to this fix.
ReefCentral Rockstar Link (Primary Link with pertinent information)
The Reefers Lounge Chrishew09 Link (Secondary link with info about alternate pin information)
To disassemble and unsolder the unit, I used the first link from Rockstar. Here are my experiences on the disassembly / unsoldering of the unit.
First need to unscrew the four phillips head screws to open up the head unit.

Once you've pulled off the cover you'll see the electonics. This is held to the back plate of the unit by the two silver colored screws to the left and right of the LED array. Simply unscrew these two phillips screws to expose the electonics in all its glory.

I ordered the new display unit from New Haven Display for $11.50....with shipping it was around $18. I ordered THIS unit....NHD-0216HZ-FL-YBW-C. Note that this new display is NOT the typical blue display, but is green. The blue display is not available...the original OEM supplier refused to sell the blue display to consumers. But I'm sort of excited to see this new color for the display....it's different.
What needs to be done is to unsolder the old display unit (16 pins) and resolder the new unit in. To do this the best way is to use a solder iron with a thin pin-point tip and a solder sucker. This solder sucker stuff was new for me and I've found that the best way was to first melt the old solder and then quickly put the entire sucker over the melted solder and "suck" it up. You can actually see the pin open up and free of solder. I also clamped the board in a wood clap to hold the whole thing steady while trying to clean up the old solder.

This took about 20 - 25 minutes to free up the old display and pull it off. Since I had this thing opened up, I wanted to do one more thing.....replace the welded back-up battery with a simply battery holder. For the life of me I can't understand why DA welded in the back-up battery. It's a standard CR 2032 button battery...but it is literally welded in place. Just to clarify, this thing is welded...not soldered. Soldering would not be good for the battery....or you...it could explode. Welding requires a pinpoint spot welder....that no one has. So what I wanted to do is to simply put in a standard holder to allow simple changes of the battery....like it should have been from day one! Here you can see the display removed, exposing the prongs where the solder sucked is being used to remove the welded battery from the board.

But here is where I'm now stuck. I was hoping I could have shown the entire fix, but the battery holder is holding me up. The holder can not be thicker than a quarter inch...these are termed low profile battery holders, and are available....but more difficult to find. I made my trip to Radio Shack with no success. My on-line search found THIS holder....but more difficult to find a supplier. So this is were I'm stuck right now. Will have to continue tomorrow to find a low profile battery holder.
Once I find the battery holder, I'll continue with my experiences and show the fixed ReefKeeper II.
Last edited: