

A Step-by-Step Guide to Culturing Phytoplankton
Background
It all started when I first saw a mandarin dragonet (Synchiropus splendidus) and decided that I wanted a pair for my 65 gallon tank. My profession is an engineer, so I tend to do a lot of research before jumping into something new. The research quickly led me to realize that my tank wasn’t large enough to support two mandarins on its own and that I would have to supplement the available copepods in the aquarium somehow. After a search at the local LFS, I recognized that I couldn’t afford to buy bottles of copepods every week and, to make a mandarin cost efficient, I would have to culture copepods on my own. I found some good news during the initial research- copepods are very hardy and live on detritus and other plankton found in the water column and settled on the substrate. Further research led to some bad news, it’s very hard to culture copepods on just detritus as the ammonia and nitrates build up quickly in a small culturing vessel, which leads to the culture’s crash. In addition, the most nutritious copepods are cultured on phytoplankton.
Introduction to phytoplankton
So, what is phytoplankton? Phytoplankton is a single-cell creature that makes up the base of the food chain in the ocean. It is responsible for half of the photosynthesis that takes place in the entire world! The next step up in the food chain is zooplankton, which include rotifers, copepods, Mysis shrimp, etc. These tiny organisms eat phytoplankton and are in turn eaten by corals, anemones, sea horses, fish and even the blue whale.
There are many types of phytoplankton. The most commonly cultured one in the marine aquarium hobby is Nannochloropsis oculata, usually referred to as Nanno. Nanno is very nutritious. However, it also has a very hard outer membrane and is hard for some zooplankton to digest. Rotifers have no problem with it, but copepods do. Another common type of phytoplankton used is Isochrysus galbana (Tahitian Strain), also referred to as T. Iso. T. Iso is another nutritious form of phytoplankton and balances well with Nanno. I also culture a diatom, Thalassiosira weissflogii (TW), since diatoms make up a large portion of a copepods diet in nature. Others use Tetraselmus (Tet) or Pavlova, which are supposed to be good and somewhat easy to culture, but I have never tried them myself. Nannochloris is another type of phytoplankton that is sometimes measured. I would recommend not using it for culturing zooplankton since it is not as nutritious as the other ones mentioned.
As I mentioned before, phytoplankton can be a very nutritious food. Specifically, it is the high amounts of EPA and DHA that make them so beneficial. Nanno and T. Iso are commonly cultured and fed to zooplankton because Nanno is high in EPA (30%) but low in DHA (0%) and T. Iso is low in EPA (3%) and relatively high in DHA (10%) and they are both fairly easy to culture. However, for the phytoplankton to be nutritious, it needs to grow on a nutritionally based diet.
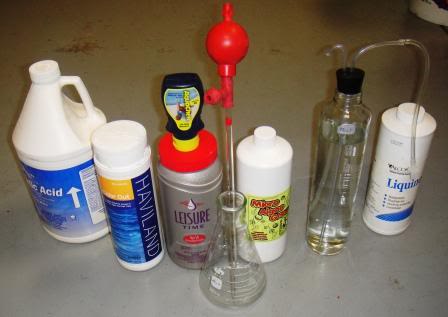
I’ve seen several well written guides that talk about growing phytoplankton with common household fertilizer. While easy and convenient, after talks with several phycologists, they all said that it results in phytoplankton that is green (or brown), but nutritionally deficient. All of them recommended using fertilizer based on Guillard’s F/2. The one I use is Micro Plankton Grow from Florida Aqua Farms.
All phytoplankton grows in a certain pattern. The first part of the cycle is the initial cycle where the cells are just starting to divide. This is a relatively slow period of growth and lasts around a day (depending on the initial culture concentration). Next begins the exponential growth period. This is where the phytoplankton has the most nutrition and usually lasts between 6 and 10 days. After the growth curve is a period of no growth where the phytoplankton is basically using up its stored energy and nutrients because it has already consumed all the nutrients from the water. This period varies in time but can last several days for most phyto, but is relatively quick for T. Iso.
This growth curve is why it is important to harvest your culture during a set period of time when it is most nutritional and before it crashes. Normally, this will be between 7 and 10 days from the time the culture is started. It is particularly important with T. Iso because of the short period of time from its exponential growth period until it crashes.
Background
It all started when I first saw a mandarin dragonet (Synchiropus splendidus) and decided that I wanted a pair for my 65 gallon tank. My profession is an engineer, so I tend to do a lot of research before jumping into something new. The research quickly led me to realize that my tank wasn’t large enough to support two mandarins on its own and that I would have to supplement the available copepods in the aquarium somehow. After a search at the local LFS, I recognized that I couldn’t afford to buy bottles of copepods every week and, to make a mandarin cost efficient, I would have to culture copepods on my own. I found some good news during the initial research- copepods are very hardy and live on detritus and other plankton found in the water column and settled on the substrate. Further research led to some bad news, it’s very hard to culture copepods on just detritus as the ammonia and nitrates build up quickly in a small culturing vessel, which leads to the culture’s crash. In addition, the most nutritious copepods are cultured on phytoplankton.
Introduction to phytoplankton
So, what is phytoplankton? Phytoplankton is a single-cell creature that makes up the base of the food chain in the ocean. It is responsible for half of the photosynthesis that takes place in the entire world! The next step up in the food chain is zooplankton, which include rotifers, copepods, Mysis shrimp, etc. These tiny organisms eat phytoplankton and are in turn eaten by corals, anemones, sea horses, fish and even the blue whale.
There are many types of phytoplankton. The most commonly cultured one in the marine aquarium hobby is Nannochloropsis oculata, usually referred to as Nanno. Nanno is very nutritious. However, it also has a very hard outer membrane and is hard for some zooplankton to digest. Rotifers have no problem with it, but copepods do. Another common type of phytoplankton used is Isochrysus galbana (Tahitian Strain), also referred to as T. Iso. T. Iso is another nutritious form of phytoplankton and balances well with Nanno. I also culture a diatom, Thalassiosira weissflogii (TW), since diatoms make up a large portion of a copepods diet in nature. Others use Tetraselmus (Tet) or Pavlova, which are supposed to be good and somewhat easy to culture, but I have never tried them myself. Nannochloris is another type of phytoplankton that is sometimes measured. I would recommend not using it for culturing zooplankton since it is not as nutritious as the other ones mentioned.
As I mentioned before, phytoplankton can be a very nutritious food. Specifically, it is the high amounts of EPA and DHA that make them so beneficial. Nanno and T. Iso are commonly cultured and fed to zooplankton because Nanno is high in EPA (30%) but low in DHA (0%) and T. Iso is low in EPA (3%) and relatively high in DHA (10%) and they are both fairly easy to culture. However, for the phytoplankton to be nutritious, it needs to grow on a nutritionally based diet.
I’ve seen several well written guides that talk about growing phytoplankton with common household fertilizer. While easy and convenient, after talks with several phycologists, they all said that it results in phytoplankton that is green (or brown), but nutritionally deficient. All of them recommended using fertilizer based on Guillard’s F/2. The one I use is Micro Plankton Grow from Florida Aqua Farms.
All phytoplankton grows in a certain pattern. The first part of the cycle is the initial cycle where the cells are just starting to divide. This is a relatively slow period of growth and lasts around a day (depending on the initial culture concentration). Next begins the exponential growth period. This is where the phytoplankton has the most nutrition and usually lasts between 6 and 10 days. After the growth curve is a period of no growth where the phytoplankton is basically using up its stored energy and nutrients because it has already consumed all the nutrients from the water. This period varies in time but can last several days for most phyto, but is relatively quick for T. Iso.
This growth curve is why it is important to harvest your culture during a set period of time when it is most nutritional and before it crashes. Normally, this will be between 7 and 10 days from the time the culture is started. It is particularly important with T. Iso because of the short period of time from its exponential growth period until it crashes.
Last edited:

")


