Been looking into doing one of these in my 75, ive got a bad issue with cyno.

Navigation
Install the app
How to install the app on iOS
Follow along with the video below to see how to install our site as a web app on your home screen.
Note: This feature may not be available in some browsers.
More options
You are using an out of date browser. It may not display this or other websites correctly.
You should upgrade or use an alternative browser.
You should upgrade or use an alternative browser.
Algae Scrubber Basics
- Thread starter Turbo's Aquatics
- Start date
-
- Tags
- algae algae scrubber scrubber
- Tagged users None


You can of course always point a powerhead at the sand; this keeps food particles from settling, which slows down cyano.
But yes if you do a scrubber it will remove N and P and GHA first, and if the scrubber is strong enough, cyano will go last.
But yes if you do a scrubber it will remove N and P and GHA first, and if the scrubber is strong enough, cyano will go last.
Yeah, I'm getting that now, just thought it'd be easier when cleaning to remove one screen and clean good, while leaving the other screen on so there's good algae to continue pulling nutrients while the changes screen re grows. Or is that not really a major concern?You will probably only want to use a single screen. Double's will get dark growth in the middle.

For that you want them side-by-side (separate screens).
I can't remember for sure where I read this, but it seems when you scrape a screen the surviving algae grows at a much faster pace for some time. This may be a survival adaptation, but it apparently happens. So you get the best scrubbing right after scraping a mature screen. That is why you scrape a screen rather than replace it. It can take weeks to get a mature screen. Its not how much algae is on the screen, but how fast it grows.
On my first algae scrubber, my screen stayed wet in case of a power failure. If it dries out you will have to start all over.
On my first algae scrubber, my screen stayed wet in case of a power failure. If it dries out you will have to start all over.
OK so I'm going to build my first scrubber this weekend. Going to build two actually, one for my 75 reef tank and one for my 280 FOWLR
Any tips or tricks other then in the start of this thread to give me?
Any tips or tricks other then in the start of this thread to give me?

OP
OP

Use schedule 80 3/4" pipe if possible, it holds shape better. Cut the slot initially without worry about width, the pipe will close a bit. Then trim it out. This also depends on the method of cutting a bit.
Rough up the screen with a saw blade, not a hole saw. Cut to size after roughing up. Work with light to moderate pressure and steady speed, pushing hard & working fast will rip the screen. You can pre-rough the screen with a wire brush attachment on a drill, just a few quick passes is enough (light pressure, low speed)
Use good reflectors or quality LEDs.
Basics covers most of the rest
The best filtering actually comes when the growth is full, but before it gets too thick to block light. Shortly after this point though, and shading becomes too much and filtering drops. So the best and most labor-intensive filtering is actually to remove just a little bit each day, and let it stay almost full. Not very practical though.
As for tips on building, this thread has lots of upflows:
https://www.reef2reef.com/forums/eq...efully-permanently.html?highlight=lowest+cost
As for tips on building, this thread has lots of upflows:
https://www.reef2reef.com/forums/eq...efully-permanently.html?highlight=lowest+cost
OP
OP
I'm still waiting to hit the lottery jackpot so I can fund testing of scrubber performance. IMO the shading issue is more of a concern with fluorescent-based scrubbers, LEDs (high power, at least) tend to penetrate deeper and keep the base growth alive longer.
On my old T5HO scrubber, you could tell it was letting go because if I waiting past 10 days to clean, it peeled right off in one pass of the scraper and the screen hardly had any holes filled in. On my LED units, after 14 days (sometimes 16) the algae is still so strongly attached that I have to scrape it hard, multiple passes.
LEDs definitely are the better light source, for many reasons.

I'm still waiting to hit the lottery jackpot so I can fund testing of scrubber performance. IMO the shading issue is more of a concern with fluorescent-based scrubbers, LEDs (high power, at least) tend to penetrate deeper and keep the base growth alive longer.
On my old T5HO scrubber, you could tell it was letting go because if I waiting past 10 days to clean, it peeled right off in one pass of the scraper and the screen hardly had any holes filled in. On my LED units, after 14 days (sometimes 16) the algae is still so strongly attached that I have to scrape it hard, multiple passes.
LEDs definitely are the better light source, for many reasons.
Floyd, recently (about 3 months or so ago) I bought one of your scrubbers, a used model 2 one I believe, off a member of the GIRS. I haven't set it up on my 75 gal reef yet as I'm having a hard time fitting the thing in my sump area and I started biopellets recently and figured I'd give them a shot first. I must say though that the scrubber appears very well built and I'm excited to give it a try on either my current system, or another system I'm setting up in the near future. I see your comments regarding the importance of strong LEDs, and was wondering if the lights that came with your scrubber which are LEDs, mostly red, are strong enough/as efficient as you are suggesting for these diy scrubbers (I assume so but just thought I'd check)? Thanks!
Last edited:
Since removing a bunch of nutrient exporting systems like bio-pellets, GFO, and a second algae scrubber my Surf2 has been growing nuts. It's been less then 7 days and I have to remove more.
")

OP
OP
Ok, you wanna see "growing like nuts"?


Floyd, it's been a while! Just the other day I got out and dusted off my gen2 ATS (I got it used last year from a GIRS member). I am going to finally add it to my filtration. It doesn't fit in my stand/sump so I'm going to add a 10 gal tank to the system to place the ATS on. My plan is to either T off my drain line to feed the tank that way or T off the return line. Is one preferred over the other? Also, does it make a difference where the ATS tank outputs water to (I could output it to the drain in the sump which would then skim the water/filter through GAC or could output water to the return plumbing)?
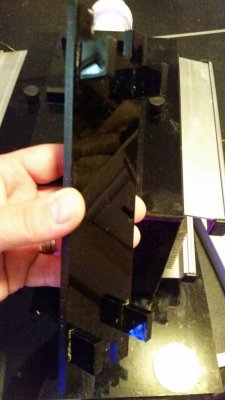
I posted a picture below of this acrylic piece with 4 legs that came with the ATS, but do not remember what the guy told me it was for. Any ideas?
Also posted a picture of the ballast of the LEDs. Still unsure if it's the MakersLED or newer one.
Thanks
I posted a picture below of this acrylic piece with 4 legs that came with the ATS, but do not remember what the guy told me it was for. Any ideas?
Also posted a picture of the ballast of the LEDs. Still unsure if it's the MakersLED or newer one.
Thanks
Attachments


OP
OP
MakersLED are only the heat sinks, the driver is a Meanwell (not Makers LED)
you have a Rev 2 L2 (U shaped cutouts for the slot pipe)
The piece in the first pic is the false bottom, goes in first, feet down. Protects drain. I have an updated one but you also need to mod the bottom drain (for the higher flow version). Rev 2 L2 doesn't really require it, but it does offer a bit more volume/protection.
You can do either on the feeding of the scrubber, but if you go off the tank drain line you need overflow protection on the tank - in case something goes down the drain and gets stuck in the pipe or on the screen that sticks up into the pipe.
Also PM me your email address, I'm guessing you don't have the snap-on light blockers, or at least, I don't see them. Or hit me up on GIRS (converted to Xenforo by yours truly about a week ago - much better now)
MakersLED are only the heat sinks, the driver is a Meanwell (not Makers LED)
you have a Rev 2 L2 (U shaped cutouts for the slot pipe)
The piece in the first pic is the false bottom, goes in first, feet down. Protects drain. I have an updated one but you also need to mod the bottom drain (for the higher flow version). Rev 2 L2 doesn't really require it, but it does offer a bit more volume/protection.
You can do either on the feeding of the scrubber, but if you go off the tank drain line you need overflow protection on the tank - in case something goes down the drain and gets stuck in the pipe or on the screen that sticks up into the pipe.
Also PM me your email address, I'm guessing you don't have the snap-on light blockers, or at least, I don't see them. Or hit me up on GIRS (converted to Xenforo by yours truly about a week ago - much better now)
Thanks for answering my questions so quickly. Yeah, I believe I don't have the snap-on light blockers, please email me at [email protected] for price and shipping (located in IC). I'm sure I will have more questions once I get things setup; first time using a ATS. Thanks- Dustin

OP
OP
For anyone reading this thread for the first time, there are 2 summaries (10 or so posts each) that are within this thread. The 2nd starts on post #37
Here is my recommendation for LED lighting of a waterfall algae scrubber screen:
This is for a double-sided screen using Philips Luxeon ES 3W Deep Red 660nm LEDs without lenses (120-140 degree) running at 700mA at 2-3" from the screen to LED
Minimum coverage: One LED on each side of every 8 sq in of screen
Maximum coverage: One LED on each side of every 4 sq in of screen
Simple as that. For new screens (bare) if using the "Maximum" level, run at 350mA until mature, or use a diffuser. Might have to do this with the Minimum level also actually, but not typically. The minimum could probably be stretched to a larger area but screen will cure slower and generally have less capacity.
So for a 6x6 screen, which is 36 sq in, /8 = 4.5 per side. Make it 5.
So for a 6x6 screen, which is 36 sq in, /4 = 9 per side.
Supplementing with blue/violet: Always run blues at 350mA, violets can be run higher but should follow the same rule for the maturing stage (350 at first, then increase after maturing). Use one to two at this current level for every 5-6 reds, roughly. Lots of flexibility here, a little blue/violet goes a long way. I've used 440-445nm Royal Blue Luxeon ESs for this, but I know of at least one other that used to use RBs and switched to Deep Violets and almost doubled growth. Steve's LEDs now carries a good Hyper Violet made by SemiLED.
Regarding non DIY-LEDs in general, this is what I have roughed out to help with this.
The issue is that my DIY LED guideline is based on coverage. You can't say "I need 5 3W LEDs which is 15W, so a 15 W fixture is what I need". It doesn't work that way.
That's because a 3W LED does not necessarily consume 3W, and a purchased LED may rate it's intensity based on actual wattage used, or it may add up the LEDs and give a wattage but the actual watt draw is less. You have to watch for this.
A 3W Philips Luxeon ES 660nm LED will typically drop 2.2v across the LED at 700mA. Power = Amps * Volts so 2.2 V * 0.700 A = 1.54W. What? I thought it was a 3W. It is. That is something called MARKETING. LEDs have become more efficient over time as they have been redesigned, so a lower Vdrop and Idrive results in the same output, but instead of calling it a 1.5W and confusing everyone, they call it a 3W still.
So now on to your fixture you are looking at.
Converting the "LED per unit area guideline" to a "wattage" guideline is as simple as doing the math.
Figure out what you need per the "unit area" guideline. In the above example, 6x6 screen, minimum level (low intensity), 5x 3W per side. Each is actually drawing 1.5W, so 5x1.5 = 7.5W. Your light fixture should actually consume, at the wall, a minimum of 7.5W. The electronics built into the fixture will draw power also, meaning that you might want to add a little cushion to the number. So a 10W fixture on a 6x6 screen would be about right for a comparable replacement to an array of 5x 3W LEDs.
Now let's add that factor in and parallel it to screen size. A 6x6 screen = 36 sq in. Make it 40. you need a 10W actual-draw LED fixture on each side of this. So you could say that the rule of thumb for a pre-built LED fixture is that you need 0.25W per square inch of screen. That would get you into the Minimum light arena - or "Minimum Intensity", and you need one of these on each side of the screen.
Doubling that would put you on the higher end. 0.5W per square inch - actual wattage draw of fixture.
What you have to watch for is when they use a multi-chip that has 9 1W LEDs on it and they call that 10W. Not necessarily true. But 1W LEDs are actually more efficient than 3W LEDs when you are talking radiant flux output per unit of energy input into the LED, so it's not horrible, just shoot for the higher light level and you'll be OK usually. At best, you will actually be at the minimum level. At worst, you'll be on the low side but still OK.
OP
OP
Leave it to Paul B
Here's a new method for making an algae scrubber screen that, IMO, could very well be a game changer.
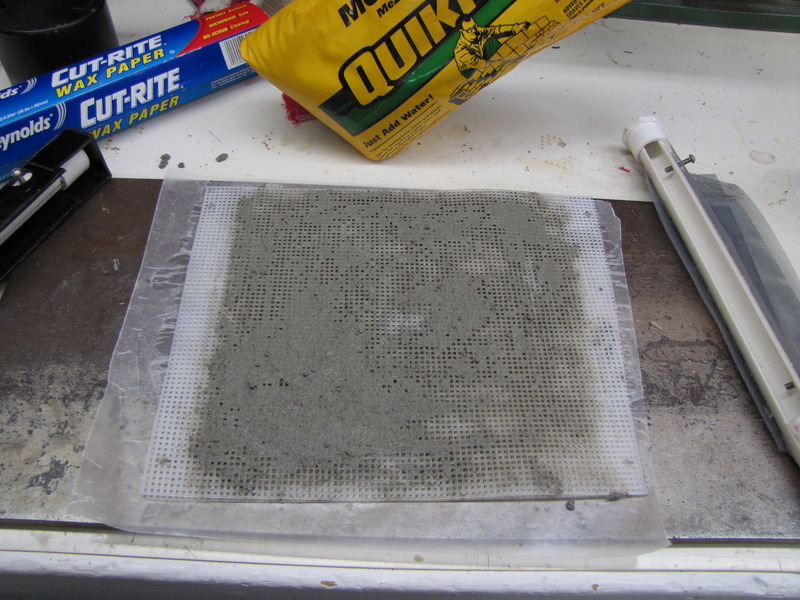
It's pretty simple. Smear the screen with a thin coating of a standard mortar mix (like you use for building a brick wall) and then sandwich it between 2 piece ofplastic wrap wax paper, and place a wet towel over it. A couple times/day, take the towel and saran wax paper off and spray it with water. Keep doing this for a few days, 2 or 3. The point is to not let the mortar dry, because you want it to cure instead.
Then, place the screen in water for a few days or a week or something, to soak out the lime and anything else. You're not using much mortar here so it's not a ton of stuff you have to worry about, it's just an extra step.
Now you're good to go. According to Paul, algae loves mortar. Algae does not have this love affair with plastic, which is why the plastic canvas (in most cases) takes a while to get started growing algae thick and well attached: the material has to "slime up" and then build up a layer of calcification or another material so that the algae can attach well.
So what happens is that algae will grow very quickly from the mortar. The mortar is not really permanent though, it will flake off as you clean the screen, but this is not relevant. The plastic canvas still has to go through the curing/maturing process for long-term growth, but while this is happening, you get good growth (and filtration!) from the mortar. Over time, growth will transition to the plastic canvas.
Now, my recommendation for preparing the screen is simple - it's what I do now for my "first stage" of roughing up. I use a wire brush drill bit (the center-crimp kind) and a good drill, running at a low to medium-low speed. I run the bit back and forth with only light pressure (I'm not pushing down and smashing the bit into the screen). I go left-right, then up-down, then diagonal, then the other diagonal. Flip the screen and repeat. That should be good enough for mortar now.
The 2nd stage of roughing that I do involves using a saw blade in small overlapping circles. I'm not sure this is necessary anymore, or maybe it's not just as critical.
I know what I'm doing this weekend...
Here's a new method for making an algae scrubber screen that, IMO, could very well be a game changer.
It's pretty simple. Smear the screen with a thin coating of a standard mortar mix (like you use for building a brick wall) and then sandwich it between 2 piece of
Then, place the screen in water for a few days or a week or something, to soak out the lime and anything else. You're not using much mortar here so it's not a ton of stuff you have to worry about, it's just an extra step.
Now you're good to go. According to Paul, algae loves mortar. Algae does not have this love affair with plastic, which is why the plastic canvas (in most cases) takes a while to get started growing algae thick and well attached: the material has to "slime up" and then build up a layer of calcification or another material so that the algae can attach well.
So what happens is that algae will grow very quickly from the mortar. The mortar is not really permanent though, it will flake off as you clean the screen, but this is not relevant. The plastic canvas still has to go through the curing/maturing process for long-term growth, but while this is happening, you get good growth (and filtration!) from the mortar. Over time, growth will transition to the plastic canvas.
Now, my recommendation for preparing the screen is simple - it's what I do now for my "first stage" of roughing up. I use a wire brush drill bit (the center-crimp kind) and a good drill, running at a low to medium-low speed. I run the bit back and forth with only light pressure (I'm not pushing down and smashing the bit into the screen). I go left-right, then up-down, then diagonal, then the other diagonal. Flip the screen and repeat. That should be good enough for mortar now.
The 2nd stage of roughing that I do involves using a saw blade in small overlapping circles. I'm not sure this is necessary anymore, or maybe it's not just as critical.
I know what I'm doing this weekend...
Last edited:
Similar threads
- Replies
- 6
- Views
- 133
- Replies
- 2
- Views
- 176
- Replies
- 8
- Views
- 388
- Replies
- 18
- Views
- 222


