Disclaimer: Not really a kiddie pool 
I’ve been an aquarium lover since I was 5 and my parents had a little freshwater tank in the dining room. Sadly, around age 7, I decided the fish were hungry and proceeded to dump all the fish food in the tank. By the time my parents noticed it was too late for the few inhabitants. Luckily, I learned from my mistake and have had 3 very successful freshwater tanks since.
A few years ago I discovered the wonder of saltwater tanks. After hearing horror stories from my friends and co-workers who tried to start tanks, and reading how difficult it was in various forums and books, I decided to have kids instead. Shortly after 2 kids, I decided I was ready to start a saltwater tank.
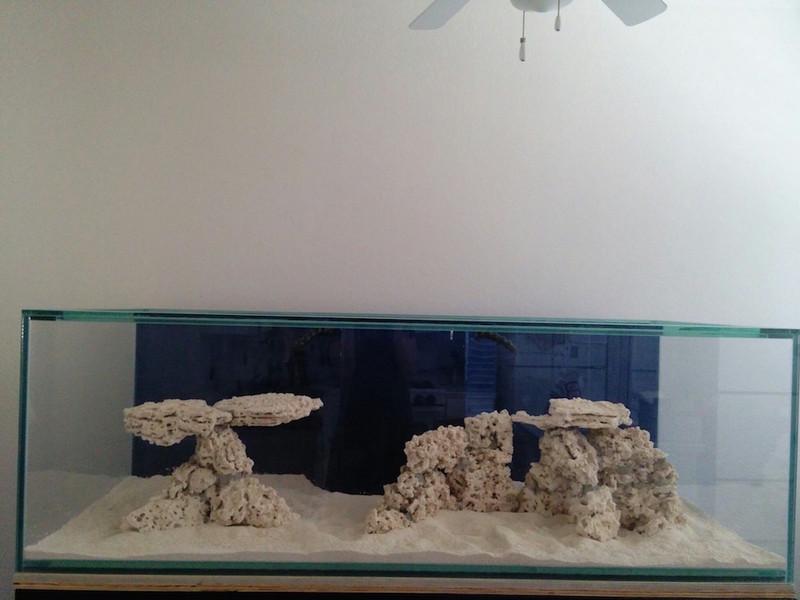
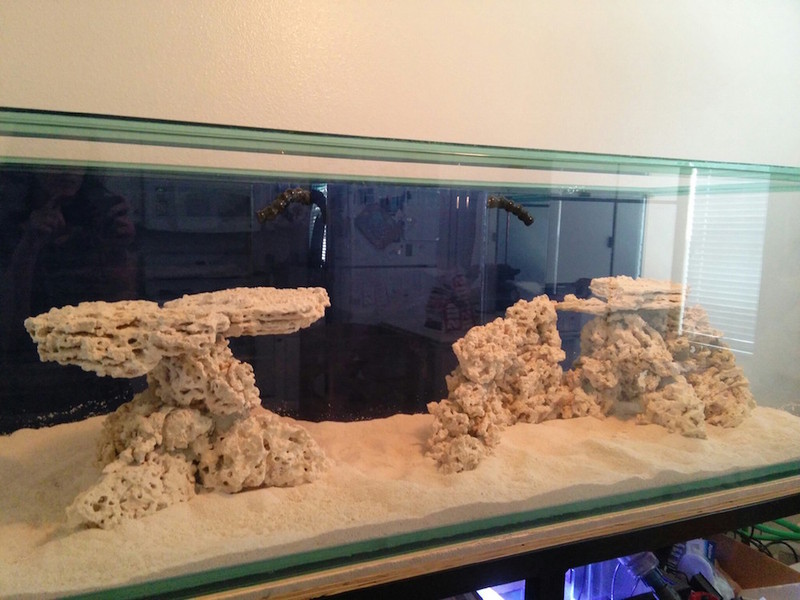
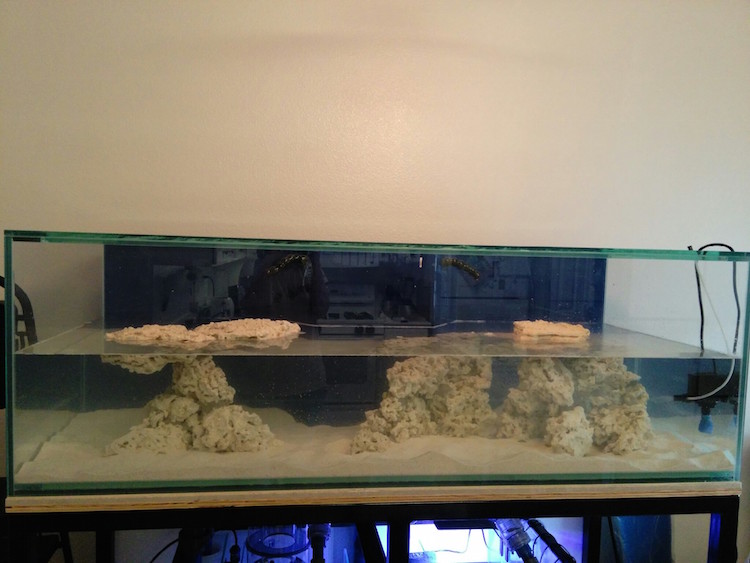
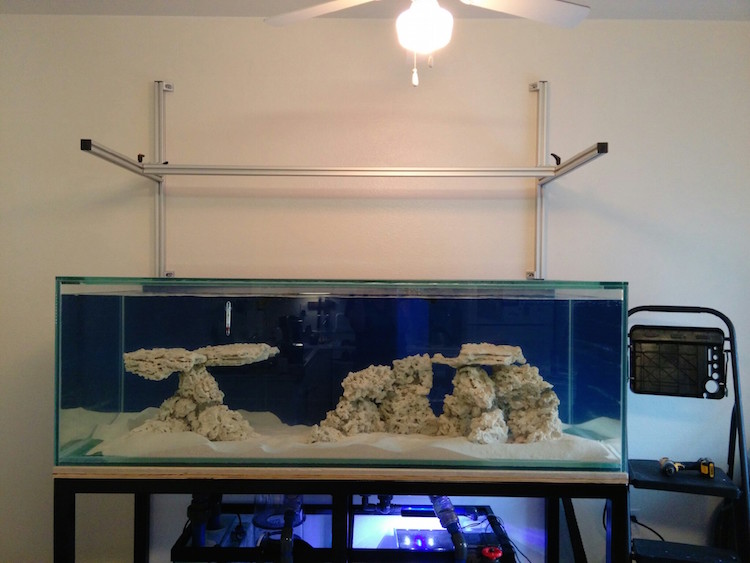
I hastily bought a 72x24x24 tank from Coast to Coast Aquariums. A week or two after I ordered it, I mocked the tank out on a foldable table so I could start playing with the rocks I ordered from Marco Rocks. I immediately regretted how narrow it felt at 24â€. So I called Coast to Coast and luckily they hadn’t started on my tank yet, so I was able to change the dimensions to 72x30x24.
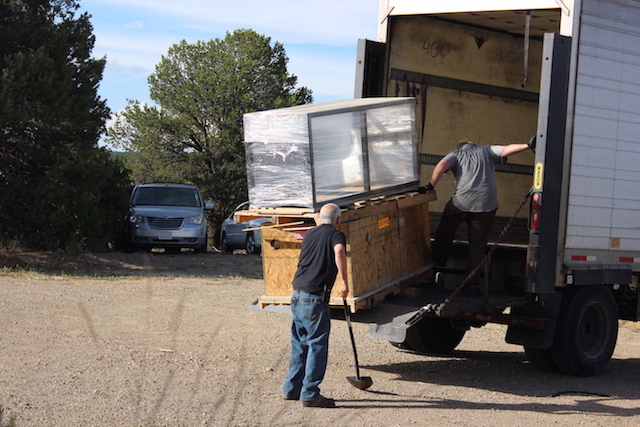
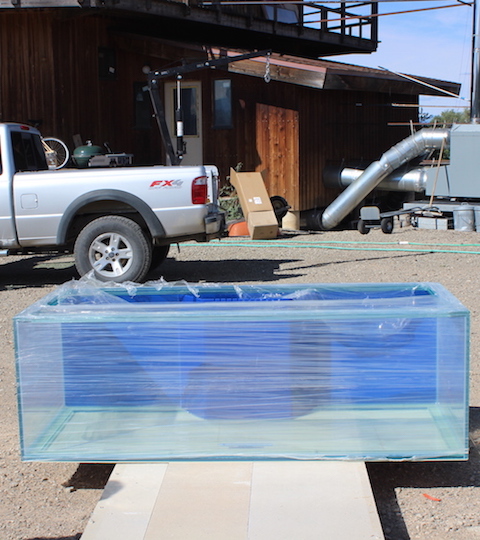
Fast forward about 8 weeks and my tank arrived! I was pretty annoyed when I looked into the truck to see a large box with stickers all over it that said “Do Not Top Load†with my steel stand loaded on top of it. The driver was nice enough that I didn’t say much about it since I know he wasn’t the one who loaded the truck. Watching him unload it was crazy. All I kept saying to myself was “If it breaks, they will replace it… if it breaks, they will replace it… “ I felt bad watching this guy try to move a 400 pound tank with a 200 pound stand on top of it. Even worse, one of the pallets it was sitting on was broken, so it kept catching on every little dent and bump on the truck floor.
After about 45 minutes and few really scary shoves, the tank was in the driveway and free of damage. Unfortunately, it wasn’t practical to set the tank up in the driveway so my dad and I had to figure out how to get this tank up on the deck and into the front door.
My dad is amazing at rigging stuff up and we were able to get straps all around the tank and lift it up on the hoist on the back of his truck.
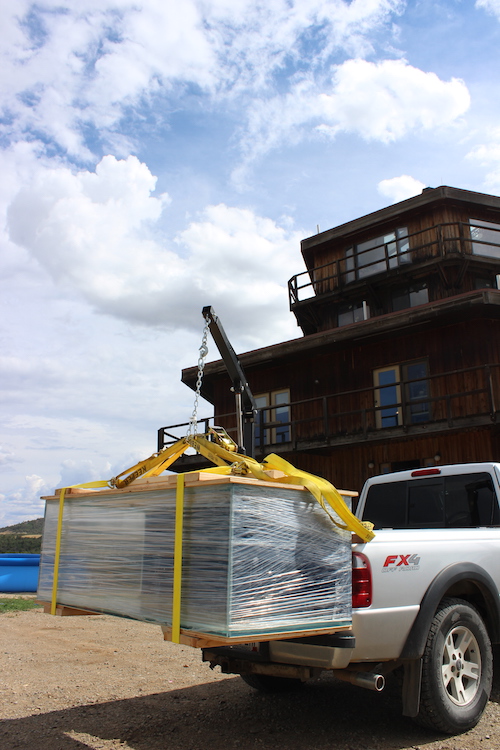
He slowly drove it over to the deck while I kept it from swinging. It lifted it exactly 1 inch above the pallet jack we planned to use to move it to the door… *whew*!
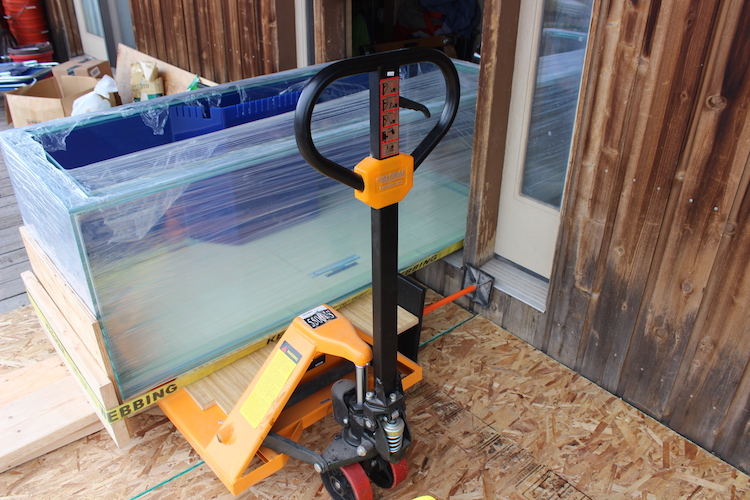
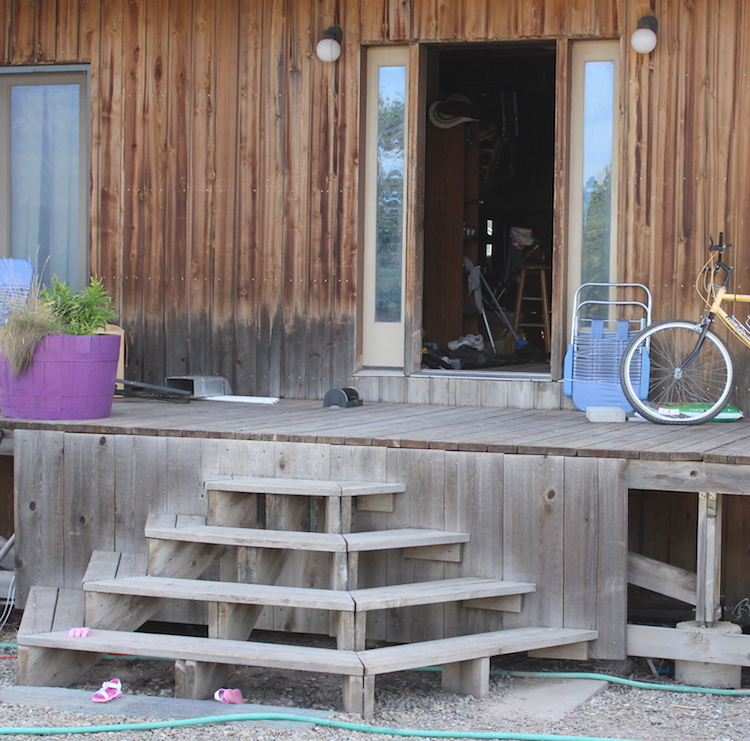
It was pretty easy to line the tank up to start sliding it threw the door. I had a moment of panic when I was realized I had no idea how wide the door entrance is, but the tank just fit.
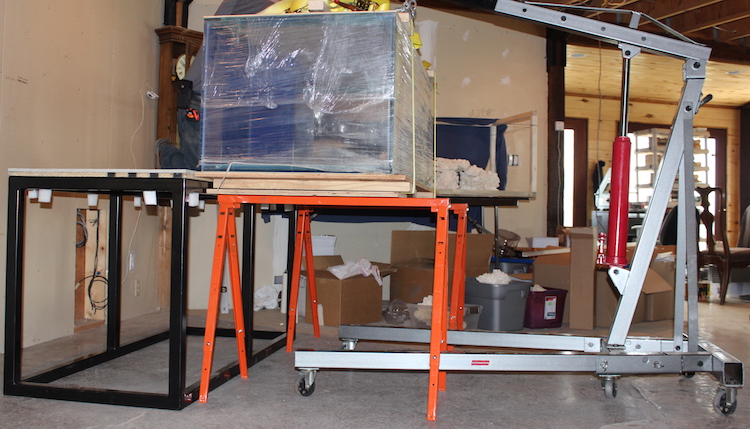
We used a pulley system around the tank and a beam inside the house to move it through the door. Used another pulley system around a beam in the ceiling to lift it high enough to get it over the bottom of an engine hoist. Then we moved the engine hoist under it and hooked it up. Helps a lot having a house with unfinished ceilings.

We used the engine hoist to move it over to the stand, but realized we had to get the straps off before putting it down on the stand since we couldn’t lift it by hand. We set it down on some very rickety metal sawhorses placed in front of the stand.
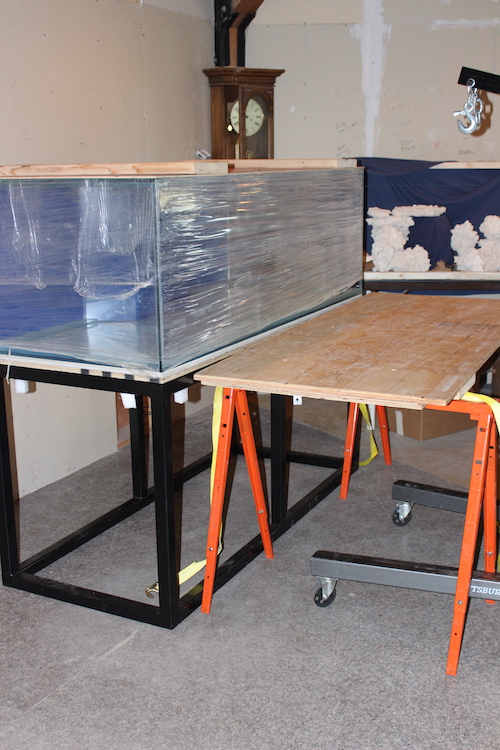
Another moment of panic when we undid all the straps from the engine hoist so the sawhorses were holding all the weight, and my dad mentions he thinks the sawhorses are from Harbor Freight. We both pushed the tank very carefully and jumped back each time one of the sawhorses creaked. Pretty scary wondering what would happen if one of the sawhorses gave out. Didn't take very long though to move it onto the stand as the foam they put on top made it very easy to slide the tank.
Now the real fun could begin! Except my husband got PCS orders to San Diego, so I had to wait till we moved. The plus side was that it was now the Navy's responsibility to move the tank.
I’ve been an aquarium lover since I was 5 and my parents had a little freshwater tank in the dining room. Sadly, around age 7, I decided the fish were hungry and proceeded to dump all the fish food in the tank. By the time my parents noticed it was too late for the few inhabitants. Luckily, I learned from my mistake and have had 3 very successful freshwater tanks since.
A few years ago I discovered the wonder of saltwater tanks. After hearing horror stories from my friends and co-workers who tried to start tanks, and reading how difficult it was in various forums and books, I decided to have kids instead. Shortly after 2 kids, I decided I was ready to start a saltwater tank.
I hastily bought a 72x24x24 tank from Coast to Coast Aquariums. A week or two after I ordered it, I mocked the tank out on a foldable table so I could start playing with the rocks I ordered from Marco Rocks. I immediately regretted how narrow it felt at 24â€. So I called Coast to Coast and luckily they hadn’t started on my tank yet, so I was able to change the dimensions to 72x30x24.
Fast forward about 8 weeks and my tank arrived! I was pretty annoyed when I looked into the truck to see a large box with stickers all over it that said “Do Not Top Load†with my steel stand loaded on top of it. The driver was nice enough that I didn’t say much about it since I know he wasn’t the one who loaded the truck. Watching him unload it was crazy. All I kept saying to myself was “If it breaks, they will replace it… if it breaks, they will replace it… “ I felt bad watching this guy try to move a 400 pound tank with a 200 pound stand on top of it. Even worse, one of the pallets it was sitting on was broken, so it kept catching on every little dent and bump on the truck floor.
After about 45 minutes and few really scary shoves, the tank was in the driveway and free of damage. Unfortunately, it wasn’t practical to set the tank up in the driveway so my dad and I had to figure out how to get this tank up on the deck and into the front door.
My dad is amazing at rigging stuff up and we were able to get straps all around the tank and lift it up on the hoist on the back of his truck.
He slowly drove it over to the deck while I kept it from swinging. It lifted it exactly 1 inch above the pallet jack we planned to use to move it to the door… *whew*!
It was pretty easy to line the tank up to start sliding it threw the door. I had a moment of panic when I was realized I had no idea how wide the door entrance is, but the tank just fit.
We used a pulley system around the tank and a beam inside the house to move it through the door. Used another pulley system around a beam in the ceiling to lift it high enough to get it over the bottom of an engine hoist. Then we moved the engine hoist under it and hooked it up. Helps a lot having a house with unfinished ceilings.
We used the engine hoist to move it over to the stand, but realized we had to get the straps off before putting it down on the stand since we couldn’t lift it by hand. We set it down on some very rickety metal sawhorses placed in front of the stand.
Another moment of panic when we undid all the straps from the engine hoist so the sawhorses were holding all the weight, and my dad mentions he thinks the sawhorses are from Harbor Freight. We both pushed the tank very carefully and jumped back each time one of the sawhorses creaked. Pretty scary wondering what would happen if one of the sawhorses gave out. Didn't take very long though to move it onto the stand as the foam they put on top made it very easy to slide the tank.
Now the real fun could begin! Except my husband got PCS orders to San Diego, so I had to wait till we moved. The plus side was that it was now the Navy's responsibility to move the tank.
Last edited: