dcmartinpc's 225 In Wall Deep Dimension Build

dcmartinpc

Active Member
View Badges
Joined
Jan 22, 2009
Messages
337
Reaction score
402
Rating - 0%
0   0   0
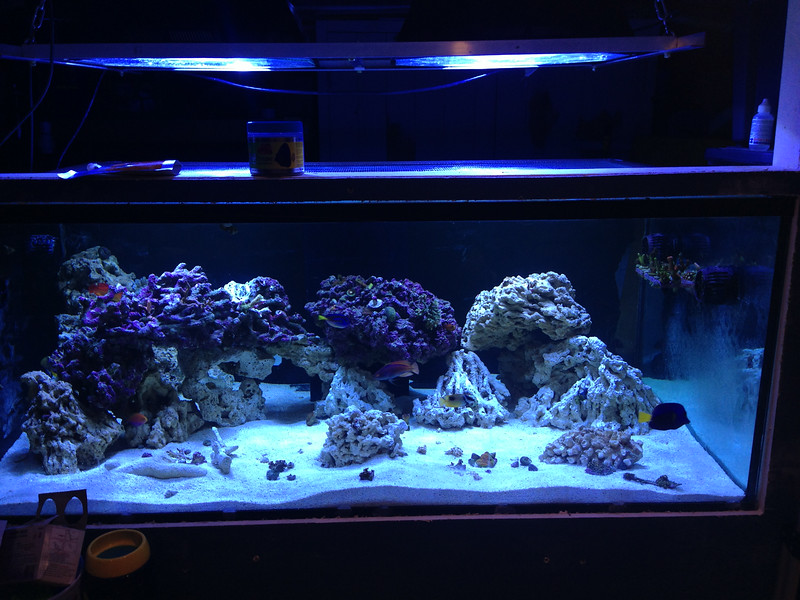
I am finally getting another big tank! I used to run a 180 in my basement before it was finished, but it never got the love or attention it deserved. I only saw the tank when I fed the fish... I am currently running a 60 Cube and a 35 "Corner Hex" in my living room on the main level. Once this new aquarium is setup, I will be taking down and selling the 60 cube.

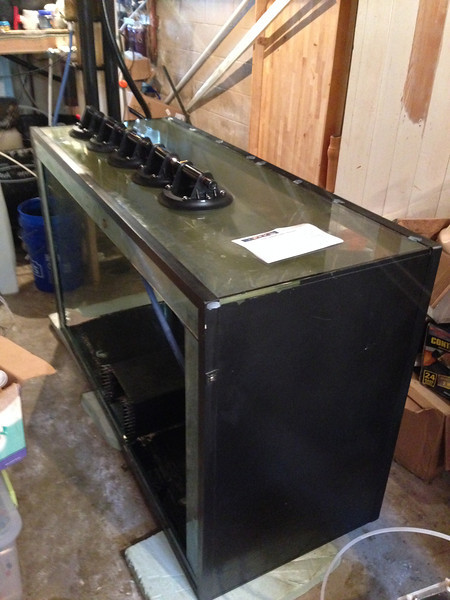
New (Used) Tank is a 225 Gallon Miracles 5x3x2 (60x36x24) - Front Panel Starfire - All 1/2" Glass.

I absolutely LOVE the dimensions. I have always wanted a deep tank!

I will be picking up the tank this Saturday. I went ahead and got some glass vacuum suction cups to make the move as easy as possible.

The tank will be lit by a pair of 400 watt Radiums on a dual PFO HQI ballast likely in LumenBright Mini pendants to start. I will be adding 4 - 48" T5's once I get everything up and running and shutdown the 60 cube.

Everything will drain into my existing 150 gallon Rubbermaid Sump. I am using an ETSS 1400XR skimmer driven by an Iwaki 100 and I will continue running bio-pellets in this system with my Reef Dynamics BPR500e reactor.

I will be utilizing a combination of types of flow on this aquarium. I will be running a full siphon on 1 of the 1.5" drain lines in the overflow with the other available for an emergency drain and using a Super Dart Gold as the return pump. I also plan on a closed loop for this system. I will be starting with a RLSS Waveline DC-12000 on the closed loop. I will also be running a Vortech MP40wES on each end of the aquarium.

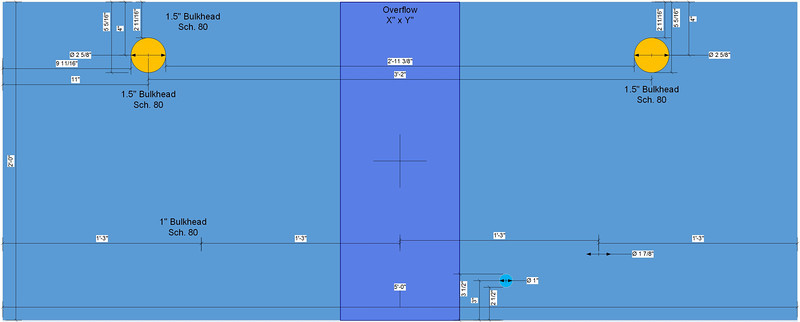
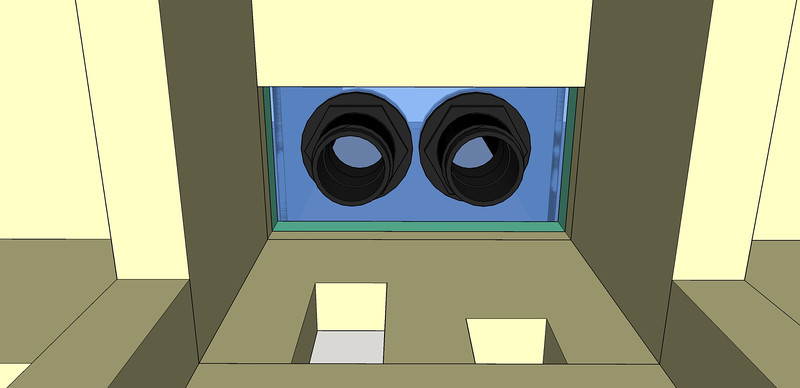
Other than the 2 holes in the bottom of the overflow, the aquarium has 3 other holes already drilled for 3/4" bulkheads in the back of the tank. I will be enlarging 2 of those holes and putting a valve on the 3rd to keep for possible future use, maybe a drain...

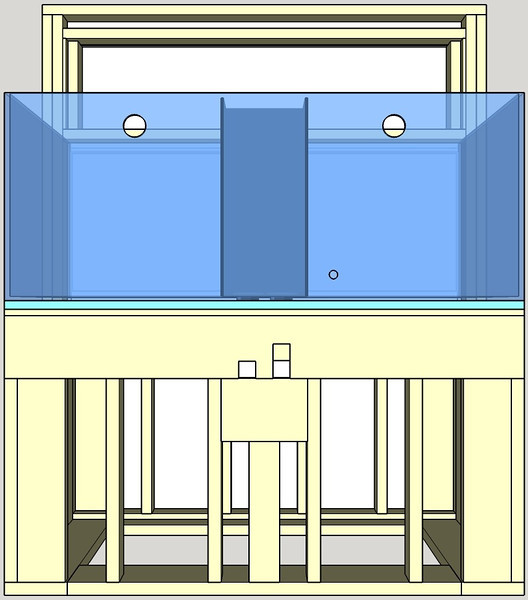
The following diagram lays out my drilling plan.

Orange (Return) - Existing holes that will be enlarged.
Gray - New holes for Closed Loop.
Blue - Existing hole to be closed with a valve.


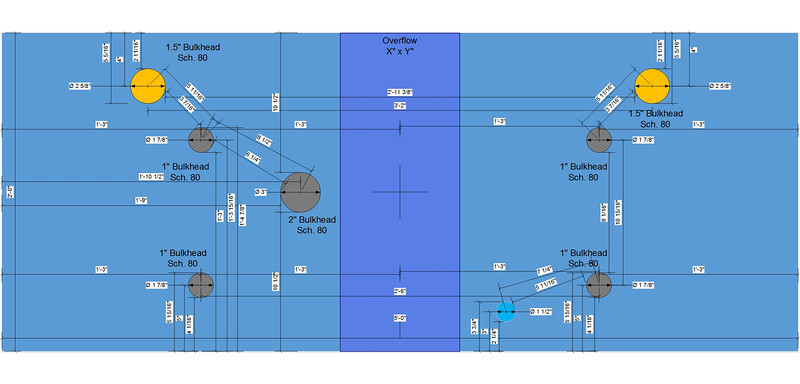
Any thoughts on the drilling plan are appreciated. Am I far enough away from all edges? Are each of the holes far enough away from each other to maintain tank integrity? Should I forget enlarging the 2 holes for the return and just drill a hole on the back center of the overflow and bring the return in there?

I will be running all Schedule 80 HD Bulkheads.

If I keep the orange holes, I know they are a little low and I would be using a pair of 90s to get the water closer to the surface to prevent too much drain back into the sump.

Don
 
Last edited:

revhtree

Owner Administrator
View Badges
Joined
May 8, 2006
Messages
47,786
Reaction score
87,396
Rating - 100%
1   0   0
Oh wow looking forward to this! Congrats!
 
OP
OP
dcmartinpc

dcmartinpc

Active Member
View Badges
Joined
Jan 22, 2009
Messages
337
Reaction score
402
Rating - 0%
0   0   0
Thanks! If you can't tell, I am very excited to get this running, but I will be taking it fairly slow and making sure every single step is well thought out and engineered properly. I don't want to be changing my mind half way through :D

Don
 
OP
OP
dcmartinpc

dcmartinpc

Active Member
View Badges
Joined
Jan 22, 2009
Messages
337
Reaction score
402
Rating - 0%
0   0   0
The tank is home!!! This build is going to take a while. I want to make sure I get every detail as close to right as possible! I am contemplating dropping the closed loop and running 4- MP40wES instead. I have been able to trade for 2 additional MP40s and I think that might be the better long term solution. Thoughts?


Don
 
Last edited:
OP
OP
dcmartinpc

dcmartinpc

Active Member
View Badges
Joined
Jan 22, 2009
Messages
337
Reaction score
402
Rating - 0%
0   0   0
So after much deliberation, I have decided to kill the closed loop. Since I am switching away from a closed loop, does it even make sense to enlarge the holes on the rear of the aquarium to accommodate my dart return, or do I just plug them and run the dart return over the back?

I will say, it would be nice for the return to come through the back so I can just make one large rectangle mesh top for the tank and call it a day!!! No cutouts, nothing weird, just a rectangle. I really like that idea, but I don't want to cause any issues either.

My only problem is, Derek from Miracles was less than supportive when it came to drilling the back of the tank at all, even though it is already drilled... He was pretty insistent that after they drill any panes of glass, they temper them, even on the back.

I know the back of the tank isn't tempered because the previous owner drilled 3 holes in it for his return, and it would have shattered if it were tempered, even with the small holes, right?

Here is an updated diagram of my thoughts. Orange are the existing 1" holes I want to drill out for 1.5" bulkheads.


Thanks!

Don
 
OP
OP
dcmartinpc

dcmartinpc

Active Member
View Badges
Joined
Jan 22, 2009
Messages
337
Reaction score
402
Rating - 0%
0   0   0
One other thing I am struggling with.... Bare bottom with some sort of HDPE bottom, or sand? I used Corian for my 60 cube bare bottom in a color called "sahara" and it looks great! I have about 5 - 5 gallon buckets of dry sand lying around I could rinse and reuse.

Thoughts on reusing sand?

If I go bare bottom, should I just get a piece of Corian the size of the inside of the eurobracing? It would lay down nice and flat inside the bracing and would actually line right up with it if I got 1/2".

Decisions... decisions...

Don
 
OP
OP
dcmartinpc

dcmartinpc

Active Member
View Badges
Joined
Jan 22, 2009
Messages
337
Reaction score
402
Rating - 0%
0   0   0
I am planning out the stand and front door layout and design. Here are some drawings of what I am thinking. I will be topping the stand with 3/4" plywood and then 1" foam. Let me know your thoughts! I made all these in Google SketchUp if you are interested in the 3D file.


Thanks!


revhtree

Owner Administrator
View Badges
Joined
May 8, 2006
Messages
47,786
Reaction score
87,396
Rating - 100%
1   0   0
Looks like a great plan!
 
OP
OP
dcmartinpc

dcmartinpc

Active Member
View Badges
Joined
Jan 22, 2009
Messages
337
Reaction score
402
Rating - 0%
0   0   0
I have made some changes to design. I figured I probably shouldn't have a support directly underneath the bulkheads! I changed the door design to make it simpler to build and conceal more light.

I also added the plywood, foam, and aquarium.

Don


OP
OP
dcmartinpc

dcmartinpc

Active Member
View Badges
Joined
Jan 22, 2009
Messages
337
Reaction score
402
Rating - 0%
0   0   0
The images above have been updated. I needed to make cutouts in the rear support to accomodate the plumbing. It would not have made it over the top edge of the sump otherwise and I didn't want my drain plumbing making an uphill turn.


Here are 2 additional images as I also updated the aquarium to add the holes and bottom bulkheads.


OP
OP
dcmartinpc

dcmartinpc

Active Member
View Badges
Joined
Jan 22, 2009
Messages
337
Reaction score
402
Rating - 0%
0   0   0
Long overdue update! I have been busy :) The stand is completed and I cut the wholes in the wall and got the tank on the stand tonight! It still needs a little cleaning, but it is on the stand! I also enlarged the return holes in the rear of aquarium to accomodate the larger 1.5" bulkheads for my return.


I will hopefully be getting water, sand, dry rock, and seed rock in it within the next couple days so I can start cycling it before tying it into the rest of the system.


I finally feel like I am getting somewhere :D


Don


OP
OP
dcmartinpc

dcmartinpc

Active Member
View Badges
Joined
Jan 22, 2009
Messages
337
Reaction score
402
Rating - 0%
0   0   0
Well, time for an update! It has taken some time, but I have been busy and just finished the plumbing today! It has been cycling for the last 3 weeks and everything is at zero, so I plumbed it into the rest of the system and fired everything up. I had quit a bit of work to do to get it here. I had to turn the sump 180 degrees and drill out an existing hole to support the 2" bulkhead for the dart return for the new tank. I moved my skimmer pump and return pump for the upstairs tanks and the frag tank over to the side of the sump. Once the pumps were moved, I could finally move my skimmer closer to my sump!


The main 1.5" drain for the 225 is a full siphon and the other is a durso standpipe. I keep the water level just below the durso so if the siphon slows down, the durso will take the overflow.


Tomorrow I will get the mesh top made and HOPEFULLY the light rack so I can get the lights hung and if I have time, move everything from my 60 cube into the 225.


Let me know what you guys think and please excuse the mess, it has been a VERY busy couple of weeks working on this and I was too tired to clean up :p


OP
OP
dcmartinpc

dcmartinpc

Active Member
View Badges
Joined
Jan 22, 2009
Messages
337
Reaction score
402
Rating - 0%
0   0   0
Here it is! I moved the contents of the 60 cube over last night, pulled the Yellow Belly Hippo Tang from my sump, and had a delivery from Live Aquaria Divers Den today :)


So far here is the stock list


Orchid Dottyback
Midas Blenny
Flame Wrasse Male
Lineatus Wrasse Male
Fathead Sunburst Anthias Pair
One spot Foxface
Yellow Belly Hippo Tang
Purple Tang
Desjardini Sailfin Tang (Juvenille)


So far everyone is getting along well, the next few days will be telling as far as aggression goes, but so far so good. The Purple Tang has been very well behaved so far.


Right now the only other fish I am thinking about is a Achilles Tang or possibly a Powder Blue. I like the Achilles, the wife the powder blue... but I hear the Powder Blue is a particularly aggressive Acanthurus.


1 pic and a quick video below from my phone. I will take some better pics later. Let me know what you think!


Don


225 Video
 
Last edited:

arnel0387

Active Member
View Badges
Joined
Mar 18, 2013
Messages
220
Reaction score
43
Rating - 0%
0   0   0
Are the flame and lineatus wrasses getting along fine? Did you add them separately or simultaneously? And were there any female with them?

Thanks! :)
 
OP
OP
dcmartinpc

dcmartinpc

Active Member
View Badges
Joined
Jan 22, 2009
Messages
337
Reaction score
402
Rating - 0%
0   0   0
Are the flame and lineatus wrasses getting along fine? Did you add them separately or simultaneously? And were there any female with them?

Thanks! :)

They get along great! They actually swim together in the tank quite frequently. Previously they were in my 60 cube together. They were added separately. I had the lineatus first and a couple months later I added the flame. The flame spent about 2 weeks in an acclimation box before he was released into the aquarium. A couple chases and all was well.

Don
 
OP
OP
dcmartinpc

dcmartinpc

Active Member
View Badges
Joined
Jan 22, 2009
Messages
337
Reaction score
402
Rating - 0%
0   0   0
So.... Long time since an update!!! And I am really just teasing a little with this one :) But this showed up on my doorstep today and wanted to share it in all of its 74 inch tall glory!!!

MTC Dual Mazzei recirculating venturi skimmer!


I will be doing a more proper update once I get this beast running and I have some time to take some more pics!

Don
 
Back
Top