Orphek
Orphek- Aquarium LED lighting
View Badges
Platinum Sponsor
Partner Sponsor 2023
Partner Sponsor 24
In LED Aquarium Lighting, Placement is Everything.
So, you’re looking for a new LED fixture for your saltwater aquarium or planted freshwater tank. Maybe you just picked a good deal from that local fish store and now you need to install it. Making a plan ahead of time will give you better results, ease maintenance and give the fixture a longer life span.
In this article we will share the experience of Frank who is using three of the Orphek Atlantikunits over his tank. He’s mounted the lights and placed the corals in his tank and then followed our recommended acclimation and introduction levels. Now that he is through the initial period he wants to make sure that he is getting 100% out of his investment in lighting and giving the corals everything that they need.
Frank mounted the lights perpendicular to the length of the tank and spaced them evenly across which resulted in higher levels under the lights and low levels between them. He also was running several channels low from the initial acclimation program and needed to understand the levels as he brought the percentages up

Three steps can help you to implement a good plan and save you time and boost the overall health and vigor of your corals; planning ahead, changing your thinking and testing and observation. Frank performed these steps and is much happier with his lights and his corals are going to show the benefits.
PLAN AHEAD:
Like most things in the hobby having a plan ahead of time will save you lots of headache when installing and using your lights. Having a basic understanding of how you wish to mount the light, recommended attachment points and coverage area is just the first step. In order to have a well-lit tank you need to plan ahead for cable routing, mounting heights and placement over the tank. The best way to do this is by drawing it up.
This can be done with a simple piece of paper and pen or you can use a drawing program on your computer such as Google Sketchup. Start by making a rough determination on the amount of area you will need each fixture to cover and then determine the orientation of these fixtures based upon that data. For example; an 8 foot by 3 foot tank footprint may be lit with 3 units running lengthwise or 4 units turned perpendicular.


This orientation is usually determined by the coverage area of the light fixture and the intensity needed. Higher intensity corals will need to have more light and many often require additional fixtures over and above most manufacturers’ recommendations. This is where having a plan ahead of purchasing fixtures can save you money in the long run.
We often see clients who purchased 2 of a competitors light and later realized that they actually needed three to cover the tank and provide the intensity that is needed for the corals that they wish to keep. They are left with the difficult task of investing more money in a fixture that has already fooled them or adding supplemental lighting of another kind which often results in a mixed bag of products and results instead of a seamless well designed system that looks good and delivers consistent results.
Know your needs and buy the correct number of fixtures based upon the needs of your tank.
CHANGE YOUR THINKING:
Most people mount their lighting flat above their tank and don’t think twice about it other than when they need to work on it. All too often they have dark spots or spotlighting as a result and think that it’s normal because of the nature of LEDs. This is not the case in a well thought out plan.
We have to begin to think of lighting our systems like we were lighting a stage and where the corals and fish are the actors. Do you like some darker caves for lower light corals? How about reducing the algae that grows on the glass? That’s always a good thing right?
You can mount the lights at an angle to reduce the amount of light that touches the glass which will reduce the amount of maintenance that you have to perform as well. Raising the lights higher above the water can help to eliminate some of the spotlighting on the sand bed as well. A higher mounting point also allows easier maintenance access inside the tank since you are not having to move the lights each time you need to get inside the tank.
Eliminating shadows and dark spots is something that many reefers are not able to overcome but it can often be as simple as respacing the fixtures. In a tank with two fixtures, spacing the fixtures out evenly over each half often leads to a dark spot in the middle of the tank that looks dim when it seems as if this should be the place with the most light. You can overcome this by moving the two fixtures closer together. In the example below the first pictures show some shadowing in the middle of the tank between the two fixtures. In the second fixture the lights were adjusted to be almost 2 inches closer and the dark spot in the middle was eliminated.

TESTING AND OBSERVATION
The final step is testing and observation of your plan in action. Watching and reacting to the corals is a good way to determine if they are getting what they need. During this phase you also need to be very aware of your water parameters to ensure that any issues in the tank are not misdiagnosed and blamed on the lighting. Coral Polyp extension is usually the first indicator that we see. Polyps should be fully extended across the entire coral. Fleshy corals such as LPS and soft corals should also maintain their swollen flshy appearance and be eating well during daylight hours when spot fed.
Looking closer as your corals become acclimated you should see some changes in color and this is a normal part of acclimation to LEDs. You can learn more about that in this article,Acclimating your tank to LED lighting.
Testing the PAR of various areas of the tank can give you an indicator of how well you’ve done with your lighting plan as the par should be fairly consistent across the length of the tank with higher PAR at the top and lower at the bottom. If you have “hotspots” (areas with very high PAR) it’s usually best to try to reduce those.
PAR testing is easily accomplished with a PAR meter which is a tool that can often be borrowed from a local reef club, another hobbyist or even a local store. Testing the PAR levels throughout the tank and writing down the levels will enable you to bring new corals in and place them in a location where they will likely be happy. Soft corals generally like lower light levels while SPS corals typically like higher light but there is a lot of wiggle room and many corals are able to be acclimated to a wide range of light levels.
If you find that your light levels are not consistent or your corals are not reacting favorably then you need to evaluate the plan and make adjustments accordingly. Photo periods are often too long or too short and need to be adjusted with longer ramp times or lower intensities to allow for the full time to be used. If the lights are close to the water surface you may find that intensities are too high and corals are bleaching out, you may need to reduce the peak intensity. If your’ PAR readings are hit and miss then an adjustment to the position over the tanks may be necessary.
In the case study at the beginning of the article, Frank enlisted the help of a local store with a PAR meter and had them stop by to help him make the evaluation. Test PAR levels and adjust the overall plan. This resulted in better coverage across the tank with more consistent light levels and PAR numbers as well as a cleaner look in his living room.
We’d like to thank Oceans by Design in Tukwila, Washington for their help with the lighting plan and testing in Frank’s tank.
Check them out http://www.oceansbydesign.com/
So, you’re looking for a new LED fixture for your saltwater aquarium or planted freshwater tank. Maybe you just picked a good deal from that local fish store and now you need to install it. Making a plan ahead of time will give you better results, ease maintenance and give the fixture a longer life span.
In this article we will share the experience of Frank who is using three of the Orphek Atlantikunits over his tank. He’s mounted the lights and placed the corals in his tank and then followed our recommended acclimation and introduction levels. Now that he is through the initial period he wants to make sure that he is getting 100% out of his investment in lighting and giving the corals everything that they need.
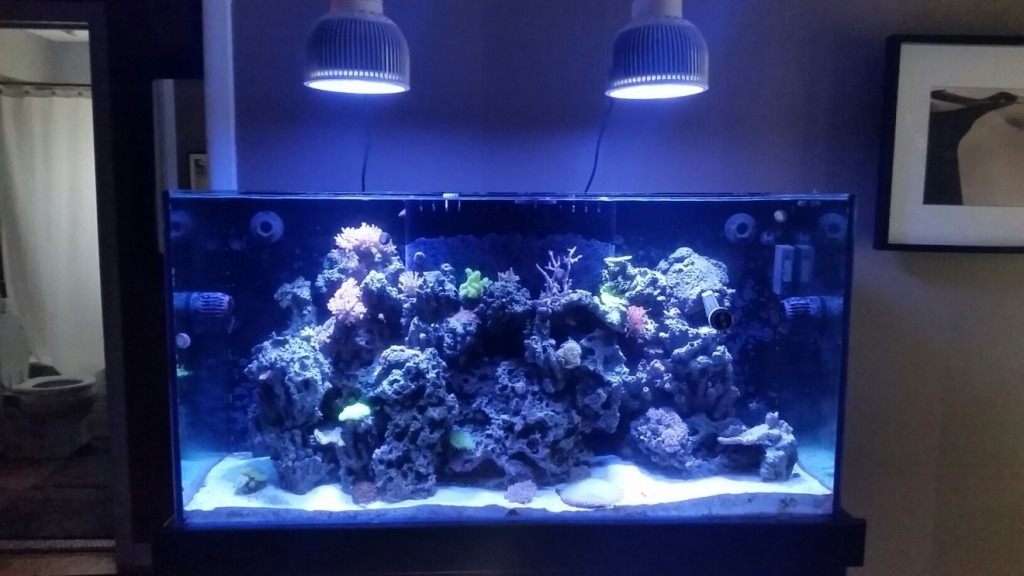
Frank mounted the lights perpendicular to the length of the tank and spaced them evenly across which resulted in higher levels under the lights and low levels between them. He also was running several channels low from the initial acclimation program and needed to understand the levels as he brought the percentages up
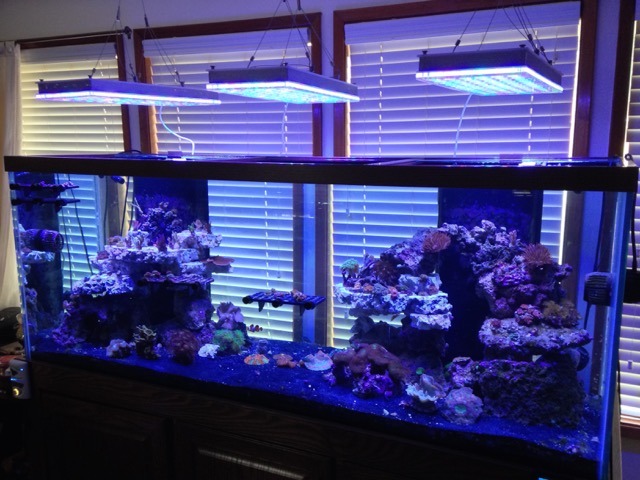
Franks tank with 3 Orphek Atlantiks mounted perpendicular
Three steps can help you to implement a good plan and save you time and boost the overall health and vigor of your corals; planning ahead, changing your thinking and testing and observation. Frank performed these steps and is much happier with his lights and his corals are going to show the benefits.
PLAN AHEAD:
Like most things in the hobby having a plan ahead of time will save you lots of headache when installing and using your lights. Having a basic understanding of how you wish to mount the light, recommended attachment points and coverage area is just the first step. In order to have a well-lit tank you need to plan ahead for cable routing, mounting heights and placement over the tank. The best way to do this is by drawing it up.
This can be done with a simple piece of paper and pen or you can use a drawing program on your computer such as Google Sketchup. Start by making a rough determination on the amount of area you will need each fixture to cover and then determine the orientation of these fixtures based upon that data. For example; an 8 foot by 3 foot tank footprint may be lit with 3 units running lengthwise or 4 units turned perpendicular.
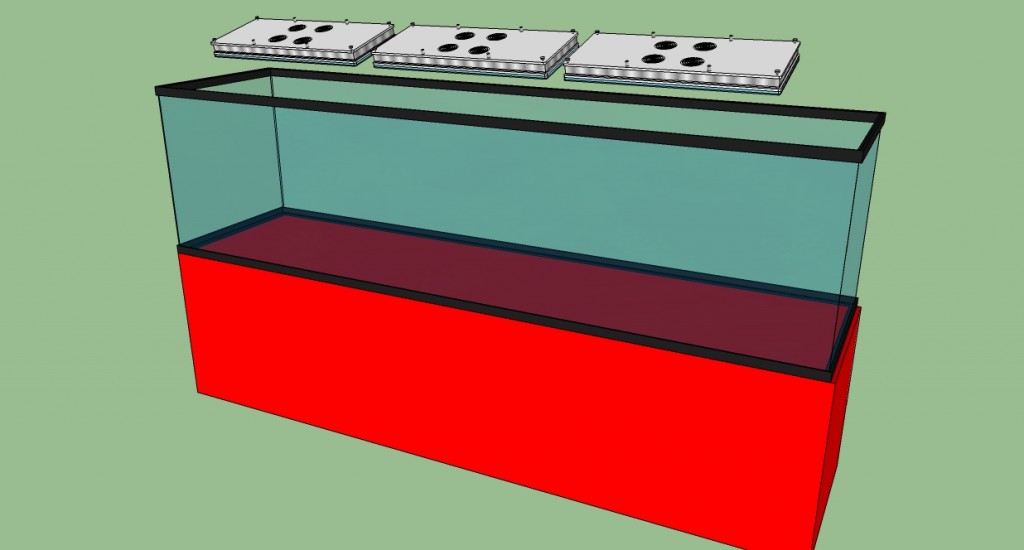
8 foot long tank lit by 3 Orphek Atlantik v2.1 units with lights running lengthwise.

Franks tank with better spread, more consistent PAR numbers and a cleaner look.
This orientation is usually determined by the coverage area of the light fixture and the intensity needed. Higher intensity corals will need to have more light and many often require additional fixtures over and above most manufacturers’ recommendations. This is where having a plan ahead of purchasing fixtures can save you money in the long run.
We often see clients who purchased 2 of a competitors light and later realized that they actually needed three to cover the tank and provide the intensity that is needed for the corals that they wish to keep. They are left with the difficult task of investing more money in a fixture that has already fooled them or adding supplemental lighting of another kind which often results in a mixed bag of products and results instead of a seamless well designed system that looks good and delivers consistent results.
Know your needs and buy the correct number of fixtures based upon the needs of your tank.
CHANGE YOUR THINKING:
Most people mount their lighting flat above their tank and don’t think twice about it other than when they need to work on it. All too often they have dark spots or spotlighting as a result and think that it’s normal because of the nature of LEDs. This is not the case in a well thought out plan.
We have to begin to think of lighting our systems like we were lighting a stage and where the corals and fish are the actors. Do you like some darker caves for lower light corals? How about reducing the algae that grows on the glass? That’s always a good thing right?
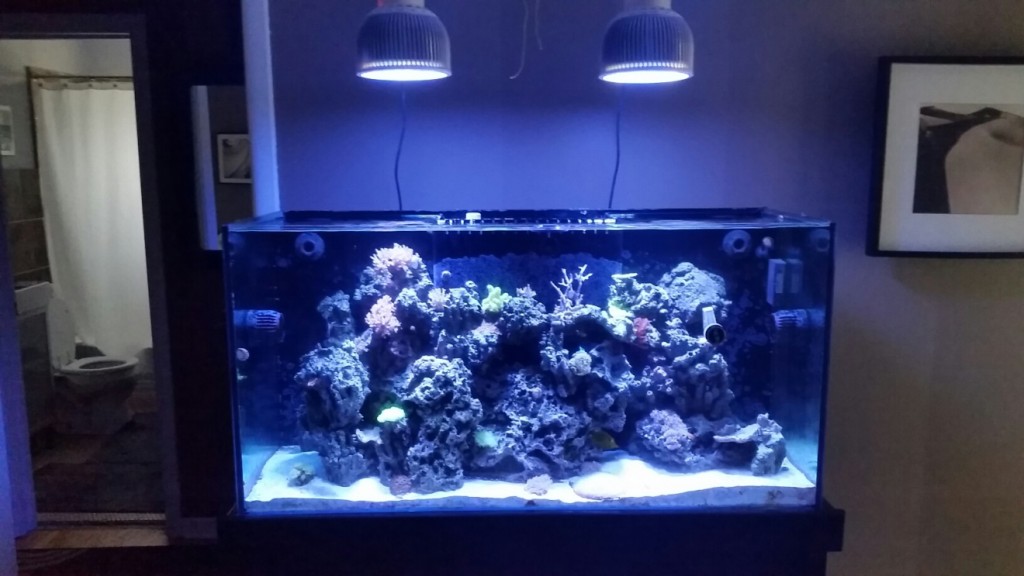
You can mount the lights at an angle to reduce the amount of light that touches the glass which will reduce the amount of maintenance that you have to perform as well. Raising the lights higher above the water can help to eliminate some of the spotlighting on the sand bed as well. A higher mounting point also allows easier maintenance access inside the tank since you are not having to move the lights each time you need to get inside the tank.

In this picture you can see the lights are angled with will reduce the amount of light that hits the front glass. Having the lights mounted higher versus low to the water line also reduces spotlighting.
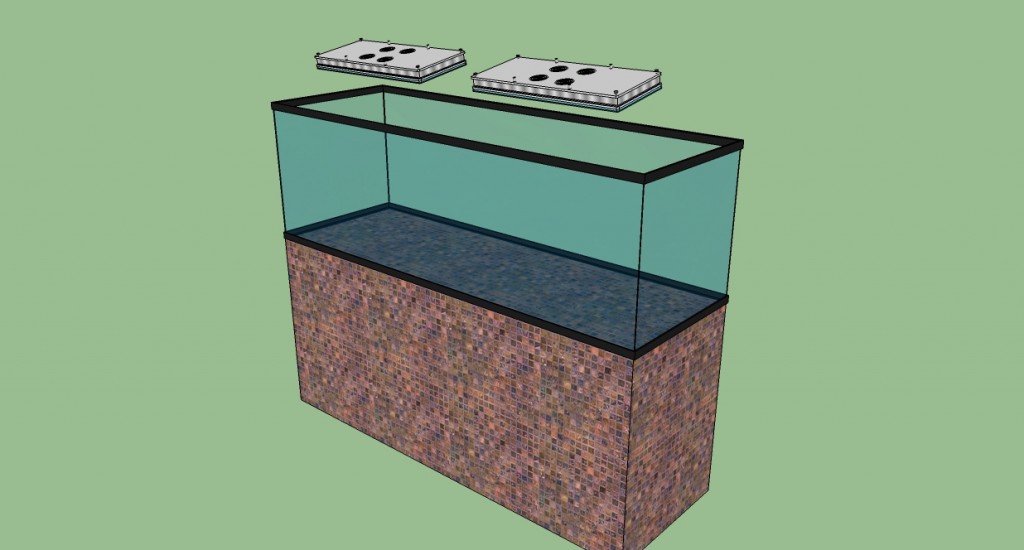
Eliminating shadows and dark spots is something that many reefers are not able to overcome but it can often be as simple as respacing the fixtures. In a tank with two fixtures, spacing the fixtures out evenly over each half often leads to a dark spot in the middle of the tank that looks dim when it seems as if this should be the place with the most light. You can overcome this by moving the two fixtures closer together. In the example below the first pictures show some shadowing in the middle of the tank between the two fixtures. In the second fixture the lights were adjusted to be almost 2 inches closer and the dark spot in the middle was eliminated.
Two Orphek Atlantik Pendants spaced evenly creating a dim area in-between.

The same two units moved 2 inches towards each other eliminating the dark spot.
TESTING AND OBSERVATION
The final step is testing and observation of your plan in action. Watching and reacting to the corals is a good way to determine if they are getting what they need. During this phase you also need to be very aware of your water parameters to ensure that any issues in the tank are not misdiagnosed and blamed on the lighting. Coral Polyp extension is usually the first indicator that we see. Polyps should be fully extended across the entire coral. Fleshy corals such as LPS and soft corals should also maintain their swollen flshy appearance and be eating well during daylight hours when spot fed.
Looking closer as your corals become acclimated you should see some changes in color and this is a normal part of acclimation to LEDs. You can learn more about that in this article,Acclimating your tank to LED lighting.
Testing the PAR of various areas of the tank can give you an indicator of how well you’ve done with your lighting plan as the par should be fairly consistent across the length of the tank with higher PAR at the top and lower at the bottom. If you have “hotspots” (areas with very high PAR) it’s usually best to try to reduce those.
PAR testing is easily accomplished with a PAR meter which is a tool that can often be borrowed from a local reef club, another hobbyist or even a local store. Testing the PAR levels throughout the tank and writing down the levels will enable you to bring new corals in and place them in a location where they will likely be happy. Soft corals generally like lower light levels while SPS corals typically like higher light but there is a lot of wiggle room and many corals are able to be acclimated to a wide range of light levels.
If you find that your light levels are not consistent or your corals are not reacting favorably then you need to evaluate the plan and make adjustments accordingly. Photo periods are often too long or too short and need to be adjusted with longer ramp times or lower intensities to allow for the full time to be used. If the lights are close to the water surface you may find that intensities are too high and corals are bleaching out, you may need to reduce the peak intensity. If your’ PAR readings are hit and miss then an adjustment to the position over the tanks may be necessary.
In the case study at the beginning of the article, Frank enlisted the help of a local store with a PAR meter and had them stop by to help him make the evaluation. Test PAR levels and adjust the overall plan. This resulted in better coverage across the tank with more consistent light levels and PAR numbers as well as a cleaner look in his living room.
We’d like to thank Oceans by Design in Tukwila, Washington for their help with the lighting plan and testing in Frank’s tank.
Check them out http://www.oceansbydesign.com/
Last edited:


