First build, some questions, and documenting my build

Glasswalker

Active Member
View Badges
Joined
Mar 24, 2016
Messages
232
Reaction score
244
Rating - 0%
0   0   0
Hey, so I'm brand new to the site, and the hobby. A friend has a large (200-300gal) tank that I've helped him with a bit, and my wife and I decided to get into it.... We're going to start much smaller.

Anyway, he's helping a lot, and we're doing a ton of our own research (including reading the sticky threads here!)

But thought I'd also start a thread to both document my build, and to ask for advice/suggestions.

Right now where I'm at right now:
  • I have a space along a foundation wall, in the end of my dining room (no direct sunlight at all). I can accomodate 18" protrusion from the wall (20" absolute max) and up to 48" wide.
  • My friend can supply me with 15g long sump tank, protein skimmer, power heads, live sand (cured), live rock (cured), main pump, and water from his RO to get started.
  • I'm currently shopping for a tank which either has a stand large enough to accomodate the sump and gear, OR I'll build a stand myself from scratch
  • For Tank, I'm looking in the 40-46gal range I think. I'd stretch as high as 50 in a pinch, or as low as 30... I think I prefer the size of the 40-46 though. I really like the bow front ones, but I've found a couple used tanks with pre-existing drills/plumbing and wier, so might make life easier if I can get one of those. Still waiting on response from the sellers of those tanks, one includes a nice stand as well...

The one tank I'm looking at appears to be a 46g long, with a nice stand, 2 drills for plumbing, and an overflow/wier box built into the left side top of the tank. I am hoping to work something out with that seller as that would be an ideal start I think. (tank already drilled, easy to plumb, good size, has a nice stand, and so on).

Other equipment list:
  • small in-sump protein skimmer, from my friend, was used in his 65g setup before he upgraded
  • Mag5 Pump (from my friend, again from his 65g setup)
  • a pair of 100w heaters (to be bought new)
  • a couple power heads for water circulation (from friend, unknown specs)
  • Planning to use a pump based Auto Top Up basin, not sure of volume yet, or specifics, just want to avoid gravity fed for risk of failure causing a flood (happened to my friend already lol)
  • No lighting yet, Phase 1 has no coral or fish, only cycling, so leaving it dark.

My friend is already filling 5g jugs with his RO for me, to prepare.

My plan for "phase 1" so far:
  1. Acquire Tank
  2. If tank has no stand, build stand
  3. Leak test tank for 24h using tap water
  4. Clean tank
  5. Move Tank and Stand into target location
  6. Complete Plumbing
  7. Setup/Configure Sump (heater/skimmer/airbubble management/pump)
  8. Test/Verify Electrics, and setup/wire
  9. Mix Salt Water in seperate large basin, pre-heated RO water
  10. Add initial salt water
  11. Deploy Sand and Rock *verify stability*
  12. Add remaining salt water
  13. Final checks
  14. Power up the system and get things running
  15. Let tank cycle (as long as needed)

So first off, anyone have any ideas/suggestions on my plan for things I've missed, or need to alter? Extra things I should consider?

Second, I have some things I'm thinking of, either concerns, or things I want to take into account in the design, would love ideas/suggestions:
  • I'm thinking of a Herbie Overflow Design, or one suggestion I saw was a Durso with a dry pipe as a backup (since I probably won't need the high flow with this size tank)
  • I'm a bit concerned about risk of moisture on the wall behind the tank as my space requirements will require it to be close to the wall. I'm thinking about options, either building a hood which has a built-in "backsplash" of some waterproof material, or simply covering the tank to reduce evap, see below.
  • Concerned about humidity/moisture damage, as I rent. Looking into options, one of which appears to be covering the tank and sump to significantly reduce evap. From what I understand, if I leave the overflow uncovered, and the skimmer, those should provide enough gas exchange to keep the fish in good health, while keeping exposed water surfaces to a minimum and controlling evap rates. But still unsure of the specifics behind this... And if this will in-fact work, or if there are other problems.
  • Trying to design as much "safety" into the system as I can, I want to take every measure to avoid a flood, or major catastrophe (again I rent lol)
  • Trying to design as much automation into the system as I can, minimizing maintenance, so even though it's a small system, I'm likely "over designing" it...

My planned next phases (will go into more depth as I draw near completion of Phase 1, but outlining them hear for feedback/consideration)
  1. Phase 1 - Initial Build and Cycling
  2. Phase 2 - Cleanup Crew, and Remaining Details (lighting and such). Plus some automation (sensors, monitoring, and so on)
  3. Phase 3 - First fish or two, and perhaps some coral
  4. Phase 4 - Final revisions, tweaking, and additional livestock in small stages going forward. Finalizing automation based on observations.

I expect to spend at least 1 month per phase, and take it slow. If it becomes obvious that I should advance I might move ahead, but for now planning on taking it slow.

Anyway, that's my first post (probably a few errors, and omissions, it's getting late lol... Will correct with edits if needed).

if anyone has any comments, suggestions, whatever I'd love to hear them!

I'll also be using this as my build-log thread, so will post pics as I can.
 

CastAway

Prone to wander, never lost.
View Badges
Joined
Jun 9, 2013
Messages
4,457
Reaction score
3,310
Location
Knoxville TN
Rating - 0%
0   0   0
Your already ahead of a lot of folks, with such detailed plans. Awesome!

Almost all of the build threads are in the "Members Tanks" forum, and I'll be the mods will move this post there for you if you'd like/ask.

Tagging along for the ride!
 

rayn

Bluefin Believer
View Badges
Joined
Mar 25, 2014
Messages
3,351
Reaction score
2,806
Location
Illinois
Rating - 0%
0   0   0
Following.

Sounds like you have a good plan going. One thing I missed was your own RO/DI water filter. Also a small tank for a QT of fish or corals, a ten will work fine for most.
 

reefm

Community Member
View Badges
Joined
Jul 29, 2015
Messages
69
Reaction score
34
Rating - 0%
0   0   0
Following.

Sounds like you have a good plan going. One thing I missed was your own RO/DI water filter. Also a small tank for a QT of fish or corals, a ten will work fine for most.

+1

A lot more RO water is needed, aside from initial fill. Evaporation will be an issue to tackle immediately, then water changes in whatever interval you choose. Not to mention having some RO aside for emergencies (QT, spills etc)

Good luck!
 
OP
OP
Glasswalker

Glasswalker

Active Member
View Badges
Joined
Mar 24, 2016
Messages
232
Reaction score
244
Rating - 0%
0   0   0
Hey, thanks for the feedback!

So for QT, my plan is during the first couple rounds of new stuff, my friend has a 65g QT tank fully up and running, so we'll likely go buy stuff at the same store at the same time, and QT it together... Eventually yeah I'll need to get a little 10g tank for QT or something, but that can likely come later (friend lives no more than a 2-3 min hop from my house)

As for the RO, in the beginning, I'll likely keep a bunch on-hand from his RO. And eventually in future phase will figure out my own solution... Not sure what that will be yet. As I rent, and don't have anywhere I can easily install a resevoir and RO to run... No room at all in any main rooms with water access, other than the garage, or outside. But being this is Canada, it gets dang cold out there for more than half the year ;) lol... (even the garage will get down below freezing in the winter)

So need some figuring on that one still...

I'm hoping to figure out a solution to keep evap under control. Cooling the tank I don't think will ever be an issue (winter it's dang cold, and in summer I run AC all the time). So if I can figure out how to keep the gas exchange up, and the water oxygenated, I'd like to cover both the display and sump... Which should significantly cut down on evap. With the addition of a small ATO resevoir, I should be able to keep my need for RO low enough to be manageable I hope...

Any thoughts/feedback/suggestions on the covered tank idea? Methods/ideas on how to keep the tank healthy while keeping evap down?

But yeah, I definitely agree, going to need a more scalable solution as soon as possible for that one.
 

DeniseAndy

7500 Club Member
View Badges
Joined
Sep 12, 2011
Messages
7,802
Reaction score
10,678
Location
Milford, Ohio
Rating - 0%
0   0   0
You can hook ro/di up to a bathroom tap or similar in kitchen if that would help.

One concern with a top is lack of o2 exchange and blocking light. Protein skimmer will help, but good surface agitation is still ideal. I still find the hardest part of my 40g breeder with 20g sump is topping off the water. It goes through soooo much more than you would think. It is in a humid area too.

That is cool that you have a fellow reef keeper so close to help out. Makes vacationing a bit easier. :)
 
OP
OP
Glasswalker

Glasswalker

Active Member
View Badges
Joined
Mar 24, 2016
Messages
232
Reaction score
244
Rating - 0%
0   0   0
Yeah having someone close by is certainly very helpful when we're diving in for the first time. Also we've been able to help them out during travel/vacation which is nice as well.

For the RO, are you suggesting a temporary deal? ie: "Need more water, hook up the RO over night" kinda thing?
Or more finding a location near one of those taps? There isn't really room in the kitchen, though there is a spare bathroom in the basement we don't use as a bathroom (more as a closet) with a bit of reorganization we could use that as a space maybe... Hmmm Definitely thinking to do.

For the blocking the light, the way I understand it the main thing is the salt buildup blocking things out. Or is there issue with the cover itself blocking light? I'm assuming glass is needed too, since acrylic tends to eat a lot of the non-visible spectrum, or is that not as important?

Definitely don't want to harm the health of the tank, but it strikes me there must be a way to control evap to some degree... Maybe that's the naive newbie in me speaking though ;) lol

Definitely appreciate all the input and suggestions, keep them coming! Now is the time for me to be rethinking/adjusting the plan as I'm waiting to procure the parts (which I'm really trying to do in the next few days). :) Plans are easy to change, I have a sneaking suspicion that established tanks/builds are a little harder to make sweeping changes to. (though I certainly expect an iterative learning process, resulting in minor adjustments, upgrades, changes over the months, until I finally bite the bullet and start a new build lol)...
 

DeniseAndy

7500 Club Member
View Badges
Joined
Sep 12, 2011
Messages
7,802
Reaction score
10,678
Location
Milford, Ohio
Rating - 0%
0   0   0
For the ro/di, that is what I was thinking. Hook up remove type thing for when needed.

Light blocking is simply that the top will get water condensation, salt creep, etc and the material itself will block out some of the light. Means significantly lower par and spectrum. I have this issue on my brace for my 210g. It is such and old tank the brace is like 18" of glass in the middle of the tank. I have to clean it alot and everything kept under that section is a bit lower light items.

Evaporation is one of those things. I know these sealed little less than 1 g or so special picos do something in that nature, so check out brandon's posts on those. I am not sure how it will work on something so large a system.
 
OP
OP
Glasswalker

Glasswalker

Active Member
View Badges
Joined
Mar 24, 2016
Messages
232
Reaction score
244
Rating - 0%
0   0   0
So as a backup plan (the tank I'm looking at that's pre-drilled and comes with a stand may not be available). So I'm talking to a few sellers for tanks, a couple of which are 55g.

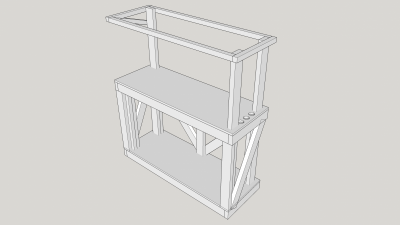
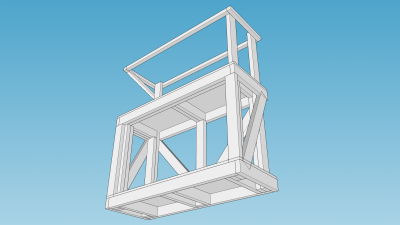
So I am trying to design a stand for it, which would be free-standing, and support a hood. Enclosed on the right side (to hide plumbing) and rear, and 2 full viewing sides (left side and front). Tank is a 55L I'm designing for. Speaking of which with used tanks, I need to drill them... Any idea how I can determine if the tank is tempered or not?

I realize the stand is extremely over-engineered, I'm fine with that lol...

Anyway, this is first pass, it needs a few refinements and adjustments but here are pics of the frame:
Fish Stand.png Fish Stand Bottom.png
Some Features:
  • Intend to build hang-on panels for the facing, makes it easy to change later for decorating, and easy to access everywhere.
  • Hang-on panels will also keep weight down for moving, the frame will be fairly heavy
  • Hood will be a slip over, using lighter materials. Meant to be lifted vertically off the hood support frame.
  • Intend on a water resistant backsplash panel behind display tank.
  • Plumbing can be neatly concealed down right side
  • Support for hood will enclose lighting and such
  • Plan to add some fans for air circulation both in hood and sump enclosure.
  • Weight carried down through verticals directly by the wood, fasteners not bearing the load
  • Should support an array of tanks in 48" width
Anyway will probably tweak a bit more still, but wanted to have a plan ready so that I can start building soon.
 

DeniseAndy

7500 Club Member
View Badges
Joined
Sep 12, 2011
Messages
7,802
Reaction score
10,678
Location
Milford, Ohio
Rating - 0%
0   0   0
Unless predrilled, most of the bottom panel of more modern tanks are tempered. At least that is my understanding. The sides can be drilled, albeit carefully. Maybe others know better than me though.

Love the stand build. Should be really nice.
 
OP
OP
Glasswalker

Glasswalker

Active Member
View Badges
Joined
Mar 24, 2016
Messages
232
Reaction score
244
Rating - 0%
0   0   0
Well I think I'm settled on a tank... Just have to go check it out in person, and confirm it's in good shape face to face.

Here is a pic of the tank from the ad from the seller:
$_27.JPG


The dimensions are 16" x 47" x 20", and glass is 3/8" thick. (which implies something along the lines of 60-65g)
It's been being used for freshwater. Anything in particular I need to do to prepare the tank (clean it special way?)

No info yet (he's looking into it, couldn't remember right away) what brand/model of tank it is. (anyone who can ID it from this info would be appreciated for sure).

So I'll be tweaking the stand design for this tank. Hopefully picking it up Sunday. Price $75

Things are slowly coming together!
 

DeniseAndy

7500 Club Member
View Badges
Joined
Sep 12, 2011
Messages
7,802
Reaction score
10,678
Location
Milford, Ohio
Rating - 0%
0   0   0
Looks nice. Rimless are pretty. Clean with vinegar and water. Should not be contamination cuz fresh. Just make sure it has not seen copper.
 
OP
OP
Glasswalker

Glasswalker

Active Member
View Badges
Joined
Mar 24, 2016
Messages
232
Reaction score
244
Rating - 0%
0   0   0
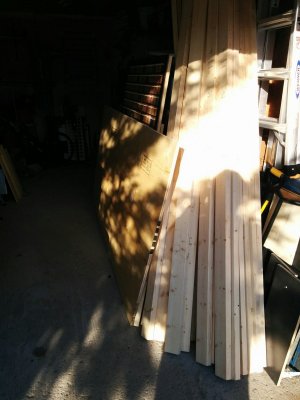
Lumber is in the garage, going to start cutting to length tonight, probably assembly of stand frame tomorrow, and going to view and most likely pick up the tank tomorrow late afternoon :)

*tents fingers and giggles maniacally*

Pic of lumber pile in my garage:
IMG_20160326_174415.jpg
 
OP
OP
Glasswalker

Glasswalker

Active Member
View Badges
Joined
Mar 24, 2016
Messages
232
Reaction score
244
Rating - 0%
0   0   0
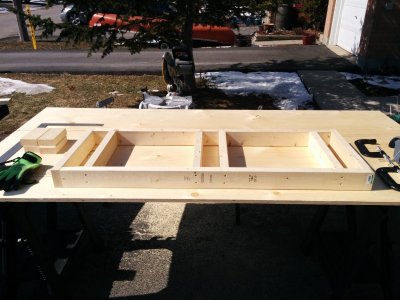
And the build has begun!

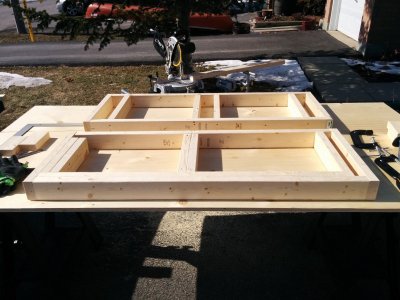
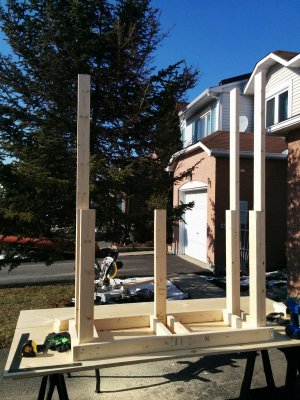
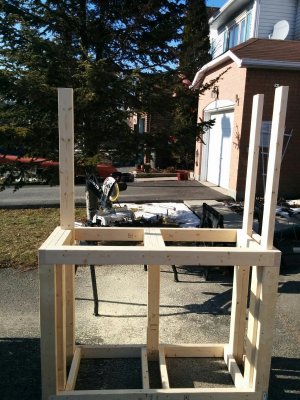
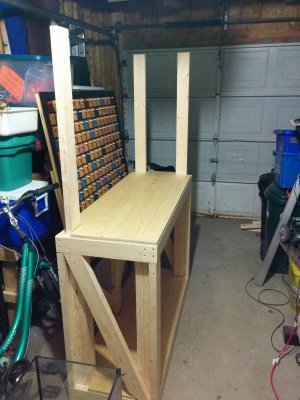
Got most of the stand frame done, only need to finish the hood support frame (which will go on after the tank is on it so I can get a feel for height needed) and cross-bracing for lateral stability (though honestly it's build like a tank) lol... Also need to get the ply sheets on the top and bottom surfaces.

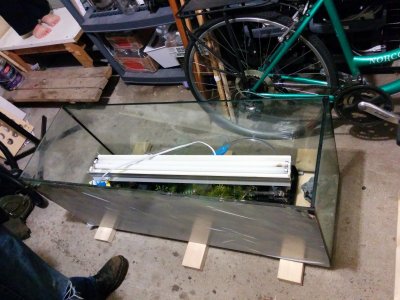
Also the tank arrived today, still a bunch of junk in it I need to sort, and need to clean it up and get it leak tested.

Will finish off the stand tomorrow, cross-bracing, 3/4 ply, and put the tank up on it for the first time.
Will worry about making it pretty in the near future, but not right away.

Pics of the build today (yes that's snow in the background, was -1C out when I started, but got up to about 12C by early afternoon, it was nice, I was in a t-shirt lol):
Bottom base platform:
IMG_20160327_145844.jpg
Display platform:
IMG_20160327_154351.jpg
Legs going on:
IMG_20160327_161104.jpg
Mostly assembled:
IMG_20160327_164327.jpg

Pic of the tank in my garage:
(a little concerned it's not braced in any way, it's 3/8 glass, so it might be alright... May start another thread about that)
IMG_20160327_204919.jpg
 

Lilly45nano

Active Member
View Badges
Joined
Oct 13, 2015
Messages
143
Reaction score
55
Location
CT
Rating - 0%
0   0   0
Sure looks like you have mad carpenter skills;)
Very nice start...following along
 
OP
OP
Glasswalker

Glasswalker

Active Member
View Badges
Joined
Mar 24, 2016
Messages
232
Reaction score
244
Rating - 0%
0   0   0
Hey! Thanks! I personally don't think they are "Mad" skills lol, but I pay a lot of attention to detail yes, and I consider myself "handy" lol...

I'm very excited about the build, and unfortunately it's raining profusely today, and I need to be outdoors to rip the 3/4 ply to size, as there isn't really enough room in my garage... So I guess the remainder waits until tomorrow... Then it's:
  • Install one more cross joist on the righthand side of the stand, I realized there is no joist directly under the end of the tank (because of the offset for the overflow plumbing) so I'll add one more support there to be safe.
  • Rip ply to size and install both sump platform and display platform
  • Cut/Install cross braces on the rear/sides (not that it really needs them, I could probably drive my truck into it and it wouldn't shift laterally lol) :) but I like to over-engineer things...
  • Clean the tank out completely, remove the cheesy background image which has seen better days, and give it a full washdown/cleaning
  • Lay down 1" foam on display platform for the tank
  • Put the tank on display platform, and fill it with water to leak test it for 24-48 hours...
In the meantime, glass drill on-order, should arrive any day...

Sorting out Plumbing, Lighting, and Heaters now...
See this thread for my lighting discussion/questions:
https://www.reef2reef.com/threads/l...ghting-choice-for-first-65g-long-reef.241824/

Still need to source glass for wier box/overflow, and possibly a DIY eurobrace...
See this thread for discussion on bracing, and whether or not I need it on this rimless tank:
https://www.reef2reef.com/threads/bracing-for-rimless-65g-tank.241818/

So will likely be another week or two realistically before I have all that sorted...

Then comes the fun part... Adding live sand and rock, Aquascaping, and filling it with water to cycle the tank :)
 
OP
OP
Glasswalker

Glasswalker

Active Member
View Badges
Joined
Mar 24, 2016
Messages
232
Reaction score
244
Rating - 0%
0   0   0
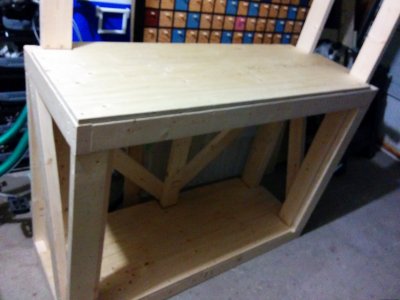
Quick update, I got a nice sunny day yesterday, so I took the evening after work while the sun lasted to finish the stand frame build (cross-bracing, one more joist, and 3/4 ply surfaces for display and sump).

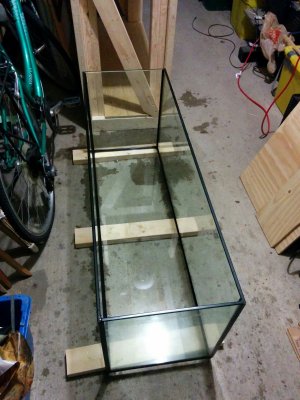
I also gave the tank it's first wash/cleaning, just plain tap water, getting rid of debris and remaining dirt and grime from previous owner.

I also tried the "polarized glasses and laptop LCD" method to determine for sure if the tank is tempered... Unfortunately test was inconclusive (tested the windshield in my truck using same method and it was inconclusive too lol, so that method is definitely not foolproof lol). Either way I'm pretty sure it's not tempered.

Some pics attached of both the frame in my garage with braces/ply, and the newly cleaned tank.
IMG_20160329_211706.jpg IMG_20160329_211729.jpg IMG_20160329_215850.jpg
 
OP
OP
Glasswalker

Glasswalker

Active Member
View Badges
Joined
Mar 24, 2016
Messages
232
Reaction score
244
Rating - 0%
0   0   0
Another quick update, so this evening I bought foam for putting under the tank, and gave the tank another good scrub with 10% vinegar solution, got all the remaining residue off... Then dried it, and gave it a washdown with water and a good final rinse. Then dried it thoroughly...

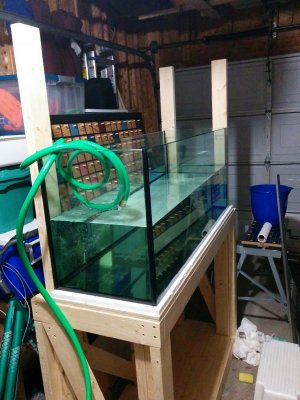
And then... The big leak test! It was a very exciting moment filling it with water :)

Unfortunately it wasn't perfectly level (floor in my garage is slopes towards the exterior door, the stand itself is good and square)

So food news it holds water, and didn't explode lol... And I made sure exterior and seams were 100% dry, no hint of water, checked after 1 hour, no moisture... Leaving it 24h and will see if any indications of a slow leak show up. I'm hoping not.

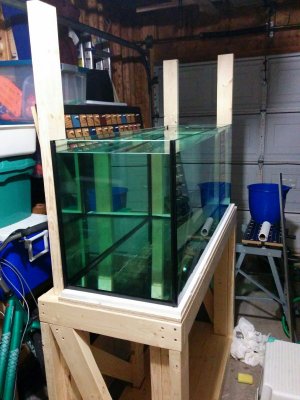
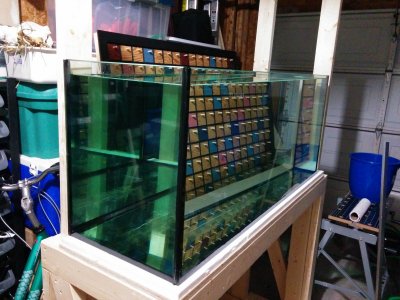
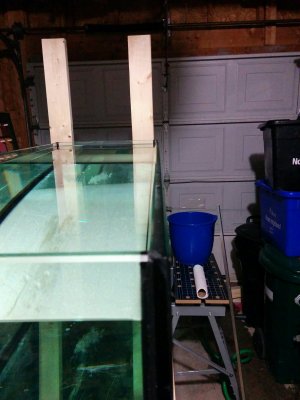
Also another important thing, I was concerned about bowing in the glass since this is full rimless with no bracing...

One pic shows along the glass front..
There is technically some bowing at the top edge but it is very minor. At dead center in the 48" length, it deflected a maximum of approximately 1mm... So I think that's quite good, but I definitely would love to hear any other input/feedback on that.

Anyway here are pics!

Still filling it for the first time... Very anxious!
IMG_20160330_222114.jpg

Full angle 1
IMG_20160330_223153.jpg

Another angle full
IMG_20160330_223205.jpg

Along glass showing approx 1mm max deflection in unbraced rimless 10mm glass on 48" front:
IMG_20160330_223217.jpg

Anywhoo, more to come! Ordering someore fear now, and waiting on drill to arrive. Will prob be 2 weeks before I can drill it, so will take that time to finish backing on stand, and move it into the house to its final home provided the leak test passes... Then can drill it in a week or two, and work on overflow and plumbing...

Until next time! As always would love to hear feedback or suggestions!
 

Algae invading algae: Have you had unwanted algae in your good macroalgae?

  • I regularly have unwanted algae in my macroalgae.

    Votes: 42 35.0%
  • I occasionally have unwanted algae in my macroalgae.

    Votes: 25 20.8%
  • I rarely have unwanted algae in my macroalgae.

    Votes: 9 7.5%
  • I never have unwanted algae in my macroalgae.

    Votes: 9 7.5%
  • I don’t have macroalgae.

    Votes: 31 25.8%
  • Other.

    Votes: 4 3.3%
Back
Top