These are an inexpensive way to create some functional and stylish dosing containers and you’ll be recycling/repurposing, too!
The “GHL Edition” in the title is just a little humor because these happen to match my GHL Doser perfectly! A little added bonus for any other GHL owners out there. But if the transparent blue is not your thing, feel free to grab a can of Krylon plastic paint and spray the caps the color of your choice.
This is almost identical to creating dosing containers using the glass Voss water bottles. I was one of the first to do this several years ago and it has become very popular. They are slick looking, but they are heavier, 30% more expensive, made of glass which can break if dropped, and the CORE bottles hold almost an extra 2 oz. But either works great, just depends on your own personal preference or what you can find at the store.

Here is the full list of supplies:


Push down all the way so it doesn’t pull out (without pressing the quick-release ring).

NOTE: I originally tried the rigid acrylic tubing that BRS sells specifically for this purpose but it does not make a good seal inside the bulkheads (which they also recommend). So your fluid will not be sucked up, and instead, only suck air. Therefore I can not recommend the rigid acrylic tubing.


NOTE
The “GHL Edition” in the title is just a little humor because these happen to match my GHL Doser perfectly! A little added bonus for any other GHL owners out there. But if the transparent blue is not your thing, feel free to grab a can of Krylon plastic paint and spray the caps the color of your choice.
This is almost identical to creating dosing containers using the glass Voss water bottles. I was one of the first to do this several years ago and it has become very popular. They are slick looking, but they are heavier, 30% more expensive, made of glass which can break if dropped, and the CORE bottles hold almost an extra 2 oz. But either works great, just depends on your own personal preference or what you can find at the store.
SHOPPING LIST
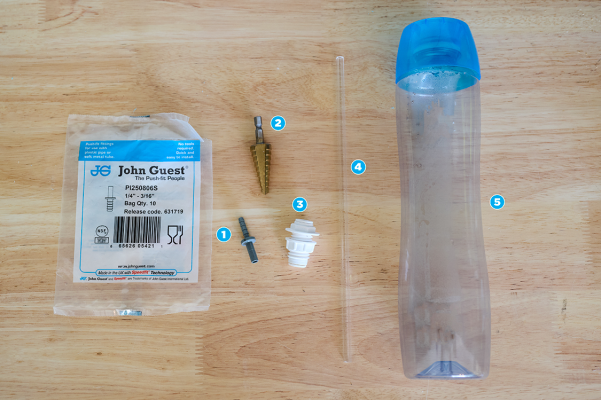
Here is what you will need. The star of the show is the CORE water bottle. I’m using the 30.4 fl. oz. bottles because these take up the least amount of real estate in my stand. In particular, I’m fitting these behind the door of my electronics cabinet.Here is the full list of supplies:
- (1) John Guest quick connect barb fitting. 1/4″ stem x 3/16″ hose barb. I got mine from Amazon.
- (2) Step Drill Bit, so you don’t crack the plastic. Mine is a 9-step. You’ll need one that goes up to 3/4″.
- (3) 1/4″ Push Connect Bulkhead. I got mine from Bulk Reef Supply.
- (4) 1/4″ RO/DI Tubing. Also available at Bulk Reef Supply.
- (5) CORE Water bottle with the label removed.
ASSEMBLY
Step 1
Remove the cap from the bottle. Get your step drill bit and carefully drill straight down through the center of the cap. There is a little dimple in the center of the cap you can use as a guide but you still have to be careful the drill bit doesn’t shift out of the center. On the inside of the blue cap is a standard white bottle cap. There is not a lot of wiggle room between the interior of this white cap and the bulkhead you will use later. Drill until you have a 3/4″ hole and the bulkhead just fits.Step 2
Now grab your bulkhead fitting, remove the bottom nut, and assemble it onto the cap. I find it easier to hold the nut inside and rotate it from the top. As I said earlier, there is not a lot of room inside the internal white cap.Step 3
Take a very small drill bit (I used a 5/64″) and carefully drill down into the cap JUST INSIDE the edge of the inner white cap. This hole is to allow air into the bottle as fluid is sucked out by your dosing pump. But you must drill within the white inner cap. If you drill beyond it, just through the blue cap, your hole will be outside the bottle and not accomplish anything. Again, there is not a lot of space between the bulkhead and the outside edge of the white cap so just pay attention to where you are drilling.Step 4
Now take your John Guest barb fitting and stick the smooth end into the top of the bulkhead.Push down all the way so it doesn’t pull out (without pressing the quick-release ring).
Step 5
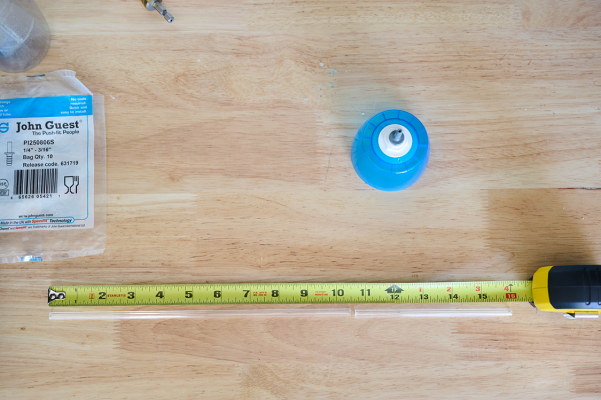
Time to cut your RO/DI tubing. I cut mine to around 11..5″. It’s long enough to reach down into the outer edge of the bottle where it’s lower, to get the most fluid out. The center of the bottle is raised. It's ok for the tubing to not be straight, just make sure it reaches the bottom.NOTE: I originally tried the rigid acrylic tubing that BRS sells specifically for this purpose but it does not make a good seal inside the bulkheads (which they also recommend). So your fluid will not be sucked up, and instead, only suck air. Therefore I can not recommend the rigid acrylic tubing.
Step 6
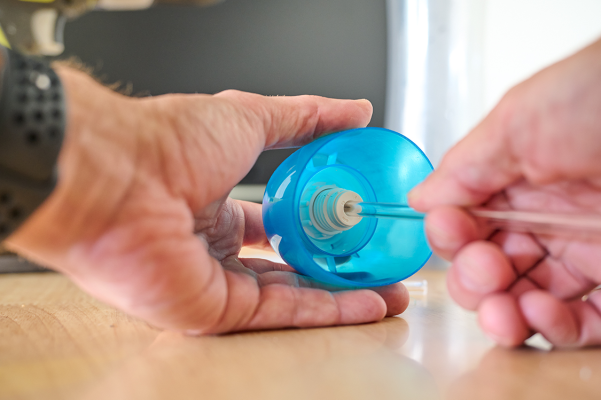
Now take that tubing and push it into the bottom of the quick connect fitting inside the cap. Make sure you push it in all the way and that you can’t pull it out (without holding down the quick-release ring on the fitting).COMPLETE!
Now you have a complete dosing vessel, ready to hook up to your dosing pump with a line of soft 1/4″ tubing. If you break down the cost, each completed dosing vessel comes to around $11 USD. Not too bad considering the cost of commercially available dosing vessels are at least 3x that. And if your plastic CORE bottle ever breaks or just gets gross, just buy a new one for $2 and swap the caps or re-assemble all your parts onto a new cap, just having to drill the holes again.NOTE


