PART 2-----COLORIMETRIC VISUAL TESTING METHODS (The Chemistry)
As we covered in Part 1 in the “Understanding Errors” section, the visual testing method consists of essentially two steps, Evaluation and Assessment. Evaluation is the test procedure (The Chemistry) and Assessment is the determination of the results. We will take a close look at each of these steps and the components of each and look at some potential areas where errors might occur and how we might minimize them.
TESTING PROCEDURES (EVALUATION)
Most test kits consist of a series of reagents* that are mixed together according to a prescribed procedure. The procedure generally requires that the reagents be measured out by “drops”, ml or some type of measuring spoon. They are added to the sample being tested according to a series of steps in a prescribed manor. There is usually a time element associated with the procedure…Mix for 1 min…wait for 30 seconds…etc. This is the case in both a titration test (add drops till color changes) or just a reaction where the reagents are mixed and a resulting color is obtained.
Once the procedure is complete the result is compared visually to a “Standard”. The standard is usually some type of color card or a colored liquid. As many of us can attest to, evaluating results of a measurement using visual color change or subtle color difference can sometimes be a challenge.
The first area we will explore where errors occur is in the measurement of the volumes of liquids and solids reagents required to do the chemistry.
It is important to note that some tests are more critical as to the amount of reagent added and others less so. This fact is not always made clear by the test kit instructions. So I tend to land on the cautious side and treat them all as if the amounts are important to accurate and repeatable results.
DROPPER BOTTLE ERRORS
Many of our test kits require the use of dropper bottles and or droppers to deliver the required volume of reagent for the test. A general rule would be 1 drop = .05mL. Thus 5 drops should yield .25mL. This seems to hold true for all of the test kits I have evaluated. Some areas where errors can creep in are:
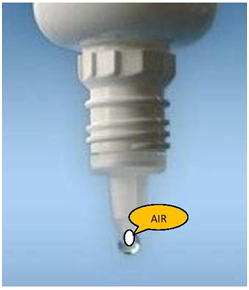
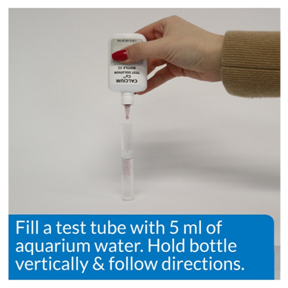
MORE CARE—Dropper was held vertically and care was taken that there was no air in the drops.
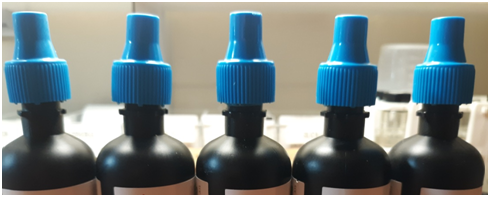
DROPPER DELIVERY VOLUME TEST (5 Different Dropper Bottles Same Test Kit)
* Measured with volume weight of distilled water (Known Value .25mL)
SYRINGE & PIPETTE DELIVERY VOLUME TEST
SYRINGES ERRORS
Many test kits require the use of syringes for measuring reagent or for titrations. When correctly used they can provide good accuracy and precision. Here are some things to watch for than can introduce errors.
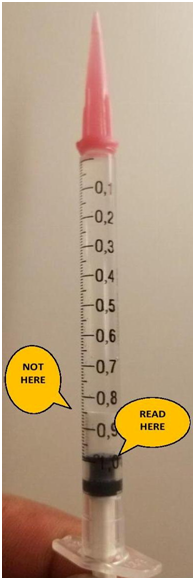
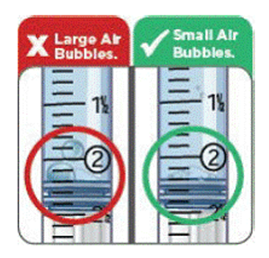
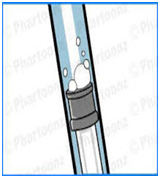
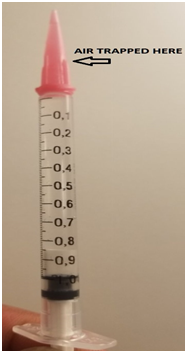
To eliminate the bubbles in the syringe column draw the reagent out of the container with the syringe with the tip fully submerged. Then expel it back into the container fully depressing the syringe. Do this several times to be sure to push out all of the air. On the last draw pull the plunger past the top mark so column is completely full. Hold the syringe tip up and tap the column to release any remaining air. Then slowly depress the plunger until a small amount of liquid comes out of the top. Then eject the extra liquid back into the container until the plunger is at the required mark. Do a visual inspection to be sure there are no remaining air bubbles.
An additional consideration would be to invest in single channel micro pipettes. (See Fig 7)Their cost is around $50 from Amazon for a good one. They are easy to use and quite accurate and precise. Over time I have purchased several different sizes to deliver a range of volumes and now do all liquid measurements with them, including measuring out the volume of tank water to be tested. An additional advantage is they speed up the testing. They; like any instrument, need to be calibrated to keep the accuracy and precision high. I calibrate using mass--- .25mL=.25g of RODI water. I use a Jewelry scale that cost about $20 (Amazon). This is the recommended procedure by the manufacturer.
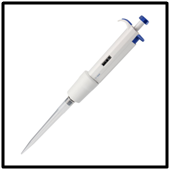
Below in Table 4 & 5 are a set of experiments to demonstrate the above ideas
* Measured with volume weight of distilled water (Known Value 1mL)
PIPETTE* VOLUME TEST –Fig 7 (Same pipette multiple times)
* Measured with volume weight of distilled water
* SCIENTIFIC SINGLE CHANNEL MICRO PIPETTE VARIABLE VOLUME 100-1000µL
As you can see from Table 4 there is quite an improvement in accuracy and precision by applying some best practices in their use. Table 5 shows the gain that can be made using Micro Pipettes.
MEASURING SPOONS ERRORS
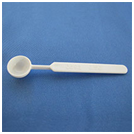
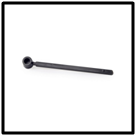
Some tests require us to add a prescribed number of measuring spoon of a dry reagent to the reaction vessel. If you read the instructions it will often say “Add One Leveled measuring spoon to the vial” The word that is often missed or ignored is “Leveled”. Many tests provide pictorial instructions that show the steps of the chemistry to be preformed. If a measuring spoon is required they just show the reagent being added with the spoon…They don’t show the “Leveling” part. You have to read the instructions to find that part. Not leveling the spoon will result in the addition of too much or too little reagent and introduce variability in the process resulting in reduced accuracy and precision. Leveling the spoon increases accuracy and precision which is demonstrated by the results in Table 6
MEASURED AMOUNT WITH SAME MEASURING SPOON MULTIPLE TIMES
MEASURED AMOUNT WITH SAME MEASURING SPOON MULTIPLE TIMES
Parallax error is the shift in apparent position of an object due to different viewing position. It is an error caused by humans, while measuring a quantity if your eye is not at the proper angle to the scale you're reading, it will cause parallax error. It only depends upon the line of sight. These errors can occur both when measuring out reagent or the solution to be tested as well as interpreting results (mLs used). See Fig 9 & 10
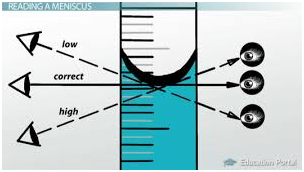
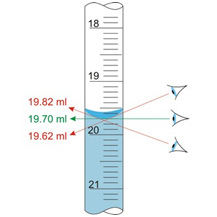
Parallax Errors can be avoided by proper positioning of the device so the meniscus (bottom of the curve of the liquid in the device) is perpendicular to your line of sight and on the same level as your line of sight.
The first 5 procedural errors (a-e) can be avoided with four simple steps.
To check for the possibility of a “bad” reagent save back enough reagent from the previous batch to do at least 3 additional tests. Run a test using the previous batch then run a test using the new batch. You should get a measured value close (within your standard % Relative error for the test. If your measured value is not acceptable repeat the test two additional times to confirm. I have on two separate occasions found bad reagent so it does happen.
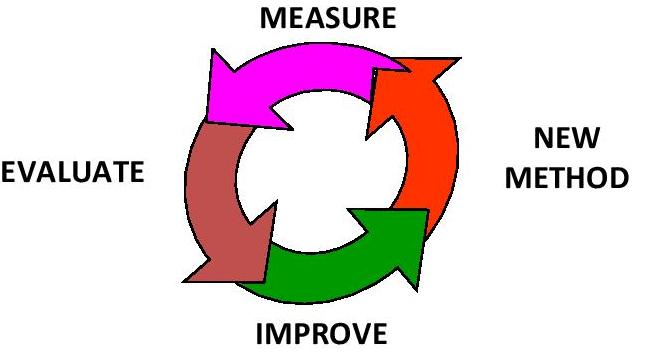
This concludes our look at the first step in The Visual Testing Methods---“Doing the Chemistry (Examination)”. In PART 3 we will look into the Assessment step of Visual Testing…”Looking at the sample”. We will explore human color vision and its impact on the results of our measurements as well as some conclusions and tips to reduce errors following our Quality System Model…Measure----> Evaluate----> Improve---> New Method
As we covered in Part 1 in the “Understanding Errors” section, the visual testing method consists of essentially two steps, Evaluation and Assessment. Evaluation is the test procedure (The Chemistry) and Assessment is the determination of the results. We will take a close look at each of these steps and the components of each and look at some potential areas where errors might occur and how we might minimize them.
TESTING PROCEDURES (EVALUATION)
Most test kits consist of a series of reagents* that are mixed together according to a prescribed procedure. The procedure generally requires that the reagents be measured out by “drops”, ml or some type of measuring spoon. They are added to the sample being tested according to a series of steps in a prescribed manor. There is usually a time element associated with the procedure…Mix for 1 min…wait for 30 seconds…etc. This is the case in both a titration test (add drops till color changes) or just a reaction where the reagents are mixed and a resulting color is obtained.
- Note on Safety: Some of the reagents we use can be hazardous…Nitric Acid…Sulfuric Acid just as examples. Exercise caution when using these reagents so as not to get then in your eyes or on your skin. Eye protection is a good practice. Some kit manufactures provide Safety Data Sheets, include precautions in their instruction sheet or label the containers accordingly. If you are unable to find this information assume it is hazardous! Keep them out of the hands of children!
Once the procedure is complete the result is compared visually to a “Standard”. The standard is usually some type of color card or a colored liquid. As many of us can attest to, evaluating results of a measurement using visual color change or subtle color difference can sometimes be a challenge.
SOURCES OF ERROR IN THE TESTING PROCEDURE (EXAMINATION)The first area we will explore where errors occur is in the measurement of the volumes of liquids and solids reagents required to do the chemistry.
- Inaccurate reagent measurement
- Inaccurate measuring devices
- Droppers
- Syringes/Pipettes
- Measuring Spoons
- Other
- Inaccurate measuring devices
- Procedural error in reagent measurement
- Not holding droppers vertical for dispensing
- Air bubbles in drops when dispensing
- Measuring Spoon over/under fill
- Not properly reading the measurement meniscus (Parallax Error)
EXAMPLES OF INACCURATE REAGENT MEASUREMENT
Here are some examples of some of measurement sources of error (Tables 1-6) as well as some Best Practices to help reduce the errors.It is important to note that some tests are more critical as to the amount of reagent added and others less so. This fact is not always made clear by the test kit instructions. So I tend to land on the cautious side and treat them all as if the amounts are important to accurate and repeatable results.
DROPPER BOTTLE ERRORS
Many of our test kits require the use of dropper bottles and or droppers to deliver the required volume of reagent for the test. A general rule would be 1 drop = .05mL. Thus 5 drops should yield .25mL. This seems to hold true for all of the test kits I have evaluated. Some areas where errors can creep in are:
1) Incorrect position of the bottle or dropper during delivery
2) Air bubbles in the drops
3) Inconsistent volume delivery of different bottles from new test kit for the same test (Replacement Kits)
Here are some experiments to illustrate these.
AIR IN DROP PROPER POSITION FOR DROP ADDITION
Fig 4
DROPPER DELIVERY VOLUME TEST (Same Dropper Bottle multiple times)
TEST # | 1 | 2 | 3 | 4 | 5 | % RELATIVE ERROR | % RELATIVE STDEV | |
ml DELIVERED 5 DROPS* | .22 | .24 | .21 | .19 | .23 | 12.8 % | 8.8 % | LESS CARE TAKEN IN MEASUREMENT |
TEST # | 1 | 2 | 3 | 4 | 5 | % RELATIVE ERROR | % RELATIVE STDEV | |
ml DELIVERED 5 DROPS* | .24 | .23 | .25 | .23 | .23 | 5.6% | 3.8% | MORE CARE TAKEN IN MEASUREMENT |
* Measured with volume weight of distilled water (Known Value .25mL)
TABLE 1
LESS CARE—Dropper was not held vertically and no observation for air bubbles was made.MORE CARE—Dropper was held vertically and care was taken that there was no air in the drops.
DROPPER DELIVERY VOLUME TEST (5 Different Dropper Bottles Same Test Kit)
DROPPER # | 1 | 2 | 3 | 4 | 5 | % RELATIVE ERROR | % RELATIVE STDEV |
ml DELIVERED 5 DROPS* | .28 | .29 | .34 | .23 | .31 | 16% | 14.0% |
TABLE 2
One way of improving the accuracy and precision is to switch to delivering the required volume (.25mL) by properly using a good syringe or single channel Micro Pipette (Fig 7). These will eliminate the difference between dropper bottles and the dropper errors. See table 3 below.SYRINGE & PIPETTE DELIVERY VOLUME TEST
SYRINGE TEST # | 1 | 2 | 3 | 4 | 5 | % RELATIVE ERROR | % RELATIVE STDEV |
ml DELIVERED .25 ml VOLUME* | .24 | .24 | .25 | .25 | .24 | 2.4% | 2.2% |
PIPETTE TEST # | 1 | 2 | 3 | 4 | 5 | % RELATIVE ERROR | % RELATIVE STDEV |
ml DELIVERED .25 ml VOLUME* | .25 | .24 | .25 | .25 | .25 | .8% | 1.8% |
TABLE 3
As you can see from comparing the results in Table 3 to those in Table 1 & 2, there is a marked improvement in the % Relative Error & % Relative Standard Deviation (STDEV) by using a syringe vs. drops. The Single Channel Micro Pipette does even better.SYRINGES ERRORS
Many test kits require the use of syringes for measuring reagent or for titrations. When correctly used they can provide good accuracy and precision. Here are some things to watch for than can introduce errors.
1) Incorrectly reading the syringe
2) Air bubbles
3) Poor quality syringes
4) Assuming “0” is at the bottom stop of the syringe
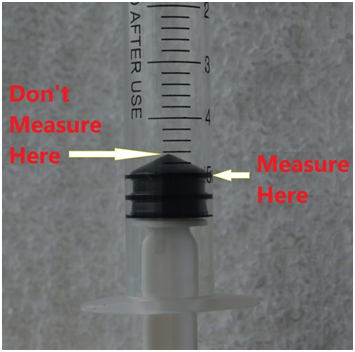
READING THE SYRINGE CORRECTLY
FIG 5
AIR BUBBLES IN THE SYRINGE COLUMN
FIG 6
To eliminate errors in the use of a syringe be familiar with the proper reading location for the particular syringe being used. The instructions provided with most kits will give you this information.To eliminate the bubbles in the syringe column draw the reagent out of the container with the syringe with the tip fully submerged. Then expel it back into the container fully depressing the syringe. Do this several times to be sure to push out all of the air. On the last draw pull the plunger past the top mark so column is completely full. Hold the syringe tip up and tap the column to release any remaining air. Then slowly depress the plunger until a small amount of liquid comes out of the top. Then eject the extra liquid back into the container until the plunger is at the required mark. Do a visual inspection to be sure there are no remaining air bubbles.
An additional consideration would be to invest in single channel micro pipettes. (See Fig 7)Their cost is around $50 from Amazon for a good one. They are easy to use and quite accurate and precise. Over time I have purchased several different sizes to deliver a range of volumes and now do all liquid measurements with them, including measuring out the volume of tank water to be tested. An additional advantage is they speed up the testing. They; like any instrument, need to be calibrated to keep the accuracy and precision high. I calibrate using mass--- .25mL=.25g of RODI water. I use a Jewelry scale that cost about $20 (Amazon). This is the recommended procedure by the manufacturer.
FIG 7
Here is where I purchase the ones I use https://www.amazon.com/s?k=single+channel+pipette&crid=1D29HNWW3YCW6&sprefix=single+channel+,aps,292&ref=nb_sb_ss_i_8_15Below in Table 4 & 5 are a set of experiments to demonstrate the above ideas
TEST # | 1 | 2 | 3 | 4 | 5 | % RELATIVE ERROR | % RELATIVE STDEV | |
ml DELIVERED 1 ml VOLUME* | .93 | .9 | .95 | .89 | .97 | 9.2% | 3.6% | LESS CARE TAKEN |
TEST # | 1 | 2 | 3 | 4 | 5 | % RELATIVE ERROR | % RELATIVE STDEV | |
ml DELIVERED 1 ml VOLUME* | .97 | .99 | 1 | .96 | .96 | 2.4% | 1.9% | MORE CARE TAKEN |
TABLE 4
PIPETTE* VOLUME TEST –Fig 7 (Same pipette multiple times)
TEST # | 1 | 2 | 3 | 4 | 5 | % RELATIVE ERROR | % RELATIVE STDEV |
ml DELIVERED 1 ml VOLUME* | .993 | .991 | 1.023 | .995 | .993 | .1% | 1.35% |
TABLE 5
* SCIENTIFIC SINGLE CHANNEL MICRO PIPETTE VARIABLE VOLUME 100-1000µL
As you can see from Table 4 there is quite an improvement in accuracy and precision by applying some best practices in their use. Table 5 shows the gain that can be made using Micro Pipettes.
MEASURING SPOONS ERRORS
FIG 8
Some tests require us to add a prescribed number of measuring spoon of a dry reagent to the reaction vessel. If you read the instructions it will often say “Add One Leveled measuring spoon to the vial” The word that is often missed or ignored is “Leveled”. Many tests provide pictorial instructions that show the steps of the chemistry to be preformed. If a measuring spoon is required they just show the reagent being added with the spoon…They don’t show the “Leveling” part. You have to read the instructions to find that part. Not leveling the spoon will result in the addition of too much or too little reagent and introduce variability in the process resulting in reduced accuracy and precision. Leveling the spoon increases accuracy and precision which is demonstrated by the results in Table 6
MEASURED AMOUNT WITH SAME MEASURING SPOON MULTIPLE TIMES
TEST # NO LEVELING | 1 | 2 | 3 | 4 | 5 | % RELATIVE ERROR | % RELATIVE STDEV |
MEASURE SPOON 1 | .103 | .094 | .1 | .134 | .127 | 11.6% | 15.9% |
MEASURING SPOON 2 | .196 | .172 | .166 | .178 | .181 | 10.7% | 6.3% |
TEST # LEVELING | 1 | 2 | 3 | 4 | 5 | % RELATIVE ERROR | % RELATIVE STDEV |
MEASURE SPOON 1 | .108 | .097 | .11 | .098 | .097 | 2% | 6.3% |
MEASURING SPOON 2 | .194 | .196 | .206 | .189 | .187 | 2.8% | 3.8% |
TABLE 6
Statistical Target Value for Measuring Spoon # 1 is .1g
Statistical Target Value for Measuring Spoon # 2 is .2g
Parallax ErrorsStatistical Target Value for Measuring Spoon # 1 is .1g
Statistical Target Value for Measuring Spoon # 2 is .2g
Parallax error is the shift in apparent position of an object due to different viewing position. It is an error caused by humans, while measuring a quantity if your eye is not at the proper angle to the scale you're reading, it will cause parallax error. It only depends upon the line of sight. These errors can occur both when measuring out reagent or the solution to be tested as well as interpreting results (mLs used). See Fig 9 & 10
Fig 9 (Graduated Container) Fig 10 (Syringe/Pipette)
Parallax Errors can be avoided by proper positioning of the device so the meniscus (bottom of the curve of the liquid in the device) is perpendicular to your line of sight and on the same level as your line of sight.
2) Procedural Errors
a. Order of addition not followed
b. Mixing procedures not followed
i. Mixing/Reaction Times
ii. Mixing intensity not followed (Gentle vs. Vigorous)
c. Equipment contamination (Dirty vials, syringes etc.)
(Note on contamination: 1ppm is roughly 7 drops in 60 gal so that means a very-- very small amount is required to contaminate a 10 ml test vial… .000001mL)d. Temperature considerations not followed (Environment)
e. Expired test reagent
f. Bad batch of Test Reagent (It does happen)
g. Not properly reading the measurement meniscus (Parallax Error)
The first 5 procedural errors (a-e) can be avoided with four simple steps.
1) Read and follow the instructions for the test kit carefully. Pay attention to the “tips” often included in the instructions.
2) Keep the equipment (syringes, vials, pipettes, etc.) clean and rinsed! Three complete rinsing after use is recommended, including cap or lid.
3) Do the test the same way every time, paying close attention to wait times and mixing times and methods (gentle vs. vigorous)
4) Check and note reagent expiration date.
To check for the possibility of a “bad” reagent save back enough reagent from the previous batch to do at least 3 additional tests. Run a test using the previous batch then run a test using the new batch. You should get a measured value close (within your standard % Relative error for the test. If your measured value is not acceptable repeat the test two additional times to confirm. I have on two separate occasions found bad reagent so it does happen.
This concludes our look at the first step in The Visual Testing Methods---“Doing the Chemistry (Examination)”. In PART 3 we will look into the Assessment step of Visual Testing…”Looking at the sample”. We will explore human color vision and its impact on the results of our measurements as well as some conclusions and tips to reduce errors following our Quality System Model…Measure----> Evaluate----> Improve---> New Method


