★ DIY [Auto] ★ [ ALKALINITY MONITOR ] ★ 3 Tank [HANNA with Raspberry PI / Ardiuno ] with ADVANCED Features

OP
OP
WallyB

WallyB

REEF Techno-Geek
View Badges
Joined
Jan 24, 2017
Messages
3,127
Reaction score
8,093
Location
GTA Toronto, CANADA
Rating - 0%
0   0   0
Continuing with the Acrylic Cover ( FIRST TAKE, Needs RE-DESIGN ) OOPS!! Too Small

Good thing I didn't bond the Acylic together before I found this out. (I almost did over the weekend)

I guess the Threads not over. I originally cut the Acylic to make a Simple Cube Box to put over the Monitor.

I realized afterwards......


- Acrylic box is heavy, and not easy to raise ( So I decided to make it a lateral Slide on )
- Then I realized I need front panel access and side access ( So I'll need holes)
- THen I decided I want a bigger Waste Tray under the Monitor
- etc ,etc


Then I learned my measurement were too tight (height), etc, etc. (After putting in a similar Printer)

Basically just like the Aquamon Monitor, I'm HACKING and Adjusting the Cover, and I go along.


HERE IS THE FAILED (TAKE 1)

2020-02-25_AquaMonCover.jpg


I got idea's to make it work.

What's it will come out like at the end (Is anyone's Guess)
 
OP
OP
WallyB

WallyB

REEF Techno-Geek
View Badges
Joined
Jan 24, 2017
Messages
3,127
Reaction score
8,093
Location
GTA Toronto, CANADA
Rating - 0%
0   0   0
HANG ON!!!

I was really perplexed how I got the Measurements that much off.

Then looking a the Post Photo, I realized I rotated the RECTANCULAR (not square) SIDE PANELS WRONG

Geezz.... if I had glued it (I'd be kicking my self really bad)

IT WILL FIT (but now it's too tall where I want to place it...I think)

2020-02-25_CoverSidePanelRotation.jpg


Time to hack away at something that will work.
 
Last edited:
OP
OP
WallyB

WallyB

REEF Techno-Geek
View Badges
Joined
Jan 24, 2017
Messages
3,127
Reaction score
8,093
Location
GTA Toronto, CANADA
Rating - 0%
0   0   0
When I flipped the Rectangular Panels, then other sides didn't match (to join things together).

The Measurement/Orientation for the Acrylic Box Cover were right the First time.

BEST TO TEST on the REAL thing
going into the Case (Not a different Printer)


IT DOES FIT (EXACTLY!! ) Now I can breathe again. (That 1/4" Acrylic wasn't cheap)

2020-02-25_PanelsFitRight.jpg


Kind of look cool Glowing/Frosty with the Acrylic Protective film. Crystal Clear will also be nice.
 
OP
OP
WallyB

WallyB

REEF Techno-Geek
View Badges
Joined
Jan 24, 2017
Messages
3,127
Reaction score
8,093
Location
GTA Toronto, CANADA
Rating - 0%
0   0   0
STILL RACKING MY HEAD ( Acyrlic Cover ) ** ONLY 1 Shot to Cut Right **

I'm terrified after I cut and bond the cover, I'll be stuck with something that doesn't work.

Making a All in one Box is Heavy and not easy for General Access.

Large Front Face make a BIG SWING on hinges.

2020-02-27_AquaMon-CoverDesignOptions.jpg


The other challenge with Hinged, is how to keep the Cover Rigid and Square. (No Bottom Plate. Stand is bottom)

OTHER OPTION is just NO FRONT COVER, but then TOP will SAG over Time and not be firm enough to use the top like a table.

This might be best (and if it doesn't work, I can add the Front Cover Afterwards (somehow)


2020-02-27_AquamonCover-NoFrontPate-Support.jpg
 
Last edited:
OP
OP
WallyB

WallyB

REEF Techno-Geek
View Badges
Joined
Jan 24, 2017
Messages
3,127
Reaction score
8,093
Location
GTA Toronto, CANADA
Rating - 0%
0   0   0
FINISHED ( COVER AND STAND ) [ SIMPLE IS BETTER ]

I haven't done acrylic bonding before, and I made mistakes, drips, bubbles...Even a scratch!!!

Nothing anyone would see, except me.

I like it, and am Happy I didn't cover front, nor Ugly Protruding Hinges.

2020-02-27_AquaMon-CoverStand-Finished.jpg
 
OP
OP
WallyB

WallyB

REEF Techno-Geek
View Badges
Joined
Jan 24, 2017
Messages
3,127
Reaction score
8,093
Location
GTA Toronto, CANADA
Rating - 0%
0   0   0
DONE!!! ( AquaMon Installed on All 3 Tanks)


2020-02-28_AquaMonLinesInstalled.jpg


I was a bit nervous.
Testing on Desk, from Bottles, Short Dosing Lines, Straight dosing lines... is not Real World.


THIS IS REAL WORLD.....

2020-02-28_AquaMonInstall-3Tanks.jpg


After calibrating the much longer, twisting, turning Lines from SPS tank, I ran a test.
(no reagent, just water)

It ran perfectly (Got a sample with no bubbles).

The rest of the sequences will work (Same as at desk)

Getting that Pure/Accurate Sample was KEY.

Time for a Well Deserved break.
 
OP
OP
WallyB

WallyB

REEF Techno-Geek
View Badges
Joined
Jan 24, 2017
Messages
3,127
Reaction score
8,093
Location
GTA Toronto, CANADA
Rating - 0%
0   0   0
WRAP UP ( TECHNICAL DETAILS ) ** Techie's ONLY **

This isn't for everyone, but for those interested.

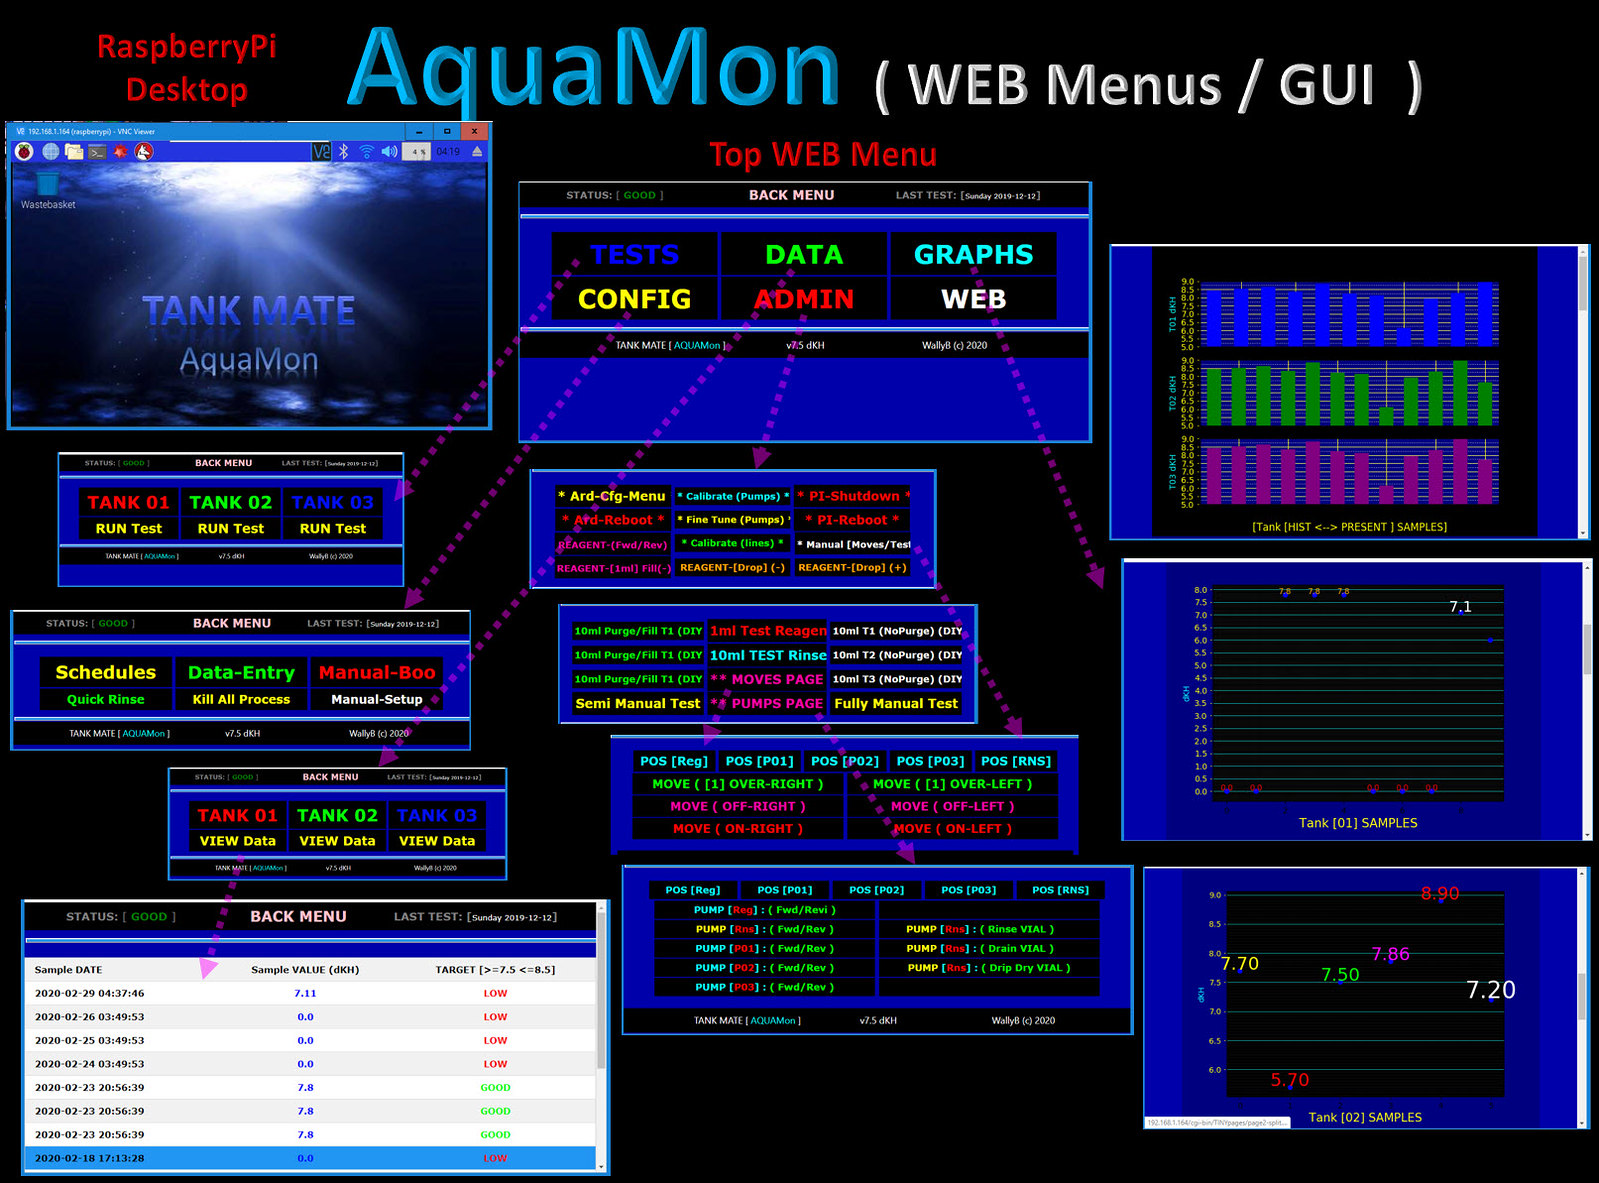
Here is how the WEB Interface and the Various Features (current list)

49602882263_0943705f1d_h.jpg
 
Last edited:
OP
OP
WallyB

WallyB

REEF Techno-Geek
View Badges
Joined
Jan 24, 2017
Messages
3,127
Reaction score
8,093
Location
GTA Toronto, CANADA
Rating - 0%
0   0   0
And for the Real Hard Core Techies.

Not my detailed Circuit Diagram (bit out of date..Not everything I threw into the Final Gen.),
but A Real Overhead Photo (What's under the Covers...or in the Black Covered Area)

A High Level Wiring Diagram which shows the Components that makes AquaMon TICK

2020-03-01_AquaMonHWCircuit.jpg
 
Last edited:
OP
OP
WallyB

WallyB

REEF Techno-Geek
View Badges
Joined
Jan 24, 2017
Messages
3,127
Reaction score
8,093
Location
GTA Toronto, CANADA
Rating - 0%
0   0   0
AquaMon ( Installed on two Tank [ SPS Tank & Frag Tank ] )

Over the weekend I installed the Alk Monitor on TWO of the 3 tanks. (Getting Real Tank Samples)

FRAG Tank is really close (few inches), SPS tank SUMP (3 feet). The LPS tank SUMP is around (10 feet away)

2020-03-01_FishRoomAquaMonBright.jpg

For now I'm running Manually initiated tests and comparing to My Salifert Test kit. Things are looking good.

Most important is I'm getting consistent results on the both (testing methods).

( I started to play with Alkalinity on the Frag Tank [on right] since it has no corals)
I'm starting to notice that the Hanna driven Aquamon Alk Testing is more accurate and responsive than Salifert test. (Wonder why).
What I mean by more responsive, is I bumped up Alk by a calculated amount of 2 Part Dosing and the Aquamon was dead on. The Salifert test lagged on the change.

Wish I had a lab grade reference sample (ALK value). Thinking of making a ALK reference solution somehow.
 

robbyg

Valuable Member
View Badges
Joined
Sep 8, 2019
Messages
2,303
Reaction score
2,859
Rating - 0%
0   0   0
I watched the video and loved it.
You really put in a lot of work into the project. I know every engineer on this forum who looks at it has their own idea on how they could make something simpler or better but the truth is that it’s a lot of work no matter how you decide to design it and the fact is that you have done the work. Bravo!!
 
Last edited:
OP
OP
WallyB

WallyB

REEF Techno-Geek
View Badges
Joined
Jan 24, 2017
Messages
3,127
Reaction score
8,093
Location
GTA Toronto, CANADA
Rating - 0%
0   0   0
AquaMon Alk Monitor ( Goes Live on all 3 TANKS ) Future will be SAFER!!

After running manually for a week, on my SPS tank, and the Frag Tank, I've built up more Trust in the AquaMon.

I've been comparing to Salifert tests (*NEW KIT*), and things are consistent. (Hanna driven Aquamon is about 0.5 dkH lower. ALWAYS)

To triple check, I got a 2nd Hanna Alk Tester, just to make sure AquaMon robotics/calibration, etc is correct.
The extra Hanna Alk tester will come in handy down the road, should things need calibration.
Eventually, it will be used to make my Next Gen AquaMon(min).

AquaMon and My Manual Hanna testing are DEAD on (Same result).

This is ALL 3 Tanks (separate Graphs) and the ( Side by Side Graph)

2020-03-10_AquaMon-LIVE-3Tanks.jpg


The little wiggle in the SPS Tank, is I'm trying to get Dosing Right with the Improved Stability/and I guess SPS growth.

The Bigger wiggle in the Frag Tank results is I started Manual Dosing to keep it stable (Till I make a doser).

The single value on the Kitchen LPS tank is I just started Testing Today.
But COOL PART is AquaMon gets a accurate/consistant test result, with Tubing running to Sump 15 feet away. (Bet a Trident can't do that)


I'll be playing with Scheduling the the next while depending on how things go.

1) SPS Tank: ( AUTO: Daily or Every Other Day) since Lighting is Ramping up and Frags might start consuming A/B dosing.
2)
Frag Tank: ( MANUAL Started TESTS: ) since no Frags *YET*....I'll just be watching Alk Drop and use it for further testing.

3) LPS/Mixed Tank: ( AUTO Monthly like I always have or Weekly) since it's an established/Stable Tank (and that's all I need)
 
Last edited:
OP
OP
WallyB

WallyB

REEF Techno-Geek
View Badges
Joined
Jan 24, 2017
Messages
3,127
Reaction score
8,093
Location
GTA Toronto, CANADA
Rating - 0%
0   0   0
I watched the video and loved it.
You really put in a lot of work into the project. I know every engineer on this forum who looks at it has their own idea on how they could make something simpler or better but the truth is that it’s a lot of work no matter how you decide to design it and the fact is that you have done the work. Bravo!!
Thanks.
BTW, I do have an Electrical Engineering Degree, so that makes me kind of an engineer, but this is all Hobby/self-education.
I've never really done any Electrical Engineering work since I fell in love with Computers during/after school.
I work in Computer systems/software, so this Controller was un-professionally hacked together. (but my Best Hack Ever!!)
 
OP
OP
WallyB

WallyB

REEF Techno-Geek
View Badges
Joined
Jan 24, 2017
Messages
3,127
Reaction score
8,093
Location
GTA Toronto, CANADA
Rating - 0%
0   0   0
TANK Mate Aqua IQ+Doser ( Companion SMART Doser for the AquaMon Alk Monitor)


Too early to start a Thread, since I'm just starting.....I may continue more posts here if there is interest.

Certainly could use some feedback/expereince for those that have Tridents, or other Alk Monitors.


The AquaMon Doser is giving me Real Data on Consumption of all my 3 Tanks (And Manual Dosing Adjustments needed)

2020-03-18_TankMate-Aqua-IQ+Doser-DataPoints.jpg


- THE SPS Tank I watch closely (Daily/Every Other day) and have had to make Manual Adjustments to Dosing.

- The FRAG TANK (has no Frags) Tested every few days.. With NO DOSING (Yet) it's consuming Alk thus dropping.

- THE LPS TANK (is Mature Stable, and rarely needs a dose Adjustment, so I've checked only twice, and won't check often...Why waste Regeant. A Salifert Test once a Month is good enough.)

All perfect data points to plan/design, and build a Companion SMART Doser.

I've already started the Preliminary HARDWARE (Case / Basic Display)


2020-03-14_TankMate-AquaIQ+DoserShell-sm.jpg


6 Dosing Heads, (Pair for each tank). 2 Heads will be Slave Remotes Near the Far away LPS Tank Sump.

The Internal Electronics I have started designing/wiring:

Basically Similar Dual Controller as AquaMon : Raspberry PI with Ariduno (Mega)

Differences are simple Motor/Bridge Shield for Doser Pump Control, and a Raspberry Pi Zero wifi/small Form Factor.
2020-03-18_TankMate-Aqua-IQ+Doser.jpg


HW fast/easy and done before.

THE HARD PART will the the Software for the Smart Doser (It must be Smart and Bullet Proof, not to Nuke my Tank/Corals)

If there is no interest from any (techies), I'll hold of on details till it's complete.
 
Last edited:

robbyg

Valuable Member
View Badges
Joined
Sep 8, 2019
Messages
2,303
Reaction score
2,859
Rating - 0%
0   0   0
I am certainly interested. I have played around with those dosing pump motors you are using and found them very hard to control in tiny amounts of movement. Before you center the project to heavily around them I suggest you do a basic test run and see if they work well enough for your project. I think you might want to use some higher end stepper motors and heads.
 
OP
OP
WallyB

WallyB

REEF Techno-Geek
View Badges
Joined
Jan 24, 2017
Messages
3,127
Reaction score
8,093
Location
GTA Toronto, CANADA
Rating - 0%
0   0   0
I am certainly interested. I have played around with those dosing pump motors you are using and found them very hard to control in tiny amounts of movement. Before you center the project to heavily around them I suggest you do a basic test run and see if they work well enough for your project. I think you might want to use some higher end stepper motors and heads.
Hey @robbyg,

I've used the DC Kamoer pumps many times with no issues.
Tried steppers. They are not made for long running since they overheat. The Neptune Dos is a good example.
DC can run forever cool and COST WAY LESS (easy to control too)

It's important to get the 6 Volt versions, and the Proper Inner/outer diameter tube (when you order), since the Tube inner diameter determines ml/min flow. (If you get the wrong tubing , the flow is too fast, so accuracy is not good)

KamoerPart.jpg

*** THE PART NUMBER (tube) when you order from Kamoer will spec the flow ** (even for same pump type/voltage/model)

Look at the difference. I got the 11ml/min not the 48ml/min.
With the 3V, you get 5ml a Minute, which is ridiculous slow.


I used the Kamoers NKP-BS04 (11ml) For the Previous Doser which has been running for a couple years.
And for the AquaMon to dose the 10ml sample, and VERY VERY ACCURATELY dose the 1ml of regent.

I also got extra BPT tubing, thinner diameter if I ever want to change the Pump to more precision.


For my Water Changer to Control THese KAMOER WORKHOUSE Beauties (but again no percision needed)
https://www.aliexpress.com/item/32891887138.html?spm=a2g0s.9042311.0.0.27424c4d1dpKXC


I generally have use these relays to turn the dosing pumps ON and OFF (no speed control).


I even used an extra pair of them (Wired like a flip-Flip-gate) (to flip the +/- voltage) to reverse the Kamoer Pumps.

Simply used 5 Volt (ON/OFF) logic to trigger the relays.

I can actually pulse the motor so briefly that I get 1/5 of a drop (ie 5 pulses to get the drop to drop)

Not sure if you used a Rapberry Pi or the Ardiuno when you had problems.

One of the reason I use a Ardiuno for all motor controls is the speed of the Ardiuno I/O (and not just the speed, but the fact that the Code runs in Machine Language. Compiled C code.

I avoid Raspberry Pi since maybe there could be delays in Python, or OS, or whatever.
Yet I think if the code running on Python was also C compile executable (it would be fast too).
Not sure. Can't risk it. So why I use the ARIDIUNO as a SLAVE to the PI (to do the Motor Work).

HOWEVER. When I built the AquaMon, I also wanted to get away from the Clackety relays. They have failed me on occasion. Yet the Doser has been running on the Relays for Years.

What I am doing for this Doser (and I did for the Aquamon) is used a H-Bridge. It 100% substitutes for the 5 Volt I/O relay.
THIS is the H-bridge.


Very similar to the Relay for ON and OFF. But you also can control direction of the Motor (ie voltage -/+) with two more Digital I/O lines. And with a 3rd I/O (Pulse width) you control the Speed of the Motor.

That H-Bridge above controls, 1 motor (and it design for BIG motors, that draw way more current than an 6 Volt, 100mA Doser pump.

So for compact size, I'm using this Motor Header, which will give me 4-6 pump control. On/OFF, Direction, and Speed. (IT's basically 4 H-bridges on one nice Board, plus two more connections for Servo motors)


I've played with all 3 methods above (last night with the L293D). Just as fast or faster than the relays.

Just remember to Power the Relays, or the Hbridge (NOT from the Ardiuno) but a separate Power Supply.

If you want ONE power supply (AC ADAPTER to run the Controller, the Bridges, and motors). which I did for the AquaMon. (I used a 2nd Power Adapter for the PI just to keep it always on)

I used one of these DC-to-DC Buck converters.


You feed in 12 Volt DC (from a DC adapter), and then DROP the Votage down to 7-9 Volts for the Ardiuno, and then another Buck converter to drop down to 6 Volts for the Motors.

The buck converter has a screw, you turn to reduce the 12 Volts down to whatever you want.
Very Efficient. It's like a Transformer, but Solid State for DC.

ALSO. What I do is Calbrate each Pump in my Code.

I time each pump to dose 10ml into a accurate vial. Roughly.]
Then I have a 2nd Fine tune calibration routine, to get the 10ml or 1ml accurately timed to MilliSeconds.
I've rarely had to re-calibrate my OLD doser for over 2 years.

If anyone is interested, I can do a video, showing the calibration, and how accruate the pump I have can dose.
1/4 of a drop.
 
Last edited:

robbyg

Valuable Member
View Badges
Joined
Sep 8, 2019
Messages
2,303
Reaction score
2,859
Rating - 0%
0   0   0
I had used the 12V version but I also noticed that they came in a range of RPM speeds, I think the ones I got were just running too fast. Anyway its great that you already tried the motors and know they work alright for the reagent. I am looking forward to seeing the next few stages :)
 
Back
Top