OP
OP
Vivid Creative Aquatics

Vivid Creative Aquatics

Upgrade Your Flow!
View Badges
Joined
Oct 12, 2017
Messages
1,375
Reaction score
1,936
Location
Phoenix, AZ
Rating - 0%
0   0   0
Why chose the L-shape sump and not have the return pump be submersed in a return chamber - making the sump traditional rectangle/square? two simple reasons come to mind - heat dissipation of the return pump to the room vs to the water (if overheating tank is something to worry about, any heat transfer source removed helps); and dry maintenance/servicing of all 3 pumps?
are there any other reasons?
You hit the nail on the head - I'm in Phoenix, and tank temperatures can sometime be a challenge. So I've always run my return pumps externally. This particular tank is in the front lobby of our office, and is right in front of a West-facing window. So the potential for additional heat is definitely something we will want to minimize

Beyond that - it's mostly preference, I just like the look of it, and I prefer the maintenance on a dry pump, vs one that's been sitting in the sump for few months (or longer)

As for the L-shaped sump, - I am trying to maximize the size of the sump while still having space for other equipment under the tank. Other than that, I really just kind of like the idea of the L-shaped sump because it's different. :)
 
OP
OP
Vivid Creative Aquatics

Vivid Creative Aquatics

Upgrade Your Flow!
View Badges
Joined
Oct 12, 2017
Messages
1,375
Reaction score
1,936
Location
Phoenix, AZ
Rating - 0%
0   0   0
Can't wait to see new progress!
Going to be picking up the rock early next week. I think I'm going to go with CaribSea Liferock for the bulk off the rock along with a few live rocks from an established tank.

I like some of the shapes and piece they offer
 

reefpizza

Active Member
View Badges
Joined
Oct 23, 2020
Messages
165
Reaction score
131
Location
italy
Rating - 0%
0   0   0
Going to be picking up the rock early next week. I think I'm going to go with CaribSea Liferock for the bulk off the rock along with a few live rocks from an established tank.

I like some of the shapes and piece they offer
I suggest you DD Aquascape rocks used in mine (take a look at my build tread)
 

Grey Guy

Well-Known Member
View Badges
Joined
May 22, 2016
Messages
568
Reaction score
457
Rating - 0%
0   0   0
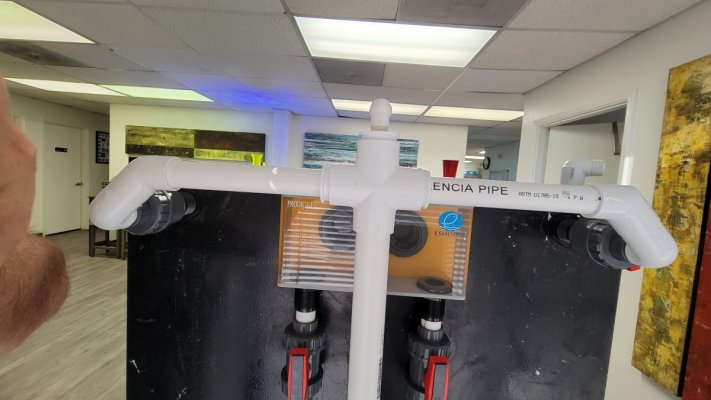
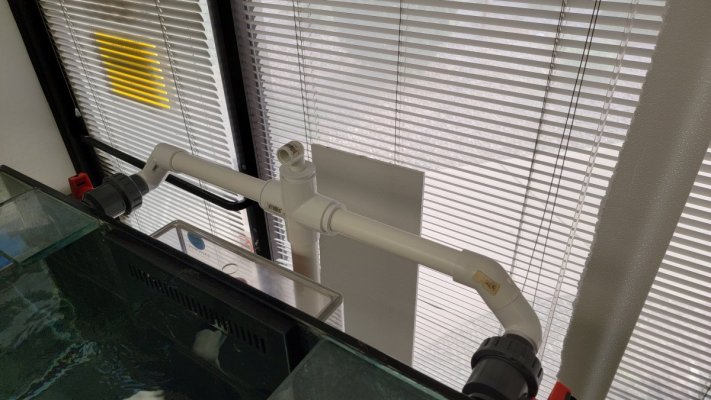
Here is the dry-fit of the return line plumbing that has the Reverse Check Valve setup. Nothing is glued yet, but I wanted to get an idea of how this would look like in real life.

Sorry for the wonky photos - the tank is somewhat close to the wall, and it's hard to get nice straight shots.


20210716_112604.jpg


I'm considering painting the upper part of the plumbing a flat black once it's all done to help make it less obviosue form the front. Standing a few feet form the tank, it;s hard to see the plumbing sticking up, but you can see the check vavle.

20210716_112558.jpg


20210713_175534.jpg 20210713_175420.jpg
20210716_112621.jpg
I would valve off both ends of the. Check valve and have unions so that the check valve can be removed and cleaned regularly.
 
OP
OP
Vivid Creative Aquatics

Vivid Creative Aquatics

Upgrade Your Flow!
View Badges
Joined
Oct 12, 2017
Messages
1,375
Reaction score
1,936
Location
Phoenix, AZ
Rating - 0%
0   0   0
I would valve off both ends of the. Check valve and have unions so that the check valve can be removed and cleaned regularly.
It will definitely need some regulars maintenance - as any check valve would need but Probably wont need valve it off, since when the return pump is off, there will be no pressure or water being the valve.

What i may do when the time comes to pull it off and clean it, is replace it with union valve. That way it is easier to remove and clean. Right now it's just female threaded part. I went this rout innately to try and minim it's size and visual impact on the build, but I may ultimately swap it out.
 
OP
OP
Vivid Creative Aquatics

Vivid Creative Aquatics

Upgrade Your Flow!
View Badges
Joined
Oct 12, 2017
Messages
1,375
Reaction score
1,936
Location
Phoenix, AZ
Rating - 0%
0   0   0
@Vivid Creative Aquatics have you run water through that reversed check valve yet? Upon pressurization, does it eject any water through the elbows into the overflow? I am wondering if that is strictly necessary to contain messes, or if it is not needed.
We have not run water through it - I hope to start gluing that section together this weekend.

From what Ive seen in other setups similar to this, is that at the initial startup, there is usually a small amount of water that gets through, just before the valve closes. Didn't seem like a lot, but probably more than you might want on the floor.

Also, if for some reason the valve fails to close on an unattended restart, I would want it routed somewhere back into the tank.

Either way, once we get it setup, i plan on testing it. I will possible trying to simulate a fail - and we'll make a video. :)
 

HBoojie

Community Member
View Badges
Joined
Jul 9, 2021
Messages
64
Reaction score
134
Location
east coast
Rating - 0%
0   0   0
This is going to be wild! I’m curious how you will show off the plumbing and what not! Plexi front door with some LEDs? But none the less, this setup is awesome! 2022= what is a power head again? :eek:
 
OP
OP
Vivid Creative Aquatics

Vivid Creative Aquatics

Upgrade Your Flow!
View Badges
Joined
Oct 12, 2017
Messages
1,375
Reaction score
1,936
Location
Phoenix, AZ
Rating - 0%
0   0   0
The Flow Solution!

We hooked up the Apex and setup some programming and we have begun doing some extensive testing of Flow Plan on this tank and so far it’s doing exactly what we envisioned.

For this one – I reached out for help from @SuncrestReef . He took my vision for the programing of this flow and made it a reality.

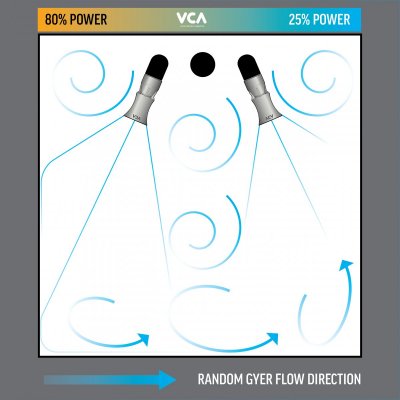
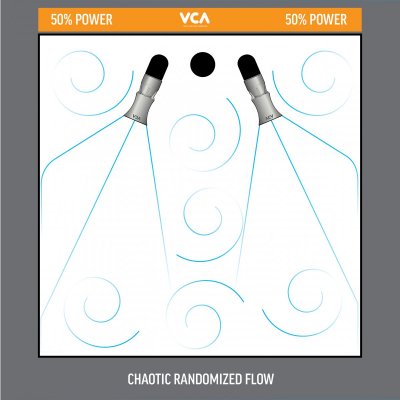
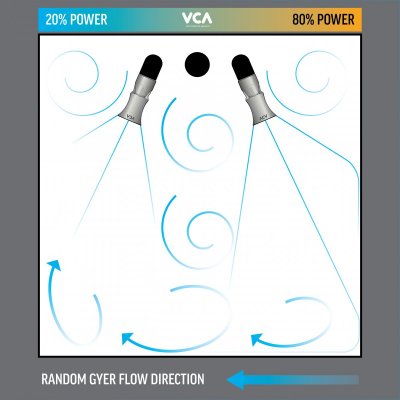
The idea here is to utilize the two opposing RFG nozzle that make up the dual close loop and slowly alternate the flow intensity between the two sides over a period of time. This will have the effect of creating a randomized gyer of sorts, where the dominate flow direction is going clockwise in the beginning of the cycle and then going counter clockwise towards the end of the cycle with a period of chaotic turbulence in the middle of the cycle.

Dual-Closed Loop Flow Soltuion-01.jpg Dual-Closed Loop Flow Soltuion-02.jpg Dual-Closed Loop Flow Soltuion-03.jpg


20210723_132709.jpg


Each cycle then lasts approximately 12 hours and 30 minutes. Because the cycle is slightly longer than 12 hours, this has the effect of creating an offset in the cycle that will shift the cycles forward about 32 minutes every day.


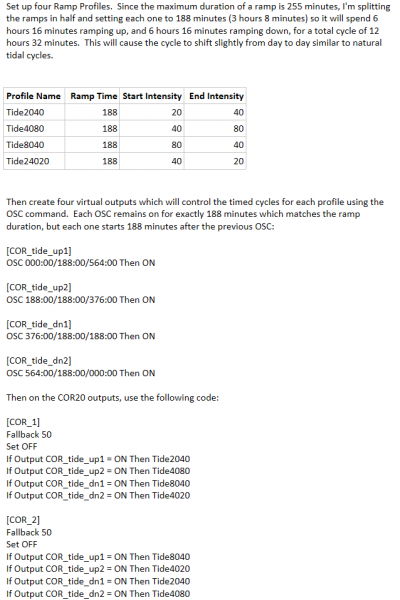
This is accomplished using 4, 188 minute profile ramps that are then applied to each pump using 4 virtual outlets with OSC statement.

So far we've only tested the flow patterns by manually switch the peak flow profiles on an off to see what would happen. And in our initial testing - the flow indeed does create a randomized gyre, and does switch direction depending on which loop is currently dominant.

For those that Are interested, here is the programing overview that @SuncrestReef created and I implemented

- - - - - - - - - - - - - - - - - - - - - - - - - - - - - - - - - - - - -

Ramp Profiles.
Since the maximum duration of a ramp is 255 minutes, they are split in half set to 188 minutes (3 hours 8 minutes) so it will spend 6 hours 16 minutes ramping up, and 6 hours 16 minutes ramping down, for a total cycle of 12 hours 32 minutes. This will cause the cycle to shift slightly from day to day similar to natural tidal cycles.


Profile Name
Ramp Time
Start Intensity
End Intensity
Tide2040
188​
20​
40​
Tide4080
188​
40​
80​
Tide8040
188​
80​
40​
Tide24020
188​
40​
20​


Virtual Outlets
Four virtual outputs control the timed cycles for each profile using the OSC command. Each OSC remains on for exactly 188 minutes which matches the ramp duration, but each one starts 188 minutes after the previous OSC:


[COR_tide_up1]
OSC 000:00/188:00/564:00 Then ON


[COR_tide_up2]
OSC 188:00/188:00/376:00 Then ON


[COR_tide_dn1]
OSC 376:00/188:00/188:00 Then ON

[COR_tide_dn2]
OSC 564:00/188:00/000:00 Then ON


Then on the COR20 outputs, use the following code:


[COR_1]

Fallback 50
Set OFF
If Output COR_tide_up1 = ON Then Tide2040
If Output COR_tide_up2 = ON Then Tide4080
If Output COR_tide_dn1 = ON Then Tide8040
If Output COR_tide_dn2 = ON Then Tide4020


[COR_2]

Fallback 50
Set OFF
If Output COR_tide_up1 = ON Then Tide8040
If Output COR_tide_up2 = ON Then Tide4020
If Output COR_tide_dn1 = ON Then Tide2040
If Output COR_tide_dn2 = ON Then Tide4080
- - - - - - - - - - - - - - - - - - - - - - - - - - - - - - - - - - - - -
 

Attachments

  • 1627077270302.png
    1627077270302.png
    42.2 KB · Views: 68

SuncrestReef

That Apex guy
View Badges
Joined
Jan 18, 2018
Messages
4,214
Reaction score
9,214
Location
Oregon
Rating - 0%
0   0   0
The Flow Solution!

We hooked up the Apex and setup some programming and we have begun doing some extensive testing of Flow Plan on this tank and so far it’s doing exactly what we envisioned.

For this one – I reached out for help from @SuncrestReef . He took my vision for the programing of this flow and made it a reality.
This was a fun programming challenge. I'm really looking forward to seeing how it works in reality.

Awesome build thread! Following.
 
OP
OP
Vivid Creative Aquatics

Vivid Creative Aquatics

Upgrade Your Flow!
View Badges
Joined
Oct 12, 2017
Messages
1,375
Reaction score
1,936
Location
Phoenix, AZ
Rating - 0%
0   0   0
This was a fun programming challenge. I'm really looking forward to seeing how it works in reality.

Awesome build thread! Following.
And it's working - this is the Flow graph is from the two 1in flow sensors measuring each side of the closed loop, from yesterday to today - not quite 24 hours, but the two blue peaks are about 12 hours and 30 minutes apart :)

1627138159198.png
 

SuncrestReef

That Apex guy
View Badges
Joined
Jan 18, 2018
Messages
4,214
Reaction score
9,214
Location
Oregon
Rating - 0%
0   0   0
And it's working - this is the Flow graph is from the two 1in flow sensors measuring each side of the closed loop, from yesterday to today - not quite 24 hours, but the two blue peaks are about 12 hours and 30 minutes apart :)

1627138159198.png
That is awesome!
 
OP
OP
Vivid Creative Aquatics

Vivid Creative Aquatics

Upgrade Your Flow!
View Badges
Joined
Oct 12, 2017
Messages
1,375
Reaction score
1,936
Location
Phoenix, AZ
Rating - 0%
0   0   0
This is going to be wild! I’m curious how you will show off the plumbing and what not! Plexi front door with some LEDs? But none the less, this setup is awesome! 2022= what is a power head again? :eek:
The plan is to leave it open and on full display. I think some LED lightning is a good idea

Also - the goal is to competently hide as much of, if not al the wires, on this build. All of the power cords will be routed through the bottom panel and under the tank.

The final APEX location will likely be a side cabinet of some sort, but I have not fully decided yet.

Still lots of undetermined aspects of this build, but I kind of like doing it this way as oppose to creating all inclusive master plan up front. Makes the whole process feel more like an adventure :)
 
OP
OP
Vivid Creative Aquatics

Vivid Creative Aquatics

Upgrade Your Flow!
View Badges
Joined
Oct 12, 2017
Messages
1,375
Reaction score
1,936
Location
Phoenix, AZ
Rating - 0%
0   0   0
Started gluing the return line parts together.

This is the main junction at the top where the reverse Check Valve will be installed and where the main return line splits to supply each side of the return.
20210726_141828.jpg


I'll be using anabundance of quick-connect unions throughout the return lines - need to be able take it apart easly, just in case - you never know. :)
 
OP
OP
Vivid Creative Aquatics

Vivid Creative Aquatics

Upgrade Your Flow!
View Badges
Joined
Oct 12, 2017
Messages
1,375
Reaction score
1,936
Location
Phoenix, AZ
Rating - 0%
0   0   0
I was thinking about the closed loop plumbing inside the tank last night and it occurred to me that I may need to protect the outlets from sand and other debris, since the return and the drain are on the floor of the aquarium

If at some point I want to remove the stand pipes or the suction strainer for cleaning or for other purposes. I run the risk of letting sand drop down the pipes. On the return side it's not as big a an issue but on the drain side, that means it would have to pass through pumps to get expelled.

Plus - I have a rather active and large Tiger Pistol Shrimp/Goby pair coming over from another tank. I guarantee that shrimp will attempt bury this drain - that's just how he is - LOL

So - I have devised a plan to create a Sand Guard around the plumbing

1627408615826.png


I don't know if this will work, and it will likely take a few design iterations to get it right, but this is the basic concept.

This Sand Guard will sit over the bulkheads and on the glass, the sand will then be added to the tank. The lip around the base of the gaurd will than act as a means of keeping it in place with the weight of the sand sitting on top of it.

Rock work will then be placed around this structure to hide it.

When it's all setup, and if it works, i should be able to remove the Suction Strainer without also dumping a lot of sand down the pipe. Same goes for the stand points, should I need or want to remove them.

The first prototype of this is already on a printer


Thoughts?
 
Last edited:

Clear reef vision: How do you clean the inside of the glass on your aquarium?

  • Razor blade

    Votes: 128 59.5%
  • Plastic scraper

    Votes: 63 29.3%
  • Clean-up crew

    Votes: 77 35.8%
  • Magic eraser

    Votes: 37 17.2%
  • Other

    Votes: 63 29.3%
Back
Top