210 Gallon FOWLR in Wall Build (6 Years Late)

JReef85

Community Member
View Badges
Joined
Aug 18, 2016
Messages
73
Reaction score
149
Location
NJ
Rating - 0%
0   0   0
So I'm a little late to the Reef2Reef party. Back in 2014 I had recently moved from a condo and purchased a house. At the condo I had a 28 gallon JBJ AIO tank. It was first ever venture into saltwater and I believe I was pretty successful at least in the first year. I built my own sump and plumbed an CPR overflow to it. I ran a small skimmer, deep sand bed, and some macro algae in there. After having it setup for over a year we got hit by a bad storm and knocked our power out for over a week. Between work and a newborn at the time I lost almost everything I had in there. At the time I was ticked and devastated but after we moved I had the itch to go bigger, a lot bigger.

After moving into our house I decided to convert half of our garage to a laundry/mudroom and put in a 150 gallon fish tank I got from a guy who sells stuff from storage units like that show on TV. After planing everything out I decided a 150 gallon wasn't big enough. My LFS had a great deal on a 210 gallon so I purchased that and redid my plans around the tank. A friend of mine had a spare 75 gallon and I decided why not make that a refugium. As I stated before this was back in 2014 and my plan was to document it on here since that is where I got my ideas and inspiration. Well unfortunately I never started a build thread and have always regretted it. In the past few weeks I've been spending a lot of time on here and enjoy talking with others who love this hobby like I do. So I decided I'll just document it now, 6 years later and try to remember what I was thinking at the time. I'm not going to post everything at once but I'll try to get it all on here within the next few weeks. After I explain my journey to the present, I'd like to continue on as I add new things and hopefully someday go even bigger!
 
OP
OP
JReef85

JReef85

Community Member
View Badges
Joined
Aug 18, 2016
Messages
73
Reaction score
149
Location
NJ
Rating - 0%
0   0   0
Here is the area I planned to place the tank. The door on the left takes you to the garage and the door in the back goes outside. I planed to put the tank where the closet is and put a computer desk behind the closet (Tank) and that's how you would access the mudroom.
IMG_1786.JPG

Here is the walls knocked out and we had to put in a large beam.
IMG_1882.JPG

This it my father holding my daughter on the stand. We build a floor in the garage to match the height of the room. I went completely over kill with this stand. It has two 2x6s that run the length. The sump is going to be in the garage so under the tank will be storage for toys and stuff. I did not want a center brace.
IMG_1941.JPG

IMG_1988.JPG

IMG_1943.JPG
IMG_1987.JPG

The plywood is overhanging slightly so I can get it flush with the drywall.
IMG_1990.JPG
 

Billldg

My Gem Tang Is Watching You
View Badges
Joined
May 14, 2018
Messages
17,478
Reaction score
121,885
Location
Georgia
Rating - 0%
0   0   0
First things, its never fair to include your daughter, we will always melt, lol!! ;Hilarious Look forward to seeing this come together.
 
OP
OP
JReef85

JReef85

Community Member
View Badges
Joined
Aug 18, 2016
Messages
73
Reaction score
149
Location
NJ
Rating - 0%
0   0   0
When I did this build I painted everything with Kilz (I think this is the name) waterproofing paint. I'm not sure if I have pictures of the sump area but it completely flaked off of everything and made a complete mess. I will never use it again but maybe I did something wrong. The only place it hasn't been to bad is around the tank.
IMG_1996.JPG

The Two pieces of wood that are painted on the left on the picture (back of the stand) are supports for the beam I had to put in. This support haunts me to this day and drives me crazy. Its just always in the way and I'm constantly slamming my head on it or my elbows.
IMG_1998.JPG
 
OP
OP
JReef85

JReef85

Community Member
View Badges
Joined
Aug 18, 2016
Messages
73
Reaction score
149
Location
NJ
Rating - 0%
0   0   0
My house backs up to a large field and I have a double gate in the back. My brother and I picked up the tank and backed it up right to my back porch. I don have any pictures of use bringing it in, but there was four of us and we didn't have to go far. I borrowed two friends and my brother who know nothing about fish or fish tanks. I didn't really tell anyone how big the the tank was and I remember them being shocked at the size. We used big ratchet straps to carry it and lift it into place.
IMG_2005.JPG
IMG_2006.JPG

My plan was to have two sides visible and then when you go into the mudroom you would have access to the entire back. In the photo below, to the right will be the door to the mudroom.
IMG_2007.JPG
 
OP
OP
JReef85

JReef85

Community Member
View Badges
Joined
Aug 18, 2016
Messages
73
Reaction score
149
Location
NJ
Rating - 0%
0   0   0
Here is another thing that I did that I have contemplated changing. I wanted a clean look in the front like the tank was flush with the wall. It came out pretty good but it is a complete pain for maintenance. Not being able to reach in from the front can really inhibit cleaning and maintenance at times. I constantly go back and forth with this.
IMG_2046.JPG

Door to access the back of the tank and mudroom.
IMG_2047.JPG

This is a look at the tank from inside the mudroom. You can see all the little wedges I put in there to level this tank perfectly. This drove me nuts and I wanted it to be perfect.
IMG_2051.JPG

IMG_2067.JPG
IMG_2070.JPG
 
OP
OP
JReef85

JReef85

Community Member
View Badges
Joined
Aug 18, 2016
Messages
73
Reaction score
149
Location
NJ
Rating - 0%
0   0   0
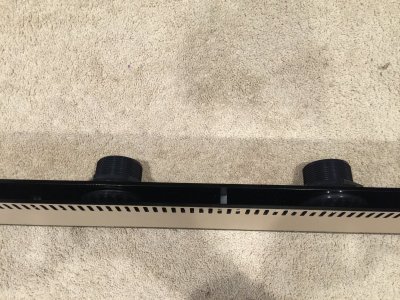
For the overflow I purchased a custom made one from ebay. It is 4 feet wide and has 2 two inch bulkheads. Drilling the tank was one of the most nerve racking things I've done. After it was finished, I've gone on to drill all sorts of tanks without any issues.
IMG_2112.JPG

IMG_2115.JPG

This is the original back it came with. I don't remember why but I wound up not liking this and built my own. The one I built is still on there, I'll take a current picture of that and post it on here.
IMG_2119.JPG
IMG_2117.JPG

Here is the drywall finished and my attempt at a "cleaner" look.
IMG_2251.JPG
IMG_2255.JPG
IMG_2253.JPG
IMG_2114.JPG
 

Gary Taylor

New Member
View Badges
Joined
Oct 15, 2015
Messages
16
Reaction score
27
Rating - 0%
0   0   0
I did mine back in 2015 looks great keep up the good work.Here’s a pic of the finished tank
85E330D6-4D02-4ED7-8C57-897461F6C1CA.jpeg
 

Dcal

Valuable Member
View Badges
Joined
Jul 17, 2019
Messages
1,494
Reaction score
3,128
Location
CA
Rating - 0%
0   0   0
Awesome work on stand and overflows and that's a great place to put it!
 
OP
OP
JReef85

JReef85

Community Member
View Badges
Joined
Aug 18, 2016
Messages
73
Reaction score
149
Location
NJ
Rating - 0%
0   0   0
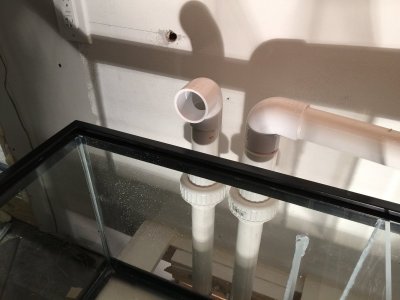
Here is the overflow installed behind the tank. Has three 1 1/2" bulkheads. For the back of the tank I purchased limo tint and tinted the back glass. Allows me to see perfectly in from here but if you are in the front you can't see through (unless its brighter behind the tank).
IMG_2888.JPG

IMG_2889.JPG

IMG_2931.JPG

The three pipes go through the stand into elbows. From there I used spa flex pipe back to regular pvc that goes under the floor I built.
IMG_2971.JPG
IMG_2973.JPG
IMG_2975.JPG
 
OP
OP
JReef85

JReef85

Community Member
View Badges
Joined
Aug 18, 2016
Messages
73
Reaction score
149
Location
NJ
Rating - 0%
0   0   0
This is my half garage about 8 feet from the tank. For my sump I used two 40 breeders connected longways by two 1 1/2 bulkheads. The three drains come to a T and are plugged under the small stand for the sump tanks. The plugs were there for easy maintenance if i needed to drain the line.
IMG_2978.JPG
IMG_2977.JPG
IMG_3173.JPG

Here is second tank which consists of the skimmer section and return.
IMG_3174.JPG

Total overkill here but I designed this first section for 6 7" filter socks. Not long after this I covered the back three cause 6 was way to many.
IMG_3177.JPG

My plan was two run two return pumps. I started off with 2 Jabeo DC12000 or whatever they were called back then. I later changed this as well and went to one return pump. A few years after this build I got solar and I wanted to cut as much electricity as possible so I wet down to one return pump. I kept the other one with a union in the same spot so I could quickly swap them for cleaning or failure.
IMG_3181.JPG
IMG_3181.JPG
 
OP
OP
JReef85

JReef85

Community Member
View Badges
Joined
Aug 18, 2016
Messages
73
Reaction score
149
Location
NJ
Rating - 0%
0   0   0
Sand and rock in and ready for water. The rock is sitting on eggcrate that is buried under the sand.
IMG_3187.JPG
IMG_3189.JPG
IMG_3190.JPG

Water going in straight from the RODI.
IMG_3206.JPG
IMG_3207.JPG
 
OP
OP
JReef85

JReef85

Community Member
View Badges
Joined
Aug 18, 2016
Messages
73
Reaction score
149
Location
NJ
Rating - 0%
0   0   0
Water in and lights on. For lights I have two Hydra 26s and one Hydra 52 in the center. They are sitting on angle aluminium. The photos of the lights are current but nothing has changed there.
IMG_3230.JPG

IMG_4408.jpg

IMG_4409.jpg

IMG_4410.jpg
 

Algae invading algae: Have you had unwanted algae in your good macroalgae?

  • I regularly have unwanted algae in my macroalgae.

    Votes: 19 33.9%
  • I occasionally have unwanted algae in my macroalgae.

    Votes: 13 23.2%
  • I rarely have unwanted algae in my macroalgae.

    Votes: 4 7.1%
  • I never have unwanted algae in my macroalgae.

    Votes: 5 8.9%
  • I don’t have macroalgae.

    Votes: 14 25.0%
  • Other.

    Votes: 1 1.8%
Back
Top