450 Gallon "Island" Overflow with Basement Sump Room

Nhltc99

Active Member
View Badges
Joined
Dec 31, 2018
Messages
100
Reaction score
113
Location
Whitewater, WI
Rating - 0%
0   0   0
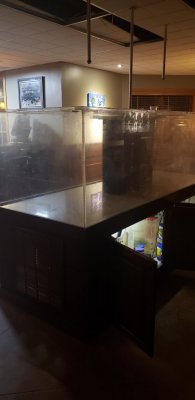
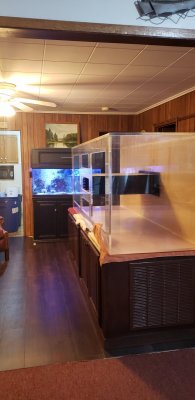
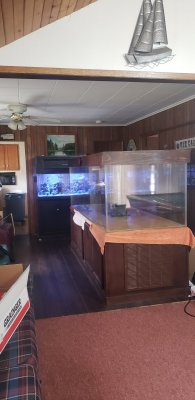
Well I decided it's time to finally start the build thread for my tank upgrade. I picked up a 450 gallon (8' x 3' x 2.5'H) acrylic tank over the winter with a center "Island" overflow that I've been slowly accumulating gear for. The tank will be in the center of what is currently my dining room, with all four sides viewable. Sump will be in the unfinished basement directly under the tank. Currently I have a 75g tank with a few torches, 2 mandarins, 2 flame angels, small blue tang, yellow eye kole tang, and a sailfin tang. I also have a separate 115g tank with a small clown tang, small yellow belly blue tang, desjardini sailfin tang, and another blue tang. Everything will be consolidated into the 450g at some point.

The plan is to use a 75g tank I picked up a month ago as the " return sump" for return pumps and some other gear. I will also be using stock tank(s) for a large refugium and more. Still deciding on the exact layout of the sump components, but the current version is for water to drain to a 150g stock tank that I can use for water changes and extra gear, this will flow into a 300g stock tank that will be refugium and live rock, this will then flow into the return sump where I will have multiple Cor20 pumps. All three tanks sumps will be at the same height (at the tops), so the return sump can back flow into the fuge upon power failure with plenty of extra volume. Sumps will all be on cinder block stands roughly 2' off the ground. It's an old house with a low ceiling, so bottom of sump to top of display tank will be about 10' vertical max. I'll start with two Cor20's, and see what kind of flow I can get from them with 1.5" pipe. If I want/need more, I will add a third. I may consider bumping these up to 2" pipe as well.

I have roughly 700lbs of rock between my existing tanks, and extra rock I've accumulated (some dry rock, some that needs to be cured still), as well asthree marine pure and brightwell blocks that are in the current tanks.

Still have one more side of the 450 to sand/polish out the scratches, and I picked up new vinyl plank flooring for the dining room yesterday, so I'm hoping to get a good chunk of this completed over memorial day weekend. My goal is to have water in the tank by mid-June at this point.
 
OP
OP
N

Nhltc99

Active Member
View Badges
Joined
Dec 31, 2018
Messages
100
Reaction score
113
Location
Whitewater, WI
Rating - 0%
0   0   0
Here's a picture of the tank and stand from when I picked it up.

20191004_190109.jpg
 

ca1ore

10K Club member
View Badges
Joined
Oct 28, 2014
Messages
13,847
Reaction score
19,707
Location
Stamford, CT
Rating - 0%
0   0   0
I have the same sized tank (though not a center overflow). Jack posts on all corners. Looks like an awesome project.
 
OP
OP
N

Nhltc99

Active Member
View Badges
Joined
Dec 31, 2018
Messages
100
Reaction score
113
Location
Whitewater, WI
Rating - 0%
0   0   0
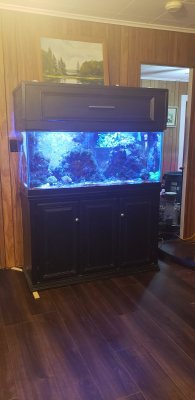
Finally made some more progress. Unfortunately, I ended up working all memorial day weekend so flooring got pushed back a bit. But at last, carpet is out and vinyl plank flooring is in, including beneath my current 75g tank. Also, the stand has been moved into position. A lot of work to do over the next couple weeks, working on having the basement floor epoxy coated prior to bringing in the sumps, but it may not work out.

Here's my current 75g tank and the stand in its new home.

20200611_165627.jpg 20200616_190105.jpg
 
OP
OP
N

Nhltc99

Active Member
View Badges
Joined
Dec 31, 2018
Messages
100
Reaction score
113
Location
Whitewater, WI
Rating - 0%
0   0   0
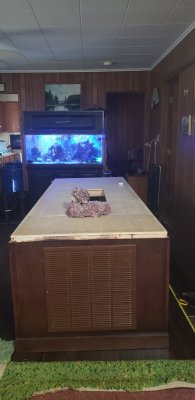
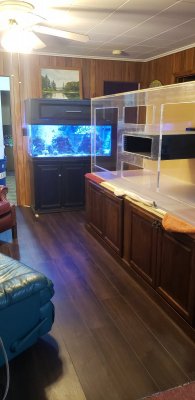
Tank is on the stand finally, just not yet facing the right direction. Still some polishing to do on the fourth side (currently facing down) which will be the main viewing side and the foam mat for between tank/stand should be here later today. Hoping to have the basement floor epoxy coated next week and then I can bring in the stock tanks and get working on the sump setup.

20200629_142735.jpg 20200629_151512.jpg
 

Jots

Community Member
View Badges
Joined
Sep 21, 2019
Messages
75
Reaction score
165
Rating - 0%
0   0   0
Tank is on the stand finally, just not yet facing the right direction. Still some polishing to do on the fourth side (currently facing down) which will be the main viewing side and the foam mat for between tank/stand should be here later today. Hoping to have the basement floor epoxy coated next week and then I can bring in the stock tanks and get working on the sump setup.

20200629_142735.jpg 20200629_151512.jpg
Exciting times for sure, looks great so far and excited to see the outcome of your setup. My house will be complete in about a month or so and preordered my stand and tank so just as excited . We have similar builds and look forward to following your thread. I’m getting a 425 gallon with a 90 gallon nem tank. Both are inwall next to kitchen area so I can view it in the morning with my coffee. Keep up the great work
 

fishguy242

Cronies..... INSERT BUILD THREAD BADGE HERE !!
View Badges
Joined
Jan 21, 2020
Messages
43,127
Reaction score
248,411
Location
Illinois
Rating - 100%
1   0   0
hi,how is tank coming along :)
 
OP
OP
N

Nhltc99

Active Member
View Badges
Joined
Dec 31, 2018
Messages
100
Reaction score
113
Location
Whitewater, WI
Rating - 0%
0   0   0
hi,how is tank coming along :)
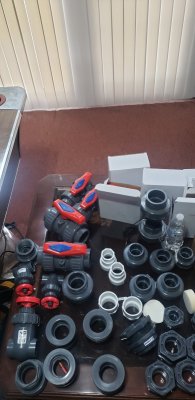
Unfortunately, it is coming along very slowly. Biggest hold up right now is waiting to get my basement floor epoxied before I can bring in the stock tanks for my sump. I did finish polishing the acrylic, but still need to drill out the holes in the overflow to match my desired sizes. Most of the holes are for ABS 1" bulkheads. I plan to use all sch80 bulkheads and primarily 1.5" and 2.0". I'm currently deciding between 8 - 1.5" and 1 - 2" bulkheads, or 4 - 1.5", 2 - 1", and 3 - 2" bulkheads. Plan is to use 2-3 for return lines, 3-4 for drains, 2 for potential closed loop UV. Finally got a rough count of all my valves and bulkheads that I have collected when I was planning for a 210g tank, need to finalize my plumbing plans and place another order for the remaining valves and unique fittings I need. Grainger employee discount definitely comes in handy for items like pvc valves. Collected some gear on the recent BRS sales/promos, another gyre, RODI upgrades, etc. Everything is getting closer and hoping to have water in the tank soon!

20201113_094634.jpg 20201113_094700.jpg
 
OP
OP
N

Nhltc99

Active Member
View Badges
Joined
Dec 31, 2018
Messages
100
Reaction score
113
Location
Whitewater, WI
Rating - 0%
0   0   0
Picked up a Sicce Syncra 16.0 from black friday sales, 30% off is hard to beat. I'm going to use this for my UV Closed Loop. Anyone know if this can be used in any orientation/direction? (such as upside down)

Also made my final decisions (I think) for bulkhead arrangement in the overflow. Hoping to start drilling these this week.
3 - 2" for UV Closed Loop in/out and for wires to go from stand to top of tank for Gyres and maybe even for power to the lights.
2 - 1" for Primary full syphon drains. This will allow me to divert water to two separate areas of the sump and control the flow rate through the refugium if needed.
4 - 1.5" for two returns, secondary drain, and emergency drain
 

fishguy242

Cronies..... INSERT BUILD THREAD BADGE HERE !!
View Badges
Joined
Jan 21, 2020
Messages
43,127
Reaction score
248,411
Location
Illinois
Rating - 100%
1   0   0
hi,i think any position is fine,except upside down ;) :)
 
OP
OP
N

Nhltc99

Active Member
View Badges
Joined
Dec 31, 2018
Messages
100
Reaction score
113
Location
Whitewater, WI
Rating - 0%
0   0   0
hi,i think any position is fine,except upside down ;) :)
I think upside down was the wrong way to describe it. I would like to have the intake facing up and the output facing horizontally (motor would then be below the impeller). Either way, I reached out to Sicce today to confirm. I don't think there is any way for it to trap any air bubbles this way but would rather double check.
 

Jots

Community Member
View Badges
Joined
Sep 21, 2019
Messages
75
Reaction score
165
Rating - 0%
0   0   0
Unfortunately, it is coming along very slowly. Biggest hold up right now is waiting to get my basement floor epoxied before I can bring in the stock tanks for my sump. I did finish polishing the acrylic, but still need to drill out the holes in the overflow to match my desired sizes. Most of the holes are for ABS 1" bulkheads. I plan to use all sch80 bulkheads and primarily 1.5" and 2.0". I'm currently deciding between 8 - 1.5" and 1 - 2" bulkheads, or 4 - 1.5", 2 - 1", and 3 - 2" bulkheads. Plan is to use 2-3 for return lines, 3-4 for drains, 2 for potential closed loop UV. Finally got a rough count of all my valves and bulkheads that I have collected when I was planning for a 210g tank, need to finalize my plumbing plans and place another order for the remaining valves and unique fittings I need. Grainger employee discount definitely comes in handy for items like pvc valves. Collected some gear on the recent BRS sales/promos, another gyre, RODI upgrades, etc. Everything is getting closer and hoping to have water in the tank soon!

20201113_094634.jpg 20201113_094700.jpg
Nothing good happens when you rush in this hobby so take your time. Being methodical and planning things out will pay dividends later. Keep up the good work and will keep my opened for further updates
 
OP
OP
N

Nhltc99

Active Member
View Badges
Joined
Dec 31, 2018
Messages
100
Reaction score
113
Location
Whitewater, WI
Rating - 0%
0   0   0
Well, it's been way too long since I updated this thread. But the good news is the tank finally has fish and coral in it! I was able to drill out all my holes in the overflow over the winter. I decided on two 1" primary full syphon drains to allow regulate flow through refugium as needed, two 1.5" drains for secondary and emergency drains, two 1.5" returns, two 2" for UV Closed loop in/out, and finally a 2" through pipe for cords to travel from the stand to top of the tank. Went with all schedule 80 bulkheads and valves. Not trusting ABS bulkheads on something like this. Gave it a lengthy leak test, had to tighten up a few of the threaded fittings into the bulkheads but no major issues.
20210310_170343.jpg

20210308_190346.jpg


Plumbing is going straight through the floor into the basement. Drilled large enough holes that I am able to fit one side of the unions through the hole for any maintenance needs. Had my first return line, and the main drain lines plumbed ahead of finishing my basement floor. Was able to have one return pump flowing with freshwater to test out how the Cor20's would handle the 10ft vertical head pressure. Increased return line to 2" almost immediately above the pump, and have a flow sensor on the horizontal stretch. I reduced the return line to 1.5" right before the ball valve and bulkhead under the tank. At the top of the overflow the 1.5" return tee's to two 1" drains. With RO water, it was able to hit over 850GPH, which I was quite happy with. I'm only aiming for 6-700GPH per return pump, but now I only need to run them at about 60% to start. Screenshot of the Cor20 from Fusion is with saltwater (top Cor20 is my 75g tank, lower one is the 450g). I added some 1" RFG's to the ends of the return line to test it, flow dropped from to 616. Not sure if I'll use them or not, I may save them for the UV closed loop instead

20210508_155016.jpg

20210508_115225.jpg

20210507_133754.jpg

Screenshot_20210528-192725_APEX Fusion.jpg


Finally was able to get my buddy to epoxy my basement floor just before memorial day weekend. It was worth the wait, and I'm definitely glad I had the concrete sealed before fully setting up the tank. I drained the RO water and disassembled all the plumbing and cleared the basement out. Then had the tank refilling with RODI and added salt, sand, and rock while we did the floor.

20210520_072902.jpg

20210524_101811.jpg

20210527_202504.jpg

20210528_172726.jpg
 
OP
OP
N

Nhltc99

Active Member
View Badges
Joined
Dec 31, 2018
Messages
100
Reaction score
113
Location
Whitewater, WI
Rating - 0%
0   0   0
Finally I took an extra day off work on the Tuesday after memorial day weekend and got a ton of work done between Monday and Tuesday. Finished the rest of the plumbing for the second return pump, and the secondary drain. Then started plumbing my existing 75g tank into this sump. I am going to run both tanks together for a while to make sure I don't run into any issues. The second return pump is currently being used for the 75g return. I took out the last section of plumbing between main level floor and the bulkhead, and used a spare union to switch over to plumbing the 75g. Reduced down to 1.25" since this is what the tank currently has and ran pipe over to it. Same with the second primary drain, and my Emergency drain line. Currently both tanks are running with 1 return, 1 primary drain, and a secondary drain.

Tuesday afternoon I made the switch. I had already been monitoring my Alk/Cal/Mag and of course salinity. I shut down the 75g for about an hour for the final plumbing changes, and then switched it back. All rock from my previous sump was transferred over to either the 450g or the new sump. I had already taken a couple small rocks and chunk of marine pure out of my sump and added to the tank to help seed it. The fish were obviously furious with me for a couple of days for chasing them around the tank. I was concerned about my female mandarin, she was not looking good that night. Both mandarins stayed in the 75g tank that has plenty of copepods until I'm happy with the life in the new tank. But she got pretty scared when I was catching the other fish and even though I wasnt trying to catch her she was always right in the middle of it. Luckily she seems to be doing ok now. Was able to get her to eat some frozen food the next day and her color looks good again.

All other fish besides my file fish from both the 115g and the 75g are now in the 450 and loving life with the extra space. Very minor issue's considering I added 7 tangs together. The two sailfins had a little bit of fin slapping to decide who's head honcho, but one is clearly bigger than the other so it was quick. I expected the sailfin's to dislike each other more, and also expected more disagreement between the three blue tangs. Instead, they seem to follow each other around.


Only added a reefbrite and an Orphek LED bar that I had for temporary lighting to start. Took a couple of evenings to get all the Apex stuff sorted out, transferred over, and semi-organized. Wire management is definitely a work in progress. Still waiting on my electrician buddy to add a couple of dedicated circuits in the basement so I can run the return pumps on separate circuits, and split the heaters up too. I have three 600w BRS titanium heaters currently. Plan is to run them on inkbird controllers, and plugged into EB4's for back up since the EB4's have one 12A plug each. In the summer the basement holds about 70, but it gets a bit chilly in the basement in the winter, so I'll see in the fall how well this set up will hold the tank temp. I plan to insulate the sumps at some point. I realized as I was routing my Dose lines that I never ordered a dose tube holder for my new sump, chip clip will have to work temporarily. The RO tube holder's that BRS sells are great for running dose lines along the ceiling/joists

20210603_210603.jpg

20210604_215912.jpg

20210604_220001.jpg

20210603_210512.jpg


Finally tonight I was able to temporarily rig up my two Hydra 26HD's on one end, and two 52HD's on the other end of the tank, and then transfer corals over. I ordered some 80/20 T-Slot extrusion that should be here tomorrow to make a light rack. Once that is done I can fully mount the lights and add the Orphek and Reefbrite LED bars that I've collected over the years. Eventually I'll either add more Hydra's, or upgrade to something else but these will work plenty fine for my euphyllia collection.

20210604_202437.jpg
 
OP
OP
N

Nhltc99

Active Member
View Badges
Joined
Dec 31, 2018
Messages
100
Reaction score
113
Location
Whitewater, WI
Rating - 0%
0   0   0
1622863409224.gif

You’ve put in soooo much hard work and have been so patient, and I’m just here cracking up like “that’s a really expensive way to carbon dose, can’t he find any kamchatka?!”
That would indeed be some expensive carbon dosing hahaha. Instead I just collected some empties to use a dosing bottles though. They might get upgraded to Tito's 1.75L bottles soon... Need to empty about 1.5 more which shouldn't take too long this summer. I use an empty Tito's bottle as my Trident waste reservoir as well. Any guesses at what my liquor of choice is?

20210604_223228.jpg
 

Caring for your picky eaters: What do you feed your finicky fish?

  • Live foods

    Votes: 14 26.9%
  • Frozen meaty foods

    Votes: 43 82.7%
  • Soft pellets

    Votes: 7 13.5%
  • Masstick (or comparable)

    Votes: 3 5.8%
  • Other

    Votes: 2 3.8%
Back
Top