Navigation
Install the app
How to install the app on iOS
Follow along with the video below to see how to install our site as a web app on your home screen.
Note: This feature may not be available in some browsers.
More options
You are using an out of date browser. It may not display this or other websites correctly.
You should upgrade or use an alternative browser.
You should upgrade or use an alternative browser.
AlexGs 4200 Gallon Display + 2100 gallon fish room? --- New House = New Build
- Monster Build
- Thread starter AlexG
- Start date
- Tagged users None
Well you’ve sure taken this to the next level lol. I’ve followed your old builds but this one is next level stuff. I don’t know how you find the time. Have you looked into if your stock cement floor is actually capable of supporting so much weight? Gotta be honest. I think you’re crazy but I can’t wait to see it done!!!
I utilize the time I have when I am not working or spending time with my wife to get work done. I just took a couple of days off and was working 8-12hrs a day on the canopy with lots breaks and started a water change on the fish room.
I spent a lot of time doing research on weigh loading on basement floors. There is a lot of interesting information available out there if you take the time to look. The best comparison I had was people wanting to place very heavy machinery on slabs of basements or standard cement slabs. Since this aquarium is a widely distributed load it will not be putting all of the weight on a small area keeping the PSI on the floor much lower than a stand that only has a few legs. Since this will also be a static load and not a live load there will not be large changes to the pressure being applied to the cement. The tank will also be filled slowly to ease the load onto the floor and allow time to monitor just in case there is an issue. It comes down to what is below the cement which for me is solid earth and unless there is a cave or swamp below the basement the weight of the tank as a distributed load should not be enough to impact the cement floor since the solid earth below has no where to go when the load is applied. A good way to think about it is that before my basement was built there was dirt occupying the same space with a much larger amount of weight being supported by the soil below.
I will also add that some of the fish room tanks such as the 2x250gallon water storage tanks actually have a higher loading on the floor since they are 42" tall filled with water over a rather small area with just a few legs supporting them and there have been no signs yet the floor is having an issue. The main display will only have 32"of water which again will help to limit the load versus a taller tank.
Don't feel bad my wife thinks I am crazy too. I still think I have the coolest wife in the world for agreeing to let me build this.
Daniel@R2R
Living the Reef Life
View Badges
Staff member
Super Moderator
Reef Squad
Partner Member 2024
Excellence Award
Photo of the Month
Article Contributor
Hospitality Award
Article Administrator
Reef Pumpkin Carver
R2R Secret Santa 2023
My Tank Thread
Looks amazing!!!The canopy is almost complete with rough construction.
Holy crap wowI have been in my new house for just over two weeks and its time to start up a new build thread. I have a temporary tank running right now with a some fish and corals from the old tank but for the most part I sold off what I had and unfortunately had some losses before I was able to move to my new home. Now its time to get building once again and this time I have a completely different plan than the last monster tank system.
Priorities:
Fish Room
- Build out the fish room
- Transfer temp tank into fish room frag tank
- Finish all fish room systems to allow normal operations
- Start building the display tanks
- Lots of display tank testing
- integrate the display tanks into the fish room system
Display Tanks
- Humidity Containment and mitigation system
- Electrical Sub panel just for the aquariums installed
- Utility sink
- 7 Stage 200 GPD RO/DI Unit
- 80 watt HO UV sterilizer - Will likely add a second sterilizer in the future
- Radiant heating system with redundant controllers
- GEO Commercial Calcium Reactor
- Skimmer - Custom DIY from my last system
- Primary sump 265 gallon HDPE tank
- Secondary sump 300-500 gallons TBD
- 200 gallons RODI water storage
- 450 gallon frag tank DIY
- 720 Gallon Refugium/research tank DIY
- 150 Gallon glass tank Mantis/research tank
- Main Return Pump Abyzz A400
- Secondary return pumps for auxiliary tanks TBD
- Inline water change tanks TBD possibly 250-500 gallons
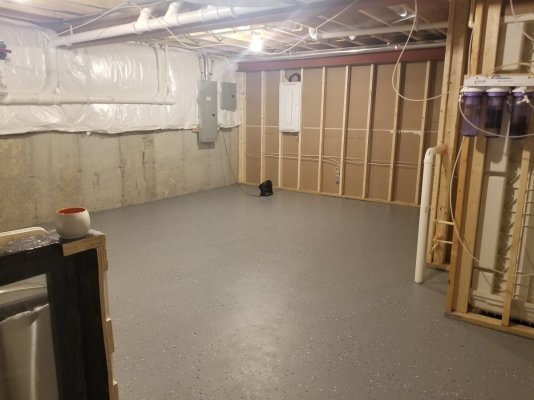
Since I have a temporary system running my first priority is to get part of my new system up and running so that I can teardown the temp tank since it is basically an indoor pond made from 2x4s and plywood with a pond liner. I am thinking that if I can get the frag tank up and running along with the 265 gallon sump I can move everything over at that point and then I can continue with expanding the fish room out the rest of the way. So far I have the RO/DI system operational again along with a 100gallon water storage tank. I cannot describe how much I disliked making RO/DI water one five gallon bucket at a time which take 35-40 minutes per bucket. I also decided I wanted my fish room to look nicer so I put down some epoxy paint on the floor. The epoxy paint turned out great it was just not so much fun moving everything from one side of the fish room to the other for painting but its done now. I have moved on to starting to layout the fish room tanks so I can move on to electrical and plumbing. At this time I am not going to share my plans for the display tanks but I included a couple pictures of the finished basement so feel free to speculate about the size but I am not telling. I am going to build my displays DIY again so I can get exactly what I want. I will be sure to post updates as I progress through this build and might even make some YouTube videos along the way.
- Construction Glass sides with composite bottom
- Will feature reef and non-reef safe fish displays
- Tank Size (CLASSIFFIED) Use your imagination for now (Still not finalized)
Temp tank and finished part of the basement where the displays will eventually go


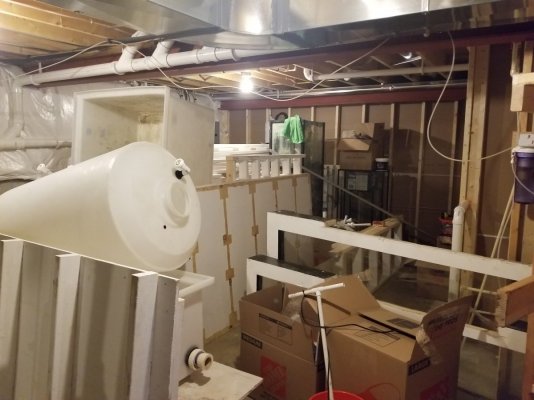
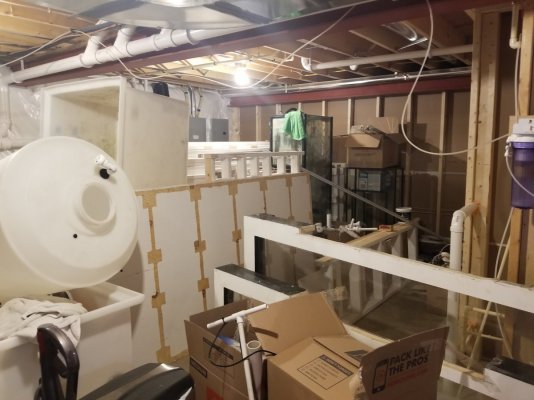
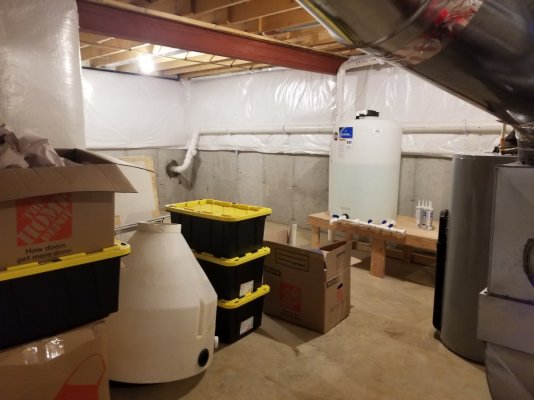
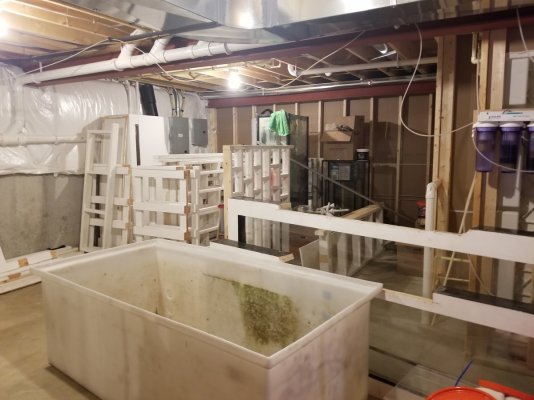
Fish Room pictures of the mess and the progress


I hope there are no extra parts left after I get done building the fish room. I did not make an Ikea style set of instructions when I tore down the old tanks.

First piece of the fish room puzzle is going together. Resurrecting the old reef tank stand which will now be a frag tank.

FollowingSmall update today. The glass has been sealed to the front of the 700 gallon tank.


amazing
Very impressive. Cant wait to see your entire system set up. I wish you well in your mammoth build. It's going to be incredible.I have been in my new house for just over two weeks and its time to start up a new build thread. I have a temporary tank running right now with a some fish and corals from the old tank but for the most part I sold off what I had and unfortunately had some losses before I was able to move to my new home. Now its time to get building once again and this time I have a completely different plan than the last monster tank system.
Priorities:
Fish Room
- Build out the fish room
- Transfer temp tank into fish room frag tank
- Finish all fish room systems to allow normal operations
- Start building the display tanks
- Lots of display tank testing
- integrate the display tanks into the fish room system
Display Tanks
- Humidity Containment and mitigation system
- Electrical Sub panel just for the aquariums installed
- Utility sink
- 7 Stage 200 GPD RO/DI Unit
- 80 watt HO UV sterilizer - Will likely add a second sterilizer in the future
- Radiant heating system with redundant controllers
- GEO Commercial Calcium Reactor
- Skimmer - Custom DIY from my last system
- Primary sump 265 gallon HDPE tank
- Secondary sump 300-500 gallons TBD
- 200 gallons RODI water storage
- 450 gallon frag tank DIY
- 720 Gallon Refugium/research tank DIY
- 150 Gallon glass tank Mantis/research tank
- Main Return Pump Abyzz A400
- Secondary return pumps for auxiliary tanks TBD
- Inline water change tanks TBD possibly 250-500 gallons
Since I have a temporary system running my first priority is to get part of my new system up and running so that I can teardown the temp tank since it is basically an indoor pond made from 2x4s and plywood with a pond liner. I am thinking that if I can get the frag tank up and running along with the 265 gallon sump I can move everything over at that point and then I can continue with expanding the fish room out the rest of the way. So far I have the RO/DI system operational again along with a 100gallon water storage tank. I cannot describe how much I disliked making RO/DI water one five gallon bucket at a time which take 35-40 minutes per bucket. I also decided I wanted my fish room to look nicer so I put down some epoxy paint on the floor. The epoxy paint turned out great it was just not so much fun moving everything from one side of the fish room to the other for painting but its done now. I have moved on to starting to layout the fish room tanks so I can move on to electrical and plumbing. At this time I am not going to share my plans for the display tanks but I included a couple pictures of the finished basement so feel free to speculate about the size but I am not telling. I am going to build my displays DIY again so I can get exactly what I want. I will be sure to post updates as I progress through this build and might even make some YouTube videos along the way.
- Construction Glass sides with composite bottom
- Will feature reef and non-reef safe fish displays
- Tank Size (CLASSIFFIED) Use your imagination for now (Still not finalized)
Temp tank and finished part of the basement where the displays will eventually go


Fish Room pictures of the mess and the progress


I hope there are no extra parts left after I get done building the fish room. I did not make an Ikea style set of instructions when I tore down the old tanks.

First piece of the fish room puzzle is going together. Resurrecting the old reef tank stand which will now be a frag tank.


Where do you find an under gravel filter for this build ? lol. Sorry. Too many Sierra Celebration Ales todayThis build is insane! Def in this for the ride
I used to build cell towers, and we would have to crush test our foundation mud before we could stack it. Specs were usually for 4500psi mud. We would have an engineer on site while we poured and they would fill a few test cylinders from each truck and chuck them in a cooler that was left o site to simulate similar conditions to the foundation. We would break them at 3, 7, 14, and 21 days (never did it take longer) and when the crush strength was 4500 psi or above we were good to go. Sometimes we got a green light at 3 days, and the older concrete gets the higher the crush. 4500 psi is a bit higher than usual, but not much (3500 - 4000)I utilize the time I have when I am not working or spending time with my wife to get work done. I just took a couple of days off and was working 8-12hrs a day on the canopy with lots breaks and started a water change on the fish room.
I spent a lot of time doing research on weigh loading on basement floors. There is a lot of interesting information available out there if you take the time to look. The best comparison I had was people wanting to place very heavy machinery on slabs of basements or standard cement slabs. Since this aquarium is a widely distributed load it will not be putting all of the weight on a small area keeping the PSI on the floor much lower than a stand that only has a few legs. Since this will also be a static load and not a live load there will not be large changes to the pressure being applied to the cement. The tank will also be filled slowly to ease the load onto the floor and allow time to monitor just in case there is an issue. It comes down to what is below the cement which for me is solid earth and unless there is a cave or swamp below the basement the weight of the tank as a distributed load should not be enough to impact the cement floor since the solid earth below has no where to go when the load is applied. A good way to think about it is that before my basement was built there was dirt occupying the same space with a much larger amount of weight being supported by the soil below.
I will also add that some of the fish room tanks such as the 2x250gallon water storage tanks actually have a higher loading on the floor since they are 42" tall filled with water over a rather small area with just a few legs supporting them and there have been no signs yet the floor is having an issue. The main display will only have 32"of water which again will help to limit the load versus a taller tank.
Don't feel bad my wife thinks I am crazy too. I still think I have the coolest wife in the world for agreeing to let me build this.
To put that in perspective, for 3500 psi floor you would have to stack about 400 gallons on a square inch of floor to get to that... hth for peace of mind.
Looking beautiful too btw!
The weight a concrete pad can withstand actually depends on whether or not the soil is expansive. If your floor is resting on granite, you could set the great pyramid on it.Well you’ve sure taken this to the next level lol. I’ve followed your old builds but this one is next level stuff. I don’t know how you find the time. Have you looked into if your stock cement floor is actually capable of supporting so much weight? Gotta be honest. I think you’re crazy but I can’t wait to see it done!!!
Update time
The active aquarium system is running well. After my second 500 gallon water change in a month the corals are starting to look better. I am seeing more color and some of the corals are starting to open more. I am going to give the system a couple weeks to see how its going before I do another ICP test or just do another water change. The fish are looking great but I did have what I would call a close call with the regal angel. Before I did the second water change the regal angel was looking stressed and looked like it had a bacterial infection but I gave it a dip in para guard and after a few days of not looking well the regal started getting back to normal. The puffer is doing well enjoying a shrimp.
The refugium tank is starting to grow algae again and I modified the egg crate to be completely underwater since it was rising out of the water just hanging which was killing the algae getting exposed to the air. Now its got some rocks on it and some extra zip ties to keep it submerged and growing algae.
The rest of the system is running as expected. My pH has been getting higher as it gets colder and I believe that is because when the tank is heating and the hot water heater is on its exhaust fan is pulling air out of the fish room more often lowering the Co2 levels in the room from a 1000ppm down into the 400-700ppm range. Since my pH was low in the summer with Co2 in the fish room at 1000ppm when the tank does not heat I think that is convincing me even more to make a DIY HRV for more air exchange to help the pH. Humidity has been holding between 39-51% and the dehumidifier runs even less this time of year.
I am happy to see the aquarium system health is going in the right once again. Time will tell.
Simply stunning! Ive completed binge reading the entire thread and the only thing that impresses me more than the actual build is your determination, thoroughness, and zeal for the hobby. You’ve inspired me in my little build and for that I thank you. Keep it up good sir, I’m most definitely following!!
Cool…cool…So do you guys wanna see my Red Sea Reefer?I have been in my new house for just over two weeks and its time to start up a new build thread. I have a temporary tank running right now with a some fish and corals from the old tank but for the most part I sold off what I had and unfortunately had some losses before I was able to move to my new home. Now its time to get building once again and this time I have a completely different plan than the last monster tank system.
Priorities:
Fish Room
- Build out the fish room
- Transfer temp tank into fish room frag tank
- Finish all fish room systems to allow normal operations
- Start building the display tanks
- Lots of display tank testing
- integrate the display tanks into the fish room system
Display Tanks
- Humidity Containment and mitigation system
- Electrical Sub panel just for the aquariums installed
- Utility sink
- 7 Stage 200 GPD RO/DI Unit
- 80 watt HO UV sterilizer - Will likely add a second sterilizer in the future
- Radiant heating system with redundant controllers
- GEO Commercial Calcium Reactor
- Skimmer - Custom DIY from my last system
- Primary sump 265 gallon HDPE tank
- Secondary sump 300-500 gallons TBD
- 200 gallons RODI water storage
- 450 gallon frag tank DIY
- 720 Gallon Refugium/research tank DIY
- 150 Gallon glass tank Mantis/research tank
- Main Return Pump Abyzz A400
- Secondary return pumps for auxiliary tanks TBD
- Inline water change tanks TBD possibly 250-500 gallons
Since I have a temporary system running my first priority is to get part of my new system up and running so that I can teardown the temp tank since it is basically an indoor pond made from 2x4s and plywood with a pond liner. I am thinking that if I can get the frag tank up and running along with the 265 gallon sump I can move everything over at that point and then I can continue with expanding the fish room out the rest of the way. So far I have the RO/DI system operational again along with a 100gallon water storage tank. I cannot describe how much I disliked making RO/DI water one five gallon bucket at a time which take 35-40 minutes per bucket. I also decided I wanted my fish room to look nicer so I put down some epoxy paint on the floor. The epoxy paint turned out great it was just not so much fun moving everything from one side of the fish room to the other for painting but its done now. I have moved on to starting to layout the fish room tanks so I can move on to electrical and plumbing. At this time I am not going to share my plans for the display tanks but I included a couple pictures of the finished basement so feel free to speculate about the size but I am not telling. I am going to build my displays DIY again so I can get exactly what I want. I will be sure to post updates as I progress through this build and might even make some YouTube videos along the way.
- Construction Glass sides with composite bottom
- Will feature reef and non-reef safe fish displays
- Tank Size (CLASSIFFIED) Use your imagination for now (Still not finalized)
Temp tank and finished part of the basement where the displays will eventually go


Fish Room pictures of the mess and the progress


I hope there are no extra parts left after I get done building the fish room. I did not make an Ikea style set of instructions when I tore down the old tanks.

First piece of the fish room puzzle is going together. Resurrecting the old reef tank stand which will now be a frag tank.


I checked out your build. What a job to tear down and move and then setup again. Its not an easy way to start a new aquarium setup. Looks like your move went well with minimal losses.Cool…cool…So do you guys wanna see my Red Sea Reefer?
Thanks @Jonathan Adams . I am always happy to share what is going on with my system even if its not always good news. I am flattered that I inspired your build.Simply stunning! Ive completed binge reading the entire thread and the only thing that impresses me more than the actual build is your determination, thoroughness, and zeal for the hobby. You’ve inspired me in my little build and for that I thank you. Keep it up good sir, I’m most definitely following!!
Hard to believe this build is now a year old. There have been a lot of ups and downs but I am happy with all the progress. The new display tank build is moving a long nicely. With the canopy rough construction completed I am soon going to be moving onto building the tank bottom.


This is epic
Similar threads
- Replies
- 115
- Views
- 2,916
- Replies
- 1
- Views
- 57
- Replies
- 9
- Views
- 294
- Replies
- 84
- Views
- 6,627


