OP
OP
Update Time
A lot of work has been going on since my last update. Not much progress on the build as I have been dedicated to resolving this zinc issue in the running system. My first joy of the week was my Apex EB8 power strip died after a power loss at the house during storms which will need a replacement after troubleshooting. This is why I never put all the critical devices on a single point of failure so the one return pump that was down had backup water flow in the tank to keep the fish happy. I received results from my ICP tests back and my RODI source water had zinc at 1ug/L and the 25gallon lagoon had 2ug/L zinc. I did some math to try and determine how much zinc levels would increase in the water via evaporation and more or less in a years worth of evaporation at a high rate of 50gallons/week which only happens in the dry winter months I would only increase zinc levels slightly which rules out source water. I posted a thread here https://www.reef2reef.com/threads/e...g-zinc-levels-ug-l-in-aquarium-system.906366/ to have my thinking checked on the chemistry forum. With this line of thinking verified I decided to take the following actions.

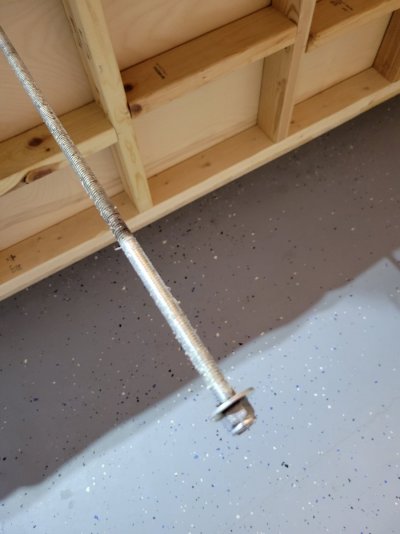
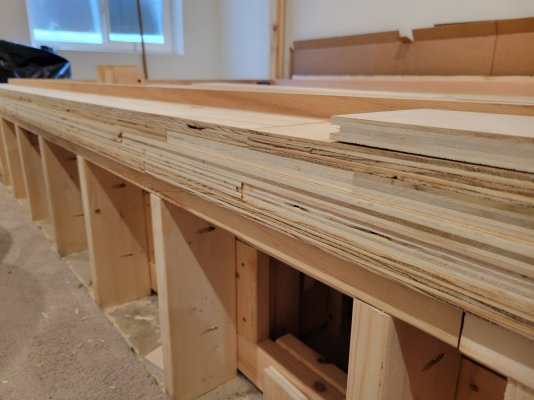
Saturday I started the day with some coffee and a skimmer cleaning. Then it was on to removing tiles starting with the 700 gallon refugium. This was an interesting task to complete without getting into the aquarium but once the first tile was out using an algae scraper and tongs I was able to get all the tiles out accept for the ones the glass is sitting on which will remain in the tank as its too risky to remove them in the 700 gallon refugium. The mantis shrimp took lots of interest watching me remove tiles. I moved on to the secondary sump tank and removed a few tiles from that tank and moved on to removing tiles from the 400 gallon frag tank. It was far easier to remove the tiles from the 400 due to it being a much shallower tank it just took time to rearrange the rockwork as the tiles were removed. I decided that while I was working on the 400 gallon tank that I would also pull the threaded rod cross braces for inspection since they are galvanized steel which means they are zinc coated. I found it hard to believe the threaded rods could be a source as they are encased in PVC that has been silicone sealed to the pond liner. As this tank is shallower I decided to removed the threaded rods one at a time and placed a bar clamp next to the threaded rod to be a temp support. As expected no corrosion or moisture was found on the threaded rods for the 400 gallon frag tank. I resealed the threaded rods on the tank with some new silicone. I also pulled the two remaining threaded rods from the sump tank that I had no inspected with the same result no corrosion or moisture was present. After hauling a few hundred lbs of travertine tiles upstairs and outside I was done for the day.


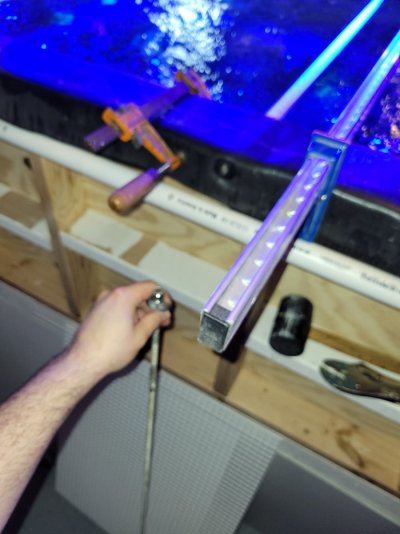
Sunday I was off and running early to get the 500 gallon water change started. This was a different 500 gallon water change that normal because I am turning it into a 1000 gallon water change which means I need to pump out 500 gallons of water from the sump tanks then pump the 500gallons of saltwater that is ready back into the main system then make another 500 gallons of saltwater for the water storage tanks to go back in line. I started by calculating the water volume of one inch of water in each sump tank. I used the BRS aquarium volume calculator to make it easy for each sump tank and 1" of water from the 265 gallon sump is 11.2 gallons and 1 " from the 500 gallon sump is 18.6 gallons. So one inch of water removed from both sumps is 29.8 gallons. 500 gallons/29.8=16.78in so I must drain 16.78 inches of water from both sump tanks. I also needed to siphon water from the 700 gallon tank to remove some detritus, algae, and lower the water level to safely be able to pull the threaded rod cross braces for corrosion inspection. I elected to remove ~30gallons of water at a time with 5 gallon buckets so I could keep track of how much water was manually removed from the system. I also needed to complete a detritus cleanup in the 265gallon sump. Overall I manually siphoned 90 gallons of water into buckets for the detritus cleanup so now I only needed to pump put 13.78" of water from the sump tanks. However the removal of 13.78" of water was going to lower water levels below the 4" sump interconnect line so I decided to continue siphoning the 700 gallon tank into the sumps until there was over 20" of water in both sumps. The 700 gallon tank threaded rod inspections were the same no moisture or corrosion was present. I also inspected/cleaned the 3 return pumps and two skimmer pumps in both sump tanks. Pump out for the sumps was easy as I already had one return plumbed to pump directly into the house waste line with the turning of three valves. I just needed to watch my tape line measurement to know when to stop the pump out. With the pump out completed and the 500gallons of saltwater on standby I started pumping water back into the system. I also took the time to build my mantis shrimp a new house in the 700gallon tank as I was not able to take pictures of the mantis before due to its house being below the glass viewing panel which would cause all picture to be distorted. With the 500gallons back in the system I replaced all the RODI pre-filters and DI cartridges then started making another 500gallons of RODI water to complete the 500 gallon water change. I was a long weekend of maintenance. Now time, more metal removers, and ICP tests will tell me if I have finally solved the zinc issues. Fingers crossed


A lot of work has been going on since my last update. Not much progress on the build as I have been dedicated to resolving this zinc issue in the running system. My first joy of the week was my Apex EB8 power strip died after a power loss at the house during storms which will need a replacement after troubleshooting. This is why I never put all the critical devices on a single point of failure so the one return pump that was down had backup water flow in the tank to keep the fish happy. I received results from my ICP tests back and my RODI source water had zinc at 1ug/L and the 25gallon lagoon had 2ug/L zinc. I did some math to try and determine how much zinc levels would increase in the water via evaporation and more or less in a years worth of evaporation at a high rate of 50gallons/week which only happens in the dry winter months I would only increase zinc levels slightly which rules out source water. I posted a thread here https://www.reef2reef.com/threads/e...g-zinc-levels-ug-l-in-aquarium-system.906366/ to have my thinking checked on the chemistry forum. With this line of thinking verified I decided to take the following actions.
- Pull out the travertine tiles from the system
- Inspect all threaded rod cross braces
- Inspect/clean all return pumps
- Complete the first 500 gallons of a 1000gallon water change
Saturday I started the day with some coffee and a skimmer cleaning. Then it was on to removing tiles starting with the 700 gallon refugium. This was an interesting task to complete without getting into the aquarium but once the first tile was out using an algae scraper and tongs I was able to get all the tiles out accept for the ones the glass is sitting on which will remain in the tank as its too risky to remove them in the 700 gallon refugium. The mantis shrimp took lots of interest watching me remove tiles. I moved on to the secondary sump tank and removed a few tiles from that tank and moved on to removing tiles from the 400 gallon frag tank. It was far easier to remove the tiles from the 400 due to it being a much shallower tank it just took time to rearrange the rockwork as the tiles were removed. I decided that while I was working on the 400 gallon tank that I would also pull the threaded rod cross braces for inspection since they are galvanized steel which means they are zinc coated. I found it hard to believe the threaded rods could be a source as they are encased in PVC that has been silicone sealed to the pond liner. As this tank is shallower I decided to removed the threaded rods one at a time and placed a bar clamp next to the threaded rod to be a temp support. As expected no corrosion or moisture was found on the threaded rods for the 400 gallon frag tank. I resealed the threaded rods on the tank with some new silicone. I also pulled the two remaining threaded rods from the sump tank that I had no inspected with the same result no corrosion or moisture was present. After hauling a few hundred lbs of travertine tiles upstairs and outside I was done for the day.
Sunday I was off and running early to get the 500 gallon water change started. This was a different 500 gallon water change that normal because I am turning it into a 1000 gallon water change which means I need to pump out 500 gallons of water from the sump tanks then pump the 500gallons of saltwater that is ready back into the main system then make another 500 gallons of saltwater for the water storage tanks to go back in line. I started by calculating the water volume of one inch of water in each sump tank. I used the BRS aquarium volume calculator to make it easy for each sump tank and 1" of water from the 265 gallon sump is 11.2 gallons and 1 " from the 500 gallon sump is 18.6 gallons. So one inch of water removed from both sumps is 29.8 gallons. 500 gallons/29.8=16.78in so I must drain 16.78 inches of water from both sump tanks. I also needed to siphon water from the 700 gallon tank to remove some detritus, algae, and lower the water level to safely be able to pull the threaded rod cross braces for corrosion inspection. I elected to remove ~30gallons of water at a time with 5 gallon buckets so I could keep track of how much water was manually removed from the system. I also needed to complete a detritus cleanup in the 265gallon sump. Overall I manually siphoned 90 gallons of water into buckets for the detritus cleanup so now I only needed to pump put 13.78" of water from the sump tanks. However the removal of 13.78" of water was going to lower water levels below the 4" sump interconnect line so I decided to continue siphoning the 700 gallon tank into the sumps until there was over 20" of water in both sumps. The 700 gallon tank threaded rod inspections were the same no moisture or corrosion was present. I also inspected/cleaned the 3 return pumps and two skimmer pumps in both sump tanks. Pump out for the sumps was easy as I already had one return plumbed to pump directly into the house waste line with the turning of three valves. I just needed to watch my tape line measurement to know when to stop the pump out. With the pump out completed and the 500gallons of saltwater on standby I started pumping water back into the system. I also took the time to build my mantis shrimp a new house in the 700gallon tank as I was not able to take pictures of the mantis before due to its house being below the glass viewing panel which would cause all picture to be distorted. With the 500gallons back in the system I replaced all the RODI pre-filters and DI cartridges then started making another 500gallons of RODI water to complete the 500 gallon water change. I was a long weekend of maintenance. Now time, more metal removers, and ICP tests will tell me if I have finally solved the zinc issues. Fingers crossed