AlexGs 4200 Gallon Display + 2100 gallon fish room? --- New House = New Build

OP
OP
AlexG

AlexG

Valuable Member
View Badges
Joined
Jun 20, 2013
Messages
2,112
Reaction score
4,898
Location
Illinois
Rating - 0%
0   0   0
Dude. What. Can the concrete even take this much weight :O I thought my 200G+ DIY build was nutz

Short answer is it should not be an issue unless there is a cave underneath my home. The weight is being distributed over 216sqft and the stand has 378 stand legs. I figure the tank will weigh ~40k lbs. That's ~185lbs/sqft or 105lbs/stand leg. Of course I am going to slowly be filling this aquarium over a week or two constantly monitoring for issues including the floor.
 
OP
OP
AlexG

AlexG

Valuable Member
View Badges
Joined
Jun 20, 2013
Messages
2,112
Reaction score
4,898
Location
Illinois
Rating - 0%
0   0   0
Update Time

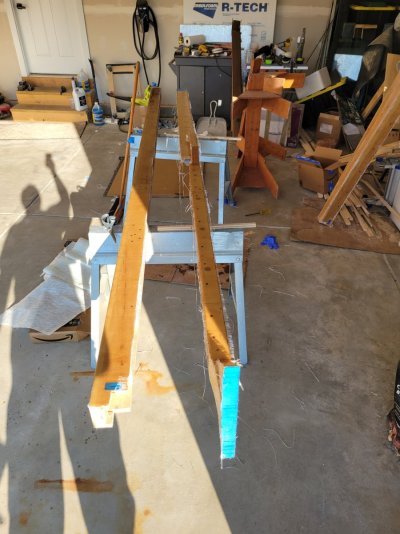
Another fun weekend of fiberglass work in the garage. I spent most of my time working on the 4 top aquarium brace beams in the garage. I have finished fiberglass layering on 2 x 6' beams and 2x 12' beams. I still have some cutting/grinding/sanding work to complete to remove excess fiber glass on the last 12' beam. Then I am going to cut out the holes for the cross braces. I felt it was easier to just fiberglass over the holes for cross braces then only drill out the holes I need and leave the extras covered over with fiberglass which can be easily drilled out later if needed. All beams will get a final light sanding to rough up the surface for pond armor epoxy which will be completed once all fiberglass work is completed. After a final cleaning of dust I will move the finished beams back downstairs to await final installation. Wood filling has also been completed on the aquarium bottom, 24', and 30' beams. I just need to do some sanding downstairs and a cleanup before I start preparing fiberglass. I can't say this is a fun part of the build but it gets me one step closer to being completed. The full body suit is also not a fun part of the job when its 87 degrees outside. I should be wrapped up by this weekend in the garage so I can begin fiberglass work in the basement.

20220716_103815.jpg
20220716_135019.jpg
20220720_220056.jpg
20220718_164808.jpg
20220720_220109.jpg
20220720_215915.jpg
 

Attachments

  • 20220718_183051.jpg
    20220718_183051.jpg
    190.3 KB · Views: 72
OP
OP
AlexG

AlexG

Valuable Member
View Badges
Joined
Jun 20, 2013
Messages
2,112
Reaction score
4,898
Location
Illinois
Rating - 0%
0   0   0
Update time

I completed a 500 gallon water change on the system and made sure to measure my salinity with a hydrometer and refractometer to make sure they matched which they did. I am working to get my Magnesium levels balanced as they have been a bit low and I am going to setup the doser to assist as the Kalk with Mag is not keeping up. I think its also about time to send out an ICP test if I get around to it this week to see overall how things are looking. The mantis shrimp and fish in the system are all doing well. Some corals are looking great and a few are still looking a bit faded including some of the acros. Hoping the water change and Mag balancing will help out.

As for the build I have completed fiberglass on the 4 beams from the top brace that were in my garage. I have moved down into the basement and completed the wood filling for the aquarium bottom seams along with the 24' and 30' beams. After a round of sanding and cleaning only a few touchups will be needed for the aquarium bottom with wood filler. The 24' and 30' beams have fiberglass pre-cut for the three sides of the beam that will have fiberglass laminated in two layers. Last night I finished off my evening by cleaning up fiber glass trimmings and coating the 24' and 30' beams with resin on three sides.

I have also doubled up on ventilation so the aquarium tent is pulling 410CFM of air flow through the tent now and last night I did not smell any vapors outside of the aquarium tent after applying resin on the beams.

20220722_203812.jpg
20220722_141757.jpg
20220722_153217.jpg
20220724_113726.jpg
20220721_204241.jpg
20220725_185937.jpg
20220725_212325.jpg
 
OP
OP
AlexG

AlexG

Valuable Member
View Badges
Joined
Jun 20, 2013
Messages
2,112
Reaction score
4,898
Location
Illinois
Rating - 0%
0   0   0
An incredible build. I wish I could forward the time in future to see how it will look, but I know it is going to be just awesome, just like it is looking now.
The build has come a long way since December 2020. I still can't believe I am this far along. I am definitely past the 1/2 way point now with water proofing underway. Once fiberglass and epoxy is complete I will be running out of stuff to do. Final glass measurements and ordering, plumbing, light racks, electrical, ventilation, tank divider build, glass installation, exterior furniture finish, cleanup, fill test, aquascaping, saltwater fill yest, cycling, Aquarium lighting, aquarium waterflow, system integration combining the fishroom and display together as one system. Okay there is still a lot to do.
 

GBRsouth

Valuable Member
View Badges
Joined
Jul 9, 2017
Messages
1,279
Reaction score
3,577
Location
N.S.W. AUSTRALIA
Rating - 0%
0   0   0
The build has come a long way since December 2020. I still can't believe I am this far along. I am definitely past the 1/2 way point now with water proofing underway. Once fiberglass and epoxy is complete I will be running out of stuff to do. Final glass measurements and ordering, plumbing, light racks, electrical, ventilation, tank divider build, glass installation, exterior furniture finish, cleanup, fill test, aquascaping, saltwater fill yest, cycling, Aquarium lighting, aquarium waterflow, system integration combining the fishroom and display together as one system. Okay there is still a lot to do.

Just reading this, I have to go and have a rest now. :D
 
OP
OP
AlexG

AlexG

Valuable Member
View Badges
Joined
Jun 20, 2013
Messages
2,112
Reaction score
4,898
Location
Illinois
Rating - 0%
0   0   0
Small update

Fiberglass work is progressing in the "tent". I now have 2 layers of fiberglass on one side of the 24' & 30' beams. Time to flip the beams to the top side and lay down two more layers of fiberglass. Hoping if all goes well that this weekend I will have fiberglass completed on the beams. Then its on to the aquarium bottom.

20220727_183613.jpg
20220727_183620.jpg
20220727_183617.jpg
20220726_190541.jpg
 
OP
OP
AlexG

AlexG

Valuable Member
View Badges
Joined
Jun 20, 2013
Messages
2,112
Reaction score
4,898
Location
Illinois
Rating - 0%
0   0   0
The final two layers of fiberglass were laminated to the 24' and 30' beams last night. I just need to grind/sand away 108' access fiberglass on the beams then give them a final rough up sanding with 40/50grit sand paper then they are done with the fiberglass process. Then its on to the aquarium bottom starting with with the bottom brace beam fiberglass and then the actual aquarium bottom. This process is taking longer than I would like but there are no short cuts when doing this kind of work. Time and patience.

On a side note I just sent in another ICP test to see how the running system is doing. A couple of corals showed some fading but many are growing and are looking healthy.

20220803_203643.jpg
 
OP
OP
AlexG

AlexG

Valuable Member
View Badges
Joined
Jun 20, 2013
Messages
2,112
Reaction score
4,898
Location
Illinois
Rating - 0%
0   0   0
Update time

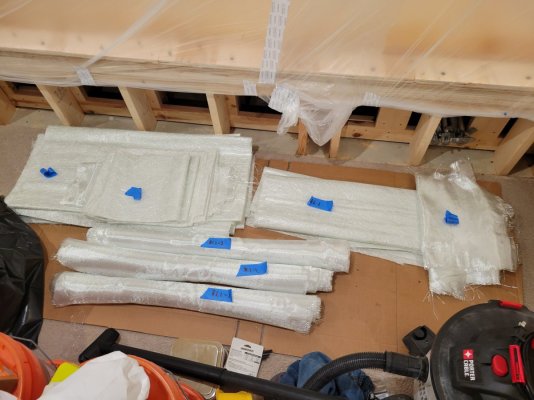
Well the end of last week and this weekend was a marathon of work. The 24' & 30' beams are nearly complete and just need a little more sanding and a minor fiberglass patch. I did a massive cleanup of the entire aquarium bottom to remove all the scrap fiberglass and dust from cutting and grinding excess fiberglass from the beams. After the cleanup I moved on to preparing fiberglass sheets for the bottom seal beam perimeter corner 84' x 2. Once those sheets were prepared it was on to the aquarium bottom fiberglass prep which was a rather quick process even though it was 216 sqft x 2 for each later prepared. Are you feeling the fiberglass itchiness just looking at the photos yet? Full body suit and throw away clothes are a must for this step along with gloves, safety glasses, and a respirator as you dont want to breath in fiberglass dust. I had just enough fiberglass to cover the aquarium bottom for both layers. I folded up all the fiberglass for both layers with labels and placed them outside the aquarium. Another round of cleanup was needed to get all the fiberglass bits cleaned up before any resin work can be completed. Resin was applied to the perimeter edge bottom seal beam and ~6" of the aquarium bottom to make sure the fiberglass will not be applied on bare wood. Then the not so fun job of applying the perimeter edge fiberglass started by first laying out all the fiberglass into the corner. Patience and a corner fiberglass roller are a must. The chopped strand mat takes a lot of resin to wet out and the vertical beam only being 2.5" tall helps but making sure you have a good bond, no major bubbles, and a nice clean corner. I actually had to take a break with the chopped strand mat after completing 60' of perimeter and go back later to complete the last 24'. After a couple hours I went in and did some light grinding on the beam to remove imperfections then another quick cleaning before starting the second layer of woven cloth fiberglass. The woven cloth fiberglass wets out really fast and corners better so that later was completed in a single work session. Today I plan to do another round of light grinding and cleanup. Then I might apply a few small patches if needed and then coat the entire aquarium bottom in resin then I just need to fiberglass the aquarium bottom.

20220805_221351.jpg
20220806_093621.jpg
20220806_093624.jpg
20220806_093637.jpg
20220806_132851.jpg
20220806_135235.jpg
20220807_173924.jpg
20220808_093156.jpg
 

Attachments

  • 20220808_093144.jpg
    20220808_093144.jpg
    183 KB · Views: 56

Sltloser

Active Member
View Badges
Joined
Aug 23, 2015
Messages
268
Reaction score
365
Rating - 0%
0   0   0
Very exciting work, it looks great! What was your thought process in using both chopped mat and woven mat on the aquarium? Were you worried that the woven matt wouldn't be strong enough?
 
Last edited:
OP
OP
AlexG

AlexG

Valuable Member
View Badges
Joined
Jun 20, 2013
Messages
2,112
Reaction score
4,898
Location
Illinois
Rating - 0%
0   0   0
Very exciting work, it looks great! What was your thought process in using both chopped mat and woven mat on the aquarium? Were you worried that the woven matt wouldn't be strong enough?
From all the studying I have done on fiberglass the chopped strand mat has unidirectional strength where woven cloth will be strongest in the directions of the cloth fibers. I decided that laminating a layer of each type will give me the best of both worlds for strength.
 

GBRsouth

Valuable Member
View Badges
Joined
Jul 9, 2017
Messages
1,279
Reaction score
3,577
Location
N.S.W. AUSTRALIA
Rating - 0%
0   0   0
If police saw your basement right now with all that plastic sheeting up, they'd think they've got a serial killer on their hands!:rolling-on-the-floor-laughing:
 
OP
OP
AlexG

AlexG

Valuable Member
View Badges
Joined
Jun 20, 2013
Messages
2,112
Reaction score
4,898
Location
Illinois
Rating - 0%
0   0   0
Small update

I have put down a section of bottom fiberglass 10'x6' and it turned out good. Should have more progress soon.

On the running system I got my ICP test back and zinc is at 38ug/L. Not great and a couple Corals look stressed but it has gone down since the last test and waterchange so the sourcemight be gone now. I am going to try something new for zinc removal. Someone mentioned to me using GFO on R2R to remove zinc as it worked for them but I was not sure if it was based on GFO properties or coincidence. I did some reading and it turns out GFO can absorb zinc and it has been used for this mostly in freshwater. I picked up some high capacity GFO from BRS and put it in the reactor today. I will give it a month or so watch the corals and then send in another ICP test.

20220810_185033.jpg


Screenshot_20220810-190314_Chrome.jpg

Screenshot_20220810-190028_Chrome.jpg
20220810_185250.jpg
 

NickHolmes

Active Member
View Badges
Joined
Apr 11, 2021
Messages
195
Reaction score
174
Location
South Africa
Rating - 0%
0   0   0
Bingewatching countless Netflix series in rapid succession has really affected my patience with these build threads. Can't wait to see this filled.
 
OP
OP
AlexG

AlexG

Valuable Member
View Badges
Joined
Jun 20, 2013
Messages
2,112
Reaction score
4,898
Location
Illinois
Rating - 0%
0   0   0
Bingewatching countless Netflix series in rapid succession has really affected my patience with these build threads. Can't wait to see this filled.
Yea there is no fast forward on this build. I am hoping tonight to get more fiberglass on the aquarium bottom. Trust me when I say its is a major trial of patience to build an aquarium like this. Stopping yourself from taking shortcuts and redoing work that did not turn out as planned is not easy when its a multiyear project. However, I can see the light at the end of the tunnel with this build. Once the water proofing is completed then I can get the glass ordered, start interior canopy work, and exterior finishing work. Its hard to believe I am over a year into the build.
 
OP
OP
AlexG

AlexG

Valuable Member
View Badges
Joined
Jun 20, 2013
Messages
2,112
Reaction score
4,898
Location
Illinois
Rating - 0%
0   0   0
Small update

I have started applying pond armor epoxy to the aquarium canopy. I have ~2/3s of the canopy done with a first coat. I have to go back and do some brush work and a second coat but figured I would get this job completed while I wait for more fiberglass resin to arrive.

20220814_160053.jpg
20220814_172739.jpg
 

Creating a strong bulwark: Did you consider floor support for your reef tank?

  • I put a major focus on floor support.

    Votes: 20 48.8%
  • I put minimal focus on floor support.

    Votes: 8 19.5%
  • I put no focus on floor support.

    Votes: 12 29.3%
  • Other.

    Votes: 1 2.4%
Back
Top