AquariumAdam’s 5-foot 120 Build

AquariumAdam

New Member
View Badges
Joined
Apr 17, 2017
Messages
6
Reaction score
8
Rating - 0%
0   0   0
Hi Friends!
Like many of us, the pandemic nudged me back into the hobby after a 5-year hiatus.

My Wife and I moved into a new house this past spring, and I immediately built a 22g LPS/Softie tank from scratch for my new home office. Here’s a photo of how that project turned out:


F02C605E-882A-46FD-BCC0-E65BD79C3A68.jpeg


Inspired by how happy I am with that system, I decided to build an additional, larger system in the same style.

The system this thread is meant to document is a 5-foot 120-gallon display, using a sump made from a 60-gallon breeder. The stand is made from extruded aluminum, and the plumbing will be similar to my smaller system (red PVC with schedule 80 fittings). I really like the exposed plumbing style system design, with the plumbing, sump, and filtration being part of the overall display. Here’s a photo of the start to this build:

ABDE8AEC-C8D9-463F-9B08-EFA361496CF4.jpeg


Obviously, my first concern when building a large-ish system in my house is the weight. The water alone in this system will weigh about 1,300lbs. The stand weighs 180lbs. The display tank weighs 250lbs, and the sump weighs about 75lbs. All-in I’m estimating this will weigh over 2,000lbs once it’s up and running.

My house is built over a crawl space, with 2x10 floor joists on 16” centers. To help handle the weight, I located the system in my office along the wall that conveniently is located on top of the house’s main load-carrying beam in the crawl space. I also reinforced the joists directly under the system with two 10-ton house jacks, 4x4 uprights, and a supplemental 4x6 beam supporting the floor joists. I feel much better about the weight having done this, and the floor feels rock solid.

BAFD05CC-1A7A-41FB-B2C9-804561C50A72.jpeg

Stay tuned for additional updates as we go along. My intention is to make this a mixed reef, with a thin sand bed. Let me know what you think! Im specifically looking for suggestions about sump configuration. 48A5A177-483D-470B-8D95-1DD328FF8F1A.jpeg
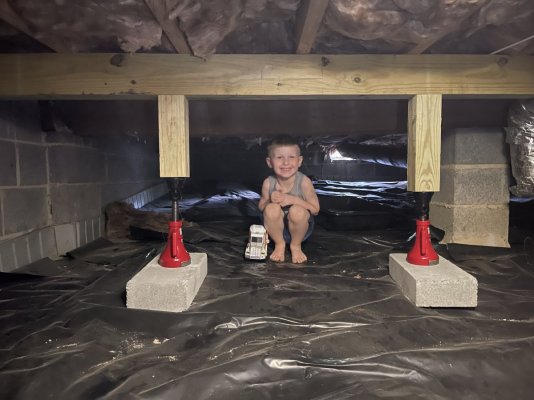
 
OP
OP
AquariumAdam

AquariumAdam

New Member
View Badges
Joined
Apr 17, 2017
Messages
6
Reaction score
8
Rating - 0%
0   0   0
Digging the aluminum stands! I think you're more than covered for any additional weight! :beaming-face-with-smiling-eyes:
Thanks! I’ve been so impressed with the quality and utility of the extruded aluminum system. They’re infinitely customizable, incredibly strong, and the fit and finish is awesome. I really like the industrial aesthetic.
 
OP
OP
AquariumAdam

AquariumAdam

New Member
View Badges
Joined
Apr 17, 2017
Messages
6
Reaction score
8
Rating - 0%
0   0   0
UPDATE 7/25/22:

This past weekend I built a simple lighting system. I wanted the system to provide several features:

1) I wanted the lighting to be supported from the framing of the house (I.e. attached to the ceiling joists - not just anchored into the ceiling drywall).

2) The fixtures need to be centered over the display, spaced evenly (this would be difficult to achieve because the framing members in the ceiling are not centered over the display).

3) the system needs to allow for future expansion or light fixture changes.

4) The system needs to be simple, and aesthetically pleasing.

I think I came up with a viable solution. To achieve this, I mounted a 6-foot section of 7/8” Unistrut to the ceiling. The Unistrut is mounted to three of the ceiling joists with 3/8” x 4” lag screws. I could have mounted it to five of the joists, but I feel like three of them is already way overkill. The fewer holes in the ceiling, the better

For those that aren’t familiar, Unistrut is a simple system of channel strut, channel nuts, and various brackets and fixtures. The strut has oblong holes along the back, allowing it to be mounted to the framing of the ceiling, while also allowing the fixture hangers to be mounted anywhere along the track. You get the best of both worlds - the system is supported by the house’s framing, and the fixtures can be hung exactly centered over the display.

I only have one fixture suspended from the system right now, but I have a second one on the way. I’m currently using angle brackets as the mounting points for the cables, only because I didn’t have two 3/8” eye bolts in the garage. Once I pick up another one of those I’ll switch out the angle brackets for eye bolts and I think it will look a little more intentional.

I really like the aesthetic of this solution, and given that the strut is mounted to three ceiling joists, the safety factor is “through the roof”. No pun intended.

4FCD1F03-36D2-4CC9-BFCC-DB9E3C0FB7A2.jpeg
E7B34BA9-9EDC-4FD4-AF0D-B9AF15954B74.jpeg
ECEDE433-2553-41FE-9C0D-008EF2145726.jpeg
 

reaper93

Valuable Member
View Badges
Joined
Dec 3, 2021
Messages
1,241
Reaction score
3,647
Location
Connecticut
Rating - 0%
0   0   0
Loving this build! The idea of having the aluminum stand and display sump/plumbing is really cool and can't wait to see this tank progress
 
OP
OP
AquariumAdam

AquariumAdam

New Member
View Badges
Joined
Apr 17, 2017
Messages
6
Reaction score
8
Rating - 0%
0   0   0
UPDATE 8/2/22:
The system is now plumbed, and cycling with water. Also my additional black box light arrived and has been installed.

I decided to modify my plans for the stand. Initially I was going to keep the stand open, with the sump and plumbing as part of the overall system display. I decided instead to enclose the stand, and built plywood panels that hide all the plumbing and filtration. I stained them to match the hardwood floors in my office. I think this focuses the attention on the display more, and creates a less cluttered look to my home office. I did cut a viewing space in the front panel so I can see the sump level without having to remove the panel

I plumbed the system with a Fiji Cube LowPro overflow box on the end side of the tank. This allows me to keep the system as close to the wall as possible. I chose this overflow because it’s the largest overflow in terms of GPH that only has one bulkhead between the display and the overflow. I’ve never felt good about the relatively thin piece of glass that’s created between the two bulkheads on larger overflow boxes.

All the pipe and fittings are schedule 80 PVC. The return pump is a Sicce Syncra Silent 3.0 (714 gph).

Also, I painted the back panel of the aquarium purple. It’s difficult to see in the photo below because the blue lights kind of wash everything out (the walls in my office are actually a really really dark gray. Almost black). I’m hoping this will create a less distracting contrast with the eventual coralline algae.

F64D66ED-4152-426E-BE60-ADE2473AEE17.jpeg
 
OP
OP
AquariumAdam

AquariumAdam

New Member
View Badges
Joined
Apr 17, 2017
Messages
6
Reaction score
8
Rating - 0%
0   0   0
Also, to add some detail to how I ran the pipe:

One of the benefits of using extruded aluminum is the continuous slots that run parallel to the length of each piece. I secured all the pipes to the bottom of the stand using stand-off straps. This creates a super clean, super secure connection. There is no movement in the pipes whatsoever.


A018A6BB-8731-4070-9345-4B0FFD61189F.jpeg
705813A9-76A0-4BA9-924A-B75C4A77CC80.jpeg
B44B9A24-1A72-4C27-A835-460884262726.jpeg
 

Clear reef vision: How do you clean the inside of the glass on your aquarium?

  • Razor blade

    Votes: 161 61.7%
  • Plastic scraper

    Votes: 69 26.4%
  • Clean-up crew

    Votes: 90 34.5%
  • Magic eraser

    Votes: 44 16.9%
  • Other

    Votes: 69 26.4%
Back
Top