that’s such a cool tank man! Love the pictures and glad you started your build thread.
Navigation
Install the app
How to install the app on iOS
Follow along with the video below to see how to install our site as a web app on your home screen.
Note: This feature may not be available in some browsers.
More options
You are using an out of date browser. It may not display this or other websites correctly.
You should upgrade or use an alternative browser.
You should upgrade or use an alternative browser.
Blaxsun's Abyss: Red Sea 750XXL
- Large Build
- Thread starter blaxsun
- Start date
- Tagged users None
I see. What you have doesn't run tank water through it? That would be a reactor version. I'm running a co2 scrubber through my skimmer silencer. I would have to choose 1 or the other?If you have an ozone-compatible skimmer you just run the air hose into the silencer and plug the ozone unit in (you can see my setup in the above image).
Yes, if you have a manifold you can run a ozone reactor instead of the skimmer (this necessitates the addition of the reactor as well, though).
Thanks. I haven't seen a bump in my ORP yet, but I'm still running it @20%. For my tank size, it indicates I should be running between 0.3-0.5 mg/hour per gallon - which works out to be between 27-45%.Glad to hear that you are having a noticable impact already. Once your orp starts to rise you will see the sparkle clarity that ozone is known for.
I'm just doing some quarterly maintenance (gyres, reactors) over the next few days at which point I'll probably bump it up to between 30-40%.
There's no on/off indicator light on the unit, right?
Correct - I'm running the ozone directly into the skimmer silencer so it gets mixed directly by the pump. You could probably add a T or Y adapter after the Co2 scrubber (with check valve) to mix the ozone with the Co2-scrubbed air that way.I see. What you have doesn't run tank water through it? That would be a reactor version. I'm running a co2 scrubber through my skimmer silencer. I would have to choose 1 or the other?
so add a T or Y after where the hose hooks into the skimmer (out of the water) , so that it splits the air going to each unit? Or after the co2 unit itself? I don't have a check valve on that hose now that goes to the co2 unit as there is not water in the line. Splitting that line wouldn't draw water into the line would it? Not planning on doing this soon but with this tank I might to keep it looking the best I can! IE: already spent a ton, what's a bit more or: having spent the $$ I want it to be the best it can be lol'sCorrect - I'm running the ozone directly into the skimmer silencer so it gets mixed directly by the pump. You could probably add a T or Y adapter after the Co2 scrubber (with check valve) to mix the ozone with the Co2-scrubbed air that way.
There is a yellow/green led on the front of the unit that indicates power on/off.Thanks. I haven't seen a bump in my ORP yet, but I'm still running it @20%. For my tank size, it indicates I should be running between 0.3-0.5 mg/hour per gallon - which works out to be between 27-45%.
I'm just doing some quarterly maintenance (gyres, reactors) over the next few days at which point I'll probably bump it up to between 30-40%.
There's no on/off indicator light on the unit, right?
Thanks - thought that was a screw (issue with the adapter - problem solved!)There is a yellow/green led on the front of the unit that indicates power on/off.
August 8. Pepsi Challenge
With the ozone (now) working away, I had a chance to take a "before" shot of the some water I used for glueing corals. Images never really do things justice, so it's a bit more yellow when viewing in-person (all things considered, not bad for over a year of almost no water changes!)
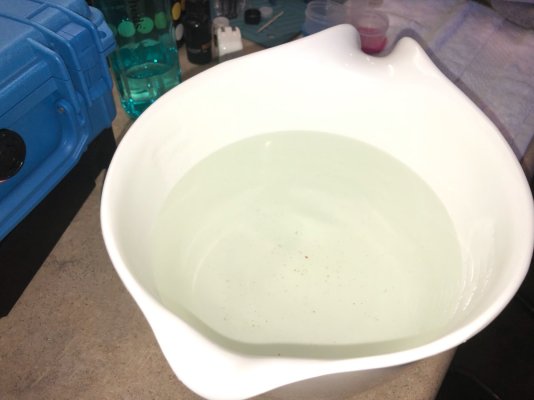
I'll update this in a week's time with what (if anything) the tank water looks like once the Poseidon has really had a chance to work its magic.
With the ozone (now) working away, I had a chance to take a "before" shot of the some water I used for glueing corals. Images never really do things justice, so it's a bit more yellow when viewing in-person (all things considered, not bad for over a year of almost no water changes!)

I'll update this in a week's time with what (if anything) the tank water looks like once the Poseidon has really had a chance to work its magic.
Between the Co2 scrubber and the skimmer. The Poseidon comes with a check valve so you're covered there (not sure if the tubing is the same diameter, so you may need an adapter). There was an issue with the power adapter on the Poseidon so it was only drawing air (no ozone), so it will be interesting to see the tank in a few days time.so add a T or Y after where the hose hooks into the skimmer (out of the water) , so that it splits the air going to each unit? Or after the co2 unit itself? I don't have a check valve on that hose now that goes to the co2 unit as there is not water in the line. Splitting that line wouldn't draw water into the line would it? Not planning on doing this soon but with this tank I might to keep it looking the best I can! IE: already spent a ton, what's a bit more or: having spent the $$ I want it to be the best it can be lol's
I like that the Poseidon can just hook up to the skimmer as it saves me another pump, air pump, reactor (etc.).
August 10. Climate Change
So we're now three (3) days into use of the new ozone system. Observations:
• The tank does look "other worldly". I haven't sampled a new batch of water to compare coloration because I just finished some quarterly tank maintenance and the (sparkling clean!) gyres are kicking up a lot of crap. In the next few days I'll most likely take a picture for comparison.
• I run oolite in my tank - and this gets stirred up frequently (parrotfish - looking at you!) It would probably be even more spectacular with a less easily-disturbed substrate.
• There is less algae growth on the glass (probably half as much as previously).
• The leathers that I thought were toast have suddenly sprung to life and looks like they'll make it.
• My alkalinity usage is down about ~20% over the past few days. pH has returned to pre-maintenance levels (7.95-8.2) and may be slowly edging up beyond that. ORP has not really changed - it still ranges between 300-315 daily. However, I two reactors and a pair of gyres were offline this week so I can't draw any conclusions here.
I had been running the ozone @2.5 and have increased this to @4.0. According to what I've been able to research (and correspondence with @Sean Clark), I want an ozone setting of somewhere between 2 and 4 on the Poseidon.
• The recommended ozone level is 0.3-0.5mg/hour per gallon (60-100mg/hour @200 gallons)
• The Poseidon 200 has an output of 0-220mg/hour
• A setting of 2.5 equates to 55mg/hour; a setting of 4.0 equates to 88mg/hour
Thus, 88mg/hour is roughly in the middle of the acceptable range for my system. @Sean Clark indicated he runs his Poseidon at a setting of 4 (thanks again Sean!), and I think he's got it dialed in perfectly.
August 11. We Interrupt This Tank to Bring You...
This week happened to coincide with a short but extensive list of tank "to do" items. Specifically:
• De-coralline all Red Sea and Maxspect gyres
• Thoroughly clean both Nyos reactors
• Replace my Nyos Zeo, Active Carbon and Phosi-EX
Since coralline grows like tumbleweed in my tank, the gyres aren't exactly an afternoon project. They require repeated scrubbing, dips in EzeClean and rinses. I finished the Red Sea gyres in 2 days but the Maxspect gyres took the better part of the week. This is where I really like the Red Sea gyres and loathe the Maxspect ones. The Red Sea ReefWaves have a disconnect so I can removed the entire unit, disassembly and soak. The Maxspect XF330s require me to remove the cabling all the way back to the controller (which is a major PITA, as it requires removing panels on the Adaptive Reef cabinet, etc.)
Short version: I removed the Maxspect impellers, scrubbed the inside of the motor housing and just cleaned the gyres, flow directors and impellers. So the gyres are sparkly clean - and the main unit has a nice contrasting growth of coralline algae. This is why I recommend the Red Sea ReefWaves over the Maxspect XF gyre family. Why do I use them? Well, I had them previously on my pair of IM Fusion 25 tanks - and I'm able to operate these on the IceCap backup battery. So they serve a very (limited) role in my tank - that being to provide secondary flow to the ReefWaves as well as emergency flow in the event of an extended power failure (I think I get somewhere between 4-6 hours).
Since I seem to answer this question a lot, I'll just quickly outline how my gyres are setup:
• The Red Sea ReefWave45s are on either side of the tank (2.5" from the top of the glass), facing towards the center of the tank. These are set to draw water vertically from beneath and apply horizontally. These run a combination of random, stepped and fixed (night) flow in the tank between 20-60%. These run 8min forward and 2min in reverse, with the reverse speed being roughly half of the forward speed. This is mainly to provide some downwards flow along the sides of the tank to stir up any detritus, etc. (as well as spiny the gyres in the opposite direction to loosen any debris that's accumulated). If you'd like my ReefWave schedule, fire me a PM and I'll send it to you.
• The Maxspect XF330s are on either side of the overflow - facing forward towards the front of the tank. These are set at a fixed 30% (which I increased from the previous 20%) and as with the ReefWaves, they also suck vertically from the back of the tank to apply horizontally.
Note that both the ReefWave and Maxspect XF330s are true gyres in that they provide a wide horizontal flow. This is very different than the conical spread of most wavemakers like the Nero3/5, MP10/40/60, etc. While the Vortech can simulate a "gyre" mode - it's not quite the same flow as a true gyre. I think the Nero and Vortech wavemakers are great, and the advantages of the wetside/smaller footprint can't be discarded. You really can't go wrong with either.
..........
I also run two (2) Nyos Torq reactors in my tank. Due to the high stocking in my tank, running carbon and GFO in a media basket was never really an option because a) they clogged up really quickly and b) when I was running filter socks, I was changing them every day (so removing the media baskets and adding two more filter socks extended this to 2 days). And while the ReefMat has a media basket under it - my extensive use found that fleece usage literally doubled when filled with carbon. This is most likely due to the finer size of the Red Sea carbon and larger 200-micron fleece used - or some combination thereof. And while you can just drop it in your tank in a passive manner - I prefer having water continuously flow through my media. So to ensure maximum flow for my media, I run the following:
• Nyos Torq reactor with 2.0 G1 body (~2000ml of Nyos Zeo). I prefer the G1 over the G2 body because it has larger openings in the mesh grate and the zeolite rocks are fairly large. This ensures more flow through the zeolite and more nitrate reduction. And you don't need to use the round black sponges - so clogging is non-existent.
• Nyos Torq reactor with 1.0 G2 body (~500ml of Nyos Active Carbon/~500ml of Nyos Phosi-EX). I prefer the G2 body over the G1 here as it locks tight (lid popping off was never an issue for me) and again, the mesh grate in the bottom has larger openings to allow more flow and you no longer need to use the round black sponges to contain media (this tended to clog up more easily).
I'm going to take a moment and plug the Nyos products here and why I like them. First, the Nyos Zeo doesn't need to be run in the traditional zeolite setup. Just add and turn the reactor on. You don't need to perform any of the typical zeo reactor things like pumping the pulp out, etc. Mine lasts roughly 4 months and has a huge impact on nitrates.
Next is the Nyos Active Carbon. These are huge pellets (probably 8-10x larger than Red Sea Carbon) - which ensures a massive amount of flow through in the reactor. And they have little if any dust. Finally is the Nyos Phosi-EX, which is their version of GFO. Again - these are huge particles which means they don't blow out into your tank and after initial rinsing they don't constantly leach the fine red powdery material into your tank. Having used RowaPhos and Red Sea Carbon (both good) - the Nyos stuff literally blows anything else out of the water (by actually staying in the reactor and not ending up across your tank!)
I find the reduction in alkalinity consumption interesting. I would likebtobsee how this plays out going forward.August 10. Climate Change
So we're now three (3) days into use of the new ozone system. Observations:
• The tank does look "other worldly". I haven't sampled a new batch of water to compare coloration because I just finished some quarterly tank maintenance and the (sparkling clean!) gyres are kicking up a lot of crap. In the next few days I'll most likely take a picture for comparison.
• I run oolite in my tank - and this gets stirred up frequently (parrotfish - looking at you!) It would probably be even more spectacular with a less easily-disturbed substrate.
• There is less algae growth on the glass (probably half as much as previously).
• The leathers that I thought were toast have suddenly sprung to life and looks like they'll make it.
• My alkalinity usage is down about ~20% over the past few days. pH has returned to pre-maintenance levels (7.95-8.2) and may be slowly edging up beyond that. ORP has not really changed - it still ranges between 300-315 daily. However, I two reactors and a pair of gyres were offline this week so I can't draw any conclusions here.
I had been running the ozone @2.5 and have increased this to @4.0. According to what I've been able to research (and correspondence with @Sean Clark), I want an ozone setting of somewhere between 2 and 4 on the Poseidon.
• The recommended ozone level is 0.3-0.5mg/hour per gallon (60-100mg/hour @200 gallons)
• The Poseidon 200 has an output of 0-220mg/hour
• A setting of 2.5 equates to 55mg/hour; a setting of 4.0 equates to 88mg/hour
Thus, 88mg/hour is roughly in the middle of the acceptable range for my system. @Sean Clark indicated he runs his Poseidon at a setting of 4 (thanks again Sean!), and I think he's got it dialed in perfectly.
Me too. I'm going to re-test with my Hanna kit this weekend. Right now I have Trident-controlled dosing set to keep alkalinity @8.35 dKH. I normally use roughly 120ml of KH daily - but my alkalinity is currently 8.39 dKH and I'm at well under 100ml for today (and dosing trails off in the evening).I find the reduction in alkalinity consumption interesting. I would likebtobsee how this plays out going forward.
I normally see a slight uptick in alkalinity when I dose NOPOX - but I've switched to just dosing Fridays instead of daily. Alkalinity usage was ~120ml/daily last Friday, dropped to 100ml/daily over the weekend and was slowly increasing back up Tuesday when I turned the ozone on.
• Friday: 120.4ml (added 25ml NOPOX)
• Saturday: 113.6ml
• Sunday: 101.2ml
• Monday: 90.8ml
• Tuesday: 99.8ml (ozone online, set @2.5)
• Wednesday: 91.2ml
• Thursday: 62.6ml (thus far; ozone set @4.0)
August 12. Cotton Candy
So I caved and picked up two small fish that I'd been eyeing at my LFS this week: a Yellow Candy hogfish (also known as a twospot slender hogfish) and a Blue Sided Fairy wrasse (which has really neat blue and yellow markings). I've named them Cotton and Candy.
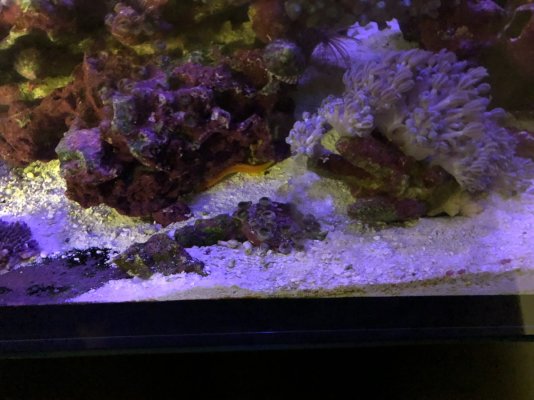
Cotton is off doing what wrasses do, but Candy found a small ledge, burrowed it out and decided to squat (in fish terms, if he's not evicted within the next 24 hours it's pretty much his lair). I wasn't planning on getting another wrasse, but hogfish and wrasses historically don't get along - and these two were fast friends in the tank at the LFS - so I figured fish of a scale...
So I caved and picked up two small fish that I'd been eyeing at my LFS this week: a Yellow Candy hogfish (also known as a twospot slender hogfish) and a Blue Sided Fairy wrasse (which has really neat blue and yellow markings). I've named them Cotton and Candy.

Cotton is off doing what wrasses do, but Candy found a small ledge, burrowed it out and decided to squat (in fish terms, if he's not evicted within the next 24 hours it's pretty much his lair). I wasn't planning on getting another wrasse, but hogfish and wrasses historically don't get along - and these two were fast friends in the tank at the LFS - so I figured fish of a scale...
August 13. Fleeced
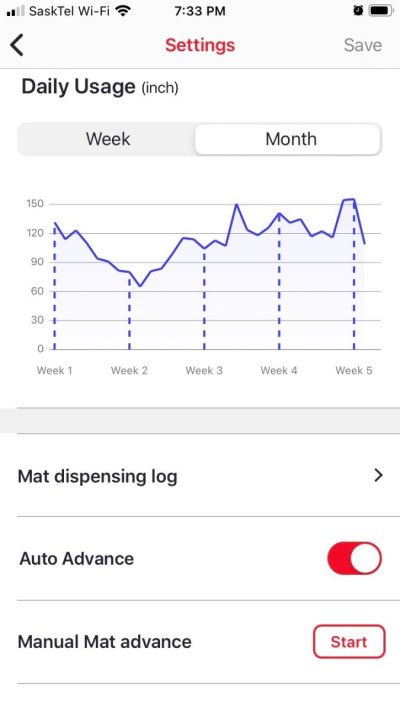
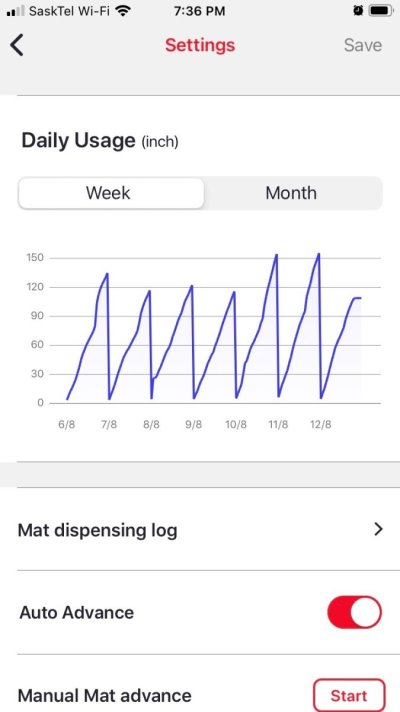
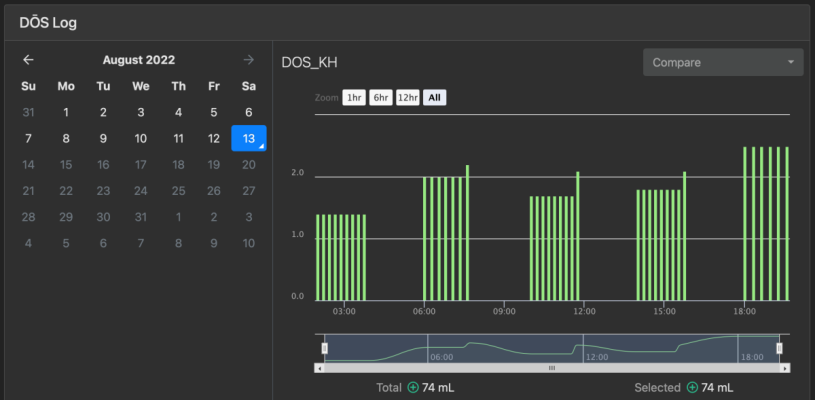
So I'm into the second month with the Red Sea ReefMat 500 and overall I'm very pleased with the results. As you can see from the following screenshots, my daily fleece usage is slightly up over the past few weeks. There are a few reasons for this which have also had some interesting results on my tank chemistry (see next post).
• Around week 3 I stopped dosing NOPOX daily in lieu of Fridays (only).
• At the start of week 4 the Red Sea ReefWaves went back online.
• The dip in the middle of week 4 is when the Poseidon ozone system was turned on.
• The spike at the end of week 4 is when the reactors and Maxspect Gyres went back online and I scraped 3 sides of the glass (the gyres were reconfigured and ended up sicking up a lot of detritus, etc.)
I'm most likely going to upgrade to a ReefWave 1200 at some point in the near future. This may actually reduce my overall maintenance cost as there's 31,640cm² in a 500 fleece roll vs. 59,500cm² (88% more fleece but only 60% more cost). I do have the space to accommodate it, and all the plumbing is the same - so it should be a simple upgrade. I think this could give me between 3-3.5 weeks per roll which would be optimal with the current stocking level.
So I'm into the second month with the Red Sea ReefMat 500 and overall I'm very pleased with the results. As you can see from the following screenshots, my daily fleece usage is slightly up over the past few weeks. There are a few reasons for this which have also had some interesting results on my tank chemistry (see next post).
• Around week 3 I stopped dosing NOPOX daily in lieu of Fridays (only).
• At the start of week 4 the Red Sea ReefWaves went back online.
• The dip in the middle of week 4 is when the Poseidon ozone system was turned on.
• The spike at the end of week 4 is when the reactors and Maxspect Gyres went back online and I scraped 3 sides of the glass (the gyres were reconfigured and ended up sicking up a lot of detritus, etc.)


I'm most likely going to upgrade to a ReefWave 1200 at some point in the near future. This may actually reduce my overall maintenance cost as there's 31,640cm² in a 500 fleece roll vs. 59,500cm² (88% more fleece but only 60% more cost). I do have the space to accommodate it, and all the plumbing is the same - so it should be a simple upgrade. I think this could give me between 3-3.5 weeks per roll which would be optimal with the current stocking level.
Last edited:
August 14. Alchemy
As I alluded to in a previous thread (and the preceding post), I've got a few interesting things happening with the chemistry in my reef tank. Here's a current list of what I dose other than alkalinity, calcium, magnesium and trace elements.
• Nyos Zero: 2.0-2.5ml ... daily
• Red Sea NOPOX: 25ml ... 1x weekly
• Red Sea ReefEnergy AB+: 12.5ml ... daily
• Nyos Coral Nectar: 8 drops ... 3-4x weekly
• Nyos Instant Plankton: 0.25ml ... 1-2x weekly
• Polyp Labs Reef Roids: 1/2tbsp ... 1-2x weekly
• Aquaforest Vitality/Build: 8 drops/ea ... 3-4x weekly
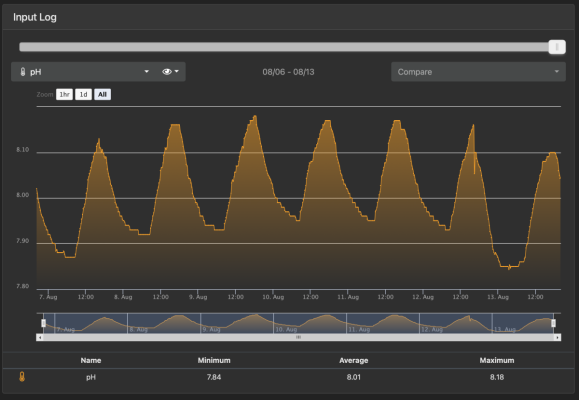
In the following image you can see the pH drop sharply after dosing NOPOX on Friday (it typically takes a day to recover to normal 8.15-8.2 levels).
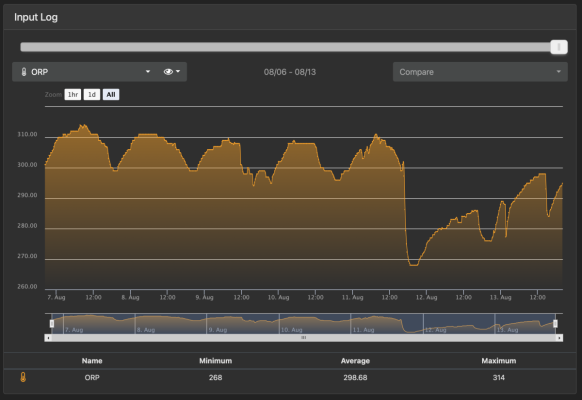
What's also interesting is how ORP is impacted. The drop late on Aug 11 was when I turned the ozone up from 0.25 to 0.4, and the drop on Aug 12 was when I dosed NOPOX. The pair of reactors and the second set of gyres also went back online Thursday - so this could be related (though you'd think I'd be seeing more oxygenation from flow and not less). I did rearrange some of the bio media early on Friday - so maybe this also had a small impact.
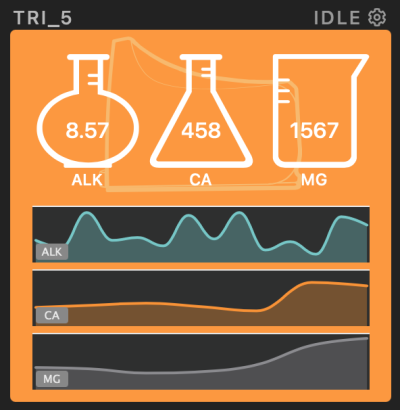
I only test my alkalinity twice a day, but it's interesting to observe that each time I dose NOPOX in the sump (which is done 6-8 hours before the Trident tests) the alkalinity spikes. Yesterday it spiked to 8.67 dKH and with dosing was down to 8.57 dKH by noon.
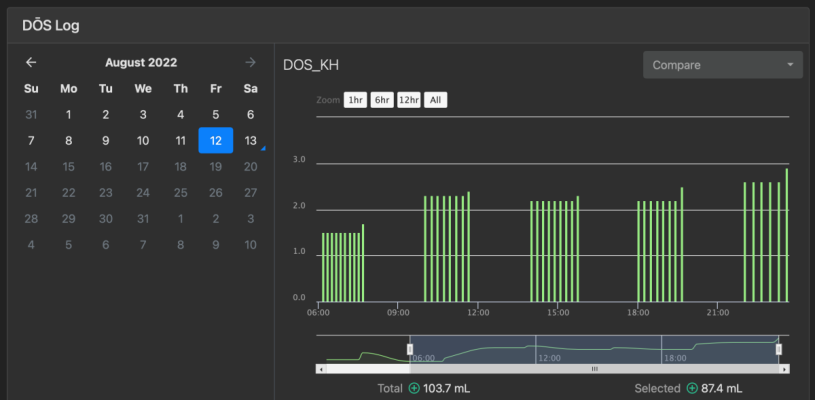
Not only the NOPOX - but the ozone - appear to be impacting my alklainity. A normal day sees alkalinity dosing of 120ml, so I'm off by 20% or more due to the target alkalinity range moving away from 8.35 dKH. Alkalinity dosing has actually been down the latter part of the week - and this has coincided with the new ozone system.
I'm not willing to definitively state that the new ozone system is increasing alkalinity, as I have to run some independent Hanna alkalinity tests to verify that the Trident numbers are accurate. I haven't replaced any of the reagents for a while and the Trident was recalibrated as recently as 2 weeks ago. But this is... interesting.
As I alluded to in a previous thread (and the preceding post), I've got a few interesting things happening with the chemistry in my reef tank. Here's a current list of what I dose other than alkalinity, calcium, magnesium and trace elements.
• Nyos Zero: 2.0-2.5ml ... daily
• Red Sea NOPOX: 25ml ... 1x weekly
• Red Sea ReefEnergy AB+: 12.5ml ... daily
• Nyos Coral Nectar: 8 drops ... 3-4x weekly
• Nyos Instant Plankton: 0.25ml ... 1-2x weekly
• Polyp Labs Reef Roids: 1/2tbsp ... 1-2x weekly
• Aquaforest Vitality/Build: 8 drops/ea ... 3-4x weekly
In the following image you can see the pH drop sharply after dosing NOPOX on Friday (it typically takes a day to recover to normal 8.15-8.2 levels).

What's also interesting is how ORP is impacted. The drop late on Aug 11 was when I turned the ozone up from 0.25 to 0.4, and the drop on Aug 12 was when I dosed NOPOX. The pair of reactors and the second set of gyres also went back online Thursday - so this could be related (though you'd think I'd be seeing more oxygenation from flow and not less). I did rearrange some of the bio media early on Friday - so maybe this also had a small impact.

I only test my alkalinity twice a day, but it's interesting to observe that each time I dose NOPOX in the sump (which is done 6-8 hours before the Trident tests) the alkalinity spikes. Yesterday it spiked to 8.67 dKH and with dosing was down to 8.57 dKH by noon.

Not only the NOPOX - but the ozone - appear to be impacting my alklainity. A normal day sees alkalinity dosing of 120ml, so I'm off by 20% or more due to the target alkalinity range moving away from 8.35 dKH. Alkalinity dosing has actually been down the latter part of the week - and this has coincided with the new ozone system.


I'm not willing to definitively state that the new ozone system is increasing alkalinity, as I have to run some independent Hanna alkalinity tests to verify that the Trident numbers are accurate. I haven't replaced any of the reagents for a while and the Trident was recalibrated as recently as 2 weeks ago. But this is... interesting.
And now for something totally different... This is our Australian Cattle Dog (Blue Heeler) named Cinder. Cinder is... quite the character. This was her first trip both in a convertible and through the McDonald's drive-through. So many exiting smells! When I'm not playing with the fish, I'm keeping her occupied/entertained. She'll occasionally bunk down for a nap in the fish room on her cot when I'm working at the computer (she hasn't really taken an interest in the fish - other than insisting on sampling the seaweed!)




August 14. H E L I O Awakens
As promised (and a special thanks again to Innovative Marine), the new Helio system is live and online in The Abyss. I'm leaving my existing Inkbird/Schego system in-place (but offline) while I put the new Helio through its paces and compile a comprehensive review. So look for continual updates here as well as the final review.
Arrival
The system itself arrives very well-packaged in an attractive blue/white box. All of the components are boxed separately with the controller and magnets packaged in padded foam as well as separators to prevent damage during shipping. In addition to the 120v power cable, the controller has 3 connectors for a titanium thermostat and up to 2 heaters (the controller works with any type of Helio heater, so you can easily upgrade or swap-out different size heaters at any point). The connectors also have these handy rubber dust covers for when not in-use.
Contents
Innovative Marine provided me with a 700-watt system (2x 350-watt heaters) along with the controller, titanium temperature probe, magnetic probe holder and two magnetic heater holders emblazoned with "Helio".
Installation
The heaters themselves are very slender (thinner than what I was expecting compared to the titanium Schego and Hygger heaters I'm used to), and has silicone covers on the tip and at the base for protecting the glass against inadvertent impacts. All of the magnets easily attached to the side of the Red Sea sump and gripped firmly. Everything connected effortlessly and I received a single alarm tone when the controller was first plugged in before it immediately registered the tank temperature.
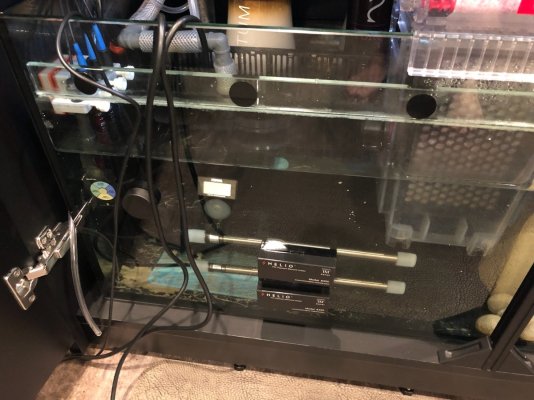
The pair of Helio 350-watt heaters setup below the ReefMat (Helio and Apex temperature probes to the left).
I opted to install both heaters below and to the left of the new ReefMat, with the Helio temperature probe between the heaters and Neptune temperature probe. This should provide a steady and constant flow of fresh, filtered water over the heaters. I have still to figure out a permanent placement as the Helio magnets may be wider than the gap at the sides and back of the sump (my current heater setup utilizes suction cups - something I'm not a fan of as they keep getting knocked off).
Configuration
Configuration was a snap. By default the Helio is set to 78°F, so you only need to adjust the alarms for the low/high threshold and calibrate the temperature probe (±0.9°F). At the time of setup the Apex was reading 78.9°F, so I opted to calibrate the Helio by ±0.5°F and they soon matched in temperature @ 78.6°F.
I run two Apex temperature probes: one in the sump and one in the display. The temperature in the display is typically -0.5-0.6°F cooler than the sump, so I will have to monitor over the next few days and probably make a slight adjustment (±0.1-0.3°F) to the Helio temperature calibration.
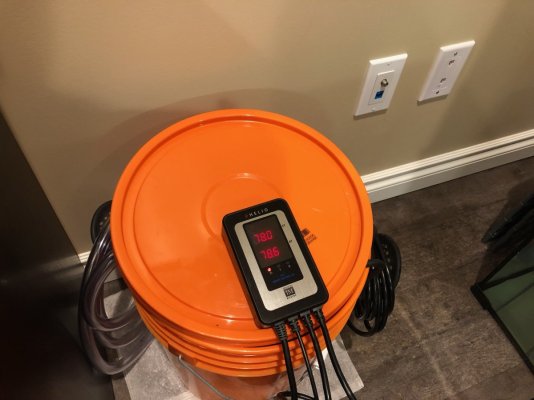
The Helio controller up and running (and away from the one chromis who likes to splash things...)
First Impressions
I'm impressed with the build quality - in particular the heaters. A lot of attention to detail has gone into the Helio system and the little things like the silicone caps on the heaters to prevent damaging your sump didn't go unnoticed. The titanium temperature probe is far superior to those I'm used to - and as they're also held in-place with a magnet they're not going to inadvertently come lose and skew the controller.
Setup and installation was very quick and effortless (much quicker than the Inkbird). I literally had everything running in mere minutes.
..........
Initial Pros
• Superior build quality (streamlined, cord disconnects feature sealed gaskets)
• Lots of attention to detail (silicone caps on heaters, covers for connectors, etc.)
• Excellent packaging (organized with ample padding)
• Easy and straightforward installation and setup
• Solid attachment with magnetic holders for probe and heaters
• Low profile design equates to a smaller installation footprint (more flexibility and space in sump)
• Temperature probe seems very accurate out-of-the-box (within ±0.5°F)
• Very audible temperature threshold alarm (ability to quickly toggle on/off)
Some Cons
• No WiFi/Bluetooth connectivity or app. This isn't necessarily a deal breaker, as half the apps I have are Bluetooth only and zero use once I leave the house anyway. I don't completely trust my existing Inkbird - which is why I have it connected to an Apex powerbar and closely monitored by the Apex temperature probes to override it if need be. So I rarely (if ever) login to my Inkbird anymore unless for whatever reason an alarm is triggered.
• Temperature settings and alarm thresholds are only available in 1°F increments, ie: 77.0°F, 78.0°F, 79.0°F (I'm used to being able to set this to 0.1°F increments with a minimum ±0.5°F spread). Supposedly the Helio is super accurate so this may end up not being an issue at all.
..........
Addendum: It was late and I wasn't thinking "outside the box" last night. First, the Helio lets you calibrate the temperature probe by 0.0-0.9°F, so this actually allows you to adjust the target temperature from 78.0°F to say 78.5°F by adjusting the probe to 77.5°F. The Helio will then attempt to maintain 78.0°F (which in actuality is -0.5°F higher, or 78.5°F).
Second, the actual variance of the Helio seems to be ultra accurate - to within 0.1-0.4°F (or even less) of the set temperature. So a target temperature of 78.0°F seems to yield a min/max of 77.8°F to 78.2°F. I haven't been able to achieve anything remotely close to this with any other heater setup, so limiting the temperature on the controller to 1-degree increments doesn't seem to pose any issues (and as you click the +/- buttons to adjust the target temperature, I can understand why they've designed it to be configured with minimal interaction). I might offer up the suggestion to Innovative Marine to allow 0.5°F intervals in future versions of the Helio controller).
As promised (and a special thanks again to Innovative Marine), the new Helio system is live and online in The Abyss. I'm leaving my existing Inkbird/Schego system in-place (but offline) while I put the new Helio through its paces and compile a comprehensive review. So look for continual updates here as well as the final review.
Arrival
The system itself arrives very well-packaged in an attractive blue/white box. All of the components are boxed separately with the controller and magnets packaged in padded foam as well as separators to prevent damage during shipping. In addition to the 120v power cable, the controller has 3 connectors for a titanium thermostat and up to 2 heaters (the controller works with any type of Helio heater, so you can easily upgrade or swap-out different size heaters at any point). The connectors also have these handy rubber dust covers for when not in-use.
Contents
Innovative Marine provided me with a 700-watt system (2x 350-watt heaters) along with the controller, titanium temperature probe, magnetic probe holder and two magnetic heater holders emblazoned with "Helio".
Installation
The heaters themselves are very slender (thinner than what I was expecting compared to the titanium Schego and Hygger heaters I'm used to), and has silicone covers on the tip and at the base for protecting the glass against inadvertent impacts. All of the magnets easily attached to the side of the Red Sea sump and gripped firmly. Everything connected effortlessly and I received a single alarm tone when the controller was first plugged in before it immediately registered the tank temperature.

The pair of Helio 350-watt heaters setup below the ReefMat (Helio and Apex temperature probes to the left).
I opted to install both heaters below and to the left of the new ReefMat, with the Helio temperature probe between the heaters and Neptune temperature probe. This should provide a steady and constant flow of fresh, filtered water over the heaters. I have still to figure out a permanent placement as the Helio magnets may be wider than the gap at the sides and back of the sump (my current heater setup utilizes suction cups - something I'm not a fan of as they keep getting knocked off).
Configuration
Configuration was a snap. By default the Helio is set to 78°F, so you only need to adjust the alarms for the low/high threshold and calibrate the temperature probe (±0.9°F). At the time of setup the Apex was reading 78.9°F, so I opted to calibrate the Helio by ±0.5°F and they soon matched in temperature @ 78.6°F.
I run two Apex temperature probes: one in the sump and one in the display. The temperature in the display is typically -0.5-0.6°F cooler than the sump, so I will have to monitor over the next few days and probably make a slight adjustment (±0.1-0.3°F) to the Helio temperature calibration.

The Helio controller up and running (and away from the one chromis who likes to splash things...)
First Impressions
I'm impressed with the build quality - in particular the heaters. A lot of attention to detail has gone into the Helio system and the little things like the silicone caps on the heaters to prevent damaging your sump didn't go unnoticed. The titanium temperature probe is far superior to those I'm used to - and as they're also held in-place with a magnet they're not going to inadvertently come lose and skew the controller.
Setup and installation was very quick and effortless (much quicker than the Inkbird). I literally had everything running in mere minutes.
..........
Initial Pros
• Superior build quality (streamlined, cord disconnects feature sealed gaskets)
• Lots of attention to detail (silicone caps on heaters, covers for connectors, etc.)
• Excellent packaging (organized with ample padding)
• Easy and straightforward installation and setup
• Solid attachment with magnetic holders for probe and heaters
• Low profile design equates to a smaller installation footprint (more flexibility and space in sump)
• Temperature probe seems very accurate out-of-the-box (within ±0.5°F)
• Very audible temperature threshold alarm (ability to quickly toggle on/off)
Some Cons
• No WiFi/Bluetooth connectivity or app. This isn't necessarily a deal breaker, as half the apps I have are Bluetooth only and zero use once I leave the house anyway. I don't completely trust my existing Inkbird - which is why I have it connected to an Apex powerbar and closely monitored by the Apex temperature probes to override it if need be. So I rarely (if ever) login to my Inkbird anymore unless for whatever reason an alarm is triggered.
• Temperature settings and alarm thresholds are only available in 1°F increments, ie: 77.0°F, 78.0°F, 79.0°F (I'm used to being able to set this to 0.1°F increments with a minimum ±0.5°F spread). Supposedly the Helio is super accurate so this may end up not being an issue at all.
..........
Addendum: It was late and I wasn't thinking "outside the box" last night. First, the Helio lets you calibrate the temperature probe by 0.0-0.9°F, so this actually allows you to adjust the target temperature from 78.0°F to say 78.5°F by adjusting the probe to 77.5°F. The Helio will then attempt to maintain 78.0°F (which in actuality is -0.5°F higher, or 78.5°F).
Second, the actual variance of the Helio seems to be ultra accurate - to within 0.1-0.4°F (or even less) of the set temperature. So a target temperature of 78.0°F seems to yield a min/max of 77.8°F to 78.2°F. I haven't been able to achieve anything remotely close to this with any other heater setup, so limiting the temperature on the controller to 1-degree increments doesn't seem to pose any issues (and as you click the +/- buttons to adjust the target temperature, I can understand why they've designed it to be configured with minimal interaction). I might offer up the suggestion to Innovative Marine to allow 0.5°F intervals in future versions of the Helio controller).
Last edited:
August 14. H E L I O
I took some screenshots of my existing Inkbird/Schego heating graph going forward so I'd have some reference for comparison with the new Helio setup.
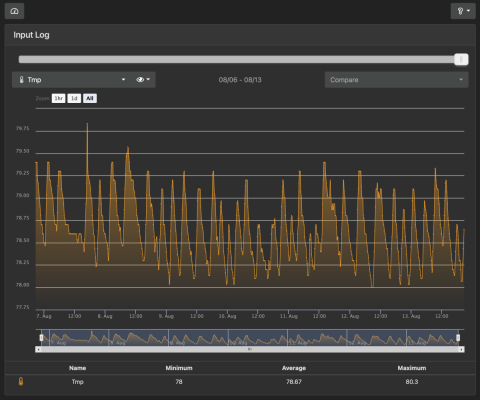
Tmp - this is the primary temperature probe, located in the sump to the left of the ReefMat. To ensure ample circulation I have a Sicce Voyager Nano providing flow in addition to the Sicce SDC 6.0 that provides the intake for the AquaUV ultraviolet sterilizer in the adjacent chamber.
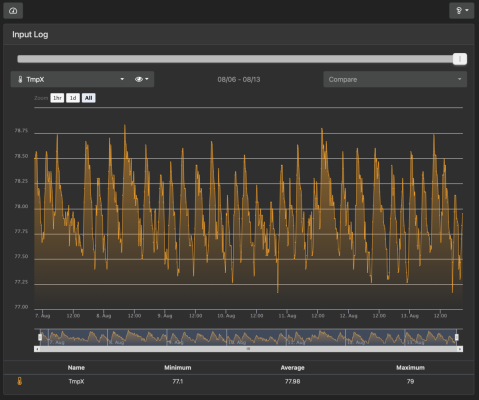
TmpX - this is the secondary temperature probe, located to the right of one of the returns in the display. In addition to the flow from the return, there is also continual flow and circulation from one Maxspect XF330 and Red Sea ReefWave45 gyre.
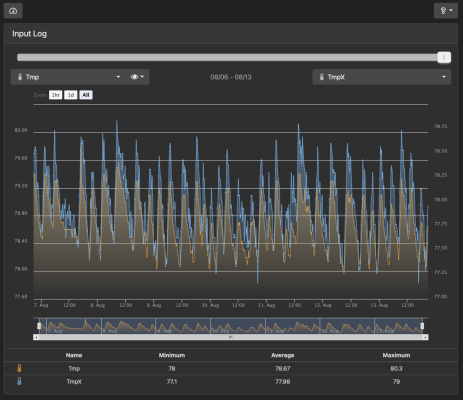
Both probe charts overlaid. The temperature in the sump has a min/max of 78.0°F/80.3°F (average of 78.67°F) and the temperature in the display has a min/max of 77.1°F/79.0°F (average of 77.98°F). It will be interesting to see how closely the Helio system can match or improve upon this.
So far, in the past hour since I set the Helio system up it's been maintaining a temperature in the sump of 78.0°F with a variance of ±0.1-0.2°F. Come this time tomorrow this should be a really interesting graph...
I took some screenshots of my existing Inkbird/Schego heating graph going forward so I'd have some reference for comparison with the new Helio setup.

Tmp - this is the primary temperature probe, located in the sump to the left of the ReefMat. To ensure ample circulation I have a Sicce Voyager Nano providing flow in addition to the Sicce SDC 6.0 that provides the intake for the AquaUV ultraviolet sterilizer in the adjacent chamber.

TmpX - this is the secondary temperature probe, located to the right of one of the returns in the display. In addition to the flow from the return, there is also continual flow and circulation from one Maxspect XF330 and Red Sea ReefWave45 gyre.

Both probe charts overlaid. The temperature in the sump has a min/max of 78.0°F/80.3°F (average of 78.67°F) and the temperature in the display has a min/max of 77.1°F/79.0°F (average of 77.98°F). It will be interesting to see how closely the Helio system can match or improve upon this.
So far, in the past hour since I set the Helio system up it's been maintaining a temperature in the sump of 78.0°F with a variance of ±0.1-0.2°F. Come this time tomorrow this should be a really interesting graph...
Last edited:
August 14. H E L I O
12 hours in and so far I'm completely blown away. I've gone from a variance of 1.4-1.6°F with the Inkbird to a variance of 0.2-0.4°F with the Helio. The spike on the left is when the Inkbird was taken offline.

Being able to only set the desired temperature in 1.0°F increments isn't proving to be an issue as it slipped my mind that when you calibrate the Helio temperature sensor you can adjust this from 0.1-0.9°F to compensate (so I've revised this aspect of my first impression above).
..........
So almost a full 24 hours with the new Helio system. What a difference a day makes. Images speak volumes - so I'll lead with those.
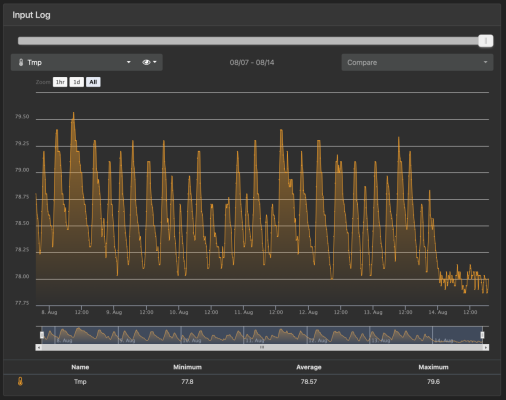
Just... wow. Look at the before (Inkbird) and after (Helio) variations.
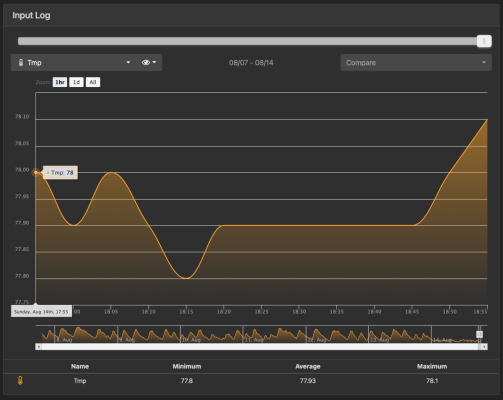
Again, just... wow. Note that the maximum temperature was actually 78.0°F because I recalibrated the Helio temperature probe to 0.0°F (from 0.5°F) as I wanted the temperature in the display closer to 78.0°F. So this is a 0.2°F temperature variance over a period of an hour!
..........
As you may have guessed by now, I'm really impressed with the Helio system so far. A few things that I've discovered in the course of running it that are pretty slick:
• The ability to toggle the (audible) alarm on and off is a nice touch (something I can't do on the Inkbird).
• There are three small status lights on the controller for visibility: the first is a small red light that indicates the unit is powered and functioning and the second two are two small green lights to indicate which heater is active. So with a quick glance you can quickly ascertain the complete status of the Helio.
• The buttons to operate the unit are on the side rather than the front - which affords a larger viewing area to view the current and set temperatures.
12 hours in and so far I'm completely blown away. I've gone from a variance of 1.4-1.6°F with the Inkbird to a variance of 0.2-0.4°F with the Helio. The spike on the left is when the Inkbird was taken offline.
Being able to only set the desired temperature in 1.0°F increments isn't proving to be an issue as it slipped my mind that when you calibrate the Helio temperature sensor you can adjust this from 0.1-0.9°F to compensate (so I've revised this aspect of my first impression above).
..........
So almost a full 24 hours with the new Helio system. What a difference a day makes. Images speak volumes - so I'll lead with those.

Just... wow. Look at the before (Inkbird) and after (Helio) variations.

Again, just... wow. Note that the maximum temperature was actually 78.0°F because I recalibrated the Helio temperature probe to 0.0°F (from 0.5°F) as I wanted the temperature in the display closer to 78.0°F. So this is a 0.2°F temperature variance over a period of an hour!
..........
As you may have guessed by now, I'm really impressed with the Helio system so far. A few things that I've discovered in the course of running it that are pretty slick:
• The ability to toggle the (audible) alarm on and off is a nice touch (something I can't do on the Inkbird).
• There are three small status lights on the controller for visibility: the first is a small red light that indicates the unit is powered and functioning and the second two are two small green lights to indicate which heater is active. So with a quick glance you can quickly ascertain the complete status of the Helio.
• The buttons to operate the unit are on the side rather than the front - which affords a larger viewing area to view the current and set temperatures.
Last edited:
Similar threads
- Replies
- 33
- Views
- 948
- Price: Best Offer
- Shipping NOT Available
- Replies
- 3
- Views
- 441
- Replies
- 130
- Views
- 4,308
- Replies
- 17
- Views
- 589
- Replies
- 2
- Views
- 615


