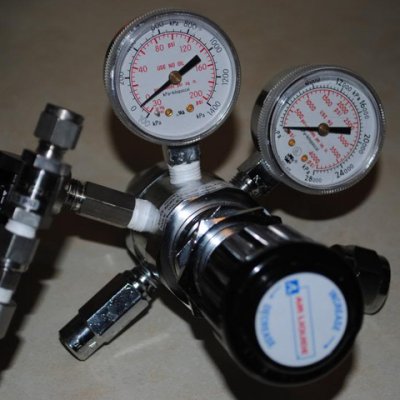
Building an Alanle style dual stage CO2 regulator

OP
OP
Water Dog

Water Dog

2500 Club Member
View Badges
Joined
Mar 28, 2016
Messages
4,219
Reaction score
4,892
Location
Fairfield, CT
Rating - 0%
0   0   0
In part 2 of the test, I now let the gas gas move over to the working pressure side of the regulator. I set working pressure side to its max psi.
C4647D05-FAF3-4238-A4FC-2471129C5133.jpeg


Now I isolate the gas on the working pressure side and remove it from the CO2 tank. It’s reading around 29 psi,
0CBC1B17-E47B-49F5-9586-2D5B93A1D81C.jpeg


I let it sit for over 24 hours and it was still holding pressure steady at around 29 psi.
303826A8-B720-4373-B427-1CB4D9934DCD.jpeg


This is confirmation that the diaphragm is sealing properly. Both the tank side and the working pressure sides are showing that they can isolate and hold pressure without gas migrating to the other side.

Leak test is complete!
 
Last edited:
OP
OP
Water Dog

Water Dog

2500 Club Member
View Badges
Joined
Mar 28, 2016
Messages
4,219
Reaction score
4,892
Location
Fairfield, CT
Rating - 0%
0   0   0
Very cool.

Though I imagine it is, because otherwise why go to effort, how is this better than the off the shelf carbon doser regulator?

If you’re diligent enough in sourcing parts, you can build one of these regulators for a good bit less than the $350 price point of the CarbonDoser. While the CarbonDoser makes dialing in CO2 very easy, at the end of the day, it’s is an electronic Clippard Mouse solenoid attached to a cheap $10 brass single stage regulator. Electronics will fail. These DIY regulators use industrial lab grade stainless steel parts (extremely precise metering valves) that will still work precisely and consistently long after you and I are gone... :) and I’m not even getting into the single vs dual stage end of tank dump discussion.

There is no question, the CarbonDoser is easy to use and has a loyal following. I‘m just presenting a guide based on the Alan Le DIY regulator thread for people like to build things and are interested in a quality alternative.
 
OP
OP
Water Dog

Water Dog

2500 Club Member
View Badges
Joined
Mar 28, 2016
Messages
4,219
Reaction score
4,892
Location
Fairfield, CT
Rating - 0%
0   0   0
I need to get back to building mine, and should pick up where I left off. Unfortunate family issues sidetracked me when I was last working on it.

Hope everything is getting better on the family front. If you need any help with your build, shoot me a PM.

Great job!

Thanks! :)
 
OP
OP
Water Dog

Water Dog

2500 Club Member
View Badges
Joined
Mar 28, 2016
Messages
4,219
Reaction score
4,892
Location
Fairfield, CT
Rating - 0%
0   0   0
In order to start putting together the post body, we need to take off the stock output valve assembly. Because of the protruding valve handle, we must first take off the working pressure gauge.

F96F55C6-A248-4DE0-A9A4-FA4ABF31625A.jpeg
 
OP
OP
Water Dog

Water Dog

2500 Club Member
View Badges
Joined
Mar 28, 2016
Messages
4,219
Reaction score
4,892
Location
Fairfield, CT
Rating - 0%
0   0   0
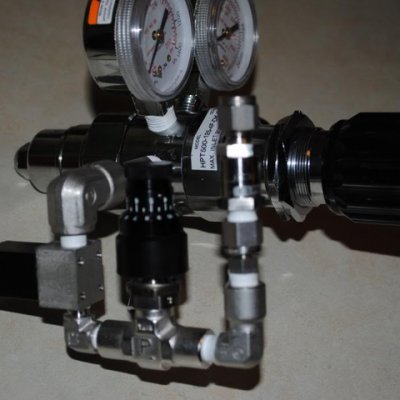
Here it is, with all the threaded pieces assembled.

B9A8C773-9922-4030-9986-5762D819C0C4.jpeg


Please note, the orientation of the Burkert 6011a solenoid valve matters. The end labeled “P” is the inlet, the end labeled “A” is the outlet.
 
OP
OP
Water Dog

Water Dog

2500 Club Member
View Badges
Joined
Mar 28, 2016
Messages
4,219
Reaction score
4,892
Location
Fairfield, CT
Rating - 0%
0   0   0
And here is the completed regulator.

5E59A6BA-714F-4D30-A699-32F3EB691E03.jpeg


Please note that because the metering valve used here is 1/8” you must give the captive nut a 3/4 turn in order to “Swage” the tube fittings together. If we were using a 1/4” metering valve with 1/4” tube fittings, we would give the captive nut a 1-1/4 turn in order to “Swage” the fittings together.

Please see this video from Swagelok for reference...

 
Last edited:
OP
OP
Water Dog

Water Dog

2500 Club Member
View Badges
Joined
Mar 28, 2016
Messages
4,219
Reaction score
4,892
Location
Fairfield, CT
Rating - 0%
0   0   0
Now, I have to perform a leak test to ensure my post body connections are leak free. Then I will use a remote bubble counter to test the solenoid and put the metering valve through its paces.

Fluval 88g-CO2 Bubble Counter - 3.1 Ounces
 

GoVols

Cobb / Webb - 1989
View Badges
Joined
Nov 29, 2016
Messages
13,078
Reaction score
37,560
Location
In-The-Boro, TN
Rating - 0%
0   0   0
@Water Dog

Great thread!!

Thanks so much for taking the time, and sure admire your skills.

Looks like a masterpiece from here... ;Woot ;Woot
 
OP
OP
Water Dog

Water Dog

2500 Club Member
View Badges
Joined
Mar 28, 2016
Messages
4,219
Reaction score
4,892
Location
Fairfield, CT
Rating - 0%
0   0   0
@Water Dog

Great thread!!

Thanks so much for taking the time, and sure admire your skills.

Looks like a masterpiece from here... ;Woot ;Woot

Thanks dude! :) Though I have to give full credit to Alanle for being so helpful via PMs when I was putting together my first regulator build. Happy I can pay it forward!

I actually also want to use this thread as a resource for members who PM me for help with their regulator builds. I can link to this thread as a reference so I don’t have to repeat instructions over and over via PMs. It’s a shame that a lot of the good assembly photos in the original Alanle DIY thread on RC are gone. :(
 
Last edited:
OP
OP
Water Dog

Water Dog

2500 Club Member
View Badges
Joined
Mar 28, 2016
Messages
4,219
Reaction score
4,892
Location
Fairfield, CT
Rating - 0%
0   0   0
Thank you very much! Can’t wait to see it in action.

It’s my pleasure! Like I said, I’m a geek with this DIY and tinkering stuff. :) I’ve got to fill up my spare 5# CO2 tank and put it through it’s paces. Hopefully everything will run smoothly!
 
Last edited:

Fishnugget

Active Member
View Badges
Joined
Oct 5, 2011
Messages
153
Reaction score
104
Location
Cali
Rating - 0%
0   0   0
Looks great, as I just ordered my Alanle regulator. It will be a good reference thread for how the parts are supposed to be assembled. Keep posting pics!!
 

GoVols

Cobb / Webb - 1989
View Badges
Joined
Nov 29, 2016
Messages
13,078
Reaction score
37,560
Location
In-The-Boro, TN
Rating - 0%
0   0   0
Looks great, as I just ordered my Alanle regulator. It will be a good reference thread for how the parts are supposed to be assembled. Keep posting pics!!

I still remember Alanle being active on RC.

Good to know that he's still out there.

Does he sell on Ebay and is so, what's his Ebay seller name?
 

GoVols

Cobb / Webb - 1989
View Badges
Joined
Nov 29, 2016
Messages
13,078
Reaction score
37,560
Location
In-The-Boro, TN
Rating - 0%
0   0   0
It’s a shame that a lot of the good assembly photos in the original Alanle DIY thread on RC are gone. :(

Yelp,
I noticed that they were gone too... :(

Thanks for passing it up!!!

It would be nice if you could cut your knowledge (with Staff) into a Reef 2 Reef article.

Have a great night, Water Dog
 
OP
OP
Water Dog

Water Dog

2500 Club Member
View Badges
Joined
Mar 28, 2016
Messages
4,219
Reaction score
4,892
Location
Fairfield, CT
Rating - 0%
0   0   0
Last edited:

Creating a strong bulwark: Did you consider floor support for your reef tank?

  • I put a major focus on floor support.

    Votes: 7 43.8%
  • I put minimal focus on floor support.

    Votes: 3 18.8%
  • I put no focus on floor support.

    Votes: 5 31.3%
  • Other.

    Votes: 1 6.3%
Back
Top