Chels & Joe's 180 bankrupting beauty!

OP
OP
ChelseaBidwell

ChelseaBidwell

Active Member
View Badges
Joined
Jul 2, 2019
Messages
192
Reaction score
441
Rating - 0%
0   0   0
Nice job! Is that a blonde Naso Tang?

Blond Naso tang.png
Yes. Very aggressive! Might try the mirror trick...
Be careful with that. She might bust the glass. I think they're more powerful than the Mantis :eek:
 

Omgitsjoe

Active Member
View Badges
Joined
Aug 17, 2019
Messages
249
Reaction score
562
Location
Georgia
Rating - 0%
0   0   0
The overflow box was delivered today (pics to come). I need some advice on the return bulkhead locations!!! I am mounting the overflow centered. There will be 2 returns. I was thinking centered between the left of the tank and the left wall of the overflow and the right of the tank and the right wall of the overflow. For the height maybe 2" below the water line? Not really sure how high or low to mount the return bulkheads. What do you guys think?
edit.jpg
 

DaneGer21

Valuable Member
View Badges
Joined
Jun 18, 2018
Messages
2,137
Reaction score
2,879
Location
Creston, 44217
Rating - 0%
0   0   0
Here’s how I had mine done. I am using a 36” long overflow, so my return are centered within the remaining space. See cad below of my tank. As you can see my builder drilled mine at 2” on center. I am only using 3/4” returns/bulkheads.

15078212-60BB-4A40-9A13-74D849906311.jpeg
 

Paulie069

Random Acts Of Kindness
View Badges
Joined
Dec 1, 2019
Messages
2,694
Reaction score
11,005
Rating - 0%
0   0   0
Sooooooooooo, I always start out expecting an epic failure when doing a new tank, but I feel pretty darn good about this one! Not only because of our decisions on equipment, but mainly because we are actually planning this one out and taking our time (as opposed to our spur of the moment, impulse buys, and erratic decision making with our previous tanks)

PSA: this is hard for me. I'm impatient and buy whatever looks good at the time instead of putting in the effort to research and make educated decisions. I'm an adult, I know. Blows my mind too! ;Hilarious That being said, bare with me through this disastrous/miraculous (unsure of which yet) adventure and pray we can get through it with full heads of hair! LOL!

To start things off, we decided we didn't want to get a brand new tank - where's the fun in that?! This is how we test the strength and boundaries of our love for each other! Haha!

So, we started looking for a used tank. Something for us to bring back to life! We've searched for weeks and weeks! Yesterday, we FINALLY found our tank. It's a 180, it included the stand and canopy. Trashed this canopy though, we're going build a floating one. We picked it up this morning, cleaned the filthy mess up (4 DAGGUM HOURS BTW), and just finished the 3rd coat of black paint on the back. By the grace of God, there's only ONE TINY scratch on the whole tank. WIN! We're going to be sanding and restaining the stand and probably redo the doors on it. Anywho, here are some pictures of before/after my deep cleaning. And, of course, my predictable shenanigans. ;Wacky
Btw, go ahead and note how hubs is a minuscule contributor. Had to notate that in case he tries to take credit for my hardwork and effort.
Love you babe! ;Smuggrin @Omgitsjoe

20200104_235531.jpg

20200104_235551.jpg

20200104_235605.jpg

20200104_235617.jpg

20200104_235627.jpg

Resized_20200104_235758.jpeg

20200104_235324.jpg

20200104_235419.jpg

20200104_235432.jpg

20200104_235242.jpg

Resized_20200104_235839.jpeg

Resized_20200104_235907.jpeg

20200105_000205.jpg


I'll update as we go along and hopefully we will have some huge progress in the very near future!
Oh, if you have any funny build pics, send them my way! This hobby is a headache majority of the time, so might as well have a little fun with it, right?! Happy reefing everyone!
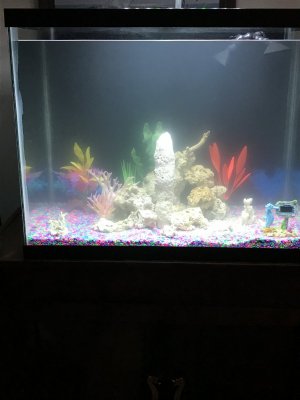
Very cool such a large project to take on, but it’s never work if u love what ur doing. I just got done with my tank today and already thinking hmmm what’s next. I can’t wait to see what u do for aqua scape?, with all that room you have I’ll bet it’s gonna be epic. Good luck look forward to seeing more,,, here’s a pic of my new seahorse condominium

0C34D362-8250-481D-914C-AF2C1EDDF7DC.jpeg
 

splitting_lanes

Active Member
View Badges
Joined
Aug 20, 2019
Messages
424
Reaction score
533
Location
San Jose, California
Rating - 0%
0   0   0
The overflow box was delivered today (pics to come). I need some advice on the return bulkhead locations!!! I am mounting the overflow centered. There will be 2 returns. I was thinking centered between the left of the tank and the left wall of the overflow and the right of the tank and the right wall of the overflow. For the height maybe 2" below the water line? Not really sure how high or low to mount the return bulkheads. What do you guys think?
edit.jpg
I’d go only an inch below waterline. Less drain back into the sump when the pump is off.
 

Omgitsjoe

Active Member
View Badges
Joined
Aug 17, 2019
Messages
249
Reaction score
562
Location
Georgia
Rating - 0%
0   0   0
Next weekend the first order of our plumbing will be arriving, our plan is to drill and start plumbing this beast!

I want to mimic this overflow piping


I plan on using 1.5" pipe. does anyone see any issue with this?
 

Hemmdog

10K Club member
View Badges
Joined
Dec 9, 2018
Messages
11,681
Reaction score
44,773
Location
Silicon Valley, CA
Rating - 0%
0   0   0
Next weekend the first order of our plumbing will be arriving, our plan is to drill and start plumbing this beast!

I want to mimic this overflow piping


I plan on using 1.5" pipe. does anyone see any issue with this?

1.5 is pretty big, maybe do 1 1/4 inch. The returns I would do 3/4 or 1 inch. I’m not an expert plumber by any means though.
 

Omgitsjoe

Active Member
View Badges
Joined
Aug 17, 2019
Messages
249
Reaction score
562
Location
Georgia
Rating - 0%
0   0   0
1.5 is pretty big, maybe do 1 1/4 inch. The returns I would do 3/4 or 1 inch. I’m not an expert plumber by any means though.

The reasoning for the 1.5" is because I currently run the triton method on my other tank. Triton suggest 10x turnonver. So im looking at about 2200 GPH
 

DaneGer21

Valuable Member
View Badges
Joined
Jun 18, 2018
Messages
2,137
Reaction score
2,879
Location
Creston, 44217
Rating - 0%
0   0   0
For my drains I went with 1” for all three, which I think would be plenty for you, if not 1.25”.

For return piping I ran 1” up to the tank with two 3/4” returns. I have a jebao dct12000 maxed out and only get just under 400gph(via 2 apex 1” sensors). 1- 1” ball valve, 4- 1” 90s, 1- 1” tee, 2- 3/4” 45s, 2- 3/4” 90s. 2- 3/4” bulkheads, 3/4” locline with 3” “flare” nozzles. And roughly 8’ of head pressure.

I actually wish I would have ran 1.25 or 1.5” for my return pipes with my two 3/4” returns.

I didn’t think I’d be so restricted on flow. A return pump with a rating of 3170gph but only getting 375-390gph.

So another words, oversize the return, not so much the drains.
 
OP
OP
ChelseaBidwell

ChelseaBidwell

Active Member
View Badges
Joined
Jul 2, 2019
Messages
192
Reaction score
441
Rating - 0%
0   0   0
What y'all know about that overflow, though? ;Smuggrin
Overflow and returns are finished! We ended up going 2" below the water line for the returns. We measured this thing like 10 times to make sure it was identical. Once the drill starts, you have to commit! Lol but I think it ended up looking really good. Filled it up, and as intended, you can't see the water line! I'm sooooo happy we went with this set up!! @Omgitsjoe is so OCD that he had to plan it all out on Solid Works. All the planning was worth it. I am in love! More updates to come!
20200125_210952.jpg

20200125_211029.jpg

20200125_211100.jpg

20200125_211135.jpg

20200125_211215.jpg

20200125_211236.jpg
20200125_211914.jpg

20200125_211703.jpg

20200125_211738.jpg

20200125_211252.jpg

20200125_211323.jpg
 
OP
OP
ChelseaBidwell

ChelseaBidwell

Active Member
View Badges
Joined
Jul 2, 2019
Messages
192
Reaction score
441
Rating - 0%
0   0   0
Money Sucking Tank Update:

So, I am about 2-3 updates behind. So, prepare yourself for tons of pics and unnecessarily elaborated jibberish. Lol!

A couple weeks ago, we started stripping the wood. I couldn't take that ghastly color anymore. So, Joe spent HOURS sanding. No exaggeration. As soon as it was sanded, I started staining it with this pretty grey color (Coastal Grey). Wasn't sure if we would end up liking it, but I LOVE IT.

20200222_212004.jpg

20200222_212052.jpg

20200222_212029.jpg

20200222_212111.jpg


Then we started attempting to seal the bottom with hopes of creating a "bathtub". So, we put our first coat of epoxy. Then our 5th coat of epoxy. Another few coats, and before you know it, we're at 16 coats. Then, guess what? You guessed it! After buying and smothering the "tub", we ended up doing almost 24 coats. And roughly 1.5 gallons of that stupid epoxy. I NEVER WANT TO HEAR THE WORD EPOXY AGAIN!!!!
NEVERRRR!!!!!!

Resized_20200202_145648.jpg

20200222_211520.jpg

20200222_211508.jpg

20200222_211458.jpg


After we spent 2 weeks sealing it with epoxy, we took an extra precautionary step and sealed the joints (guesstimated 1/4 inch) with white silicone. I DARE THIS THING TO EVER ALLOW WATER ON MY CARPET!!!

20200222_211613.jpg

20200222_211631.jpg


After that, we started building our "power box? - cord box? - ugly crap box?" - not sure of the term. But it's where all our apex / modules / and corresponding cords (eyesores) are going to be banished to. Anywho, it's screwed into the frame of the stand and the front cover is removable. We used magnets. Pretty smart huh? It's magic - YEP. The "Dough Boy" kind of magic. ;Smuggrin
So, long story short, we can just pull it off as opposed to using hinges. The right side of the "skin" is removable also (yep - magnets - again) in case we ever need to get to anything from the side.

20200222_211013.jpg

20200222_210956.jpg

20200222_210942.jpg


Then I put a little wood stopper under the front cover just in case the magnets don't hold up. YEP. Another (probably unnecessary) precautionary measure. And after my annoying, OCD, thorough shenanigans, we put the skin on to see how it all looked. I'm diggin it. As for the doors, I am still undecided on what I want. I'll eventually post an update on that once I stop being so indecisive. After those are installed, I believe we will be done with the stand.

20200222_211417.jpg

20200222_203712.jpg

20200222_203733.jpg

20200222_210857.jpg

20200222_210815.jpg


Then we semi- started the plumbing. But, we're exhausted. So, we're gonna save that for another day. Side note - all pipes are blue, and we're using all SCH80 fittings. Pretty neat color scheme once I saw it all put together.

20200222_211316.jpg

20200222_211214.jpg


After all the hard, time consuming, headache inducing work, this is where we stand today. WHAT A DIFFERENCE. You wouldn't even know it's the same tank/stand if you weren't reading this thread.

20200222_210708.jpg


Our next step is getting the sump and plumbing done. Maybe the doors. Oh, we're also going to be building a customized ATO. We will see how that goes? HA. Good night, guys! Happy reefing!
 

Caring for your picky eaters: What do you feed your finicky fish?

  • Live foods

    Votes: 27 30.0%
  • Frozen meaty foods

    Votes: 71 78.9%
  • Soft pellets

    Votes: 15 16.7%
  • Masstick (or comparable)

    Votes: 8 8.9%
  • Other

    Votes: 7 7.8%
Back
Top