- Joined
- Nov 20, 2019
- Messages
- 67
- Reaction score
- 70
Hey everyone!
My name is Trevor, and I am finally wrapping up a 180 gallon system that is going in my living room. Since this room is the main living space, I have a couple requirements of this tank for my own sanity that may not pertain to tanks in other areas of the house.
1) It has to be quiet
2) It can't bleed light everywhere
3) It has to look clean - both inside and out

The lighting for this system is a 60" Aquatic Life DX18 with (4) T5 lamps, as well as (3) Kessil A360x's mounted along the center. After hanging this fixture and turning it on, it immediately became apparent that something needed to be done with the light spill into the room, as well as the harsh glare coming from both the T5's and the Kessils. Fortunately the Kessils was an easy fix with the narrow beam reflectors. I bought those, slapped them on and simply raised the fixture from 8" above water to about 13" above water and the light distribution evened out.
The T5's however.... Not as simple of a fix. But on a setup without an enclosed canopy, I should have known that this would be an issue. So I built a shade that absolutely mitigates both the light spill into the room as well as the harsh glare from the T5's that strained my eyes even from a peripheral angle. While I am not a lighting engineer, I am a commercial/industrial master electrician by trade and have spent a great deal of time constructing, retrofitting, and installing expensive lighting fixtures throughout the years. And this project is not too difficult! Hopefully it can help someone with a similar lighting requirement in their home.
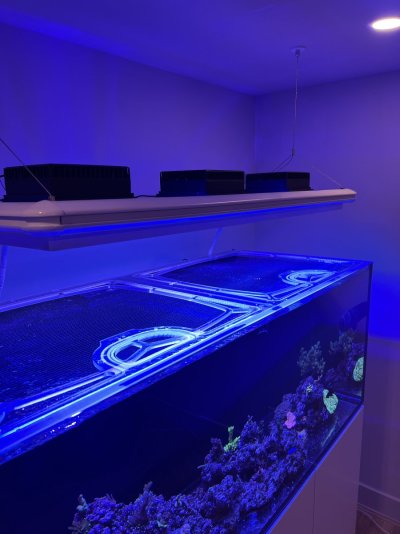
As you can see in the first picture, the reflectors of the Aquatic Life itself are very visible from straight on and below the fixture and they bounce light into the room. All that is needed here (at least in my application) is a 1" lip surrounding the reflector that extends down toward the water. If you aren't sure if 1" will be enough for you, grab some painters tape and some cardboard and tape up some pieces to see what length you need.

This is the underside of the fixture, where we will be building the shade in place.

This is extruded aluminum angle stock, which just became available at my local Home Depot. It's sold in 8' sections, so I needed four of them. About $15 each.

Here are the other tools I used. Aluminum Primer and matte black paint, good off for the stupid stickers on the aluminum, a heavy pair of Wiss snips to cut the aluminum, a sheet metal seamer to tweak your cuts back to straight, and a file to clean edges or shave off a little more after cutting. Alternatively you could use a miter saw with a metal blade , or band saw, but these work fine. You'll need two hands to snip the metal though, lol. It would also be a good idea to take the stickers off now, instead of after it's built (like I did).

Here is the goal. Cut your pieces on the outside first, EXACTLY to the length of the rubber corners of the fixture. The rubber corners are raised, so the aluminum can snap into it, as shown above. Cut as closely as you can, erring on long and shaving it down. Get it as snug as practical for the cleanest look. I built the outside box first and did the two inside pieces last since there isn't much to support them.
As far as bonding the aluminum together, I used the super glue shown above. This is NOT an indestructible bond. I would certainly not build an entire fixture this way, but super glue bonds well to aluminum, and the Aquatic Life fixture is a sturdy base so there will be no flexing of the shade once installed. Just don't be rough will it at any point.
For my joints, I cut every piece exactly to length, then cut (8) pieces of angle to just shy of an inch, then glued my corners as you can see in the picture. Pinch and hold for (15) seconds or so. After the perimeter box is done, do the remaining inside long pieces.

Here is a close up of what I did for corners. You can see my short angle pieces I used to join my corners, and also how the sections butt right into the rubber corners of the fixture.

Super glue holds the entire shade together well. Again just treat it delicately, since it isn't held together by a mechanical means such as screws.

Two coats of primer about 15 minutes apart (not more than an hour apart). Then let it cure for 48 hours.

Same with the paint, 2 coats in 15 minutes.

Here's a close-up of the corners after paint. Not perfect, but it's clean and presentable and won't detract from the DX18, which I think is one of the better looking fixtures available today.

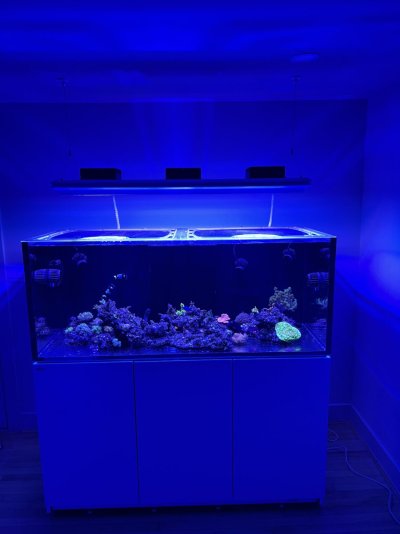
Lastly, we get some black silicone and run a thin bead along the perimeter of the DX18, then place the shade on top of the fixture. This will serve as both the fastening means for the shade to the fixture, as well as a gasket to prevent light shining between the shade and fixture. (Sorry for not getting any pictures of this part, but its pretty simple). After 24 hours, I flipped the fixture and ran a bead of silicone from the underside to the two inner sections of the shade. And above is the final picture.

The paint is a pretty close match, and it doesn't drastically change the aesthetic of the fixture. And it MASSIVELY cuts down on glare and room spill.
Thanks for reading! Let me know if you have any questions")
My name is Trevor, and I am finally wrapping up a 180 gallon system that is going in my living room. Since this room is the main living space, I have a couple requirements of this tank for my own sanity that may not pertain to tanks in other areas of the house.
1) It has to be quiet
2) It can't bleed light everywhere
3) It has to look clean - both inside and out
The lighting for this system is a 60" Aquatic Life DX18 with (4) T5 lamps, as well as (3) Kessil A360x's mounted along the center. After hanging this fixture and turning it on, it immediately became apparent that something needed to be done with the light spill into the room, as well as the harsh glare coming from both the T5's and the Kessils. Fortunately the Kessils was an easy fix with the narrow beam reflectors. I bought those, slapped them on and simply raised the fixture from 8" above water to about 13" above water and the light distribution evened out.
The T5's however.... Not as simple of a fix. But on a setup without an enclosed canopy, I should have known that this would be an issue. So I built a shade that absolutely mitigates both the light spill into the room as well as the harsh glare from the T5's that strained my eyes even from a peripheral angle. While I am not a lighting engineer, I am a commercial/industrial master electrician by trade and have spent a great deal of time constructing, retrofitting, and installing expensive lighting fixtures throughout the years. And this project is not too difficult! Hopefully it can help someone with a similar lighting requirement in their home.
As you can see in the first picture, the reflectors of the Aquatic Life itself are very visible from straight on and below the fixture and they bounce light into the room. All that is needed here (at least in my application) is a 1" lip surrounding the reflector that extends down toward the water. If you aren't sure if 1" will be enough for you, grab some painters tape and some cardboard and tape up some pieces to see what length you need.
This is the underside of the fixture, where we will be building the shade in place.
This is extruded aluminum angle stock, which just became available at my local Home Depot. It's sold in 8' sections, so I needed four of them. About $15 each.
Here are the other tools I used. Aluminum Primer and matte black paint, good off for the stupid stickers on the aluminum, a heavy pair of Wiss snips to cut the aluminum, a sheet metal seamer to tweak your cuts back to straight, and a file to clean edges or shave off a little more after cutting. Alternatively you could use a miter saw with a metal blade , or band saw, but these work fine. You'll need two hands to snip the metal though, lol. It would also be a good idea to take the stickers off now, instead of after it's built (like I did).
Here is the goal. Cut your pieces on the outside first, EXACTLY to the length of the rubber corners of the fixture. The rubber corners are raised, so the aluminum can snap into it, as shown above. Cut as closely as you can, erring on long and shaving it down. Get it as snug as practical for the cleanest look. I built the outside box first and did the two inside pieces last since there isn't much to support them.
As far as bonding the aluminum together, I used the super glue shown above. This is NOT an indestructible bond. I would certainly not build an entire fixture this way, but super glue bonds well to aluminum, and the Aquatic Life fixture is a sturdy base so there will be no flexing of the shade once installed. Just don't be rough will it at any point.
For my joints, I cut every piece exactly to length, then cut (8) pieces of angle to just shy of an inch, then glued my corners as you can see in the picture. Pinch and hold for (15) seconds or so. After the perimeter box is done, do the remaining inside long pieces.
Here is a close up of what I did for corners. You can see my short angle pieces I used to join my corners, and also how the sections butt right into the rubber corners of the fixture.
Super glue holds the entire shade together well. Again just treat it delicately, since it isn't held together by a mechanical means such as screws.
Two coats of primer about 15 minutes apart (not more than an hour apart). Then let it cure for 48 hours.
Same with the paint, 2 coats in 15 minutes.
Here's a close-up of the corners after paint. Not perfect, but it's clean and presentable and won't detract from the DX18, which I think is one of the better looking fixtures available today.
Lastly, we get some black silicone and run a thin bead along the perimeter of the DX18, then place the shade on top of the fixture. This will serve as both the fastening means for the shade to the fixture, as well as a gasket to prevent light shining between the shade and fixture. (Sorry for not getting any pictures of this part, but its pretty simple). After 24 hours, I flipped the fixture and ran a bead of silicone from the underside to the two inner sections of the shade. And above is the final picture.
The paint is a pretty close match, and it doesn't drastically change the aesthetic of the fixture. And it MASSIVELY cuts down on glare and room spill.
Thanks for reading! Let me know if you have any questions