DIY LED upgrade in an old PFO MH/VHO fixture led driver suggestions.

oreo54

5000 Club Member
View Badges
Joined
Sep 18, 2017
Messages
5,590
Reaction score
3,440
Rating - 0%
0   0   0
In europe...

Reflowing leds is not for the faint of heart.
Besides Steves led price is about what you would pay price-wise in getting the parts. You would need a pretty specific reason for it.
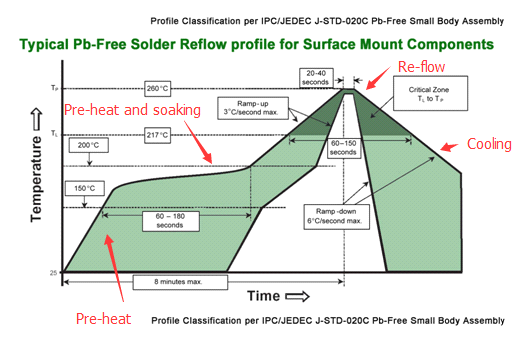
Example of how its done in industry, That said one can use an electric fry pan.
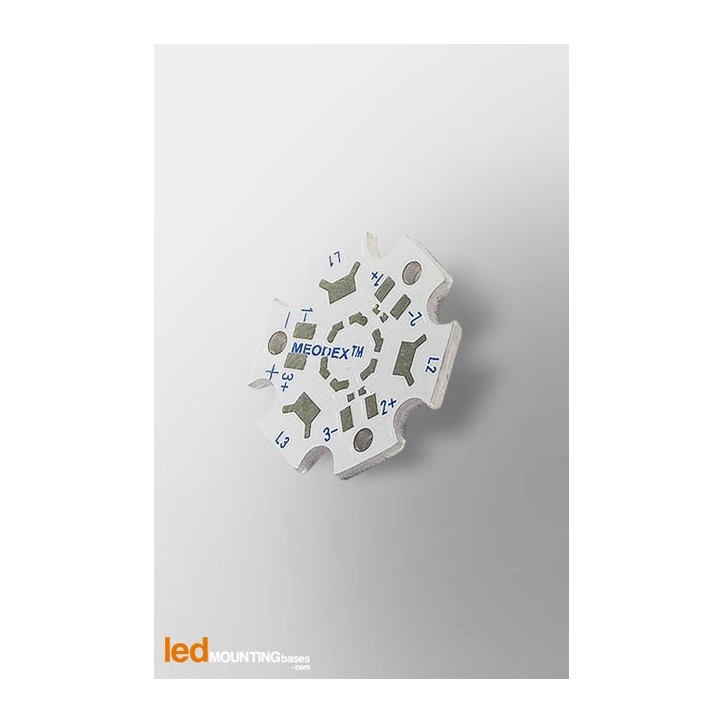
typical-pb-free-solder-reflow-profile.png
 
OP
OP
geekengineer

geekengineer

Active Member
View Badges
Joined
Feb 10, 2019
Messages
427
Reaction score
538
Location
South Aurora
Rating - 0%
0   0   0
I do have a re-flow DIY oven that I can use. I copied it from a project someone did (I think it was Element14 but not sure been to long) and used their code that has a temperature profile setup etc. I was just wondering if that would help if we can't get curtain LEDs.
 

oreo54

5000 Club Member
View Badges
Joined
Sep 18, 2017
Messages
5,590
Reaction score
3,440
Rating - 0%
0   0   0
I do have a re-flow DIY oven that I can use. I copied it from a project someone did (I think it was Element14 but not sure been to long) and used their code that has a temperature profile setup etc. I was just wondering if that would help if we can't get curtain LEDs.
Yea it would be great. Biggest problem.
1) Finding boards in the US. google foo didn't even take me to Alibaba. Plenty in Europe In China also if you want 10,000 of them.
2) Hardest is finding cyan. Didn't check Digikey but Mouser had them for $3.72 each in lots of 10 or more.
Last ones I got were $2.62 each and didn't have to buy 10.. :) Yea I'm cheap.

I'd try Steves first, They may be holding inventory for their strips. I just put a buch of 3 ups in my shopping cart.. Didn't get rejected..

you know on thing we haven't discussed is your idea of looks.
Also since this will be dimmable and matters little AND it's out of my comfort zone to ask BUT you are putting a
ton of light over a 40. Old fixture especially.
There

@ 150W (or so) each channel is is enough for that tank.. in general.

Interesting though after cruising steves..
For $135 you can get 3 14up boards populated.
They are 2 channel but looks to be easily jumpered into one series string.
126V (approx) @700mA = 88W

SADLY unlike the stars cyan wasn't listed. Possible supply chain or as I like to call it the gouging conspiricy may be an issue.
 
OP
OP
geekengineer

geekengineer

Active Member
View Badges
Joined
Feb 10, 2019
Messages
427
Reaction score
538
Location
South Aurora
Rating - 0%
0   0   0
So is it that big of a deal not to use the china 10W ones (for the colors)? Seems like it just makes it more complicated to find and more expensive at this point. If they break I can either replace them or later I can do something better.
 

oreo54

5000 Club Member
View Badges
Joined
Sep 18, 2017
Messages
5,590
Reaction score
3,440
Rating - 0%
0   0   0
So is it that big of a deal not to use the china 10W ones (for the colors)? Seems like it just makes it more complicated to find and more expensive at this point. If they break I can either replace them or later I can do something better.
No that's fine and about normal.
;)

My very first light for my fw 40 went though a similar evolution.
Throw a bunch of reg blue w/ the Bridgelux and call it a day.
One thing though regarding cyan and China.. In the past ( now WAY in the past) they were doing
dual dies of blue and yellow and calling it cyan. Had 2 peaks and of course missed the cyan peak all together.
Annoyed me so went strictly w/ quality Cyans as assurance.
Technically not real important but something to keep in mind.

Again the Bridgelux has plenty of cyan.

You will be relying a lot on the Bridgelux cobs for decent coloration.

Side note, ran across these and thought they were a fair deal.
Rated 70-80W assume passive cooling (?).
your fixture has fans so not as big of a deal but worth looking at.
Hard to find decent anodized heat sinks for a good price.

Go for it.. Suggest not adding the 2 RB, just for heat sake..
Yea still added cyan, pumps up the ch 2 "tone"..like an "accent".
bridge5.JPG


Bummer about the cancellation thing
 

oreo54

5000 Club Member
View Badges
Joined
Sep 18, 2017
Messages
5,590
Reaction score
3,440
Rating - 0%
0   0   0
bridge6.JPG

Math: (33.5 x 4) + (12 x 9) =DANG
Take out the cyans..
Ch2
(33.5 x 4) + (12 x 6) = 206V
206 x .7 = 144.2W
You could put the 2 rb's back in ch 1 ..

bridge7.JPG
 
Last edited:

oreo54

5000 Club Member
View Badges
Joined
Sep 18, 2017
Messages
5,590
Reaction score
3,440
Rating - 0%
0   0   0
I have the non anodized ones is that a problem? I got them for $15.
Was that each?
Anyways, it depends...
The facts:
Anodizing or even painting a heatsink improves heat transfer away from the sink.
The coating increases surface area and emissivity.
Long story here:

Second property of importance. Fin spacing.
Larger spacing for passive cooling.
Better removal of the skin effects.

Then if course you have surface area. Even that is...complicated.

Now this is for sinks passively cooled.
You have fans so it changes the dynamic
considerably.
Wouldn't hurt to apply a thin coat of black lacquer to the back :) but not necessary.

Example: Phillips Coralcare vs like viparspectra.

Heatsinks for passively cooling large watt arrays adds considerable cost to a light.
 

oreo54

5000 Club Member
View Badges
Joined
Sep 18, 2017
Messages
5,590
Reaction score
3,440
Rating - 0%
0   0   0
Not sure where the Tea came from
Anyways the "it's usually more complicated than assumed".
Color doesn't mater w/ the anodized either.
not sure I agree w/ the "don't use it with fans" part but it is less necessary.


Emissivity improves as a result of its microscopic texturing and increased surface area.
The unfinished surface of aluminum can be measured at an emissivity of approximately 0.05. The emissivity of an anodized aluminum surface can be measured at around 0.85.


This is a significant difference. But the improved radiation heat transfer will have a more pronounced effect (percentage-wise) on heat sinks that are smaller. It will also have less overall impact on active heat sinks (which utilize a fan).

Painting an extruded aluminium heatsink will increase its coefficient of emissivity from .09 to about .94. At the temperatures we are talking about, colour doesn't matter at all. What counts is the dullness of the surface. The thickness of the paint layer affects both radiation and conduction.


Paint is less conductive than metal, so do not paint your heatsink unless radiation dissipates a significant proportion of the heat generated by the source. This is likely only under conditions of natural convection. If there is a fan on the heatsink, don't paint it.


The hotter a surface is compared to its surroundings, the more heat will be radiated rather than lost to convection.


An LED panel operating at 60 Celsius with a bare aluminium top surface open to the air will radiate about 10% of the heat generated by the LEDS. This could increase to 50% if the surface is painted, almost doubling the amount of power you can put through the panel.


I have made a spreadsheet that performs some approximate calculations for flat horizontal surfaces: https://smokedprojects.blogspot.com/2021/06/dont-believe-hype-led-panels-run-hot.html
 
OP
OP
geekengineer

geekengineer

Active Member
View Badges
Joined
Feb 10, 2019
Messages
427
Reaction score
538
Location
South Aurora
Rating - 0%
0   0   0
OK well looking at anodizing it I probably could do this at home myself, but I hope its not really that necessary. I was going to maybe thermal epoxy two of those 2 inch ones I got in the center if I need more heat sinking. I ordered two extra one so if I really wanted to I could have three 2 inch ones in the center glued together if it ends up being nessisary. I thought about getting a single bigger one but it seemed to get more expensive that way with the profiles the offered.
 

oreo54

5000 Club Member
View Badges
Joined
Sep 18, 2017
Messages
5,590
Reaction score
3,440
Rating - 0%
0   0   0
For that many cobs I'd be thinking along these lines. Sold per inch. Quote is for 35"
Roughly 15sq in per inch. 525 sq inches.

3 sq in/ watt is one guesstimate
Some guesstimates discount fin height surface area. Did not do that here.
525/3 = 175 watts..

You would have approx.
8 x "10w" + 4 x 23.45w
173.8w
Heatsink calcs are an art and science.

Makers heatsink would be about $90.
392 sq in/ ft. 1176sq in in 3ft
99w per 3ft heatsink passively cooled.

32.67 sq in/ inch
33 w/ft no fan 100w/ft with fans.


a one-foot section of the heat sink can easily handle approximately 33-watts of LEDs


Too much work...


Screenshot_20220922-210319.png

.Honestly between 4 to 12 sq in is probably a better estimate for passive cooling.
I'd have to look but the Bridgelux can handle heat pretty well if I remember correctly.
 
Last edited:
OP
OP
geekengineer

geekengineer

Active Member
View Badges
Joined
Feb 10, 2019
Messages
427
Reaction score
538
Location
South Aurora
Rating - 0%
0   0   0
Well I already got some of the 2 inch ones coming so I rather not buy a new one at this point and use what I got. I know the thermal epoxy isn't as ideal but hopefully it would be close enouph. If its a problem I can change it if I have to. If I do all three I would have 6 inch long with some degradation.
 
OP
OP
geekengineer

geekengineer

Active Member
View Badges
Joined
Feb 10, 2019
Messages
427
Reaction score
538
Location
South Aurora
Rating - 0%
0   0   0
So I just want to be sure this is the plan as far as LED layout?

I left it so I can add the heat sinks around the center one.

LED_mockups3.jpg
 

oreo54

5000 Club Member
View Badges
Joined
Sep 18, 2017
Messages
5,590
Reaction score
3,440
Rating - 0%
0   0   0
bl--w--bl--rb--w --bl--bl--w--rb-- bl--w--bl

2 cobs between every white cob...
 
OP
OP
geekengineer

geekengineer

Active Member
View Badges
Joined
Feb 10, 2019
Messages
427
Reaction score
538
Location
South Aurora
Rating - 0%
0   0   0
I got the cords all cleaned up on the fixture. For some reason they decided to wrap a bunch of it up in electrical tape. I don't know why they didn't just leave the cord sheath on up until it goes to the loom braiding. I can see why they did that part to make all those cables more flexible. So I ended up pulling it all out and put heat shrink where they had the electrical tape. I think that stuff breaks down after a while and it was all sticky yucky.
 
OP
OP
geekengineer

geekengineer

Active Member
View Badges
Joined
Feb 10, 2019
Messages
427
Reaction score
538
Location
South Aurora
Rating - 0%
0   0   0
I also thought if it's a problem for the bridge lux is add some fans on the back near them. Also thinking about it it would be better to mostly use a good thermal grease but use the thermal epoxy in a few spots to hold the heat sinks together.
 

Being sticky and staying connected: Have you used any reef-safe glue?

  • I have used reef safe glue.

    Votes: 121 88.3%
  • I haven’t used reef safe glue, but plan to in the future.

    Votes: 8 5.8%
  • I have no interest in using reef safe glue.

    Votes: 5 3.6%
  • Other.

    Votes: 3 2.2%
Back
Top