DIY Submersible Nano AIO Refugium Grow Light

trevorhiller

Reefing Nurse
View Badges
Joined
Oct 22, 2021
Messages
1,052
Reaction score
752
Location
Williamsport
Rating - 100%
1   0   0
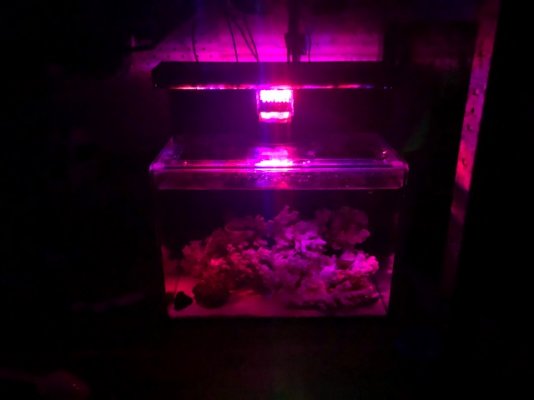
I’m looking for a way to potentially grow chaeto in the rear middle chamber of my AIO Waterbox Peninsula 15 gallon. After searching for submersible lights and not finding many small options, I’m considering DIY.

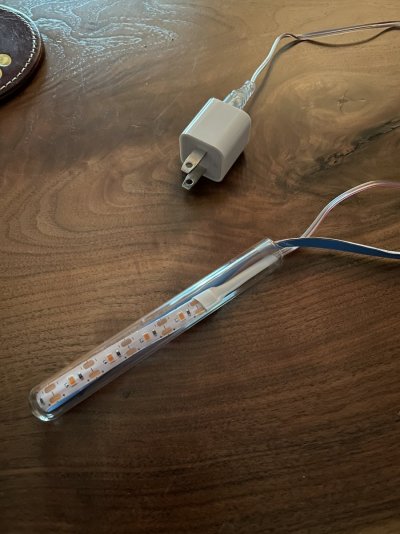
After finding some YouTube inspiration, I have a prototype. I purchased a cheap $7 USB LED grow light strip that is customizable for length off of Amazon. My plan is to place the light strip in a test tube for extra water resistance (the light strip isn’t submersion rated, only water resistant). Then I can silicone the end of the test tube shut.

I still have to find a way to keep the tube submerged in the water, ideally with the siliconed end above the water line to help with water resistance.

thoughts? This is just a prototype and I might try to find a slightly longer glass tube to allow it to hold more of the LED before I trim the strip, but you get the idea.
9DBF6D04-49D6-4EAD-8490-83F68888BC49.jpeg
 

blaxsun

10K Club member
View Badges
Joined
Dec 15, 2020
Messages
26,709
Reaction score
31,146
Location
The Abyss
Rating - 0%
0   0   0
If it were me I'd get a rubber stopper for the end and cut two slits into it for the cables, then silicone the slits and insert into the tube. That way, if you need to remove it for maintenance you can.

In terms of mounting, probably some suction cup clips that match the diameter of the test tube (either rubber or plastic). Should work slick!
 
OP
OP
trevorhiller

trevorhiller

Reefing Nurse
View Badges
Joined
Oct 22, 2021
Messages
1,052
Reaction score
752
Location
Williamsport
Rating - 100%
1   0   0
That’s a good idea with the suction cups. I also thought about potentially putting a magnet inside the tube and another on the outside of the glass.
I wonder if I could find some aquarium heater size suction cups and a matching tube. A test tube 6-8” long would be ideal.
 

Borat

Valuable Member
View Badges
Joined
Apr 4, 2021
Messages
1,491
Reaction score
1,724
Location
United Kingdom
Rating - 0%
0   0   0
I’m looking for a way to potentially grow chaeto in the rear middle chamber of my AIO Waterbox Peninsula 15 gallon. After searching for submersible lights and not finding many small options, I’m considering DIY.

After finding some YouTube inspiration, I have a prototype. I purchased a cheap $7 USB LED grow light strip that is customizable for length off of Amazon. My plan is to place the light strip in a test tube for extra water resistance (the light strip isn’t submersion rated, only water resistant). Then I can silicone the end of the test tube shut.

I still have to find a way to keep the tube submerged in the water, ideally with the siliconed end above the water line to help with water resistance.

thoughts? This is just a prototype and I might try to find a slightly longer glass tube to allow it to hold more of the LED before I trim the strip, but you get the idea.

9DBF6D04-49D6-4EAD-8490-83F68888BC49.jpeg
The wire that connects to the led strip - is that low voltage DC already? I would personally be reluctant to take a risk of bulb breaking and the mains get exposed underwater..

If the parts are cheap - I wouldn't worry too much about ability to remove the seal, just silicone it and let it run for as long as it can (and that can be a very long time).

Generally LEDs longevity is dependent on efficient thermal transfer from leds out - somehow you may need to think how you can improve that. Whilst the LED strip you bought was designed to benefit to being exposed to air convection - it can be detrimental when the strip is enclosed in a bulb as the air around it will quickly become hot: it's possible that pushing the leds against the glass instead can actually be good for them, glass may act as heatsink and transfer heat outside of the bulb.
 

Skullring

Community Member
View Badges
Joined
Apr 29, 2020
Messages
75
Reaction score
87
Location
Oneonta, Alabama
Rating - 0%
0   0   0
The back glass on my Waterbox 10 gallon nano is black smoked glass. Not sure about your tank but you would probably be able to see the leds pretty well in the back chamber.
 

Starganderfish

Active Member
View Badges
Joined
Aug 8, 2019
Messages
179
Reaction score
133
Rating - 0%
0   0   0
This is a cool idea. I’ve just started contemplating something similar for a Waterbox Cube 4 gallon.
Want to 3d print a long “u” shaped channel, place the led strip in it and then fill the channel with clear silicone. Basically a smaller DIY version of the Tunze eco-chic. The LED strip ends up completely encased in a “block” of cured silicone, with a 3D printed surround to hold it in shape. Embed a couple of suction cups in the 3d printed part, or maybe some strong neodymium magnets to hold it in place.

Cost is a few bucks for the 3d filament, a few bucks for the led strips and a few bucks for the silicone. Should be able to do the whole thing for under $20.
I like your idea of the test tube, just need to battle the bouyancy of the air wanting to float it. You’d probably get better light transmission through the test tube glass than I would through silicone and the lights would probably stay cooler inside the tube transmitting heat to the water than trying to push that heat through the silicone.
Hmmn, going to take a look at this idea further!!
 

AdamD76

Active Member
View Badges
Joined
Nov 21, 2015
Messages
484
Reaction score
601
Rating - 0%
0   0   0
Put some kind of spacer in the tube to keep the leds against the glass and fill the whole thing with silicone or clear resin.
 

Koh23

Valuable Member
View Badges
Joined
May 23, 2021
Messages
1,306
Reaction score
1,049
Location
Croatia
Rating - 0%
0   0   0
Are led strips enough to grow chaeto?

What power is that piece of strip, i was thinking of using led strips for my chaeto, to get some blue and red, but strongest strip that i can find localy is 14w per meter, so small piece is very low wattage and intensity.....
 

Starganderfish

Active Member
View Badges
Joined
Aug 8, 2019
Messages
179
Reaction score
133
Rating - 0%
0   0   0
Are led strips enough to grow chaeto?

What power is that piece of strip, i was thinking of using led strips for my chaeto, to get some blue and red, but strongest strip that i can find localy is 14w per meter, so small piece is very low wattage and intensity.....
I built a Fuge light for another Pico tank using LED strips. It's not designed to be submersible, only sealed from ambient moisture but it uses the same kind of strips (https://www.ebay.com.au/itm/124252014278).
I used two strips approx 200mm - pumps out quite a lot of light.
As a comparison, the Tunze Eco Chic submersible fuge light is 300mm and consumes 9w. I have one of those on my WB 20 and I honestly think my DIY solution is a little brighter - and the Tunze retails for well over $100.

Haven't had my DIY running for long enough to measure its effectiveness on Chaeto growth but its really bright. I would be pretty confident in a strip of LED's for an AIO fuge light. :

1641992299802.png


1641992313406.png

Here is it in place on the Pico tank :
image0.jpeg
image1.jpeg
 

Joe31415

Valuable Member
View Badges
Joined
Dec 25, 2020
Messages
1,089
Reaction score
799
Location
Milwaukee
Rating - 0%
0   0   0
I still have to find a way to keep the tube submerged in the water, ideally with the siliconed end above the water line to help with water resistance.
I'd experiment with filling the test tube with epoxy* rather than attempting to seal the end of it. Both because it'll probably be better at making it waterproof, but also because it'll make it heavier.
Also, I assume you've seen it, but Tunze makes a few magnet mountable, submersible fuge lights. Here's one of three I saw on BRS. I'm linking to this one only because it has a video on the page so you can see how it works. If for no other reason, so you can see the mounting system. You might be able to do something similar with yours by mounting it to a cheap magnetic glass cleaner.

*Like a two-part clear epoxy, not the JB-Weld type.
 

Koh23

Valuable Member
View Badges
Joined
May 23, 2021
Messages
1,306
Reaction score
1,049
Location
Croatia
Rating - 0%
0   0   0
Thank you!

These strip is 60w/5m, this is 12w per meter, similar to mine, only difference is that mine is rgbw strip, its not a problem to build "module" with 1 or even 2 meter of strip arranged in square, and connect red and blue channel, but still not sure that this will be enough to grow....

Maybe better option is to use dedicate blue and rwd strips, maybe they give better output than rgb strip? Or is it the same?
 

Starganderfish

Active Member
View Badges
Joined
Aug 8, 2019
Messages
179
Reaction score
133
Rating - 0%
0   0   0
Thank you!

These strip is 60w/5m, this is 12w per meter, similar to mine, only difference is that mine is rgbw strip, its not a problem to build "module" with 1 or even 2 meter of strip arranged in square, and connect red and blue channel, but still not sure that this will be enough to grow....

Maybe better option is to use dedicate blue and rwd strips, maybe they give better output than rgb strip? Or is it the same?
An RGB strip has individual LED’s which are each made up of a red a green and a blue diode. The colour is set by varying the strength of each one of the three. The “grow-light strips” replace this three part LED with either a dedicate red or a dedicated blue LED, usually tuned to a specific spectrum that’s best for photosynthesis. You can choose how you want these red and blues arranged (3 reds than a blue or 4 reds or 5 reds for every blue.) This helps to match the desired spectrum for photosynthesis which is primarily red with a little blue.
I think you will get more light out of a dedicated red or blue diode than you would out of an RGB diode set to either red, blue or a mix of both.
The grow bulbs are better tuned to emit the best spectrum for photosynthesis and don’t waste wattage or space on diodes you don’t need.

4F14FBA8-AE17-4ADC-AE08-E67A00A7A3A9.jpeg
 

Starganderfish

Active Member
View Badges
Joined
Aug 8, 2019
Messages
179
Reaction score
133
Rating - 0%
0   0   0
I've just finished building my Test Tube Fuge light. It's to go in a 4 gallon AIO. so small and compact is the key.
I used a 200mm glass test tube with a rubber stopper. I designed and 3d printed an internal piece to hold the led strip within the tube, used the waterproof LED grow-light strips and stuck the strip to the 3d printed part with its own adhesive. I wired up some long thin wire passed through the small hole in the rubber stopper. Both ends of the LED strip are sealed with silicone, as are the solder joints and the hole in the stopper, I filled the gap between the 3d printed part and the stopper with about 5m of silicone. The wires are heat shrink wrapped and the heat shrink goes through the stopper all the way down to the top of the 3d printed part and is also sealed in silicone.
It's spent the last two hours sitting (powered off) in water and there's no sign of leaks, it still powers up perfectly, even submerged. I'll be running it for a few more hours this afternoon, with the power connected and lights running, to ensure its leak-proof.
After that it will be dropped into the AIO fuge of my WB 4, to grow chaeto. The glass tube and 3d printed part ensure its heavy enough that it doesn't float, and the test tube is the perfect size for one of those heater suction-cup c-clip pieces to hold it to the side of the tank. It'll be hooked up to a Smart power switch and controlled with Alexa to switch on and off on a reverse cycle to my tank lighting.
This was such an easy build, even the 3d printed part was easy to design and printed in a day on my resin printer. Everything was easy to acquire and pretty cheap and there's enough silicone on all the potential leak points that I'm confident it will last for years. Honestly, the hardest part was soldering the wires to the LED strip, and even that only took a few minutes. Big thanks to @trevorhiller for coming up with this idea, so much easier than my initial plan of trying to simply embed the LED strip in clear silicone or epoxy.
IMG_3178.JPG
IMG_3180.JPG
IMG_3184.JPG
IMG_3186.JPG
IMG_3193.JPG
IMG_3194.JPG
IMG_3196.JPG
 
OP
OP
trevorhiller

trevorhiller

Reefing Nurse
View Badges
Joined
Oct 22, 2021
Messages
1,052
Reaction score
752
Location
Williamsport
Rating - 100%
1   0   0
I've just finished building my Test Tube Fuge light. It's to go in a 4 gallon AIO. so small and compact is the key.
I used a 200mm glass test tube with a rubber stopper. I designed and 3d printed an internal piece to hold the led strip within the tube, used the waterproof LED grow-light strips and stuck the strip to the 3d printed part with its own adhesive. I wired up some long thin wire passed through the small hole in the rubber stopper. Both ends of the LED strip are sealed with silicone, as are the solder joints and the hole in the stopper, I filled the gap between the 3d printed part and the stopper with about 5m of silicone. The wires are heat shrink wrapped and the heat shrink goes through the stopper all the way down to the top of the 3d printed part and is also sealed in silicone.
It's spent the last two hours sitting (powered off) in water and there's no sign of leaks, it still powers up perfectly, even submerged. I'll be running it for a few more hours this afternoon, with the power connected and lights running, to ensure its leak-proof.
After that it will be dropped into the AIO fuge of my WB 4, to grow chaeto. The glass tube and 3d printed part ensure its heavy enough that it doesn't float, and the test tube is the perfect size for one of those heater suction-cup c-clip pieces to hold it to the side of the tank. It'll be hooked up to a Smart power switch and controlled with Alexa to switch on and off on a reverse cycle to my tank lighting.
This was such an easy build, even the 3d printed part was easy to design and printed in a day on my resin printer. Everything was easy to acquire and pretty cheap and there's enough silicone on all the potential leak points that I'm confident it will last for years. Honestly, the hardest part was soldering the wires to the LED strip, and even that only took a few minutes. Big thanks to @trevorhiller for coming up with this idea, so much easier than my initial plan of trying to simply embed the LED strip in clear silicone or epoxy.
IMG_3178.JPG
IMG_3180.JPG
IMG_3184.JPG
IMG_3186.JPG
IMG_3193.JPG
IMG_3194.JPG
IMG_3196.JPG
Love it! Really nice job. I ended up abandoning this in favor of a skimmer that I found would fit in my tank *JUST* barely. But I'm glad it's working for you. Nice job overcoming the buoyancy of the test tube.
 

Neil Cohen

Active Member
View Badges
Joined
Apr 30, 2018
Messages
234
Reaction score
135
Location
Upper Westchester, NY
Rating - 0%
0   0   0
Just started exploring this, myself. Was going to use silicon ice trays to embed the strips in resin but I like this better. My thought was to fill the tube with epoxy resin. Heat should be carried off by the water. And if anything goes sideways, it’s all sealed. Only a buck or two each to make, so swapping vs repair makes sense. I see no reason why it shouldn’t grow algae or chaeto (mine is for a turf scrubber) considering the diy units are usually gonna through the side of the sump. This would have less to pass through.
 

Starganderfish

Active Member
View Badges
Joined
Aug 8, 2019
Messages
179
Reaction score
133
Rating - 0%
0   0   0
Love it! Really nice job. I ended up abandoning this in favor of a skimmer that I found would fit in my tank *JUST* barely. But I'm glad it's working for you. Nice job overcoming the buoyancy of the test tube.
Nice. Mines for a 4 Gal Pico. I do have a tiny Skimmer that will fit the tank, but I have no idea how to balance the saltwater loss from the Skimate, freshwater loss from evaporation as well as automated Water Changes. I use an Auto Water Change unit that does ATO as well as water changes, but with a skimmer pulling saltwater out, even a little, the ATO would almost certainly start diluting the salinity. In such a small tank, it just gets too complicated at that point to be constantly monitoring salinity and adjusting the salt in the water change or ATO water.
Buoyancy wasn't an issue strangely enough. Between the weight of the glass and the weight of the 3d printed piece its not floating. I think my design doesn't have much air inside the tube so it's less likely to float.
Just started exploring this, myself. Was going to use silicon ice trays to embed the strips in resin but I like this better. My thought was to fill the tube with epoxy resin. Heat should be carried off by the water. And if anything goes sideways, it’s all sealed. Only a buck or two each to make, so swapping vs repair makes sense. I see no reason why it shouldn’t grow algae or chaeto (mine is for a turf scrubber) considering the diy units are usually gonna through the side of the sump. This would have less to pass through.
Epoxy is a great idea and far less likely to leak. The only concerns I had with that was:
a) using an epoxy that doesn't yellow when exposed to UV or near UV light
b) heat dissipation - if the heat doesn't pass through the epoxy fast enough it could burn out the LED's
c) but the biggest concern was that I had a heck of a time finding glass test tubes in Australia!! I eventually sourced a pack of 10 but they're almost $4 a pop at that point (with stoppers and shipping). Combined with the wiring and the LED strip, the cost of epoxy... the price starts to edge towards the "too expensive to be disposable" territory for me. If mine dies I can always scrape out the silicone and re-use the test tube, stopper and the 3d printed part. It's just a new LED strip for me then - assuming it doesn't leak and fry the tank of course!!!

...hmmn, actually I may look into using epoxy for V2. The silicone is the weak point in my design. Let us know how the epoxy goes and how well the lights hold up.
 

Neil Cohen

Active Member
View Badges
Joined
Apr 30, 2018
Messages
234
Reaction score
135
Location
Upper Westchester, NY
Rating - 0%
0   0   0
My first version was just “waterproof” led strip lights. They weren’t as waterproof when I tried to make them “double sided”, putting them back to back. The fold wound up cracking the clear rubber cover, turning the tank cloudy from electrolysis (my assumption).

I am willing to take the cost with acrylic because it will be inert. With constant flow, I am thinking it would be like a heat sink. LEDs will burnout either way but I don’t think it will be from the heat.
 

Neil Cohen

Active Member
View Badges
Joined
Apr 30, 2018
Messages
234
Reaction score
135
Location
Upper Westchester, NY
Rating - 0%
0   0   0
Had a thought, what about pyrex glass tubes? Epoxy the bottom and top with the LED in the airspace. The water "should" cool it. Though most of the LED grow lights that I find are already waterproof. Not a reliable waterproofing, more like water resistant but the LED are encased in a clear rubber, so not much heat dissipation happening there. Hoping to find the same strips but non-waterproof.

Here's a link to the pyrex tubes. Not sure if it will work in Australia.


Nice. Mines for a 4 Gal Pico. I do have a tiny Skimmer that will fit the tank, but I have no idea how to balance the saltwater loss from the Skimate, freshwater loss from evaporation as well as automated Water Changes. I use an Auto Water Change unit that does ATO as well as water changes, but with a skimmer pulling saltwater out, even a little, the ATO would almost certainly start diluting the salinity. In such a small tank, it just gets too complicated at that point to be constantly monitoring salinity and adjusting the salt in the water change or ATO water.
Buoyancy wasn't an issue strangely enough. Between the weight of the glass and the weight of the 3d printed piece its not floating. I think my design doesn't have much air inside the tube so it's less likely to float.

Epoxy is a great idea and far less likely to leak. The only concerns I had with that was:
a) using an epoxy that doesn't yellow when exposed to UV or near UV light
b) heat dissipation - if the heat doesn't pass through the epoxy fast enough it could burn out the LED's
c) but the biggest concern was that I had a heck of a time finding glass test tubes in Australia!! I eventually sourced a pack of 10 but they're almost $4 a pop at that point (with stoppers and shipping). Combined with the wiring and the LED strip, the cost of epoxy... the price starts to edge towards the "too expensive to be disposable" territory for me. If mine dies I can always scrape out the silicone and re-use the test tube, stopper and the 3d printed part. It's just a new LED strip for me then - assuming it doesn't leak and fry the tank of course!!!

...hmmn, actually I may look into using epoxy for V2. The silicone is the weak point in my design. Let us know how the epoxy goes and how well the lights hold up.
 

Starganderfish

Active Member
View Badges
Joined
Aug 8, 2019
Messages
179
Reaction score
133
Rating - 0%
0   0   0
Had a thought, what about pyrex glass tubes? Epoxy the bottom and top with the LED in the airspace. The water "should" cool it. Though most of the LED grow lights that I find are already waterproof. Not a reliable waterproofing, more like water resistant but the LED are encased in a clear rubber, so not much heat dissipation happening there. Hoping to find the same strips but non-waterproof.

Here's a link to the pyrex tubes. Not sure if it will work in Australia.


That's a really good idea.
I'd probably do some silicone to seal the top and bottom and then an epoxy plug on the very ends. Epoxy is rigid and doesn't have any flex, while silicone is flexible and has a bit of give and silicone sticks really well to glass. Combining the two should give really good sealing. Wish I'd thought of that before killing myself getting test tubes - would have been a lot easier.
 

Neil Cohen

Active Member
View Badges
Joined
Apr 30, 2018
Messages
234
Reaction score
135
Location
Upper Westchester, NY
Rating - 0%
0   0   0
Think I am giving up on the submersible part. IP68 (submersible) is way too expensive and saltwater finds a way to win. Just wrapped the sump with the strip lights and we'll see what happens.
 

High pressure shells: Do you look for signs of stress in the invertebrates in your reef tank?

  • I regularly look for signs of invertebrate stress in my reef tank.

    Votes: 31 31.3%
  • I occasionally look for signs of invertebrate stress in my reef tank.

    Votes: 25 25.3%
  • I rarely look for signs of invertebrate stress in my reef tank.

    Votes: 18 18.2%
  • I never look for signs of invertebrate stress in my reef tank.

    Votes: 25 25.3%
  • Other.

    Votes: 0 0.0%
Back
Top