Awesome looks like you hit the jackpot!Had all yellows on for the first pics for more natural color - didn't realize there is a little pop of color

Navigation
Install the app
How to install the app on iOS
Follow along with the video below to see how to install our site as a web app on your home screen.
Note: This feature may not be available in some browsers.
More options
You are using an out of date browser. It may not display this or other websites correctly.
You should upgrade or use an alternative browser.
You should upgrade or use an alternative browser.
Erik's Red Sea Reefer 170 Build - a Return to Reefing
- Build Thread
- Thread starter SFREEF3R
- Start date
- Tagged users None


OP
OP
Definitely better than I expected!Awesome looks like you hit the jackpot!
The larger bit of some species of brain (presumably?) coral looks to be doing ok - even has its feeders out! Could use some help on identification for these coral bits if anyone has thoughts.
That top one looks like some kind of favites and the one with 3 lobe maybe lobophyllia? I’m a novice too.Definitely better than I expected!
The larger bit of some species of brain (presumably?) coral looks to be doing ok - even has its feeders out! Could use some help on identification for these coral bits if anyone has thoughts.


OP
OP
It's been a busy year, but finally getting around to making some updates. When I last posted, I hadn't even added my live rock to the tank yet.
Tank has been up for a little over 7 months and is doing great. Have some intermittent patches of Dinos/Cyano, but nothing that seems to bother any of the corals. Parameters are generally stable and starting to get some growth out of my corals. Only challenge has been keeping my nutrients exactly where I want them. I have a lot of rock and the nutrients can bottom out quickly if I reduce feeding.
Have had a few coral losses - for the most part things that RTN'd immediately after introduction. These have been primarily smooth skin acros and freshly cut specimens (no encrusting on the plug). I suspect shipping or my relatively strong prophylactic Bayer dip may be responsible (I do know smooth skin acros can be sensitive to dips). Anything that has lasted more than a week has been successful long term - with the exception of my frag of red planet that was eaten by my urchin.
OP
OP
I made some changes from the initial equipment plan. I nixed the ADJ power bar in favor of a second GHL power strip (why have a controller if it isn't able to control things?) and opted to mount the MP10 and Osmolator controllers directly to the stand inside instead of a peg board interposer.
Space was a premium inside the stand so I mounted the large AC-DC converters for the Radion and MP10s on the back of the tank with adhesive backed velcro. The controller for the return pump (which I never touch) ended up inside the electronics enclosure and the controller for the Finnex heater is behind the DT.
I had looked at making the access panel for the electronics compartment removable with screws and magnets, but ended up using a slot routed around 3 sides of the enclosure to constrain it. I was initially worried that the gap would be too large in the front and not seal well enough, but the fan pumping in air from the outside creates enough pressure that you can feel light flow at both the gap in the front over the door and at the cord exit in the rear. I wanted to make sure that positive pressure is always maintained to prevent any moisture accumulation in the area with high voltage components.
Here is the plan I settled on:
OP
OP
First step was to make the electronics enclosure. It was a good excuse to use my hand router and a lot of learning along the way. Wasn't quite as clean as I would have liked, but fortunately most of the detail is hidden by the stand and it was precise where it really needed to be.
The notches on the sides are to provide space for the fan (on the left) and cords to exit (on the right)
Some pictures along the way:


The notches on the sides are to provide space for the fan (on the left) and cords to exit (on the right)
Some pictures along the way:
Last edited:

OP
OP
I used a piece of PVC foam sheet mounted to a reducing coupling to mount the fan:
.jpeg")
And used this Icotek KEL-BES 10 cable pass through for the cord exit:

Here is the finished/painted result with the PVC tubing for mounting the air intake tube and cable pass through attached:

And used this Icotek KEL-BES 10 cable pass through for the cord exit:
Here is the finished/painted result with the PVC tubing for mounting the air intake tube and cable pass through attached:
Last edited:
OP
OP
It was a very tight fit into the stand. The chamfer on the top/front corner of the box is there to enable fitting/rotating the box into place. And I couldn't avoid overlapping with the hinge slightly so I needed to route a small recess in the left panel for the enclosure. The push-push for the door had to be removed (I had planned to relocate lower but hasn't really been needed)
I mounted these lights under the access panel for extra light. There is a motion activation feature but it isn't great for working in the Sump. I have switch that I plan to add in the near future.
I had a piece of glass cut at a local glass shop for a shelf, mounted on these brackets.
A Bashsea 5 gal ATO reservoir lives between the tank and the wall.
I was pleased with the finished result:

Inside the electronics compartment:

I mounted these lights under the access panel for extra light. There is a motion activation feature but it isn't great for working in the Sump. I have switch that I plan to add in the near future.
I had a piece of glass cut at a local glass shop for a shelf, mounted on these brackets.
A Bashsea 5 gal ATO reservoir lives between the tank and the wall.
I was pleased with the finished result:
Inside the electronics compartment:
Last edited:
OP
OP
I was tracking some discussion on my backup power supply on this thread.
I ended up using the configuration below.
I found this Progeny 300W DC power station (299 Whr) with a 12v and 24V output (profilux needs 12V and MP10 need 24V).
I replaced the AC-DC converters with these male-male 5.5x2.1mm cables.
The Progeny 24V plug was 5.5x2.5mm so I needed this adapater.
I'm pretty happy with the performance so far. I can get >45hrs backup with this solution and I haven't implemented reduced flow when power loss is detected.
The power station lives out of the way under the credenza to the left of my stand.
Last edited:

OP
OP
To make my rockscape - I planned to build a structure out of the 40 lbs of MarcoRocks and integrate in the pieces of Gulf Live Rock (20lbs) using the BRS NSA method. Structure was built using Maxicure Extra Thick Cyanoacrylate (I went through 8oz making the structure) + Glue accelerator to initially set the structure. A mixture of E-Marco-400 mortar (primarily) and NYOS reef cement was used to reinforce the structure after initial glueing.
As you may notice from the picture of my completed rockscape, I probably made the structure a little too large and I certainly underestimated the size of my pieces of Gulf Live Rock, so there is a LOT of rock in the tank. I had planned to integrate the live rock into the structure while building it initially, but there was so much sponge and other life I didn't want the rock to spend extended time out of the water - so it was a bit of guesswork how to fit it in. I will likely need to remove some rock once the corals grow.
I started with a cardboard frame of my DT:

The pieces of MarcoRocks were too large to use initially so used a hammer and chisel to break them up:


After super glue:

After reinforcement with mortar:

It took me darn near an entire day to build this - was pretty happy with the result until I actually got it in the tank with the rock and realized I had overdone it... oops
As you may notice from the picture of my completed rockscape, I probably made the structure a little too large and I certainly underestimated the size of my pieces of Gulf Live Rock, so there is a LOT of rock in the tank. I had planned to integrate the live rock into the structure while building it initially, but there was so much sponge and other life I didn't want the rock to spend extended time out of the water - so it was a bit of guesswork how to fit it in. I will likely need to remove some rock once the corals grow.
I started with a cardboard frame of my DT:
The pieces of MarcoRocks were too large to use initially so used a hammer and chisel to break them up:
After super glue:
After reinforcement with mortar:
It took me darn near an entire day to build this - was pretty happy with the result until I actually got it in the tank with the rock and realized I had overdone it... oops
Last edited:
OP
OP
And here it is in the tank - 5/10/21, 2 days after adding the rock.
As I mentioned before, structure is clearly too large and will need to be reduced when the corals on top fill in. I also had intended for space between the two "islands" but by the time I fit in all the Gulf live Rock a lot of the negative space was occupied.

As I mentioned before, structure is clearly too large and will need to be reduced when the corals on top fill in. I also had intended for space between the two "islands" but by the time I fit in all the Gulf live Rock a lot of the negative space was occupied.
Last edited:
OP
OP
The first CUC was added at the end of May from Saltyunderground:
-6x Berghia nudis
-2x Nassarius snails
-2x Astrea snails
-2x Cerith snails
-2x Nerite snails
I've added Berghia now 3x separate times to try to rid myself of the Aiptasia that came in on the live rock. So far this has been totally unsuccessful. They all disappear within a few days and no Aiptasia are ever touched. I'm pretty sure there is something in my tank (perhaps another hitchhiker) that is consuming them, but at this point I still have no idea. I've been using Aiptasia-X, but at it doesn't actually seem to kill the Aiptasia. They just shrink and grow back.
The the next batch of inhabitants were added in June with an order from Live Aquaria:
-ORA Captive-Bred Yellow Watchman Goby & Ocellaris Clown
-ORA Marshall Island Green Hydnophora & Biota Cultured Green Alveopora
-Porcelain Anemone Crab
I was initially super disappointed in the coloration of the "Yellow" watchman goby, as it was very much gray in coloration. I knew this was a risk and was hopeful it would color up with time. It remained gray until September when it fairly abruptly changed coloration:
In August (1st picture) and September (2nd/3rd picture)


I knew I wanted to add a YWG from the start and designed the rock structure with a large ledge over the sand in the front of the tank on the left. Before I added it I cleared out a large cave. I used some small Tupperware to bring it close by when I added it to the tank and it took to it instantly. I used a similar approach when adding the pistol shrimp later.
My clown likes to hang out on the right side of the tank in about 6 cubic inches of space. I love it but wish it swim around a bit more hahaha.
.jpeg")

-6x Berghia nudis
-2x Nassarius snails
-2x Astrea snails
-2x Cerith snails
-2x Nerite snails
I've added Berghia now 3x separate times to try to rid myself of the Aiptasia that came in on the live rock. So far this has been totally unsuccessful. They all disappear within a few days and no Aiptasia are ever touched. I'm pretty sure there is something in my tank (perhaps another hitchhiker) that is consuming them, but at this point I still have no idea. I've been using Aiptasia-X, but at it doesn't actually seem to kill the Aiptasia. They just shrink and grow back.
The the next batch of inhabitants were added in June with an order from Live Aquaria:
-ORA Captive-Bred Yellow Watchman Goby & Ocellaris Clown
-ORA Marshall Island Green Hydnophora & Biota Cultured Green Alveopora
-Porcelain Anemone Crab
I was initially super disappointed in the coloration of the "Yellow" watchman goby, as it was very much gray in coloration. I knew this was a risk and was hopeful it would color up with time. It remained gray until September when it fairly abruptly changed coloration:
In August (1st picture) and September (2nd/3rd picture)
I knew I wanted to add a YWG from the start and designed the rock structure with a large ledge over the sand in the front of the tank on the left. Before I added it I cleared out a large cave. I used some small Tupperware to bring it close by when I added it to the tank and it took to it instantly. I used a similar approach when adding the pistol shrimp later.
My clown likes to hang out on the right side of the tank in about 6 cubic inches of space. I love it but wish it swim around a bit more hahaha.
Last edited:

OP
OP
After a few months of making water 5 gallons at a time for top off and water changes with my portable water changing station, I decided I need a better solution. Given that I need around 10gallons a week between ATO and WC, my portable station was essentially permanently on the floor of my bathroom in the way and, while portable, when filled with water its not exactly light so moving around was a bit of a pain.
Form my more permanent WC station, I used 2x Den Hartog 20 gallon containers (one for salt and one for fresh). The RO DI is plumbed into a float switch valve in the top of the fresh water container.
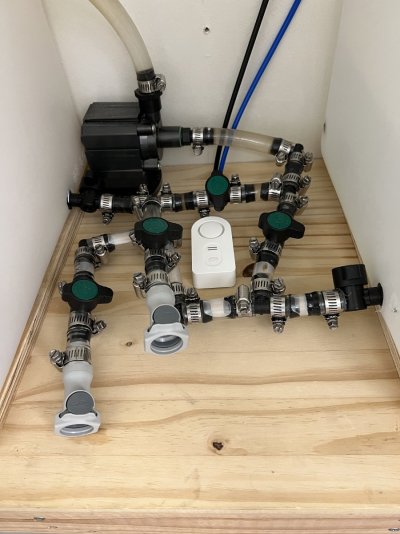
Because the space is quite limited it was a bit of a challenge to find a plumbing solution that could fit. Given that the max pressure is quite low, I opted to use irrigation valves from Drip Depot - 1/2” MPT X 1/2” barbs out of the tank and 1/2” barb valves/tees/elbows for the rest of the connections.
These “1/2 inch” barb connections actually require 5/8” ID tube. I used their “1/2 inch” clamps to secure the tubing. I used 5/8” HFC 12 quick disconnect couplings from US plastics for detachable hoses to fill my water change buckets.
Tanks are plumbed to a Danner Supreme 350GPH pump that can be used either recirculate the salt water tank or transfer water from the fresh to the saltwater tank.
I installed a heavy duty shelf above the toilet in our guest bathroom to store the containers. The water line is tee’d off of the pipe that fills the toilet. Needless to say my wife was not super thrilled about this addition. Longer term I plan to hide the red input line in the wall and to add cabinet doors to hide the tanks from view.


With detachable hoses connected:

Form my more permanent WC station, I used 2x Den Hartog 20 gallon containers (one for salt and one for fresh). The RO DI is plumbed into a float switch valve in the top of the fresh water container.
Because the space is quite limited it was a bit of a challenge to find a plumbing solution that could fit. Given that the max pressure is quite low, I opted to use irrigation valves from Drip Depot - 1/2” MPT X 1/2” barbs out of the tank and 1/2” barb valves/tees/elbows for the rest of the connections.
These “1/2 inch” barb connections actually require 5/8” ID tube. I used their “1/2 inch” clamps to secure the tubing. I used 5/8” HFC 12 quick disconnect couplings from US plastics for detachable hoses to fill my water change buckets.
Tanks are plumbed to a Danner Supreme 350GPH pump that can be used either recirculate the salt water tank or transfer water from the fresh to the saltwater tank.
I installed a heavy duty shelf above the toilet in our guest bathroom to store the containers. The water line is tee’d off of the pipe that fills the toilet. Needless to say my wife was not super thrilled about this addition. Longer term I plan to hide the red input line in the wall and to add cabinet doors to hide the tanks from view.
With detachable hoses connected:
Attachments
OP
OP
Directly behind the wall the RODI is mounted to is my laundry closet. I used a Wall Eye cable pass through to make a passage to feed the power cable for my power strip and RO DI waste water (thanks for the idea @FortLivingRoom).
I use these Wi-Fi switches to control the heater in the salt reservoir and circulation pump.
My only regret about this set up is how close I put the tank to the ceiling, but I wanted to make sure it was high enough to be out of the way when using the toilet. I need to stand on a step ladder to add salt and with the limited room above the opening it’s a little bit of a pain to add the salt to the reservoir. When I redo this bathroom I may raise the ceiling in the cabinet area to make a little more room above.
Last edited:
Very impressive set up and equipment & live stock
I have similar tank, but been running for a few years, also from the bay area
I have similar tank, but been running for a few years, also from the bay area

OP
OP
Thanks! Still a work in progress. Do you have a thread on your tank?Very impressive set up and equipment & live stock
I have similar tank, but been running for a few years, also from the bay area
I don't have build thread, but I have a pictures a few picturesThanks! Still a work in progress. Do you have a thread on your
I don't run skimmer
![IMG_2778[1].JPG](https://www.reef2reef.com/data/attachments/2414/2414050-8688584bb329dd22ab605180e051a824.jpg "IMG_2778[1].JPG")
![IMG_2786[1].JPG](https://www.reef2reef.com/data/attachments/2414/2414051-b8ba47153bd9fa7d361323ff4669ce13.jpg "IMG_2786[1].JPG")
Last edited:
OP
OP
I don't have build thread, but I have a pictures a few pictures
I don't run skimmer
Looking good! I actually only run my skimmer a few hours a day at night and have debated just turning it off altogether. I have a ton of filter feeders in the tank and hypothesize that skimming will reduce the amount of microflora/fauna in the water column. I don’t run a filter sock for the same reason. I dose 60ml of phyto from algae barn a day as well.
Last edited:
OP
OP
Some new inhabitants from LA in QT/observation:
-pair of banggai cardinals
-emerald crab
-tunicate
-pink feather dusters
I’m typically very weary about adding filter feeders for fear they starve, but so far all of the filter feeders in my tank seem to be thriving so I have some confidence
I have tons of feather dusters that seem to be reproducing, multiple sponge and tunicate species going strong and growing a year after receiving the rock, and at least a dozen bivalves.
Unfortunately a day after drip acclimation, the feather dusters haven’t opened yet. Will keep observing but not sure they made it through shipping. I had a pistol shrimp in the order that was also DOA.
Last edited:
OP
OP
Some of the happy filter feeders presently in my tank:
Large turkey clam:

White Feather Dusters:

Tunicates:

Large turkey clam:
White Feather Dusters:
Tunicates:
Last edited:
Similar threads
- Replies
- 40
- Views
- 1,865
- Replies
- 6
- Views
- 301


