Fred’s 70g build: less than ideal conditions

fredward

Community Member
View Badges
Joined
Jan 17, 2023
Messages
94
Reaction score
123
Location
San Diego
Rating - 100%
1   0   0
Hey everyone. Wanted to start my build thread. Don’t have a whole lot yet. I am a nurse in the cath lab in San Diego. The last 5 years ish I was travel nurse working in icu’s across the country. really enjoying being in one place again. So it’s finally time to start a tank!

I wasn’t planning on starting a tank for a while still but found this used 70gal 3’x2’x19” reef ready for only $70 and can’t wait to get it started! Of course the savings on the tank itself had very little impact on how much I’ve spent since then! Haha. good lord this hobby has gotten expensive. Or I just didn’t know any better 15yrs ago when I was a broke college kid with a reef tank.
C90B6A18-D38F-4630-BCB8-AEF67103C6AE.jpeg

it was a bit wider front to back than I wanted at 24” but it will actually be a better tank overall for aquascaping and flow.

Here is a picture from the previous owner
64F0481F-E93E-421D-90E8-06E213EC200D.jpeg

It is already drilled with a center overflow, I actually prefer this design so I can get it close to the wall. Especially helpful since it’s so wide and our house is small. Really wish there was room to drill a 4th hole to do a beananimal design but I just don’t see a way to do it. I could use all three holes as the drains but don’t know how I would do a return since it’ll be so close to the wall.
1E172515-4541-463B-B56C-F6C75A956615.jpeg


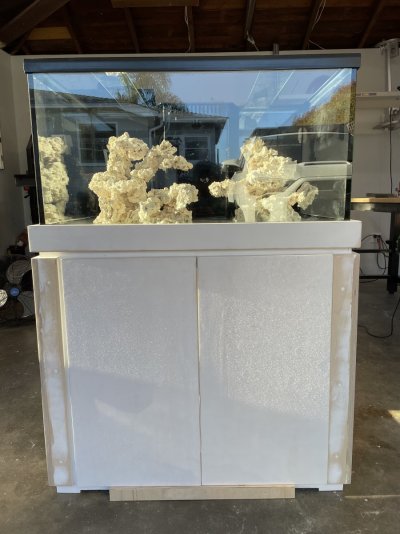
so here it is mocked up where it will sit. I was going to put it taller but the wife didn’t like it that high up so this is about 32” to the bottom of the tank. I think it’ll look nice.
BBC5A54C-ED61-4DE4-9570-8890ED0FDE8E.jpeg


This brings me to my first obstacle, or should I say obstacles. If you notice there is an exterior door just to the right. Like I said I live in San Diego about 5 min from the ocean. Which creates multiple issues. First is we have these two French doors right by the tank and we have the all the doors and windows open about 80% of the time year round. Meaning our house gets lots of natural light and airflow. Temps get all the way into the 40s inside in the winter and into the 80s inside in the summer. We have no AC and that old butt heater next to the tank…yeah we don’t use that either. Hood heater plans and a chiller are in my future. I think a good controller will be a necessity for a successful tank here. I already have a Neptune and two 200watt heaters to start. I’m thinking for next winter I will make lids for the sump and maybe the tank and maybe surround the sump with foam blocks. At least there will be zero co2 . The natural light situation…. I’m just crossing my fingers at this stage.
 
Last edited:

Peace River

Thrive Master
View Badges
Joined
Apr 29, 2014
Messages
21,517
Reaction score
164,618
Location
USA
Rating - 100%
1   0   0
Congratulations on the new adventure!!!
 
OP
OP
fredward

fredward

Community Member
View Badges
Joined
Jan 17, 2023
Messages
94
Reaction score
123
Location
San Diego
Rating - 100%
1   0   0
Aquascape time! Whether if it’s “trendy” or not I love the look of nsa aquascapes. So here’s my first attempt at doing an aquascape with Marco rock. Super fun to do.
First I used some conduit and duct tape to make a mock tank. I started with three base rocks and just started gluing rocks together.
I used extra thick gel Cyanoacrylate (ca) glue with some accelerator to get the initial bond. Then I used a combination of small grain rubble, powder, water thin CA glue, and accelerator to build up the joint. This worked super well. The super thin glue creates an exothermic reaction with the Marco rock powder. It even smokes. So that’s basically welded rock. I bought some mortar but I’m not even going to use it.
F75464E8-6658-4D23-B326-92A15C0E6490.jpeg
B257D747-DFFC-4747-86AE-48B523282D36.jpeg
8056880E-F460-4D28-98CD-EAE53C6154F9.jpeg
A7B85690-9B90-493B-910D-03DA5B80EFA8.jpeg


I also just picked up three sheets of Russian Baltic birch 3/4” plywood for my stand.
557216AA-AE97-4076-9396-C8A4A998F126.jpeg


here are my plans. I decided it would be best to leave the plastic rims on the tank. I really think it would have been completely fine without them but i didn’t want to take the chance. So I am building a little recess into the top of the stand to hide the bottom rim and I’ll cover the top trim with a wood frame to match.
F16CF7A6-D91D-4015-BD70-74286976FF48.jpeg
heres the inner structure. Everything above will just attach to this frame. My drawing don’t show all the vertical supports but they’ll be there. Was just too difficult to draw them and still see the details I wanted. And I’m going to put the bottom frame/shelf all the way at the bottom. After I started mocking up the sump I realized I needed every inch of height inside the cabinet
0DB70E11-89FE-4B85-B02C-41C7446E2FB1.jpeg
 
OP
OP
fredward

fredward

Community Member
View Badges
Joined
Jan 17, 2023
Messages
94
Reaction score
123
Location
San Diego
Rating - 100%
1   0   0
I wanted to reiterate for anyone that sees this in the future that the dimensional drawings are not 100% finished or accurate. I made changes on the fly and did not draw everything.

Turned my garage into a wood shop this weekend. Ended up with all these pieces time to assemble
B1823067-15D8-44E4-9EC7-39C606900D51.jpeg

3F31AD88-F2F5-4951-B6C9-FB3E21DDB21F.jpeg


also played with the scape some more. Added a bunch. Some more coral mounting spots and tiny caves/swim throughs.

64026EDF-BF48-457E-9327-545D91B4E993.jpeg


6D7EEF09-C3A1-4257-A5E9-5D2724189ECA.jpeg

9400888A-B737-4BF8-99EA-D3742CFC5716.jpeg
 

Attachments

  • B073140E-211B-4503-A94F-4CBDEC9B9E27.jpeg
    B073140E-211B-4503-A94F-4CBDEC9B9E27.jpeg
    281.5 KB · Views: 18
OP
OP
fredward

fredward

Community Member
View Badges
Joined
Jan 17, 2023
Messages
94
Reaction score
123
Location
San Diego
Rating - 100%
1   0   0
Pic dump. Stand in coming along. Got tank fitted into the upper trim. Sets in there perfectly to cover up the black plastic brace. Waiting on hinges to finish the doors, couldn’t find the ones i needed locally at all. Then it’s another base coat and a few top coats.

Still need to figure out the electronics partition. my sump is quite wide so there’s not really any room on the sides. We’ll figure it out. Then need to figure out ato reservoir, then plumb it. Figure out and install sump baffles, wire the 20a breaker to the single outlet it’ll be on, then just install everything and fill it up. Oh and mount lights. gotta make some custom fixture for that. But I can do that while it’s cycling
B9A19DE7-62D2-45C2-8A06-6BC834DE7679.jpeg
E371DC31-3FE1-412C-B314-F1E26A21140F.jpeg
65B4F28A-8730-4A46-85D2-95A7A6C6CFAC.jpeg
33CC2917-225B-4215-A307-CF944FC2B262.jpeg
3B7D5766-C8A7-40CF-AB7E-C608E1B2109C.jpeg
 

Attachments

  • 8D18161F-0425-43DA-8F71-522C8FA672A1.jpeg
    8D18161F-0425-43DA-8F71-522C8FA672A1.jpeg
    175.3 KB · Views: 11
OP
OP
fredward

fredward

Community Member
View Badges
Joined
Jan 17, 2023
Messages
94
Reaction score
123
Location
San Diego
Rating - 100%
1   0   0
Update. Got the stand almost complete. Has taken sooo long. Sanding, painting, sanding, painting etc. finally switched to the spray can version of the rustoleum appliance epoxy, I would for sure start with the roll on version but after a good base coat sand smooth and do a few coats with the spray, much nicer finish so your not sanding off 90% of it to get a smooth finish. And 100% use a base coat, this stuff is meant for metal and soaks in to bare wood pretty good. once i started wet sanding with 1000 then 3000 i was finally getting it to look like what i was envisioning. i wish it was more perfect but for my first woodworking project i guess i cant complain. looks great in pictures! lol. now i just need to finish the last two doors, plumb it, get the sump baffles cut and glued in, and the lights mounted. then its just clean the tank, rinse the rock and sand, and were off to the races!! cant wait.
57AC7829-2761-4D30-891B-550BA4C02D69.jpeg
68162145-7CD1-4E07-AC0B-39BA039A275A.jpeg
3891FF72-4C60-400E-BF35-7F8F2EC47F0A.jpeg

found out the clownfish breeder i was wanting to use is actually local! so ill be getting my first fish from Krista at clownfishcorral.com. I want some really cool black ice snowflakes but the wife wants something more black and white so we might go with black phantoms.
D46A3D58-A199-4E7B-AD8B-596204E8FC60.jpeg
DF116A24-FFA0-454D-8C23-FEA784FC4FE2.jpeg
79077BBE-52F3-4935-B78B-7A736E499284.jpeg

oh also wired up the outlet I’m using to its own 20amp and added a gang and a hardwired Ethernet for the apex so I don’t have to rely on wireless connection.
0FED0D36-3339-448F-ACC8-8497D89BC28C.jpeg
 
OP
OP
fredward

fredward

Community Member
View Badges
Joined
Jan 17, 2023
Messages
94
Reaction score
123
Location
San Diego
Rating - 100%
1   0   0
finally got the tank running! Finished the stand and I gotta say it came out really nice. Definitely made a few mistakes that I would do differently. And still unsure if I should have added some ventilation underneath. Wiring is a big PITA in this cabinet.
IMG_2523.jpeg
Wanted to make a partition for the electrics but there was just not enough room. And now that it’s full and running, getting behind the sump to modify or add wiring is next to impossible.
IMG_2517.jpeg
Had all the wires nicely Velcro tied, had to move a few things and now it’s a mess. Also not the safest in terms of drip loops…. I used some mesh nets meant for car seat backs to make a place to hold all the power bricks up
IMG_2522.jpeg

Anyway hopefully it’s all good long term. Kinda worried about condensation building up on the electronics.

Got my water/fish room started. This needs work, going to stack the brute cans so gotta build a stand for that and need some sort of work bench and shelving. I want to set up a qt station here as well.
IMG_2559.jpeg


going to hang the lights as soon as I get some 8020 bits I ordered. Just wanted to turn them on to see what it’s looking like
IMG_2606.jpeg


but for now we are all blacked out. Just because the room as so much natural light I wanted to give the hood guys a leg up in the microbial war I just started.
IMG_2619.jpeg


and last update. Built my screen top. Really glad I went with the expensive Red Sea kit, really nice to work with and was able to get a super snug fit.
IMG_2641.jpeg

Okay. That’s all for now. Thanks for looking
 

Algae invading algae: Have you had unwanted algae in your good macroalgae?

  • I regularly have unwanted algae in my macroalgae.

    Votes: 35 34.3%
  • I occasionally have unwanted algae in my macroalgae.

    Votes: 21 20.6%
  • I rarely have unwanted algae in my macroalgae.

    Votes: 9 8.8%
  • I never have unwanted algae in my macroalgae.

    Votes: 6 5.9%
  • I don’t have macroalgae.

    Votes: 28 27.5%
  • Other.

    Votes: 3 2.9%
Back
Top