Eldritch Blast’s Cade 1200 S2

Eldritch_blast

Active Member
View Badges
Joined
Jul 26, 2020
Messages
171
Reaction score
145
Location
Maple Valley
Rating - 0%
0   0   0
Heyooo all, I’m pretty new here, so a little background with experience (also please excuse any formatting I am have a bit of work to do in that department!). I was first introduced to saltwater when I was like 18 through l coworkers, working in the fish department at Petsmart. Over the years I have set up a few different setups but they’ve always been budget builds, and always second or third hand gear, and always like a nano with McGrubered solutions. After the crash to a 30 gallon nano I put a lot of effort into and had running about 3 years, I packed it up and wanted to wait until I was a bit more settled down and rooted up a bit to really commit to the hobby the way I’ve wanted to. Moved into that place about 18 months ago, grabbed a little countertop 9 gallon to house a Yasha goby and pistol friend. That’s been up for about 14 months and doing just fine.

04D51F3E-F1FF-46EF-B79A-DB0B4CBBF346.jpeg


That tank was just to light a fire under my butt, and it’s worked. Saturday I put in my order for a Cade 1200 S2, and will be setting up hopefully as advanced as I can take it. Knee jerk would say “ mixed reef” but we’re gonna just see how everything plays out, I’m not committing myself to goals I know will change. The tank is supposed to ship pretty quick so it will be in my hands before end of June, allowing a week or so for shipping delays since supply chain is a nightmare right now. Im not in a huge rush to have in hands though, because I am starting from scratch here so there’s a lot to buy and prep for. I’ve got a bit of a to do list getting ready for it, and would love any suggestions, as I plan to navigate through this process pretty humble, as one of my problems with past experiences was thinking I knew some of the simpler details that could have led to some unnecessary problems.
So far the list of current plans before I can set up are:
-Build out Mixing Station in garage, this will include adding couple tanks, ro/di filtration, utility sink, and all plumbing/pumps ect. Pics of space included because pictures are always more fun. Yesterday I tore apart a shelf in the garage where I plan to build this out.

ADFA1E58-DAD0-4390-B9F0-1C2284C37A14.jpeg
119BFBAF-BC5C-43C0-98F2-9CFDA4D8D1DA.jpeg
- Select/Procure equipment. I haven’t decided on even as much as a heater yet but am rabbit holing constantly and pretty much working through brstv’s entire video library. Lol holy cow there so much info out there. Lighting wise, I am leaning towards just starting with the Aquatic Life T5 hybrid, with maybe scoring a couple deals on some led’s from the marketplace here to lessen the cost of this whole thing all at once a schooch, but I’m certainly open to suggestions, and would love some feedback. Still looking for all pumps, skimmer, modifications to stock sump

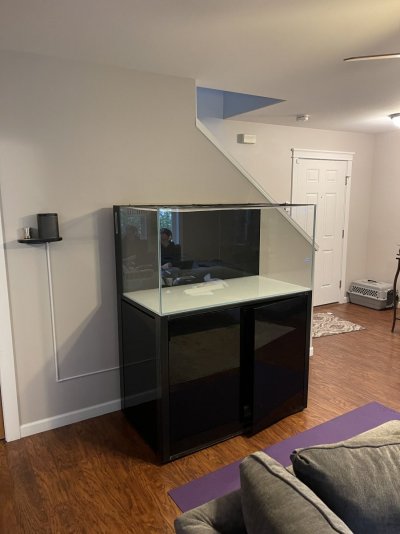
- Select tank location! It’s down to two locations, one the fiancé approves of and one she’s not so much very excited about. The spot I sold her on i initially for tank placement was in the little nook next to the fireplace. This space is 5’ so it wouldn’t leave a lot of room on the sides, but the space is deep enough to pull off the wall enough for access and still maybe look okay. Would be a tight squeeze. Second spot is outside the coat closet next to the stairs. This would give full access and viewing and glee to each side of the tank, so getting to look through some of that glass I paid for being low iron would get utilized, plus the Cades have a hinged side panel so you can open as a door to get to a second either side for electrical needs and accessing a second side of the sump for cleaning. This location would also allow me to easily run utilities through the wall into the coat closet be it controllers or plumbing for water changes. The other spot would all have to be done in the furthest corner of the crawler(boo), along with the 6” space on either side, or complete loss of side panel access with only a foot on the other, I prefer the one she’s iffy about
1606B585-89AD-48F3-8F29-9D450A76E1F5.jpeg

E4005C7D-8FCC-4DDA-B41E-0D1CCF13EA43.jpeg
-run dedicated circuit/s for power. Either 1 or 2 20 amp circuits to be added to one tank location. there is space on my panel for the circuits but I need to add up the maths and make sure it’ll handle. Will confer with a sparky to verify.
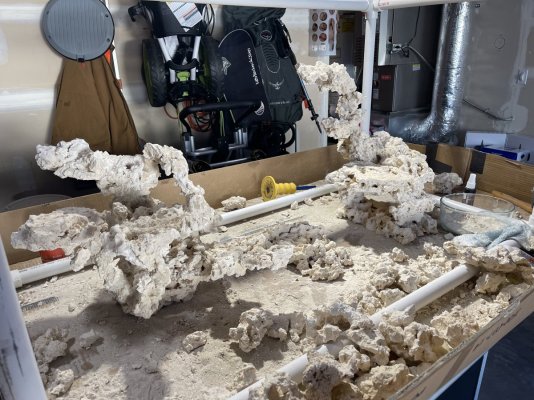
-plan an Aquasacpe! Super stoked for this and would love to hear and see your builds you are proud of for some inspiration. Like I said ultimate goal is mixed reef but not going to hold myself to hard I have much learning to do still but I plan on getting lighting and up and running to run LPS/SPS with some zoos and a couple other softies probly.

That’s all I’ve got time to throw out right now but I should be busy with this so I’ll keep coming back as I progress. Cheers and look forward to getting this going and getting involved around here, You guys all seem like a great group with tons of knowledge!
 
Last edited:

lapin

10K Club member
View Badges
Joined
Dec 16, 2017
Messages
10,755
Reaction score
17,905
Location
Austin
Rating - 0%
0   0   0
Nice
 
OP
OP
Eldritch_blast

Eldritch_blast

Active Member
View Badges
Joined
Jul 26, 2020
Messages
171
Reaction score
145
Location
Maple Valley
Rating - 0%
0   0   0
Received the tank 2 days ago. I ordered it through my LFS, and was fulfilled by Algae Barn. I was not expecting the two crates to show up stacked, and the heavy one was on top. So if anyone is ordering a Cade, this is how they ship them now so have a plan to get the tank off the crate for a 48 hour inspection. Luckily I was able to get a material hoist brought over through a work connection, as I honestly didn’t want to ask any friends or neighbors to help me lift something I would probably die if there was an accident. I don’t have any experience manhandling expensive glass boxes so I was sweating it but all worked out!


so I successfully got the tank off and cracked it open for an inspection I did find some small impact chips or I’m not sure how you’d describe it, looks almost like a screwdriver or other tool slipped and double tapped it. Looks like it’s going to be right at or above the water line, so I reported it to Algae Barn for their take on it, I’m more concerned about wether or not it’s compromising. Obviously I want it pristine but I will wait to see what Algae Barn says about it and what they suggest/offer. Email sent out late yesterday and today was Friday so I’m sure I will hear something back Monday.
What would you guys do receiving this? It’s a pretty big hassle dealing with even receiving a package like this having to leave early for work, and go through the whole ordeal. See pics and let me know what you think about them, if just cosmetic, or concerning.


43A4994B-0C0E-4F24-A06D-6F7D0A3E55D9.jpeg


I have also finished the frame up for my mixing station, and as soon as I get time will be piping up the waste/water for the utility sink I am adding. Then I will finish up the base for tanks and will be getting those on order through Plastic-mart. If anyone has any suggestions on where to snag some tanks in Western Washington I could pick some up without a 5 hour round trip from King County let me know, as two 65 Gallon Norwesco tanks look to be about 650 after 200 for freight.

4D219EB5-1E1E-41CF-968B-7E6BC0C1E404.jpeg A20D7385-6C56-463B-8277-447B9A9C8BD7.jpeg

Still have lots of work to do, I am aiming to have running by end of August

DBAB6AA7-7C37-4849-A04D-395C511CB911.jpeg 207600D9-4238-4F9C-B83C-A6D9409D19F0.jpeg 2AC3889B-CC27-4B62-B6A7-E2868A414C2A.jpeg 78A533C2-C34F-402E-82FA-6B58FF844FCC.jpeg C6DF89DE-4791-4D2C-943C-4E1AD73E541C.jpeg
 
Last edited:
OP
OP
Eldritch_blast

Eldritch_blast

Active Member
View Badges
Joined
Jul 26, 2020
Messages
171
Reaction score
145
Location
Maple Valley
Rating - 0%
0   0   0
Well operating with the intent of having things up and running by the end of August I am moving slowly getting things done.

Algae Barn confirmed the small marks Cosmetic, and I really dont think it will be much of an issue, with its location.

Got the utility sink plumbed in today so I can finish up the base for the tanks and get those coming in. I had no luck finding anything local to avoid a hefty freight fee on the tanks so I will be ordering a couple from plastic-mart. Also time to start picking out some gear and maybe even start putting my aquascape together.

IMG_0933.JPEG

Mixing station sink.jpg
 
OP
OP
Eldritch_blast

Eldritch_blast

Active Member
View Badges
Joined
Jul 26, 2020
Messages
171
Reaction score
145
Location
Maple Valley
Rating - 0%
0   0   0
Well I have been pretty busy with work, not getting to spend much time getting through the rock work. I figured this was going to take me about 40 hours. Following suggestions from BRS and Tidal Gardens on the NSA scape. While it’s slow and tedious, it’s pretty fun! I have only stacked rocks in the past for my scapes so I am looking forward to enjoying the “I built that” when viewing.

if anyone who has done this feels like sharing their experience doing this and has some wisdom feel free to drop here, would like to hear how it went fr you.

I am using the thin CA glue from BRS (also some starbond but the BRS stuff seems to cure faster/stronger) , mixed with sand in a few layers at joints, and then will be setting it with the Marco aquascaping mortar. Hitting some spaces with the thick CA glue as well, but mostly several layers of the thin.

Here’s what I’ve got so far. As soon as I think I have a plan with how I’m going it ends up taking a slightly different direction. Not sure how exactly to build up in the middle but I would like to do have the largest amount of surface area between these two structures, and will probably build out each of the little platforms on these.
 

Attachments

  • 7A88C480-819F-40F3-B3C4-579D4300F7B4.jpeg
    7A88C480-819F-40F3-B3C4-579D4300F7B4.jpeg
    238.1 KB · Views: 78
  • F5EDB8EA-D96F-4D0D-B235-C9EE1F7420B3.jpeg
    F5EDB8EA-D96F-4D0D-B235-C9EE1F7420B3.jpeg
    278.9 KB · Views: 91

TheWB

Valuable Member
View Badges
Joined
Sep 22, 2017
Messages
2,323
Reaction score
3,589
Location
Puyallup,WA
Rating - 0%
0   0   0
Well I have been pretty busy with work, not getting to spend much time getting through the rock work. I figured this was going to take me about 40 hours. Following suggestions from BRS and Tidal Gardens on the NSA scape. While it’s slow and tedious, it’s pretty fun! I have only stacked rocks in the past for my scapes so I am looking forward to enjoying the “I built that” when viewing.

if anyone who has done this feels like sharing their experience doing this and has some wisdom feel free to drop here, would like to hear how it went fr you.

I am using the thin CA glue from BRS (also some starbond but the BRS stuff seems to cure faster/stronger) , mixed with sand in a few layers at joints, and then will be setting it with the Marco aquascaping mortar. Hitting some spaces with the thick CA glue as well, but mostly several layers of the thin.

Here’s what I’ve got so far. As soon as I think I have a plan with how I’m going it ends up taking a slightly different direction. Not sure how exactly to build up in the middle but I would like to do have the largest amount of surface area between these two structures, and will probably build out each of the little platforms on these.
Always nice to see another local build thread here in western WA. Nice start on the scape. I think the Cade tanks are a pretty good value package. Following along.
 
OP
OP
Eldritch_blast

Eldritch_blast

Active Member
View Badges
Joined
Jul 26, 2020
Messages
171
Reaction score
145
Location
Maple Valley
Rating - 0%
0   0   0
Always nice to see another local build thread here in western WA. Nice start on the scape. I think the Cade tanks are a pretty good value package. Following along.
Howdy neighbor!

Yes I am pleased with the Cade so far. Seems to be great quality, and I really dig the stand on it.

thanks for saying hello!
 

TheWB

Valuable Member
View Badges
Joined
Sep 22, 2017
Messages
2,323
Reaction score
3,589
Location
Puyallup,WA
Rating - 0%
0   0   0
Howdy neighbor!

Yes I am pleased with the Cade so far. Seems to be great quality, and I really dig the stand on it.

thanks for saying hello!
No problem, gotta support the locals. It’s always more fun when people comment. Which location did you decide on for the tank?
 
OP
OP
Eldritch_blast

Eldritch_blast

Active Member
View Badges
Joined
Jul 26, 2020
Messages
171
Reaction score
145
Location
Maple Valley
Rating - 0%
0   0   0
No problem, gotta support the locals. It’s always more fun when people comment. Which location did you decide on for the tank?
It’s going at my preferred location. I really want to be able to view this from all three sides, and both side panels are doors on this stand, so having all that room for maintenance was enough reason for her to okay the location
 

TheWB

Valuable Member
View Badges
Joined
Sep 22, 2017
Messages
2,323
Reaction score
3,589
Location
Puyallup,WA
Rating - 0%
0   0   0
It’s going at my preferred location. I really want to be able to view this from all three sides, and both side panels are doors on this stand, so having all that room for maintenance was enough reason for her to okay the location
Nice, that seems like a good spot, it’s always good when things work out the way you want them to.
 
OP
OP
Eldritch_blast

Eldritch_blast

Active Member
View Badges
Joined
Jul 26, 2020
Messages
171
Reaction score
145
Location
Maple Valley
Rating - 0%
0   0   0
Happy to say I will be applying the E-Marco-400 mortar to all accessible joints today! Once that’s done I’m probably going to take my bucket of tiny scraps from the busted up reef saver rock and build out some of my shelves a bit wider. I’m pretty happy with how the structures have turned out, I wanted to make sure to leave room to get to the back as I’m going to try to keep the coralline off the as well as have some room out front for some island pieces on the sand bed.
For height, I was tempted to go higher but I’m right at about 2/3 height so hopefully in a few years staying this low pays off and I’ve got some big stony forests taking up all that airspace up top.

 
OP
OP
Eldritch_blast

Eldritch_blast

Active Member
View Badges
Joined
Jul 26, 2020
Messages
171
Reaction score
145
Location
Maple Valley
Rating - 0%
0   0   0
Like your mock up for visualizing aqua scape
Ya BRS had suggested on their NSA scaling video. All the dimensions are glass to glass on it, really helped with scraping access and the height. I actually built the whole thing inside of it as it wasn’t really in my way too much.
 

TheWB

Valuable Member
View Badges
Joined
Sep 22, 2017
Messages
2,323
Reaction score
3,589
Location
Puyallup,WA
Rating - 0%
0   0   0
Happy to say I will be applying the E-Marco-400 mortar to all accessible joints today! Once that’s done I’m probably going to take my bucket of tiny scraps from the busted up reef saver rock and build out some of my shelves a bit wider. I’m pretty happy with how the structures have turned out, I wanted to make sure to leave room to get to the back as I’m going to try to keep the coralline off the as well as have some room out front for some island pieces on the sand bed.
For height, I was tempted to go higher but I’m right at about 2/3 height so hopefully in a few years staying this low pays off and I’ve got some big stony forests taking up all that airspace up top.


That looks great. Can’t wait to see it in the tank covered in frags.
 
OP
OP
Eldritch_blast

Eldritch_blast

Active Member
View Badges
Joined
Jul 26, 2020
Messages
171
Reaction score
145
Location
Maple Valley
Rating - 0%
0   0   0
Minor update, but was such a big milestone for me as I was super nervous to carry this from garage into the house. Had a buddy come and we just went for it. I think it looks great in this area.

I will be doing the plumbing tomorrow and will be doing my calculations to judge whether or not I need to reinforce the floor. I’m thinking I may be okay with the placement but will be double checking it. I think I am on schedule to be cycling by end of month!
 

Attachments

  • DE673056-DD89-4FF4-A81F-AC9117AB90E1.jpeg
    DE673056-DD89-4FF4-A81F-AC9117AB90E1.jpeg
    123.1 KB · Views: 70
OP
OP
Eldritch_blast

Eldritch_blast

Active Member
View Badges
Joined
Jul 26, 2020
Messages
171
Reaction score
145
Location
Maple Valley
Rating - 0%
0   0   0
Well end of august came and went and the tank is still dry. August was a bit of a crazy month for me work wise so I’m pleased with the progress that’s been made…and hoping she gets wet this weekend! I made no plans for the 3 day weekend and am charging ahead with the final steps.
I do have my mixing station completed in the garage and once I get everything wired up and placed in the cabinet I should be able to begin filling. Plan to get my leak test and initial fill with RO water then mix in the tank to get this cycle rolling! This has been a lot of work, but fun the whole way!

I went all SCH80 PVC, because I am a Plumber and don’t get to do much exposed piping projects in my garage too often and I can get pretty good prices on material so went for it. Should be a breeze to keep up with the H20 needs!
Practically none of this set up is my intended set up out here but that’s probably a common feeling in this hobby as we are all probably always upgrading something in line, but this will get me started for sure.

09FD5D29-ACB2-43B9-B684-E1B110680613.jpeg BF04929C-E6C8-4269-AFAC-5E9EB9D2568F.jpeg 3900A0FA-DA6B-4CAE-8851-10579DB0C62D.jpeg
 

Jbmynes

Community Member
View Badges
Joined
Aug 23, 2021
Messages
36
Reaction score
60
Location
Norton, Oh
Rating - 0%
0   0   0
Nice work, I didn't even think to snag a few pieces of scrap unistrut but now I will when I install my water change station! I'm a pipefitter, so easy access to scrap around the jobsite. On your ro/di did the booster pump make much of a difference? I'm on a well and the cut on in my pressure switch is set around 38psi and cut off at 60, pressure tank is good. But wow.... it's sooooo slow I started filling almost 24 hours ago and I'm just about 7 inches deep in the display. I'm wondering of its worth the cost for the booster pump...
 
OP
OP
Eldritch_blast

Eldritch_blast

Active Member
View Badges
Joined
Jul 26, 2020
Messages
171
Reaction score
145
Location
Maple Valley
Rating - 0%
0   0   0
Nice work, I didn't even think to snag a few pieces of scrap unistrut but now I will when I install my water change station! I'm a pipefitter, so easy access to scrap around the jobsite. On your ro/di did the booster pump make much of a difference? I'm on a well and the cut on in my pressure switch is set around 38psi and cut off at 60, pressure tank is good. But wow.... it's sooooo slow I started filling almost 24 hours ago and I'm just about 7 inches deep in the display. I'm wondering of its worth the cost for the booster pump...
UA Pipefitter? If so hello brother!

I was only getting about 40 psi at my filter, and the booster pump kicked up to like 89. Before I set this up I was using an outdoor hose to make water for my little tank, and at my hose I had about 55 and it operated much faster, I think the sweet spot is 50 if I’m not mistaken so if you can get above that no pump needed.
 

Jbmynes

Community Member
View Badges
Joined
Aug 23, 2021
Messages
36
Reaction score
60
Location
Norton, Oh
Rating - 0%
0   0   0
UA Pipefitter? If so hello brother!

I was only getting about 40 psi at my filter, and the booster pump kicked up to like 89. Before I set this up I was using an outdoor hose to make water for my little tank, and at my hose I had about 55 and it operated much faster, I think the sweet spot is 50 if I’m not mistaken so if you can get above that no pump needed.
Yessir! Local 94 Canton Ohio!
 

Clear reef vision: How do you clean the inside of the glass on your aquarium?

  • Razor blade

    Votes: 135 60.0%
  • Plastic scraper

    Votes: 64 28.4%
  • Clean-up crew

    Votes: 81 36.0%
  • Magic eraser

    Votes: 39 17.3%
  • Other

    Votes: 63 28.0%
Back
Top