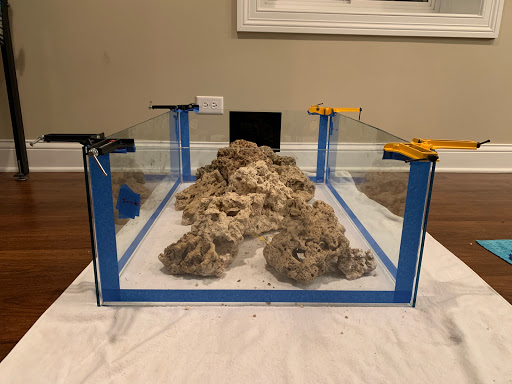
Funlad3's 45 Gallon 3' x 2' x 1' Acropora Lagoon

Funlad3

Active Member
View Badges
Joined
Jul 1, 2012
Messages
266
Reaction score
193
Location
Chicago
Rating - 0%
0   0   0
Hi all! I've been madly bored while everything is shut down to mitigate the pandemic, so I finally gave in and decided to set up a build for some random acros. I used to sell commercially years ago back in highschool, and I haven't had a proper tank to grow things out in since. I'm a huge wild Acropora collector, so this tank should fill in quickly. The plan is to grow out frags/chunks from different colonies and see what I can turn them into alongside some old classics. The other gimmick that I'm sticking with for this build is that I'm trying to scavenge/repair/recycle as much equipment as possible. Thankfully, I have plenty of old equipment sitting around, but I've already got to meet with other local reefers and had to dig around on Craigslist for other materials.

Here are some specs of what this build will include!

3' x 2' x 1' Shallow Lagoon Peninsula
Custom T5/LED Lights
Two Maxpect Gyre XF250
50ish Pounds of Pukani
40 Breeder Sump
Ecotech Vectra M1
Reef Octopus 150 NWB Skimmer
Neptune Apex Classic
Ancient Geo's Reef (I think?) Calcium Reactor with Milwaukee Regulator

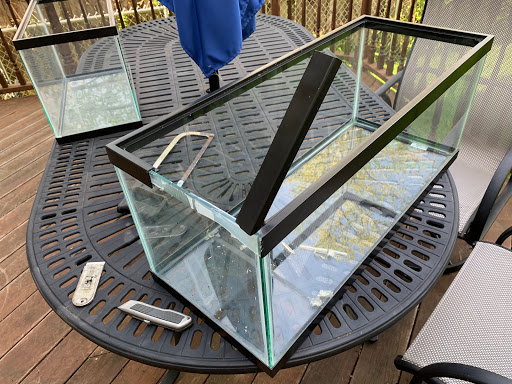
So here's where things get fun. I've been building tanks for years, but my long-time reefing buddy convinced me to try to cut my own glass for a small desktop build. Small is boring and I had some glass laying around, so I decided to cut apart some tanks that I had laying around, which was moderately successful? I broke some tanks, and I was lucky enough to have some local reefers bail me out with extra tanks . I used 40 Breeders for the 36" long panels and a 20 Long for the 24" long panels. Cutting 1/4" glass is easy when it decides to break where it's supposed to. That doesn't always happen.

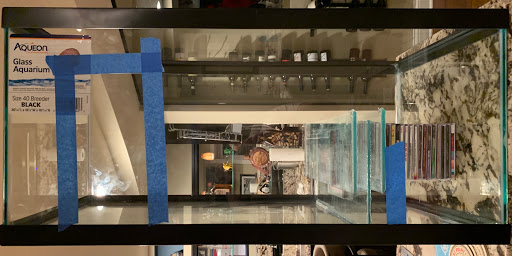
A sacrificial 40 Breeder:
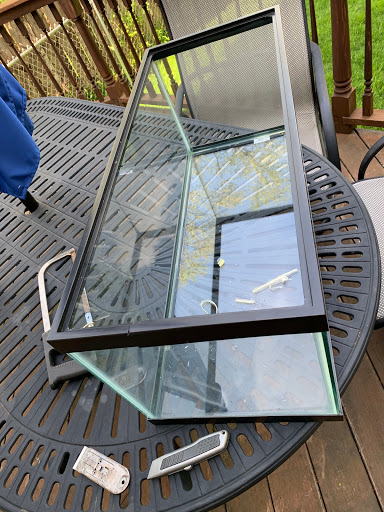
IMG_1104.jpeg
101519426_1589631137852164_4428723860476526592_o.jpg


Cutting apart the rim:
IMG_1105.jpeg
100918569_1589631197852158_6741820631366500352_o.jpg


Rimless (right before I tore the panels apart):
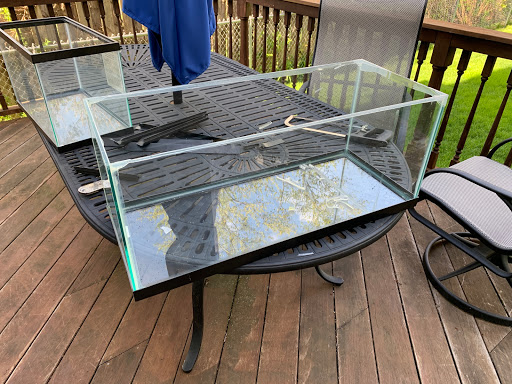
IMG_1106.jpeg
100981077_1589631301185481_6232739755499454464_o.jpg


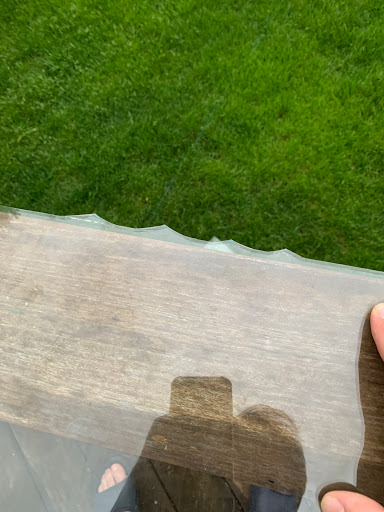
Cutting a 36" long strip of 4" wide glass from my 36" x 16" 40 Breeder panels didn't go well and left jagged edges on my 36" x 12" peninsula panels:
61197209025__44BE5BC1-EA61-42B1-BD20-423A0EC45BCE.JPG
100828997_1589631014518843_4036557603633889280_o.jpg


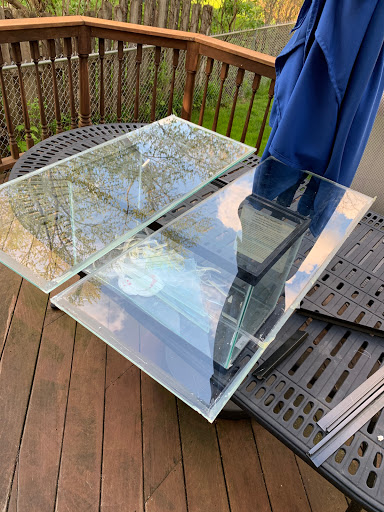
Two 30" x 12" panels from a 20 Gallon that I tore apart:
IMG_1107.jpeg
100969140_1589631324518812_8604850682706526208_o.jpg


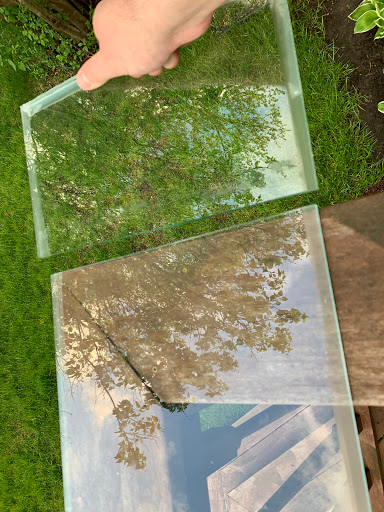
Cutting 6" off of the 30" panel to get to my 24"x12" side panel:
IMG_1113.jpeg
100683534_1589631337852144_3382181746534514688_o.jpg


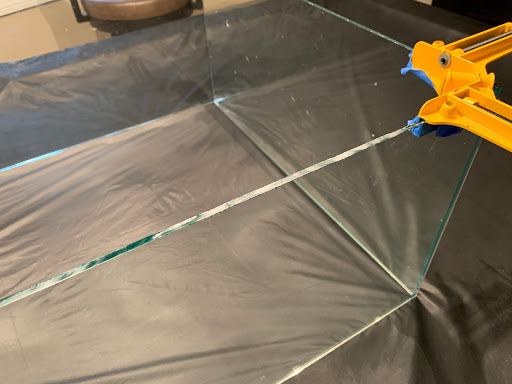
I ground the few jagged edges on my 36" panels and clamped my four sides together. The grinding isn't perfect, but it's good enough.
61204963269__F7E2BDC8-FB67-4D1F-BB1D-6CBD13A7E73C.JPG
100827473_1589630874518857_1613738415629533184_o.jpg


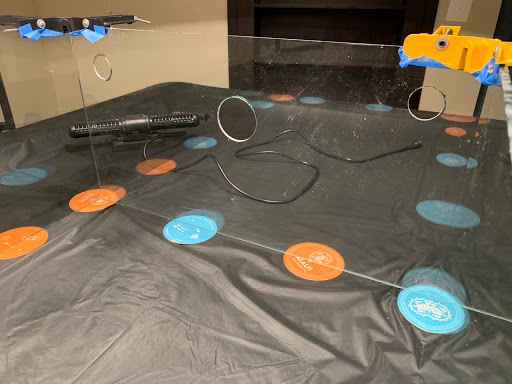
I also drilled some holes for the plumbing on the 20" back panel. The 1.5" hole is for the overflow box. There are two 3/4" drain holes.
IMG_1187.jpeg
101522302_1589630781185533_8808775910309232640_o.jpg


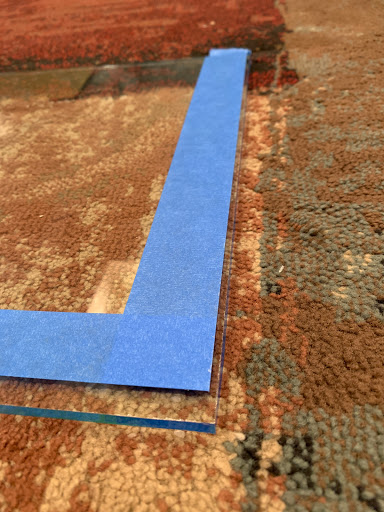
I took the tank apart and taped up all of the edges so that I can silicone it nice and cleanly! I'm using the injection method of building this tank, which is why the taping is 1/4" off on the sides of the short panels (pictured):
61224046175__4D49B4C3-3C0C-44DA-ACEB-FBB6815E5A47.JPG
100690395_1589631411185470_1048497518062600192_o.jpg


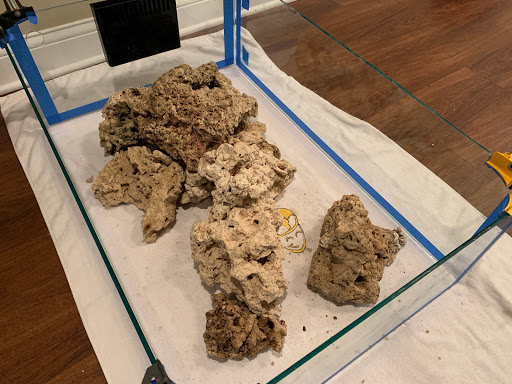
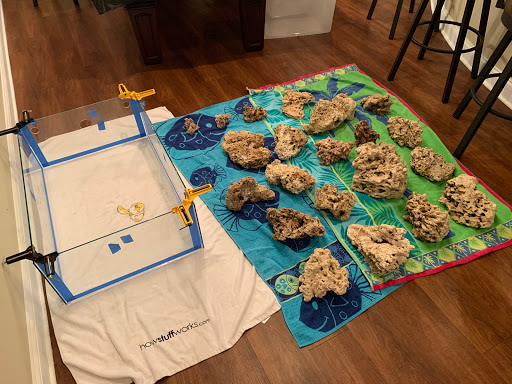
So! At this point, the tank was all taped up and I was using 90º clamps to hold the panels in place, so I decided to do some dry scaping with my rock. A friend is getting to ready to move out of town, so I snagged a bunch of bleached/cleaned Pukani rock for dirt cheap. Here's what I had to work with:
IMG_1195.jpeg
101107593_1589631071185504_167378483297648640_o.jpg


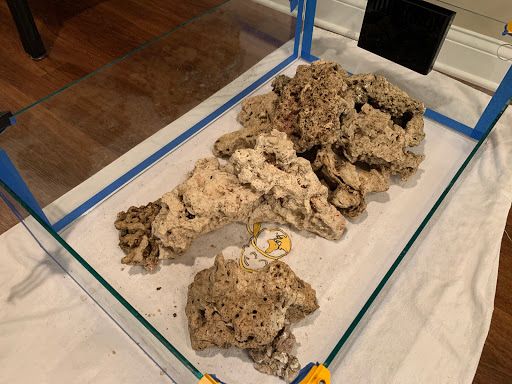
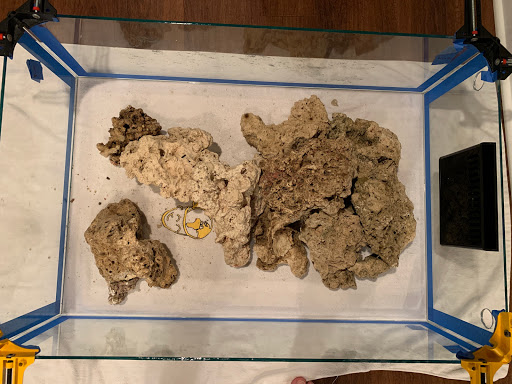
And this is what I ended up with. Top view:
IMG_1199.jpeg
101362407_1589630954518849_6678149188607279104_o.jpg


Front left:
IMG_1201.jpeg
101504901_1589630817852196_7924126893463306240_o.jpg


Front right:
IMG_1200.jpeg
101151985_1589630924518852_4723310904190435328_o.jpg


Right side:
IMG_1197.jpeg
100851917_1589630764518868_7203952115914375168_o.jpg


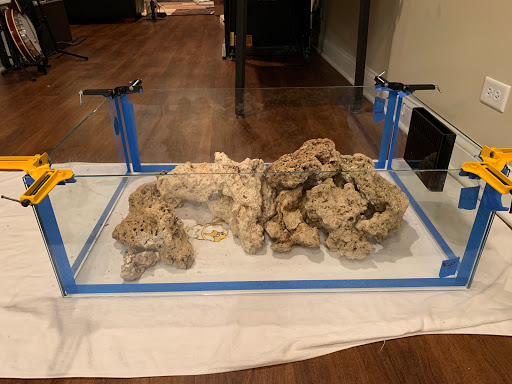
Front:
IMG_1196.jpeg
100738249_1589630684518876_6525948862035656704_o.jpg


Left (there's more room between the rock and the glass than the picture shows; the extra-wide painter's tape hides the gap)
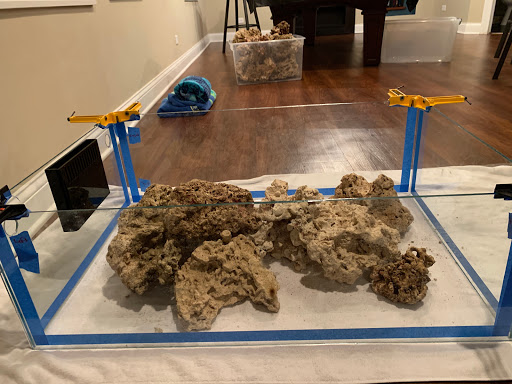
IMG_1198.jpeg
101360977_1589637171184894_6470917716654948352_o.jpg


This tank is only 12" deep (11 3/4" when I finally get the bottom panel), so I wanted to keep the rockwork low so that my acros have room to grow vertically. Here's a rim-level side profile showing how I did. The tallest point of the scape is exactly 3" below the rim. After I subtract for the bottom panel and water level, I'll still have about 2" of water from the absolute top of the rocks and closer to 6" throughout the rest of the tank.
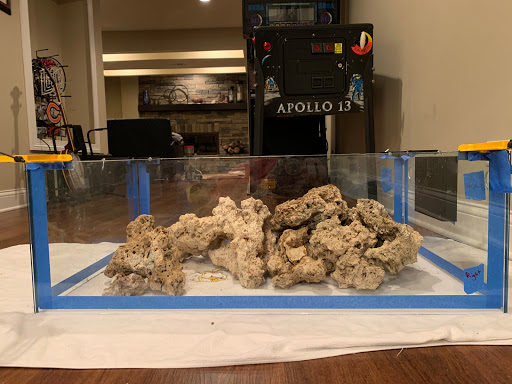
61225269706__51FEBEAD-EDE2-4E92-BEA7-642241932A94.JPG
101324089_1589631084518836_2199135633371299840_o.jpg


For the sump, I was going to build a custom 30"x18"x14" tank and throw in baffles and a sock holder, but I'm thoroughly tired of taking tanks apart. I caved and bought a 40 Breeder (after I destroyed two of them getting the glass for the DT. Oops). I'm going to use some scrap glass as a lid for the drain/filter sock chamber, and I have oversized skimmer and return chambers. I had the Reef Octopus and Vectra sitting around from my 24G nano build from two years ago, and I can always use even larger equipment with this sump in the future.
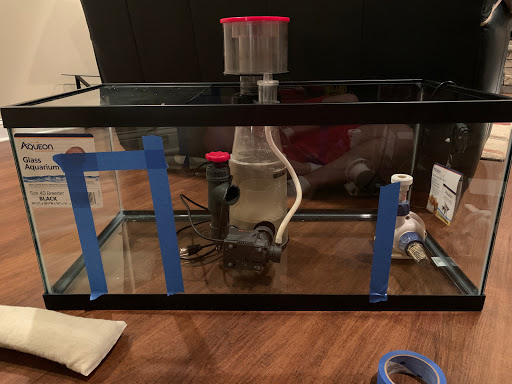
61215499082__8F07C581-6B2F-4E85-B232-5B73ECDC16E6.JPG
101234446_1589631247852153_1437225228383027200_o.jpg


Putting in an 8" bubble trap:
IMG_1185.jpg
101108540_1589630851185526_8800766861454082048_o.jpg


Putting in two baffles for my filter sock holder. I'm going to cut the holder itself from some acrylic that should be arriving later today:
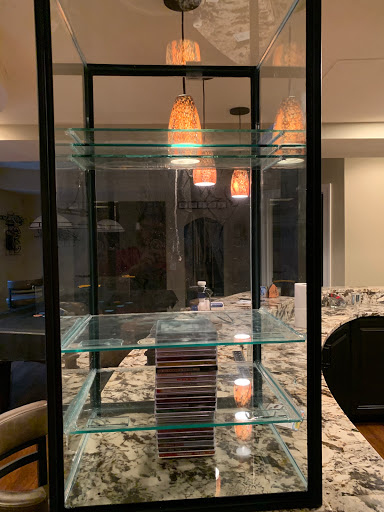
IMG_1192.jpeg
100753876_1589630967852181_4307567437261307904_o.jpg


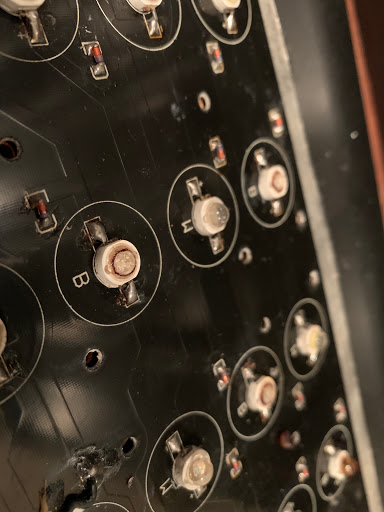
For lights, I have a super old 48x3W LED board that I originally ordered back in 2011ish. Two years ago, I cut it in half to fit into my Nanocube hood. Now I'm going to lay the two halves of the board into the middle of a custom hybrid fixture, but first I have to replace some of the broken LEDs. Luckily, I found some replacement diodes for $0.80 apiece on Amazon.
IMG_1189.jpg
101470627_1589643231184288_1458191961641975808_o.jpg


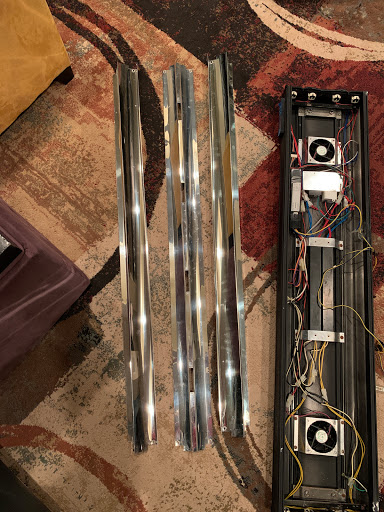
For the T5 part, I had an old 4x39W retrofit kit left over from my old growout tank that I took down in 2014. I managed to ruin the reflectors, so I got a 4' Aquaticlife T5 fixture from another local that I gutted for the reflectors and fans. I'm going to cut the center channel in half and end up with two 36" T5s on either side of my rebuilt LEDs. Check out this wild three-piece four bulb reflector:
61222967068__DC49222B-D85B-4C26-94A4-750C286E42E8.JPG
101051044_1589631467852131_5106257030184697856_o.jpg


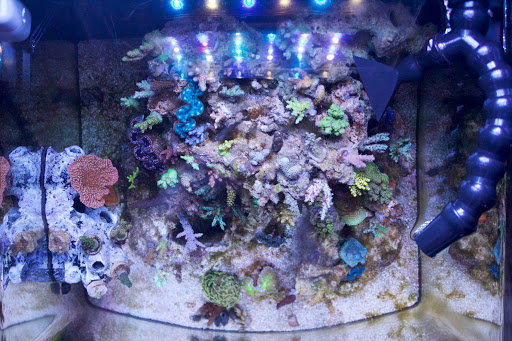
That's where I'm at for today. I ordered the bottom tank panel from a glass shop because I couldn't find any 36" x 24" glass locally, and that should be done by the weekend. Once it is, I can silicone the tank together and let it sit for a few days before I leak test it. In the mean time, I need to build a stand and canopy, cut my filter sock holder, and get my lights put together. With any luck, I can get this tank fully up and running by next weekend. I already have my eye on some nice Aussie colonies and I have a store owner tracking me down some fish; this should all progress quickly. I'll leave you all with a picture of my old nano before from before it crashed out. Too many corals, not enough water volume.
44057187_1120662541415695_4846017883613954048_o.jpg


(Also I swear the next round of posts will have better photo quality. I just realized that the forum isn't running vBulletin anymore and I guess I have to stop hosting my photos on Facebook. I used Blogger for this post, and the compression is wild.)
 
OP
OP
Funlad3

Funlad3

Active Member
View Badges
Joined
Jul 1, 2012
Messages
266
Reaction score
193
Location
Chicago
Rating - 0%
0   0   0
I got a call this afternoon that my bottom glass panel was cut and ready at the glass shop, so I ran out to pick it up as well as some materials for my stand! I wanted to put the tank together on a level surface, and it was a great opportunity to throw a first version of the stand together. I made it as large as I could with the materials that I bought with the knowledge that I can always cut it smaller. I definitely want to leave a ledge running along all sides of the tank, but I'm not going to stick with the 6" that I currently have. Once I play around with placing the tank on the stand some more, I'll have a better idea of how much I want to cut it down by. For now, here's what I got done today!

Stand materials from the Home Depot and a 3'x2' piece of sheet metal for my custom canopy:
IMG_1227.jpeg


I decided to get fancy and use the table saw to cut special joints in my 4x4s. Now I can have my 2x4s sitting upright on the vertical supports, which should save me from needing additional bracing. And it was fun:
IMG_1228.jpeg


The stand, version 1.0. Right now, it has a 4' x 3' footprint, which I'm definitely going to make smaller. The 30" height is perfect, though:
IMG_1233.jpeg


The glass panels, cleaned, taped, clamped and ready to go. They're sitting on a yoga mat so that everything lays perfectly flat and level, even if the nearly 3/4" plywood is bowed (it somehow was):
IMG_1238.jpeg


Here's a closeup on the edges. I taped them so that there's always an extra 1/8" of silicone on each glass panel. Each panel is also 1/8" away from the edge of the next panel so that there's a gap to extrude the silicone into. This gap is maintained by silicone rubber spacers that are super glued onto the edges of each panel:
IMG_1239.jpeg

IMG_1240.jpeg


And then there was silicone! Removing the tape and extra silicone got a little messy, but everything should clean up nicely once it cures and I can get at stray silicone with a razor blade. For now, the seams look smooth and air bubble free:
IMG_1241.jpeg


Finally, I took the sump down from the counter and dropped the equipment back inside. There's definitely room for more/larger gear if I want it:
IMG_1243.jpeg


Tomorrow, I'm going to start working my acrylic that I got in the mail today. I still need to cut my filter sock holder for the sump, and I'm also working on an overflow box. Once I get all of the wet equipment built, I can move onto my lights and canopy. For now, the priority is to get the system wet and running so that I can get some acros growing! One day at a time.
 
OP
OP
Funlad3

Funlad3

Active Member
View Badges
Joined
Jul 1, 2012
Messages
266
Reaction score
193
Location
Chicago
Rating - 0%
0   0   0
Today was pretty uneventful; I just cleaned up the tank some and cut up a bunch of acrylic!

Here's the tank looking *clean* from the right:
IMG_1246.jpeg


From the front:
IMG_1247.jpeg


From the left:
IMG_1248.jpeg


I did a few things with acrylic today. I cut the panel that I'm going to make into my filter sock holder. I'm going to cut the holes tomorrow, but look at how well it fits between the panels. I also had the idea to put four small pieces of glass on the vertical panels the sock holder will sit between so that it has something to rest on for extra support. It fits *perfectly*. I'm very happy:
IMG_1249.jpeg


IMG_1250.jpeg


And then I cut a bunch of acrylic for a custom low-profile overflow. My friend @Kerber13 was nice enough to give me an extra Eshopps Eclipse M that just needed a new bulkhead, but it only has two drains in the back chamber. Instead of cutting it apart to replace the bulkhead and still being stuck with two drains on the overflow box, I decided that I would build my own 12" long overflow box with three 1" drains outside the tank so that I could run a Bean Animal system. I still need to get the big 1.5" bulkhead so that I can build the boxes and attach them to the tank, but at least I got the acrylic cut. I also need overflow teeth, but I have something in the works for that as well.

Overflow parts:
IMG_1251.jpeg


Internal and external overflow boxes:
IMG_1252.jpeg


The internal box, missing exactly 2.25" of acrylic. This is where my overflow teeth assembly is going to go once I get it built:
IMG_1253.jpeg


And here's the external overflow box, which I also cut a lid for! I'll have plenty of room for all three of the drains that I want:
IMG_1255.jpeg


We'll see what I can get done tomorrow; I'm running out of things to do on the watery side of this build, so I foresee some canopy work this weekend.

Happy Friday, all!
 
OP
OP
Funlad3

Funlad3

Active Member
View Badges
Joined
Jul 1, 2012
Messages
266
Reaction score
193
Location
Chicago
Rating - 0%
0   0   0
I made more progress today! I got all of my bulkheads and loc-line ordered along with some other odds and end, so I should be able to get this tank water tested by Wednesday. With any luck, I'll have the stand and canopy done by then. I just about finished my acrylic work for the day by drilling holes in the filter sock holder and the holes to connect my internal overflow box to the external box. I also managed to pick up even more equipment that I didn't need to upgrade something I hadn't even built yet. Onto pictures.

The filter sock holder is cut! I freehanded a 4" hole template and then routed it into my 6" wide piece of acrylic. The edges aren't perfect, but the filter sock fits *snugly*, so I'm happy:
IMG_1257 2.jpeg


Then I peeled off the protective wrap and siliconed it in place. I promptly gouged the top of it with a razor blade trying to clean up some excess silicone, but so it goes. I used "Fluorescent Blue" acrylic from McMaster-Carr because I like the blue tint, and it's also cheaper than regular clear acrylic:
IMG_1263 2.jpeg


IMG_1264 2.jpeg


Then I drilled the hole for the 1.5" bulkhead that's going to join my internal and external overflow box. It took me forever to measure the spot so that the top of the overflow will sit just below the top edge of the tank. If the future teeth get clogged, the water will just pour over the top of the overflow and into the drains in the back instead of over the top of the tank and onto the floor:
IMG_1258 2.jpeg


I cut the internal and external panel at the same time, and the holes' edges are *CLEAN*:
IMG_1260 2.jpeg


Finally, I cut the holes for my 1" Bean Animal drain. Of course, my template slid on the first hole, but there's still enough room for all of the bulkheads. I'll survive the imperfection.
IMG_1261 2.jpeg


The overflows are all laid out and ready for solvent glue! I should get it in the mail in the next few days, and my overflow teeth should be in by then too:
IMG_1271 2.jpeg


And now for the purchase I didn't need. Now I *could* have replaced the dead LEDs on my 48x3W LED board and would have had enough light for this tank. But my buddy who's moving his tank decided that he wants to do halides, so I picked up these Chinese black box LEDs for super cheap. When in doubt, double your light.
IMG_1266 2.jpeg


I actually really love these boards, and they're going to be super easy to rivet to the piece of sheet metal that I'm going to use to separate my T5s and LEDs from the ballasts/drivers/switches in the canopy. I'm going to order more thermal paste to help take care of the heat transfer and keep these boards nice and cool:
IMG_1268 2.JPG


Here are both of the gutted fixtures. Outside of the different brands of fans from the identical fixtures, all of the lenses being glued on one of the two fixtures, and the LED drivers being secured in different ways between the two fixtures, I'm actually pleasantly surprised by the build quality. All of the quick connects should make wiring up my lighting very straight forward:
IMG_1273 2.jpeg


That's all for today! Tomorrow, I'm going to try to get the lid cut for the overflow section of the sump and get some more work done on the canopy and the stand. I'm stuck on water testing/plumbing until my bulkheads get here on Wednesday, but I should be able to have pretty much everything else ready to go by then.

Happy weekend!
 
OP
OP
Funlad3

Funlad3

Active Member
View Badges
Joined
Jul 1, 2012
Messages
266
Reaction score
193
Location
Chicago
Rating - 0%
0   0   0
Today I picked up 80 pounds of CarribSea Special Grade Reef Sand, even though I'll probably only need half of it. I also got some work done on the custom lighting.

I got the LED boards ready for mounting on my sheet metal. I drilled holes where I'm going to need rivets, and I also cut some holes so that my wire leads can push straight through to the backside of the sheet metal. I'm waiting on some thermal paste to sandwich between the back of the LED boards and the sheet metal, but then I'll be able to rivet them into place:
IMG_1284.jpeg


Then I cut down my 4' T5 Reflectors by 1' so that they'll fit over this tank:
IMG_1279.jpeg


Finally, I got the reflectors measured out and riveted in place:
IMG_1287.jpg


I have a bunch of little electrical parts coming over the next few days, so I should hopefully be able to wire everything up shortly. The Acrylic glue should come tomorrow, so I should get pretty close to finishing the overflow boxes as well. This build is getting close!
 
OP
OP
Funlad3

Funlad3

Active Member
View Badges
Joined
Jul 1, 2012
Messages
266
Reaction score
193
Location
Chicago
Rating - 0%
0   0   0
Today I finally got my drain cover drilled for my sump. I still have to silicone the drain cover in place, but I'm waiting for my bulkheads to come in the mail before I do:
IMG_1295.jpeg


And here's the sump with the filter sock cover removed.
IMG_1296.jpeg


I got my acrylic solvent/glue in the mail today, so I was finally able to glue up the external overflow box. I'm still going to run it over a flush bit on my router to clean up all of the edges:
IMG_1298.jpeg


I also got my thermal paste in the mail! I marked out the location of each LED on the circuit boards and put thermal paste on the sheet metal board to aid in heat transfer:
IMG_1300.jpeg


And to wrap up the day, I got the LED boards riveted to the sheet metal. Tomorrow, I'm going to build the canopy around it and do some stand work while it's nice outside. I'm *very* happy with how the lighting is turning out (save for the loose lens that fell; I have to reglue it):
IMG_1301.jpeg
 

BighohoReef

A reefer in need is a friend indeed!
View Badges
Joined
Apr 14, 2020
Messages
3,997
Reaction score
11,346
Rating - 0%
0   0   0
I just got through your latest post. We just added our first DIY refugium to our sump and it has me itching to do another project. Looking forward to the next update! Keep’em coming!
 
OP
OP
Funlad3

Funlad3

Active Member
View Badges
Joined
Jul 1, 2012
Messages
266
Reaction score
193
Location
Chicago
Rating - 0%
0   0   0
I just got through your latest post. We just added our first DIY refugium to our sump and it has me itching to do another project. Looking forward to the next update! Keep’em coming!

My first DIY project was a refugium too! I used a pretzel bucket to keep Chaeto from floating around and used a spare powerhead to keep water flowing on the inside. That was back in 2011. It's only been more fun from there!
 
OP
OP
Funlad3

Funlad3

Active Member
View Badges
Joined
Jul 1, 2012
Messages
266
Reaction score
193
Location
Chicago
Rating - 0%
0   0   0
I took advantage of the nice weather today and got the tank painted! I used a black enamel spray paint, and it came out great:
IMG_1311.jpeg


Here's what it looked like tonight once it had a chance to dry. I definitely need to clean up some of the other panels, because I definitely didn't use enough tape and paint dust got everywhere:
IMG_1312.jpeg


The most time consuming and frustrating part of this build so far was definitely getting the T5 endcaps mounted to the sheet metal. I didn't realize that they sell brackets to make this ten times simpler and fought for about three hours to get the eight end caps riveted into place. If I need to replace any caps in the future, I can just drill out and replace the rivet, but for now, I don't even want to think about that. One of the bulbs is slightly out of alignment from the others, but I'm past the point of caring about it:
IMG_1315.jpeg


With all of the lighting finally attached to my sheet metal, I got to put it inside of the 9" tall wooden canopy that I ripped on the table saw this afternoon. This was me checking that it fit and definitely not breaking a T5 bulb on the ground:
IMG_1316.jpeg


After some trimming around the edges of the sheet metal, I got to mount the whole lighting board 3" from the top of the canopy with some more rivets and some L brackets. I now have 6" of canopy below the light board to keep glare and stray light around the tank to a minimum and still leave me enough room in the top section to get my wiring done and put plenty of fans:
IMG_1321.jpeg


Mounted:
IMG_1319.jpeg


Glamour shot:
IMG_1320.jpeg


The bulkheads that I've been waiting for should be arriving later today, so my plan is to finish resizing the stand and to run a water test with both pieces of the overflow box on the tank. It's going to be 90º and humid out, so I'm not looking forward to all of the cabinet work, but at least I'll be able to get the tank wet.
 
OP
OP
Funlad3

Funlad3

Active Member
View Badges
Joined
Jul 1, 2012
Messages
266
Reaction score
193
Location
Chicago
Rating - 0%
0   0   0
I did what I could today without my bulkheads, and that ended up being a lot.

First, I cut the stand down to its final size and broke out the router to cut my plywood flush with the rest of the stand:
IMG_1325.jpeg


I left an extra 3" around the front and sides of the tank with 6" at the back so that I have extra room to feed pipes and plumbing. Here's what the tank looks like on the stand:
IMG_1327.jpeg


With my massive 1.5" overflow hole in the back of the tank, I was only able to fill it halfway to check for leaks. There were none, and there was only 1/16" of bowing, which I'm totally comfortable with.
IMG_1333.jpeg


That took me most of the day, so I devoted the night to getting my wiring done in the canopy. First I got my old T5 retrofit kit wired up. These bulbs are years old, and I checked the PAR at the front edge of the canopy; they only peaked at 300 through 6" of air:
IMG_1335.jpeg


Then I wired everything else to my switches and WiFi smart outlet. It looks more chaotic than it actually is; I'll put up a diagram tomorrow:
IMG_1336.jpeg


And somehow, everything turned on the way it was supposed to on my first wiring attempt! With everything fired up at once, the PAR from 6" jumped from 300 to over 2500, and that's still with bad T5s. This light is gonna be a monster, and I'm thrilled with how it's turned out so far:
IMG_1342.jpeg


Tomorrow, I'm going to see if I can get the last part for my overflow and track down a black yoga mat to put under the tank. If I can, I might even start plumbing tomorrow. If not, I still need to wire up my fans and mount them and my potentiometers for the LEDs. Either way, the tank should be up and running by the weekend!
 
OP
OP
Funlad3

Funlad3

Active Member
View Badges
Joined
Jul 1, 2012
Messages
266
Reaction score
193
Location
Chicago
Rating - 0%
0   0   0
Today was another busy day, but first the wiring diagram from yesterday! I'm using a WiFi outlet to turn my three channels (Blues, Whites, T5s) on and off, but I also wanted to be able to manually override the schedule to turn individual channels on or off for viewing and photos. I came up with this rig that utilizes Three Position Rocker Switches to let me do that. Basically, the middle terminal carries power from either Position I (controlled by the WiFi outlet) or Position II (power from an outlet that stays on). If I set the switch the middle position (Position 0), it breaks the circuit and that channel is off. Here's how it's wired (shout out to @jayjigga for making sure I didn't accidentally blow a circuit or set something on fire):
Canopy Wiring Diagram (Final).jpg


So onto today. My order from BRS finally came and I got all of the bulkheads that I've been waiting on. That meant that I got to finish up my internal overflow box; the 1.5" bulkhead inside has to be put into the overflow before it gets glued together, so I drove across town to pick up my 3D printed set of overflow teeth from a cousin.
IMG_1343.jpeg


Here's a better look at how the internal and external overflow boxes fit together. I cut about 1" off the back of the 1.5" bulkhead so there's more room for the water to flow into the external overflow box:
IMG_1347.jpeg


With most of the big projects for this build coming together, it was time to get the stand inside and get the tank settled. The stand is 30" wide, so it had to be taken apart to fit inside.
IMG_1348.jpeg


And finally, I got my scape back together! I took about 20 pictures a few weeks back when I took my mock-up apart, so it only took about half an hour to put it back together. I tweaked a few things, and I'm thrilled with how it turned out. I did my best to avoid straight line contours at the edges while keeping a steady slope upwards towards the back of the tank. There a ton of caves and crevices, so I should be in good shape for breaking up sight lines to minimize aggression.
IMG_1351.jpeg


IMG_1352.jpeg


IMG_1353.jpeg


IMG_1355.jpeg


A quick look at the mounted overflow (the color of the 3D printed teeth should blend in with the box once it's wet):
IMG_1356.jpeg


The external overflow box, waiting for Bean Animal plumbing:
IMG_1357.jpeg


That's all for now! I'm going to get the plumbing done today and get some water running to check for leaks. If it clears, then I'll toss in the salt, my Fritz Turbo Start, and then some sand!
 

najer

Valuable Member
View Badges
Joined
Jul 9, 2016
Messages
20,453
Reaction score
144,449
Location
Humble, England
Rating - 0%
0   0   0
Skills, great build, can't wait to see this progress. :)

I do have a thought though, I have read a lot of DIY builds of sumps and snug fitting acrylic, admittedly for baffles and not a sock holder is not a great idea as the acrylic can expand and potentially crack the glass, just a thought.
 
OP
OP
Funlad3

Funlad3

Active Member
View Badges
Joined
Jul 1, 2012
Messages
266
Reaction score
193
Location
Chicago
Rating - 0%
0   0   0
I do have a thought though, I have read a lot of DIY builds of sumps and snug fitting acrylic, admittedly for baffles and not a sock holder is not a great idea as the acrylic can expand and potentially crack the glass, just a thought.

Good flag! This is my fourth build using an acrylic sock holder, and as long as you cut it slightly smaller than the width of the tank it's going into, there's nothing to worry about. I even have the glass baffles cut narrower than the sump by about 1/8" just so that I didn't have to worry about breaking anything when I was putting them in the sump. :)
 
OP
OP
Funlad3

Funlad3

Active Member
View Badges
Joined
Jul 1, 2012
Messages
266
Reaction score
193
Location
Chicago
Rating - 0%
0   0   0
Just two pictures, but there was a lot of work behind them.

Plumbing is done! There was one pinhole leak on a seam of the external overflow box, but I dried it up and applied more acrylic solvent/glue. I still need to get some threaded/slip adapters to I can put the drains coming from the sump bulkheads underneath the sump water line; the 1/4" gap splashes a ton, but that should go away once I get the drains underwater. The Vectra M1 is pushing so much water that my 1" gate valve is fully open and the secondary 1" drain is pretty close to a full siphon as well; this'll take some fine tuning, but it's already pretty quiet aside from the fixable splashing:
IMG_1361.jpeg


And finally, the tank! The water level goes up or down based on how high I have the Vectra set, so I can play around with how much height I have from the rim. This is what it looks like right now with the return pump off:
IMG_1363.jpeg


Later today, I'm going to get the tank quieted down some, and then the salt and heater will go in. Once it's clear, I'll add sand. The tank is getting there!
 
OP
OP
Funlad3

Funlad3

Active Member
View Badges
Joined
Jul 1, 2012
Messages
266
Reaction score
193
Location
Chicago
Rating - 0%
0   0   0
Today, I got the adapters that I needed to completely silence my plumbing. Now the only noise from the system is the water dripping into the filter socks. Anyone have any ideas on how to quiet that down? Otherwise, I can live with it, especially when I get around to skinning the stand.

The tank running with RO and at the proper water level:
61308900962__6E6312D4-5C63-44C0-9D83-F4DD5B7B598F.JPG


A closeup of the overflow box in action:
61309343381__44FBA82D-7310-4379-ACCA-5EEFC75E8D7D.JPG


And I just finished mixing in salt and adding sand! Once I even it out, I'll probably have 2-3" across the whole tank. I may remove some, but I have plenty of time to decide:
IMG_1372.jpg


I officially have fish in quarantine! I asked my friend who owns a LFS to track me down a few tangs and "anything else unusual" from Hawaii. Well, he delivered big time, and I now have a male/female pair of Spotted Boxfish (Ostracion meleagris):
61308877150__0B25ABA3-6B39-4D5A-AA47-558D12B8D6BD.JPG


I won't be able to tell if the boxes are from Hawaii or the greater Indo-Pacific until the male gets larger, but they're some of my favorite fish to chase around with my camera in Maui. They're still shy and will definitely benefit from some power feeding, but I'm super excited to work with these fish. The female is definitely more shy and cautious than the male (which I've already seen lunge at the female once or twice), but I moved around the rock in the QT to give them more hiding places and to diffuse aggression. Once I get them and the naso eating, they'll all go through three weeks of copper before making it into the SPS Lagoon:
IMG_1369.jpg


I'm adding the Turbo Start to the lagoon shortly, and I want to get the light hung over the tank by the end of the weekend. We'll see what else I manage to get done!
 

Being sticky and staying connected: Have you used any reef-safe glue?

  • I have used reef safe glue.

    Votes: 129 88.4%
  • I haven’t used reef safe glue, but plan to in the future.

    Votes: 8 5.5%
  • I have no interest in using reef safe glue.

    Votes: 6 4.1%
  • Other.

    Votes: 3 2.1%
Back
Top