Gifted Tank Help

8888Tank

New Member
View Badges
Joined
Jan 26, 2023
Messages
3
Reaction score
3
Location
Pittsburgh, PA
Rating - 0%
0   0   0
I was gifted a 225 gallon tank (see attached pic). It has four holes drilled at the top of the tank. There are two close to each other in the middle and then one on the left and right side. I know these are drilled for pipes that lead to a sump, but can anyone help guide me with how to utilize these for a sump? Is there a diagram anywhere, or description what to do, what equipment to buy, etc?

Thank you!
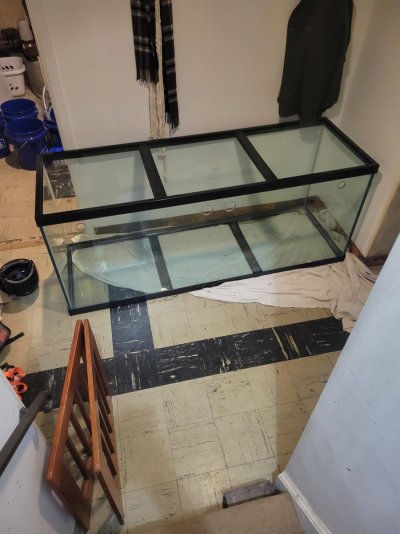
Tank.jpg
 

Eagle_Steve

Grandpa of Cronies
View Badges
Joined
Jan 30, 2018
Messages
11,564
Reaction score
60,957
Location
Tennessee
Rating - 0%
0   0   0
I was gifted a 225 gallon tank (see attached pic). It has four holes drilled at the top of the tank. There are two close to each other in the middle and then one on the left and right side. I know these are drilled for pipes that lead to a sump, but can anyone help guide me with how to utilize these for a sump? Is there a diagram anywhere, or description what to do, what equipment to buy, etc?

Thank you!

Tank.jpg
More than likely, the 2 holes in the middle are for an overflow box. You can measure the distance between the 2 holes and then look at overflow boxes specs to see which one fits that. I would suspect due to tank type, it may be drilled for an Eshopps overflow box.

The other 2 holes would be for your return lines. You would put bulkheads in those (more than likely drilled for 3/4" bulkheads). For bulkheads, I would measure the hole size and then compare that to a bulkhead size chart. I believe BRS hs. chat on their website. One thing, bulkhead labeled 3/4" is not really 3/4". The 3/4" is for what size pipe or threaded fitting the bulkhead is intended to take. For example, a 3/4" ABS bulkhead takes a 3/4" pipe or fitting, but the actual outside diameter of the bulkhead is usually around 1.33".

For how this would work, it would really depend on what overflow box was being used.

This is crude, but should help explain it.

Here is an Eshopps Overflow Box to use as an example. You have 3 drains in it. One will be for the main drain, the other for a trickle drain and the last for an emergency drain.

Screen Shot 2023-01-27 at 7.04.23 AM.png


Here is a snip from BRS website explaining a Bean Animal Drain setup. This is what is typically used for a setup like the one above.

Screen Shot 2023-01-27 at 7.06.27 AM.png


This setup, as crudely shown below would work like this.

The gate valve would be adjusted to set the full siphon water level in the DT/Overflow box. The trickle drain would just barely have water going down it and the emergency drain would be just above the water line and is only ever wet if something happens to clog up the other 2 drains.

So for the below, you can see the 3 blue lines are your drains. The Main and trickle would go to filter sock area or whatever is the start of your sump. These 2 lines would be just under the waterline to keep things quiet. The emergency drain would be set to either the same chamber, the skimmer/fuge chamber or another chamber where the water is somewhat calm. This allows for an audible alert (water from pipe draining loudly or dripping) to let you know that one of the mains is clogged or misadjusted. That is the drain system.

For the return part, the red box int he below is the return pump. The return lines would run from it up to the return holes/blukheads in your tank. For this, usually most will plump the returns to where it is an even distance between the 2 returns and joining them with a wye or a tee to become a single line. From there, the single line runs directly to the return pump and can have a check valve or a shutoff valve installed. Either is fine, and I prefer using a shut off valve for maintenance purposes. Check valves are not really needed and will get dirty. If dirty, they will not stop a siphon when the return cuts off for whatever reason. You can buy ones that can be disassembled and cleaned, so that is an option. I prefer just to drill small antiphon holes in my locline that is on the inside of the tank from the returns. You just drill them in a pice that is just a hair below the waterline line. Some water will drain back, but when the hole is exposed to air, the siphon stops.

Again, this is crude, but hope it helps.

Screen Shot 2023-01-27 at 7.20.20 AM.png
 
OP
OP
8

8888Tank

New Member
View Badges
Joined
Jan 26, 2023
Messages
3
Reaction score
3
Location
Pittsburgh, PA
Rating - 0%
0   0   0
More than likely, the 2 holes in the middle are for an overflow box. You can measure the distance between the 2 holes and then look at overflow boxes specs to see which one fits that. I would suspect due to tank type, it may be drilled for an Eshopps overflow box.

The other 2 holes would be for your return lines. You would put bulkheads in those (more than likely drilled for 3/4" bulkheads). For bulkheads, I would measure the hole size and then compare that to a bulkhead size chart. I believe BRS hs. chat on their website. One thing, bulkhead labeled 3/4" is not really 3/4". The 3/4" is for what size pipe or threaded fitting the bulkhead is intended to take. For example, a 3/4" ABS bulkhead takes a 3/4" pipe or fitting, but the actual outside diameter of the bulkhead is usually around 1.33".

For how this would work, it would really depend on what overflow box was being used.

This is crude, but should help explain it.

Here is an Eshopps Overflow Box to use as an example. You have 3 drains in it. One will be for the main drain, the other for a trickle drain and the last for an emergency drain.

Screen Shot 2023-01-27 at 7.04.23 AM.png


Here is a snip from BRS website explaining a Bean Animal Drain setup. This is what is typically used for a setup like the one above.

Screen Shot 2023-01-27 at 7.06.27 AM.png


This setup, as crudely shown below would work like this.

The gate valve would be adjusted to set the full siphon water level in the DT/Overflow box. The trickle drain would just barely have water going down it and the emergency drain would be just above the water line and is only ever wet if something happens to clog up the other 2 drains.

So for the below, you can see the 3 blue lines are your drains. The Main and trickle would go to filter sock area or whatever is the start of your sump. These 2 lines would be just under the waterline to keep things quiet. The emergency drain would be set to either the same chamber, the skimmer/fuge chamber or another chamber where the water is somewhat calm. This allows for an audible alert (water from pipe draining loudly or dripping) to let you know that one of the mains is clogged or misadjusted. That is the drain system.

For the return part, the red box int he below is the return pump. The return lines would run from it up to the return holes/blukheads in your tank. For this, usually most will plump the returns to where it is an even distance between the 2 returns and joining them with a wye or a tee to become a single line. From there, the single line runs directly to the return pump and can have a check valve or a shutoff valve installed. Either is fine, and I prefer using a shut off valve for maintenance purposes. Check valves are not really needed and will get dirty. If dirty, they will not stop a siphon when the return cuts off for whatever reason. You can buy ones that can be disassembled and cleaned, so that is an option. I prefer just to drill small antiphon holes in my locline that is on the inside of the tank from the returns. You just drill them in a pice that is just a hair below the waterline line. Some water will drain back, but when the hole is exposed to air, the siphon stops.

Again, this is crude, but hope it helps.

Screen Shot 2023-01-27 at 7.20.20 AM.png
Thank you!!
 
OP
OP
8

8888Tank

New Member
View Badges
Joined
Jan 26, 2023
Messages
3
Reaction score
3
Location
Pittsburgh, PA
Rating - 0%
0   0   0
By the way, looks like you are new here, so welcome.

If you decide to get that thing setup, start a build thread. Would love to see it all setup and going.
I am definitely new. I am a little intimidated, but excited to try. I still haven't decided if I will do fresh/planted or salt/reef. Salt/Reef seems much harder and more time consuming.
 

Eagle_Steve

Grandpa of Cronies
View Badges
Joined
Jan 30, 2018
Messages
11,564
Reaction score
60,957
Location
Tennessee
Rating - 0%
0   0   0
I am definitely new. I am a little intimidated, but excited to try. I still haven't decided if I will do fresh/planted or salt/reef. Salt/Reef seems much harder and more time consuming.
They both have their challenges. But if looking to salt/reef, I suggest reading the stickies shown below, having a good hard thinking session about what your end goal is, finding some builds that are close to that and read through them. From there, you can be pretty well informed and have only one thing left. That one thing is patience. It is your best friend when it comes to being new to this hobby.
 

High pressure shells: Do you look for signs of stress in the invertebrates in your reef tank?

  • I regularly look for signs of invertebrate stress in my reef tank.

    Votes: 36 31.3%
  • I occasionally look for signs of invertebrate stress in my reef tank.

    Votes: 28 24.3%
  • I rarely look for signs of invertebrate stress in my reef tank.

    Votes: 21 18.3%
  • I never look for signs of invertebrate stress in my reef tank.

    Votes: 30 26.1%
  • Other.

    Votes: 0 0.0%
Back
Top