Hans and his SCA150 adventure in the Dakotas.

hhaase

Active Member
View Badges
Joined
Nov 11, 2019
Messages
415
Reaction score
355
Rating - 0%
0   0   0
Hi there, I'm Hans from South Dakota. Long time listener, first time caller. I've decided I wanted to finally transition my build thread here from elsewhere on the internet. Mainly since people, you know, actually visit this site. And that's all I'll say on THAT topic. Let's get on to some fish stuff. Some background on me is that this is my 2nd large saltwater tank, along with a bunch of smaller freshwater tanks. My previous tank was a 90 gallon AGA which was a long and difficult learning process over about a 5-6 year period. At the end it was running well, then I had to move cross-country, and the tank was broken down and sold. Only a few items remained and I'll mention that later.

So the good news for you guys is that I'm going to pretend to start this tank from scratch..... but in reality it's been running for months. While it's not an exciting SPS packed wonderland yet..... I'm happy with it and things seem ready to really take off soon. My lessons from the previous tank came in handy with a long planning period, so I'm off to a much better start this time around. I'm no expert by any means but I'm not awful at this either. I was tempted to lead off with a full-tank shot.... but that spoils the suspense! We'll start with the obligatory photos of the bare tank after being delivered, and move on from there, shall we?

The empty space here is where the tank was planned to go. It's sheltered from any natural sunlight, sits on a basement concrete slab, and down here the temp is a touch on the cool side even in the summer. A near perfect location. The other good thing about this spot is that door on the left, which is my utility room. There's space in that room for some remote elements to the tank that have made my life SOOOO much easier. But again, spoilers! (and yes, I fixed the missing drip loop on my shrimp tank. What an embarrassing photo.)

HansReef-0002.JPG


The tank is the ever-popular SCA 150, pre-drilled for the Synergy Shadow overflow. I knew I wanted a back-mounted weir of some type, and thru-glass returns. It fits the available space nicely, and the dimensions are exactly how I wanted. It's exactly the size I said I wanted when I first started planning. It took four of us to get this down the stairs. Heavy box of glass for sure.


HansReef-0013.JPG


The stand was custom made at a local shop to my dimensions, and here it is prior to color and panels. Don't worry, I know what you're worried about, I took care of that. I also had some crossbars installed along the back and under the top for helping with plumbing and wiring. It was a long and convoluted process to get this stand built and finished, due to some issues with the shop, but in the end I was very happy with the result. Plenty beefy to hold the weight, very solid, and great access. I can't wait to show you guys the finished look.


HansReef-0012.JPG
 
OP
OP
hhaase

hhaase

Active Member
View Badges
Joined
Nov 11, 2019
Messages
415
Reaction score
355
Rating - 0%
0   0   0
OK, now that I teased a few things, let's start getting into more nice details on this build. We'll go from the bottom up and start showing the stand.

Here's a few shots of it prior to lifting the tank. The finish is rhino-lining with stainless sides and doors. You can also see the rear and top cross-bars that I had put on. The doors swing normally and the sides are removable if needed, so that I can install or remove a full length sump. I only remove one side at a time, as I didn't even think about gussets until it was too late, and the welding shop doesn't normally do tank stands, so they didn't think about it either.

It got 1/2" plywood on the inside shelf, and 3/4" plywood on top. Cosmetics and a bit more structural work weren't done here yet. The coloring was chosen to match the rest of the room and provide a bit more POP as a focal point on that wall.

Budget wise I splurged on the tank, and I splurged on the stand, as those are the pieces that are most critical in the long run. I had to make a few sacrifices here and there in order to get this all up and running, which is another part of my decision on the lighting. As you can see I didn't exactly buy a high end sump either. Media reactors were used, dosing pump is a jebao, and the skimmer is a Bubble Magus Z7. Eventually those are going to probably see some upgrades but are working well for now.

HansReef-0014.JPG
HansReef-0015.JPG
HansReef-0017.JPG
 
OP
OP
hhaase

hhaase

Active Member
View Badges
Joined
Nov 11, 2019
Messages
415
Reaction score
355
Rating - 0%
0   0   0
Looking forward to the build.

Appreciate it! The good news is I've had water in it for 9 months now, so I've got a few pictures to play catch-up with.

I'm going to side-step a bit now to the overflow. The tank was pre-drilled for the Synergy overflow, but there are a few things I didn't like about that one, so I ended up with one from Modular Marine instead. It was a couple bucks extra to fit it into the Synergy hole pattern but I really liked how theirs actually reached the top of the tank. The extra height also let me flip the bulkhead fittings upside down for the plumbing, meaning I put the threads and mounting nuts on the inside of the overflow box. The advantage to this is that I can completely disassemble the drains from the overflow without cutting any pipe. The only drawback is that the bulkhead fittings extend a couple inches upward into the box. I had to get a bit creative to make that work, including 3D printing a tool to tighten the bulkhead nuts, but it gave me that ability to maintain if needed.

It's really hard to get a picture of the internal weir since it's black, the tank backing is black, and everything is shiny. Looking at it across the room I can't even see the internal box at all. This is one of the few angles that you can see the thing. Since I assembled this all with the tank already near the wall, I wasn't able to get a good camera angle behind the tank.

HansReef-0019.JPG


I was doing a few courses in Blender at the time, and had a creative streak. So I modelled this U-bend for inside the rear box. Nobody will ever see it, except the rare cases I have to look into the overflow, but sometimes I just get fancy with things for no particular reason. Otherwise it's a pretty standard Bean Animal overflow setup. I only had to do a bit of adjusting when I first ran the pumps, since then it's been silent and reliable for me.


HansReef-0021.JPG
HansReef-0022.JPG
 
OP
OP
hhaase

hhaase

Active Member
View Badges
Joined
Nov 11, 2019
Messages
415
Reaction score
355
Rating - 0%
0   0   0
Like water through the overflow, these are the tanks of our lives. Let's keep following that water.

Downpipes like I said are a pretty standard bean overflow. The crossbar there gives me a spot to support the bottom halves of these. This photo I was still test-fitting and working out locations for everything, so nothing was glued yet. I did the downpipes first and then worked everything around them. The 45's in there keep the water flowing along the pipe walls and keeps it from doing a direct drop into the sump, which helps keep things quiet. I eventually had to move the main drain to the center location due to clearances in the overflow box with my u-bend.

HansReef-0020.JPG


Then here we've got the return manifold. I'm using a pair of Jebao pumps, one running to each of the returns, and sized to run at about 30% during normal operation. Left pump only runs the left return, right pump runs the right side return and reactor manifold. Should one pump fail, or just for normal maintenance, I just need to turn a pair of valves and a single pump can maintain the whole system at around 70%-80% of pump capacity.

HansReef-0023.JPG


Once I had all the plumbing sorted out, I put a simple 2-panel baffle into the sump. I don't like to drive a huge changeover through the sump, I prefer to slow it down a bit and let the water interact with the different filtration elements more before heading back to the tank. I don't have any issues with microbubbles at all that way either, so the baffles are mostly there to keep a constant level for the skimmer. Due to the bright flash, you can't see that I've also painted the bottom panel at this point to match the room walls and protect the plywood a bit. I also added in some couplers to the return lines, the bottom few inches aren't glued so that if needed I can still pull the sump by just removing that little stub. Eventually I plan on adding a refugium chamber to the right of the sump, but I've left that area open for the meantime. I want to make sure the rest of the design is viable and matured before adding that in.

HansReef-0028.JPG


And that's how things looked with the tank at the time it got filled back in June, 2020. About 100lbs of dry rock and 100lbs of oolitic aragonite with a dual island aquascape, the left side has a nice cave/overhang in there. This places the rockwork directly under the lights.


HansReef-0027.JPG
 
OP
OP
hhaase

hhaase

Active Member
View Badges
Joined
Nov 11, 2019
Messages
415
Reaction score
355
Rating - 0%
0   0   0
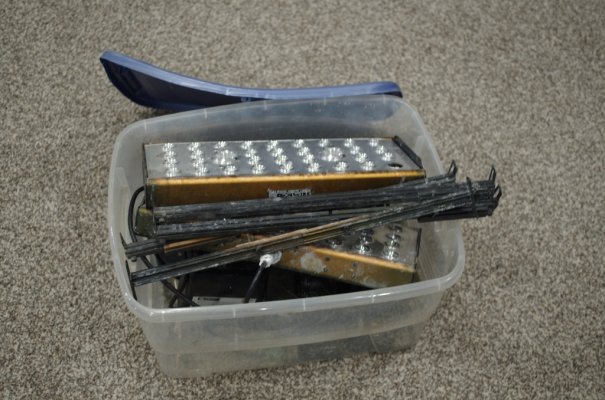
You guys are going to love this. Here's my lights. No, I'm not joking. These are the sad remains of my previous tank, a pair of MaxSpect G2 160's.

These lights were a massive disappointment to me. I bought them new, and they were NOT cheap at the time. They were the "Hot New Ticket" when I was in the market. Each of them has 16 blue and 16 white 3w LED's and a pair of 30W white LED's for some real SPS frying punch. Not the smartest design choice with those big units, but I didn't know any better at the time.

Almost from the start I had blue LED's failing, driver modules failing, and wires burning off of the 30W LED's. During warranty I got 3 or 4 driver modules replaced, one cable, and a few blue LED's. Once the warranty ran out the communication with them stopped and things really went downhill. I think only half of the blue LED's were still working when I tore my old tank down. So if you notice some animosity toward MaxSpect from me in the future, these lights are why. Their trade-in deal only made me more upset.

I'm using these lights because I'm stubborn and want to prove a point to myself. And if anybody has another one of these units they want to sell me for cheap, I'm actively looking for one, because I'm REALLY stubborn.

But don't worry, this gets fun.

HansReef-0005.JPG

Now for the fun I'm having with these crappy old LED's......

So this generation of MaxSpect lights had a few of very significant problems, and I think MaxSpect really burned a lot of people in how they handled it. The biggest problem were that they were over-driving the LED's. I was told the blue LED's were rated for 700mA, and were being driven at 1050mA. So they put out a lot of PAR for a while, but the failure rate was quite excessive. I had a number fail during the 1yr warranty period, and they continued to fail as time went on. At the 18 month point 50% of my blue LED's were dead, and that's AFTER I had already receive a half dozen replacements. Not a great selling point for something advertised as a long-term solution.

Like I said, I'm stubborn, so I bought some replacements from Steves LED's to directly swap out all of the blue pieces in both pendants. Out came the old, and in went the new. These are the Seoul Z5's, which may not be the best on the market, but are a big upgrade from the originals. I, uh, forgot to take a picture after I soldered the wires on. I'll do that in the future with some upcoming upgrades. As you can see, the old LED's are pretty scorched. The original white LED's survived much better, so I left them in place. You can also see the big 30W LED's in there, which I originally kept..... that didn't go well. I'll talk about that in a later post.

HansReef-0007.JPG

HansReef-0008.JPG


The other big issue was the driver modules. They also had about a 50% failure rate during the same period. I was able to limp them along until my 90 gallon was torn down, but I also knew that long-term it wasn't going to be viable to keep them going. When the 150 got set up I still used the original drivers for a while, during that time I planned my other updates. The thing is, the modular drivers were utter trash, but the power distribution board actually wasn't too bad. The controller board is pretty basic, but also isn't bad at all. What I ended up doing was building a new power distribution board that uses meanwell APC-35 drivers in place of the MaxSpect drivers. I'm currently only using two of the three channels, again I'll explain that later. But I did build in a circuit to add a third driver and use that third channel at some point. It'll be tight though. Top half of this picture shows the original distribution board, bottom half is my replacement. It's snug, but it fits. I'm currently using 500mA drivers but I can easily swap in a few different rated units either more or less powerful as needed. I have a PAR meter on order, which is something I've lacked, so I'll wait until I have more data before I make any further lighting decisions.

But now you can see why I want a third one of these units, because I have a solid rebuild plan and realistically I do know I need more PAR in this tank. Long term though I know I'll be completely replacing the lighting with something more modern. But I needed to pick and choose where to spend the budget. I was able to refurbish these for just a couple hundred bucks, which will get me by until I have enough money to get some top-end lights from a more reputable brand.

HansReef-0045.JPG
 
Last edited:
OP
OP
hhaase

hhaase

Active Member
View Badges
Joined
Nov 11, 2019
Messages
415
Reaction score
355
Rating - 0%
0   0   0
Now, to get pretty much caught up with display tank equipment, here's what it all looked like after filling and initial aquascaping. The lighting is a bit washed out on purpose in this picture, as I was evaluating if I wanted to keep the lens kits on the LED units. I decided not to keep the lenses, as it's just too directional and too focused directly on the rocks. But here's how it all looked while cycling. It really came along nicely and I'm super happy with the tank and stand.

Lighting is the previously mentioned refurbished MaxSpect's, and I'm using a Jebao SCP-150 gyre pump for circulation. This pump gave too much flow initially while the sand was fresh, so until last week it was only on the bottom two power settings. I'm slowly ramping it up now though since the sand has taken on its biofilm and isn't blowing around any more. I don't make big changes, the sand has been stable for a couple months, and I'm being cautious not to over-do it.

HansReef-0032.JPG


This is the sump section, not long after I started cycling. I picked up a Profilux as you can see, and I still hadn't had a shelf for it yet. I still haven't appreciably cleaned up the wiring either. In fact, the wiring is much worse now due to more additions that came later.

The red media reactor has about 1L of BRS biopellets in it. There's also a bit of carbon in there but not too much. I find carbon to be too much of a crutch at times. Third reactor is empty. From past experience, biopellets are a pain to add into an already working system. You've really got to add them in slow and let them cycle. But once they stabilized, my old tank really took a turn for the positive. So I added these right from the initial fill and I've got to say I've never had a tank cycle so easily and with such stability. I never had an appreciable ammonia or nitrite spike, nor did I have the big diatom bloom I'm used to seeing.

Another addition that went in early was the back 1/2" plywood back panel. It's bolted directly to all the uprights in order to prevent any sideways shifting of the stand. There's also some household LED pucks along the top for giving me some illumination when I'm working underneath.

And, yep, more Jebao. Triple circuit dosing pump for calc, alk, and mag. I'm eventually going to upgrade some of these components to higher end stuff. But going with more budget pumps and re-furbishing the lights let me spend on the Profilux.


HansReef-0033.JPG
 
OP
OP
hhaase

hhaase

Active Member
View Badges
Joined
Nov 11, 2019
Messages
415
Reaction score
355
Rating - 0%
0   0   0
Now to get the tank situation completely caught up, here's a full tank shot from last week. Details are after the photo.

HansReef-0043.JPG


Cycle started 6/29/2020
First stocking was 7/29/2020
So we've just about hit the 8 month point on the tank hosting livestock. The ecosystem is only recently starting to thrive, so I haven't stocked much coral at all yet, and am only about 50% of what my eventual fish-load will be. Coraline algae only recently started showing up and I've had no real measurable calcium consumption, while alkalinity has only required very minor dosing to maintain.

Livestock:
1x Percula clown
2x Kupang Damsels
2x Bangai Cardinals
1x Firefin Goby
1x Serpent Star
1x Skunk cleaner shrimp

I did lose a lawnmower blenny last week, which is my only fish loss in this tank. He made the great escape, and was found on the carpet behind the tank. I miss that guy, he was the only one so far that I'd seen the shrimp actually cleaning.

Corals:
1x Favia, about golf-ball sized and growing nicely.
1x sarcophyton, was doing well, but now I'm struggling with some nearby vermetid snails annoying it.
1x Capnella. This kenya tree just will NOT grow.
1x damicornis, Healthy but not growing very rapidly. Probably too low / not enough PAR.
1x yet-unidentified coral, possibly Porties (acquired yesterday).

I also had a decent frag of red monti-cap, but the 30w LED bricks inside these lights completely scorched it in very short order. It was limping along for a while, but eventually died. That is until I found a small chunk on the sand that had broken off at some point. Only about a dozen polyps on it, but the color is coming back and I've got my fingers crossed that it may yet grow out on me.

I'm only playing guessing games on PAR right now, and I'm assuming it's low. I've got a PAR meter on order from BRS which will answer a lot of questions for me on this tank. The next phase of this tank will really be decided by those numbers. I have a couple ideas on getting more PAR from these lights, or I'm also considering saving up and doing a complete new light system. Nothing is dying off, but nothing is thriving either except the Favia.
 
Last edited:
OP
OP
hhaase

hhaase

Active Member
View Badges
Joined
Nov 11, 2019
Messages
415
Reaction score
355
Rating - 0%
0   0   0
Huh, more PAR than I expected from these lights. It's still not enough, but it's worth me pursuing a bit more modification on the lights to boost it before I start worrying about getting new lights right away. Quick and dirty PAR readings are as follows.....

#1 = 110par
#2 = 240par
#3 = 120 par
#4 = 200 par
#5 = 110par

I'm going to do some more thorough measurements once I get a better mount for the sensor, and these are with an SQ-420, so I'm likely reading a bit low. Still.... surprising. My brain is tossing around a few ideas on ways to boost it within these fixtures. I just don't know which way yet that I'm going to go.

HansReef-0043A.JPG
 
OP
OP
hhaase

hhaase

Active Member
View Badges
Joined
Nov 11, 2019
Messages
415
Reaction score
355
Rating - 0%
0   0   0
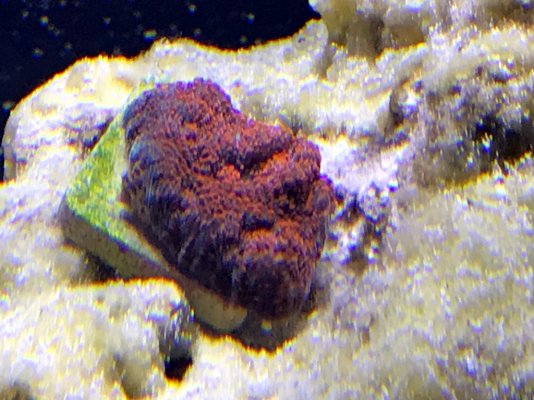
Just a couple random shots. First is the new coral, and I'm terrible with SPS ID. (Update: it's not even an SPS, it's a Chalice) Anybody tell me what this sucker is? Seemed to be thriving at the edge of the frag tank, so it doesn't seem to be a high light coral. Sorry about the blotchy digital zoom.

HansReef-0047.JPG

Second photo is an old one I found of two of my favorite occupants. Both still thriving after at least 6 months. Rare to get a photo of the serpent but he seems happy.

HansReef-0048.JPG
 
Last edited:
OP
OP
hhaase

hhaase

Active Member
View Badges
Joined
Nov 11, 2019
Messages
415
Reaction score
355
Rating - 0%
0   0   0
I have some LED parts on the way to update the fixtures a bit more. I'm going to add back in that third channel with some hyper-violet's driven at 700ma, plus I'm going to rebuild the white channel completely, and have a mix somewhat similar to the Radion XR15 blue's. This will be as far as I'm going to modify the existing lights, anything further is just spending a lot of money for little return, eventually I will be replacing these but have some other things to take care of on the tank first.

I'm seriously considering removing the current biopellets and replacing these with a good refugium light and some chaeto (or other macro, given the chaeto availability these days.) I had expected my lack of coral growth to be due to a lack of light. But the PAR numbers I'm seeing should be in the sufficient range for more favia growth and color, and my softies should be very rapidly growing at these PAR numbers. So I'm guessing I'm nutrient deficient.

I hadn't really seen a need for nitrate and phosphate testing until this point. I need to start doing that. It's one thing to suspect an issue, but without proper testing I'm only setting myself up for failure. So first step is to start testing, then make changes based on the results.

Another problem I spent today solving was lack of connectivity on the Profilux, which was more of a house WiFi issue. This connectivity problem had kept me from setting up proper data charts, so I can go ahead and work on that now too.
 
OP
OP
hhaase

hhaase

Active Member
View Badges
Joined
Nov 11, 2019
Messages
415
Reaction score
355
Rating - 0%
0   0   0
All the LED parts are in the mail, should be here in a week.

As are a Kessil A360X and 4oz of Ulva since all my normal sources don't seem to have any Chaeto in stock.

Then I also ordered a Hanna nitrate checker, and reagents for my phosphate checker. Like I said, time to start monitoring this properly. My initial phosphate test was high at 0.41, which is really unexpected with having a liter of biopellets in the reactor. But I won't have the full picture until I also have a nitrate test going. Could be leaching from the rock which isn't unheard of. I don't have any algae issues at all, so I'm assuming I've got a low nitrate but high phosphate situation.

I did find that the pellets had clumped on me and weren't tumbling properly. I got that taken care of and will do a couple more tests before introducing the algae to confirm if that was contributing.
 
Last edited:
OP
OP
hhaase

hhaase

Active Member
View Badges
Joined
Nov 11, 2019
Messages
415
Reaction score
355
Rating - 0%
0   0   0
Aaaaaaand I'm stuck with it. Will cost me $55 to return it. I'll have to figure out some way to make it work the way I had originally hoped it would.
 
OP
OP
hhaase

hhaase

Active Member
View Badges
Joined
Nov 11, 2019
Messages
415
Reaction score
355
Rating - 0%
0   0   0
Oh my lord, Ulva smells TERRIBLE. I didn't realize that when I ordered it. Hopefully the stuff starts to improve as it settles in.

More updates later. Uck!
 
OP
OP
hhaase

hhaase

Active Member
View Badges
Joined
Nov 11, 2019
Messages
415
Reaction score
355
Rating - 0%
0   0   0
Well that was a fun Friday night. This Ulva was an absolutely awful choice to order. Never again. I’ll just wait for chaeto, no matter how long that takes.

I didn’t initially realize how much this batch stunk before putting it into my refugium. The first thing I realized was how much better ulva is than chaeto at getting out of the refugium and into the sump at large..... and thus into my entire system. So I shut the pumps down in a hurry to minimize the result. My attention was focused on this problem too much to catch the issues with the health of the ulva.

I had some eggcrate and window screen around, so I made up a quickie screen to keep things in the refugium. This worked reasonably well, but then the smell really start to hit me. By then It had stunk up the whole house. Badly.

We went out to dinner to let the house air out, but it still smelled really bad upon return. So I decided to trash the Ulva with a vengeance. I don’t care if they refund or not, I just wanted it gone.

Easier said than done though. It crumbled and broke apart if I so much as looked at it funny. Took forever to get most of it out, and it had managed to pack into both the return pumps plus the skimmer. All three needed the impellers pulled to clean them out. The skimmer was the worst as it also collected in the air box and I had to tear the skimmer apart three times as the ulva continued to collect pieces in there. Needle wheels also hold crumbly macro algae quite nicely too. Fun!

So all the pumps are running properly again now. I put in a carbon reactor as a precaution, and didn’t see any ammonia on an API test. So I think things are going to be ok. Livestock doesn’t seem to be concerned at all other than some momentary closed polyps that have since gone back to normal. I’m sure nitrates will go up a bit, but the tank needed that anyway.

I also put in a filter sock for the night to try and catch as much of the floating pieces as I can, plus clear out floating detritus that got kicked up while cleaning the sump. I know I’ll be seeing this stuff grow again on me though. It just got too chopped and pumped all over the system for it not to be thoroughly introduced. Oh joy. I’ll make sure my next livestock are herbivores.
 
OP
OP
hhaase

hhaase

Active Member
View Badges
Joined
Nov 11, 2019
Messages
415
Reaction score
355
Rating - 0%
0   0   0
Like I said, this stuff got EVERYWHERE in my sump system. Here's just one of three batches my skimmer harvested.


HansReef-0049.JPG


Wait till you see it......

HansReef-0050.JPG


Ceramic bushing for the impeller on my skimmer.
I didn't save it, had to pull the trap to get it back. Thankfully I was able to retrieve it that way.

Though, to be honest, my chalice has never looked this happy. Today is the first time I've really seen it reaching out with its feeder tentacles, and my favia is looking fuller than it has in a while too. Though could be because I started target feeding them mysis last night. Though my toadstool does look happier and more extended again too. So maybe I'm on the right track in looking to increase nitrates.
 
OP
OP
hhaase

hhaase

Active Member
View Badges
Joined
Nov 11, 2019
Messages
415
Reaction score
355
Rating - 0%
0   0   0
Today was a good day. I posted more details in the lighting forum, but I got the 2nd channel rebuild done today on both of my fixtures, and got some work done on the 3rd channel. I'm now running a pseudo AB+ spectrum, and initial tests show an appreciable bump in PAR. Now I just need to get that violet channel done and these fixtures are finished. I've got a feeling they're going to work quite well for a while longer. Gives some great pop to my chalice, so yay! I think these lights are going to be exactly what I need for this tank.

The Hanna Nitrate Checker arrived as well. Seems complex on first view, but not as bad as some other tests I have like a Red Sea Magnesium test. As expected, it tested at zero nitrates. I need to start working on raising that a touch.

HansReef-0055.JPG
HansReef-0056.JPG
 

Being sticky and staying connected: Have you used any reef-safe glue?

  • I have used reef safe glue.

    Votes: 127 88.2%
  • I haven’t used reef safe glue, but plan to in the future.

    Votes: 8 5.6%
  • I have no interest in using reef safe glue.

    Votes: 6 4.2%
  • Other.

    Votes: 3 2.1%
Back
Top