Jasen's Office Tank - 15 gallon Reef

JasenHicks

Community Member
View Badges
Joined
Aug 9, 2020
Messages
48
Reaction score
79
Location
Yokosuka, Japan
Rating - 0%
0   0   0
I am building a new setup to replace my non-drilled, 8 gallon tank in my office here in Japan. Since this is in a Navy Building and I have office mates, I can't just build a 90 gallon tank and go nuts. Need to be a good colleague and all plus reef keeping in Japan is expensive! Fortunately, I can get shipments at reasonable shipping rates and times via Fleet Post Office from the states, but alas all my live stock comes from one tiny store in my town because I haven't been able to navigate the Japanese internet very well (I don't speak/read Japanese. I am a very bad Gaijin).

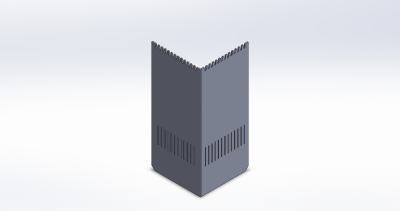
I am using this Kotobuki LEGLASS F-600S tank to start. Instead of using the combined drain/return I am going to neck the drain down to 25mm pipe (from 50) so it fits into the bulkhead on the blemished Sapphire 26 I am trying to finalize with Trigger Systems. Normally, I would try to do a a dual or triple drain (Herbie or Bean Animal method), but I only have the one hole and I think its going to be hard to crap up a 50mm hole. Noise isn't an issue since our office has huge vents overhead that are constantly blowing air making the tank seem silent (at least my current one). One I am going to do is make a new overflow cover insert. I have access to a laser and decent plexi/acrylic so I'll just make two pieces, weld-on together and remove the white part. I want more teeth at the top for the overflow, and a different pattern at the bottom (I may just omit them completely).

I picked up a ton on plumbing parts from BRS and a new skimmer including a Syncra Silent 5.0 Pump and a SN143-QP Monzter Mini Protein Skimmer. General diagram of my plumbing down below. If you like the graphic and want to use any of the parts inside to plan plumbing, let me know. I have it saved as an illustrator file and will be happy to share it.

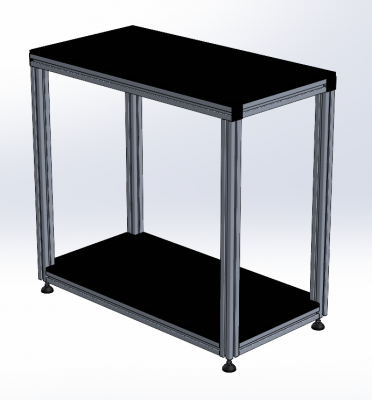
For the stand, I reached out to Framingtech to get a quote. The sump is definitely the limiting factor since the tank is only 600mm x 300mm x 45mm so the stand will be a bit overkill. I do plan on moving home again in the future so I will reuse a lot of this for a bigger tank in 2023 when I retire/return.

Plan: Setup the new system at home and validate no leaks. Break it all down, move to the office. Set it up and move 1/2 of my media in my Eheim canister to the refugium section of the sump to kick start it all while maintaining the current system running. Once the new tank is ready to accept the old tank's inhabitants they will move over, or at least get fragged out so I can minimize any problems in the display.

For rockwork, I may look more at Than from Tidal Gardens recent projects with sand, CA, and rocks to build a neat structure that's open and offers something a bit nicer than my current place and pray rockwork.
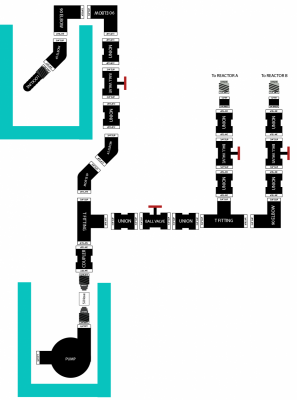
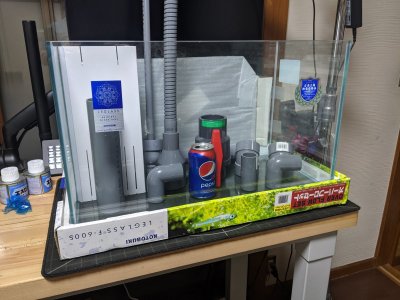
plumbing-plans.PNG IMG_20200809_172722.jpg
 
OP
OP
JasenHicks

JasenHicks

Community Member
View Badges
Joined
Aug 9, 2020
Messages
48
Reaction score
79
Location
Yokosuka, Japan
Rating - 0%
0   0   0
Will do! I love this hobby and am mad it took me this long to get back in. Just ordered 50lbs of Reef Saver rock from Marine Depot to get as much here and ready to go as possible :) COVID-19 takes a lot of free time for travel and turns it into project time, doesn't it?
 
OP
OP
JasenHicks

JasenHicks

Community Member
View Badges
Joined
Aug 9, 2020
Messages
48
Reaction score
79
Location
Yokosuka, Japan
Rating - 0%
0   0   0
First render from FramingTech came in. It's not fancy by any means but I think it will do. I am asking them to add a cross bar across the back and one under the main tank. Cross bar across the back for attaching things like my plumbing manifold and top for a convenient mounting point for a refugium light.

I am going to forgo the HDPE panels and see if I can source some nice plywood from a local source here in Japan. My local store "Homes" has some interesting slabs available but all of my tools are in storage back in the US, so I'll have to either buy a jig saw to cut some of it or hopefully COVID restrictions are lifted so I can use the on-base wood shop :)

@Takaki1980 - Any recommendations for local fabricators that might be able to help with some wood tops? :-D

image.png
 
OP
OP
JasenHicks

JasenHicks

Community Member
View Badges
Joined
Aug 9, 2020
Messages
48
Reaction score
79
Location
Yokosuka, Japan
Rating - 0%
0   0   0
Ordered an RO/DI unit from Air,Water,ice. I had one similar in 2004-2007 from them and it was great. I figure that 13 years later I should still support :) I'll have to figure out what I need to hook it up to my alt washer hook up here in Japan though. I'll share pics of the install when done :-D

1597196269781.png
 
OP
OP
JasenHicks

JasenHicks

Community Member
View Badges
Joined
Aug 9, 2020
Messages
48
Reaction score
79
Location
Yokosuka, Japan
Rating - 0%
0   0   0
I'm not a huge fan of the included baffle plates for my tank, so instead of living with it ... I just designed my own. Mocked up in Solidworks, shown below. I'll cut out of 3mm black acrylic on a laser and use weld-on to keep the pieces together. I didn't like the lack of teeth around the top of the baffle because I could see the 4 thin slits getting clogged almost immediately and the slits around the bottom went all the way to the bottom so I suspect it those would get clogged up as well.

My design has 10mm x 5mm teeth around the top and 2mm wide, 50mm tall slits around the bottom that start 75mm above the bottom. This is well above the top of the sand I intend on using (likely going to use about 1cm of sand just to have something down there.

baffle-assembled.PNG
 
OP
OP
JasenHicks

JasenHicks

Community Member
View Badges
Joined
Aug 9, 2020
Messages
48
Reaction score
79
Location
Yokosuka, Japan
Rating - 0%
0   0   0
This project is rather simple, a 1" pipe hanger designed to fit around t-slot aluminium extrusions. Why? I like clean straight lines for my plumbing and fitting it around my new Framingtech stand will do just that. I spent an hour or so in Solidworks making the model and getting it just right. This was the first print and I realized that I made some key mistakes. Another attempt is coming! Printer: FLSUN QQ-S PRO Filament: PURSA PLA Galaxy Black

 
OP
OP
JasenHicks

JasenHicks

Community Member
View Badges
Joined
Aug 9, 2020
Messages
48
Reaction score
79
Location
Yokosuka, Japan
Rating - 0%
0   0   0
A number of updates that I failed to post as I went.

First up: A new RO/DI from airwaterice.com - I only have a 10GAL reservoir for my water, but it works and fits in my space. Fortunately, here in Japan my home has a second washer connecting in my down stairs bathroom area. It's super weird but very convenient and my cats still have a place to "do their business" rather unbothered.

IMG_20200901_183046.jpg


Incoming TDS is super low.

IMG_20200901_183623.jpg


But effluent is better :)
IMG_20200901_183619.jpg


This little guy really held me up since my RO/DI setup is intended for use on American Style pluming and fixtures but Japan uses JIS and BPT fittings so I had to get creative. Fortunately, @Takaki1980 put me on to some great resources and Vlad of Coral Aquatic really helped me out by showing me where I could get this adapter. It was a $30 kit that I only needed on part out of. Worth it.

IMG_20200831_211227.jpg


If you are in Japan and want to support Vlad and Coral Aquatic, details below.


[ サンゴ専門店 ] コーラル・アクアティック
〒164-0013 東京都中野区弥生町2-8-7 輿水ビル1F
TEL: 03 6276 3484
MAIL: [email protected]
 
OP
OP
JasenHicks

JasenHicks

Community Member
View Badges
Joined
Aug 9, 2020
Messages
48
Reaction score
79
Location
Yokosuka, Japan
Rating - 0%
0   0   0
Next up. My Framingtech aluminium stand! Its way too big for my current setup, but I want to ensure that any investment in equipment now will last a long time and be useful with larger systems. This definitely fits the bill.

IMG_20200910_194512.jpg


I actually quite like the look of the bare frame, but since my tanks is puny compared to it. I needed to add some wood tops and bottoms to support everything. They are being stained (drying) now, so more pics to come.

IMG_20200912_155235.jpg
 
OP
OP
JasenHicks

JasenHicks

Community Member
View Badges
Joined
Aug 9, 2020
Messages
48
Reaction score
79
Location
Yokosuka, Japan
Rating - 0%
0   0   0
Finally for tonight: I finished my rock work using the sand/CA glue trick I saw on Tidal Gardens' YouTube channel. I know Than didn't invent this but its the first place I found it. If I did it all over (which I might do in the future) I'd change a few things.

1. I'd get some activator for initial holding of the rock with thicker glue.
2. I'd use less sand to hold it all together. I think the use of activator and thicker glue to get the first hold would help achieve this.
3. I wouldn't go so high. I got a little excited and made my piece a bit to tall so the top of the rock will likely just be coraline algea area instead of any cool SPS stuff that can grow up. It might be OK but my quick "arm" measure shows its too high. Once I set it in the tank, ill know better and if I have too, ill chip the base down with a hammer and chisel to make it shorter.

I laid out the tank and the rock OK area for ease of reference:

IMG_20200919_150353.jpg


Built the rock structure:

IMG_20200919_175326.jpg


I left the front more open for some clams and swimming space away from the rocks. Ill be putting a stand alone chunk over there so it looks a bit more balanced.
 
OP
OP
JasenHicks

JasenHicks

Community Member
View Badges
Joined
Aug 9, 2020
Messages
48
Reaction score
79
Location
Yokosuka, Japan
Rating - 0%
0   0   0
Thanks! I do love that Litter Robot. If I could have a robot that walked my two Shiba Inus and cleaned up after them... I'd 100% buy it.

The RO/DI is actually attached to a tension wall/divider thing that are pretty popular here. I may be wrong, but most homes have wall paper and not painted walls so if you rent like I do, drilling into them is a big no-no. My home is about 20 years old so I suspect it will get torn down and rebuilt when we move out per the norm, but I wasn't going to risk it. The tension wall isn't "super high quality" but its good enough that the downward force from the RO/DI unit doesn't cause me much concern since its close up against the wall and the space would prevent it from falling more than about 4 feet forward and wedging itself between the walls.
 

Takaki1980

Active Member
View Badges
Joined
Apr 3, 2020
Messages
188
Reaction score
1,398
Rating - 0%
0   0   0
First render from FramingTech came in. It's not fancy by any means but I think it will do. I am asking them to add a cross bar across the back and one under the main tank. Cross bar across the back for attaching things like my plumbing manifold and top for a convenient mounting point for a refugium light.

I am going to forgo the HDPE panels and see if I can source some nice plywood from a local source here in Japan. My local store "Homes" has some interesting slabs available but all of my tools are in storage back in the US, so I'll have to either buy a jig saw to cut some of it or hopefully COVID restrictions are lifted so I can use the on-base wood shop :)

@Takaki1980 - Any recommendations for local fabricators that might be able to help with some wood tops? :-D

image.png
There are a few saltwater fish shops in Japan that make tank stands for you, but they are very expensive and probably don't speak English.

By the way, if you tell them the dimensions, the home center such as "HOME'S" and "CAINS HOME" in Yokosuka will do simple processing for you.They do it quite accurately.
 

Takaki1980

Active Member
View Badges
Joined
Apr 3, 2020
Messages
188
Reaction score
1,398
Rating - 0%
0   0   0
Finally for tonight: I finished my rock work using the sand/CA glue trick I saw on Tidal Gardens' YouTube channel. I know Than didn't invent this but its the first place I found it. If I did it all over (which I might do in the future) I'd change a few things.

1. I'd get some activator for initial holding of the rock with thicker glue.
2. I'd use less sand to hold it all together. I think the use of activator and thicker glue to get the first hold would help achieve this.
3. I wouldn't go so high. I got a little excited and made my piece a bit to tall so the top of the rock will likely just be coraline algea area instead of any cool SPS stuff that can grow up. It might be OK but my quick "arm" measure shows its too high. Once I set it in the tank, ill know better and if I have too, ill chip the base down with a hammer and chisel to make it shorter.

I laid out the tank and the rock OK area for ease of reference:

IMG_20200919_150353.jpg


Built the rock structure:

IMG_20200919_175326.jpg


I left the front more open for some clams and swimming space away from the rocks. Ill be putting a stand alone chunk over there so it looks a bit more balanced.
Very good job!Wonderfully cool!
 
OP
OP
JasenHicks

JasenHicks

Community Member
View Badges
Joined
Aug 9, 2020
Messages
48
Reaction score
79
Location
Yokosuka, Japan
Rating - 0%
0   0   0
I had to put the new rocks in to see if they fit or if I had to do another go because I messed up. They fit and look great! Lots of room for fish to swim through and it tilts back a bit onto its flat spots so there are some tiny overhangs for crabs and such to fit under. Super happy with it.

IMG_20200920_083604.jpg
 
OP
OP
JasenHicks

JasenHicks

Community Member
View Badges
Joined
Aug 9, 2020
Messages
48
Reaction score
79
Location
Yokosuka, Japan
Rating - 0%
0   0   0
Moved everything to the stand to start dry fitting everything. Since this will be taken down and moved to my office (US Navy Officer that works in a secure basement) I have to get everything done at home and leak tested before I move it and finalize it near my desk. This entire thing is a rather stupid build but its zero compromise :) I'm a firm believer in having an upgrade path down the road... and I must say I think I achieved it.

Lights: Reef Builder Photon V2 16" (Main) Kessil H80 for the sump
Return Pump: Syncra Silent 5.0
Skimmer: Mini Skimz
ATO Container: 5 Gallon Sapphire from Trigger Systems
Sump (not pictured): Trigger Systems 26 Sapphire
Circulation Pump: Ecotech MP10


EiWmshfUYAAI4jp.jpg
 

High pressure shells: Do you look for signs of stress in the invertebrates in your reef tank?

  • I regularly look for signs of invertebrate stress in my reef tank.

    Votes: 36 31.3%
  • I occasionally look for signs of invertebrate stress in my reef tank.

    Votes: 28 24.3%
  • I rarely look for signs of invertebrate stress in my reef tank.

    Votes: 21 18.3%
  • I never look for signs of invertebrate stress in my reef tank.

    Votes: 30 26.1%
  • Other.

    Votes: 0 0.0%
Back
Top