Jason’s 185g Reef Savvy with Basement Fish Room

OP
OP
I

inetjnky

Well-Known Member
View Badges
Joined
Nov 3, 2013
Messages
555
Reaction score
294
Location
Pennsylvania
Rating - 0%
0   0   0
Wow it’s been awhile since I’ve updated… a lot has been accomplished in the meantime…

All the electrical has been completed in the fish room and under the stairs in my mixing closet.

I have a full Apex setup running the heart of the system. In the mixing room under the stairs I have an EB8, PM1, FMM (high and low optical sensors and leak detection sensors), and BoB connected to the Head unit to control refilling the top off barrel and the salt mixing barrels. It also runs the mixing pump and powers the Versa (salt), Versa (kalk), and cheap $10 dosing head (fresh) for adding fresh water for ATO and Kalk Stirrer and new salt water to the sump.

BF63F8F6-28F1-4141-9D71-3EBA925B283C.jpeg


i also removed the Avast Marine solenoids I was using to turn the water from the RODI off to both barrels and replaced them with US Solid stainless steel ball valves which are low power and can be powered on safely for long periods of time without any worry of them burning up. Definitely a better choice then a solenoid valve. I also added one before the RODI unit to turn the water supply off to the RODI unit when no water is being requested by either barrel. I added an EB4 at the RODI unit to power that ball valve as well as the auto flush kit so it’s not constantly powered when no water is running through it.

7112396A-535A-466C-8C48-6A803BF15765.jpeg
901F9037-DBDD-4B51-91AE-5F3282288668.jpeg


In the fish room i have two dedicated 20amp circuits powering the heart of the fish room. I’ve mounted two EB832s, one in each 20a circuit to power the return pumps, dual Versa pumps for AWC and Calcium Reactor, the skimmer, the Varios 8 internal return pump for providing flow to a manifold, refugium, and through a Lifegard 90w 3” UV that dumps back into the 60g frag tank. An FMM module has optical sensors attached for high and low sensors for water level in the sump along with a leak detector outside the sump and a 1” flow sensor on the output side of the UV to monitor flow through the UV. There’s a Kessil h160 refugium light hanging above the refugium for macro algae. Inside the refugium are 4 large 8x8x4” marine pure plates and two brightwell bricks along with some large and small ARM media to fill in some gaps at the bottom. For heating i went with two EB4s split across the dual 20a circuits with dual Ranco controllers connected to two EB4s. Connected to the controllers are dual Finnex Titanium 500w heaters. They’re doing a fantastic job keeping up temp, even in the winter months. Was happy to see this. I was worried since I’ll be pushing the limits of the 20a circuits and don’t want to go over 16a on either one. Over the 48x24x12 frag tank I have another EB4 that is powering dual Ecotech Radion XR30 G5 Pros and a single Ecotech Marine Vortech MP60 for flow. I went with the MP60 but dialed it down due to the 3/4” acrylic wall thickness. On this panel I also have a BoB (push buttons for emergency shut off, skimmer maintenance, and turn off the Varios 8 pump for feeding in the frag tank. There’s also a PM1 for monitor temp and PH in the frag tank where I have the probes sitting in the overflow. In the sump itself I have a temp prob downstream of the heaters and a salinity monitor both connected to the head unit. For the main return to the display upstairs, I have a pair of Iwaki MD-100RLT pumps. The frag tank has been laced with ARM media on the bottom for astetics as well as bacteria colonization. Four frag racks not pictured were purchased from Building an Obsession for a nice clean look and feel.

84428242-F382-4EE2-93E8-D42527438738.jpeg
17539017-9600-4228-86E2-134E4FE2EF7D.jpeg
 
OP
OP
I

inetjnky

Well-Known Member
View Badges
Joined
Nov 3, 2013
Messages
555
Reaction score
294
Location
Pennsylvania
Rating - 0%
0   0   0
Also in the fish room I have a 55g QT tank currently setup with a HOB sponge filter, two Hydor Koralia pumps for flow and oxygen, a BRS heater, Tunze nano ATO with 10g top off tank, and a InkBird temp controller. I’m currently running copper at 2.5ppm to QT a sailfin that has been known to have Ich previously. I also have a 40g long available for a second QT as need permits when more fish start arriving before they go into the display. Egg crate with mesh under it protects any fish from jumping out.

image.jpg
 

LVReefer94

Active Member
View Badges
Joined
Aug 18, 2020
Messages
114
Reaction score
51
Location
Las Vegas
Rating - 0%
0   0   0
Also in the fish room I have a 55g QT tank currently setup with a HOB sponge filter, two Hydor Koralia pumps for flow and oxygen, a BRS heater, Tunze nano ATO with 10g top off tank, and a InkBird temp controller. I’m currently running copper at 2.5ppm to QT a sailfin that has been known to have Ich previously. I also have a 40g long available for a second QT as need permits when more fish start arriving before they go into the display. Egg crate with mesh under it protects any fish from jumping out.

image.jpg
Just started reding this thread. Its absolutely amazing!! Keep it up!
 
OP
OP
I

inetjnky

Well-Known Member
View Badges
Joined
Nov 3, 2013
Messages
555
Reaction score
294
Location
Pennsylvania
Rating - 0%
0   0   0
Sump, Refugium, and frag tank have cycled (took about 6 weeks) and have been running now since Feb. started getting diatoms end of March in the frag and refugium after I turned on the lights. I picked up 50 red banded trocus snails from a LFS about an hour away and put 40 in the frag tank and 10 in the refugium. I also picked up 2 or 3 hermits from a fellow reefer that had coralline on their shells to seed the tank. The snails made quick work of the algea and everything has been doing well. In the last few weeks I’ve noticed more green film algae starting to show up and picked up 8 cats eye turbos and added them to the frag tank this week. Hermits got ahold of one of them. They’ve been making it a fine meal over the last two days. Purple coralline has started to show up on the frag racks. Going to add a tester SPS coral in the coming weeks after vacation… I also started the AWC with a dual Versa setup. Calibrated both pumps and set Mobius to change 4.5g per day based on total water volume between the fish room and main display. Been monitoring now for two weeks and it’s been spot on. Salinity isn’t changing either on a constant 24x7 cycle.
 
OP
OP
I

inetjnky

Well-Known Member
View Badges
Joined
Nov 3, 2013
Messages
555
Reaction score
294
Location
Pennsylvania
Rating - 0%
0   0   0
2 weeks ago I was like a kid at Xmas… so much so that I didn’t take any pictures when it got here but the stand, canopy, lighting, and flow pumps got delivered. Had a few people over that Saturday and we got the stand in the house.

Here are pictures taken and sent to me by Chris Benner at Benner’s Woodworking who was super fun to work with, creative, and super responsive the entire two years this has been planned. He’s not the cheapest out there but the craftsmanship is quality and exactly what I wanted. Super nice guy!

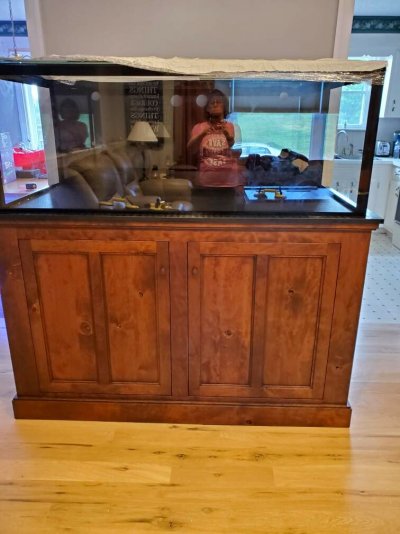
Stand and Canopy were made out of Rustic Cherry with an HDPE plastic trim around the top. The tank sits at 40” high when it’s on the stand. Inner drawers pull out on the right side with a shelf on the left side. The left side will house a UPS and the power supplies for the lighting and pumps.

64D478C7-441A-44F7-B876-148F27B44ADA.jpeg
DA6ABB66-DE40-431C-A8FC-3E63860842CA.jpeg
0996C502-D618-463A-B8E7-8FD140439C35.jpeg
F2D27BD6-9E67-49AC-9D24-C01DDBDFF7A2.jpeg
AFEA5F8F-EF75-49EE-ACC0-6D0B1FFAA611.jpeg
41513A1D-7BCA-4C48-9413-648BA65A530D.jpeg
5BC7CE26-044D-4537-962C-DDCDD55907F7.jpeg
A95D8167-D30A-40BA-B44C-039B7E05E304.jpeg


the Canopy has exterior removable panels in the same setup as Ryan’s 360 tank over at BRS. The panels are super easy to remove for access inside the tank and the lighting is adjustable based on need.

0C9BEF20-2881-4A6B-A965-2EA2BA67CDED.jpeg

52FFDACE-8FD4-4F46-8E3F-8C64D2CEA0EE.jpeg


the back panel on the canopy has a fan that pushes outside non humid air into the canopy and exhausts the warm humid air out the top through passive venting.
 
OP
OP
I

inetjnky

Well-Known Member
View Badges
Joined
Nov 3, 2013
Messages
555
Reaction score
294
Location
Pennsylvania
Rating - 0%
0   0   0
Last week the tank arrived on Weds from Felix Borden over at ReefSavvy!

4DCEBCEF-502E-4220-BAA3-D87D551253B4.jpeg


Super nervous snd gave me high anxiety about getting this beast in from the garage and up a flight of stairs and onto the stand… weighs between 500 to 600lbs. Shipping info showed, with the crate, 730lbs!

Here are pictures Felix sent to me right before it shipped.

Tank dimension is 60x30x24. 3/4” star fire on all 3 sides, reef savvy ghost overflow, armored seams, double fantom bottom, eurobraced, with full wall to wall liner inside on the bottom since this will be bare bottom.

BF4E437F-515C-4536-90EA-E80BA246A40E.jpeg
3137F3D2-B41F-4573-8E65-D06D0695B75F.jpeg

D8E785F4-E122-450F-8D11-C24750F9B64C.jpeg

5A69D996-B490-4E3D-A401-629ED95F1FEA.jpeg


And… the money shot!

EFB4509B-1DAC-4EA3-85BC-80A54C120D27.jpeg
 
Last edited:
OP
OP
I

inetjnky

Well-Known Member
View Badges
Joined
Nov 3, 2013
Messages
555
Reaction score
294
Location
Pennsylvania
Rating - 0%
0   0   0
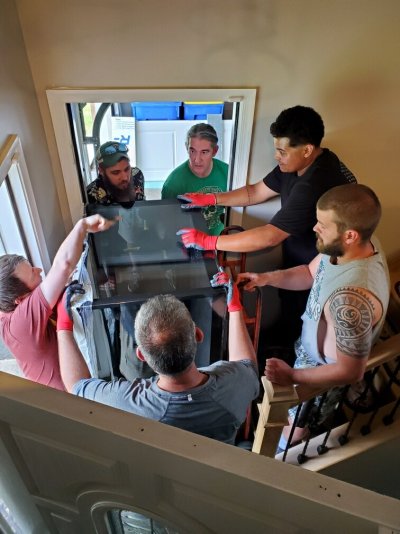
This last weekend was the weekend to get the tank out of the garage and into the house onto the stand. A team of seven, including myself stopped over with the enticement of Pizza and drinks….

let the fun snd high anxiety begin… while on the crate it shipped in, we lifted it up on its side which protected the corners of the glass due to 1.5” thick the styrofoam bed it sat on. From there we pushed the crate base with tank to the door opening from the garage into the house. On the inside landing we prepared the landing with blankets and positioned an old but heavy duty appliance dolly to rest the tank onto to get it up the staircase.

4731A6A7-D969-4045-BC09-F068AF4BC6BF.jpeg
35767113-8D23-4BCF-95B1-AE22CA4458F2.jpeg
94E95AEF-EEBA-47A3-894E-E75B10CE3F96.jpeg
6F18EBC5-8618-45BA-BBCE-F8008F2C58A1.jpeg
038BC36A-DC2B-4174-94A0-FCB570A373F9.jpeg


Lift!

EACE9EA7-D11D-4E9E-989D-04891A33D9CF.jpeg
91B58D0B-184E-4E9F-A247-E3BF99823731.jpeg


With the first heavy lift successful and secured to the dolly, it was time to push / pull this beast up the staircase!

65AB6D25-D550-4041-B557-9C9F63E37971.jpeg
604ADAA1-FB11-48D6-81A3-DC438FE6D660.jpeg
BB8E59C7-A0A3-4CCE-9ED0-DD0D30632866.jpeg


holy sh$t it’s up the stairs… we’re all dying! Lol

E2FDDB9C-46C5-4244-AAD7-FCE2AE311679.jpeg


At this point we pivoted the dolly and laid the dolly down flat and positioned the dolly snd the tank right in front of the stand. All hands were on deck to lift it up onto the stand and onto a 1” thick piece of foam board under it.

FC7F7361-0950-4645-8915-4E00F7755B29.jpeg
D70A5149-2C18-4B58-B750-8E91EF66F0AF.jpeg


with everything finally in place…

3217EE82-1033-4352-8655-9BC4D5E2C668.jpeg
AE95046F-4A1C-47FF-BDDD-A61ECFCEA25E.jpeg
D893A0BF-6CF7-4B13-B25A-13BB0BC4F493.jpeg


A few pictures of how the canopy rests on the eurobrace…

2CB83041-DB31-4A50-A329-F338CC2B2B55.jpeg
9471684F-5AB1-4FCE-8B87-2133E33F7DFD.jpeg
D22F9A8E-CCCE-4D3F-8812-2BE6EA2C91BB.jpeg


The main display here will be lit by 6 Ecotech XR15 G5 Pros, and 3 custom length reefbrite XHO Actinics. Flow will be run by 4 Ecotech Vortech MP60s. All plugged into 2 EB8s for power and a PM1 to place a temp and ph probe inside the ghost overflow. A68DF5AD-58CE-406F-A217-61E23E868DEA.jpeg A7FEC515-880F-46FD-A50B-FA4F8A392CC0.jpeg
 
OP
OP
I

inetjnky

Well-Known Member
View Badges
Joined
Nov 3, 2013
Messages
555
Reaction score
294
Location
Pennsylvania
Rating - 0%
0   0   0
Time for a Vegas vacation! Cya all in a few weeks! Will be plumbing the tank in when I get back from vacation right before I start demo on my kitchen and dining room for an upcoming remodel. So much to do!
 
OP
OP
I

inetjnky

Well-Known Member
View Badges
Joined
Nov 3, 2013
Messages
555
Reaction score
294
Location
Pennsylvania
Rating - 0%
0   0   0
Nice build! Following along
Haha. We have almost identical builds, going at the same time, in parallel. I too am waiting for my Reef Savvy, in an almost identical size.
Did I miss the part where you explained why this prolonged wait for the tank is a blessing? :)

The wait while a bit painful was a blessing mostly because it gave me an opportunity to learn through working with a Chris and a Felix on what I truly wanted with my build. Watching Randy over at BRS with his 360 build and what Chris did with his stand gave me ideas for mine I didn’t even think we’re possible (and to an extent until Chris did Ryan’s he didn’t either). He and I discussed it at length after the stand was completed snd he agreed that taking the time to figure out what you really want and design it properly definitely made a better finished product. With Felix, it allowed me time to really research and learn as I grew with building everything out to really tweak the build of the tank to its final product like going from 3/4” returns to 1” to maximize flow up to the aquarium form the basement and doing the double phantom bottom for better structural integrity to end to end coating inside the tank for a more polished look for a bare bottom display. It’s the little things on going back sad forth with each person saying, hey, here’s an idea, how can we do this, or is this possible to do this way? For me the biggest adjustment was in the canopy. When we first discussed this two years ago it was going to be completely made out of wood, but when Chris built Ryan’s canopy out of aluminum with the wood wrap, I knew that was the ticket for me as well because I needed to be able to get it off the tank by myself if I needed too.
 
Last edited:

Pakman2

Active Member
View Badges
Joined
Jul 9, 2018
Messages
201
Reaction score
112
Rating - 0%
0   0   0
Update on the fish room build... I went back and forth on this quite a bit and it took me awhile to get started because I just wasn’t sure how I wanted it setup. I initially wanted to setup the frag tank under the double window in this room but the more I thought about it the more I thought it was a bad idea due to salt creep getting all over everything, including the $400 dual Bali blackout blinds I ordered to keep daylight out of this room. I needed everything to be compact, yet easy to service for maintenance and room to move around. With the floor done, ceiling and overhead lighting in, electrical in, and all the trim done... it was time to start building the stand to hold the sump, refugium, and frag tank.

a few years ago I had originally purchased a 120g acrylic tank that was used that had a coast to coast overflow. My son being in his senior year of highschool at that time, built a stand for it for me to sit the tank on. However that tank never got wet and got sold off, but I held onto the stand and wanted to incorporate this into the build. However the dimensions of the top were actually too small for the new frag tank I ordered with Advanced Acrylics. So I made the decision to dismantle the stand and incorporate what I could from it. More on that later... let the pictures begin.

503A1AB5-581A-48D9-8F39-7A1FD454DD2F.jpeg

AE3D842A-509A-480D-A9B0-3CBE80198547.jpeg

EA1E8520-0693-4D31-B47D-C70738A581A0.jpeg

2A0AEFE7-2F83-41A2-B8AD-548AC1FC8145.jpeg


These are the doors from the stand my son built. I managed to salvage these and a few pieces of 3/4” skinning material on this section of the stand. I was happy with how it turned out.

467473D7-C152-4D8E-8C01-8889E8CE7FEE.jpeg

34C894D2-8E6E-402A-9B35-E61A74D2CE0F.jpeg
4D225FD0-8C15-44A1-8AEE-0F140CD51533.jpeg


With all the skin cut and fit together, it was time to paint it all up. I first sealed everything with two coats of oil based killz primer. Then did two coats of Valspar Door and Trim Oil Enriched Enamel paint. I also used this same paint on the wood trim in this room in the event there would be any humidity issues it would offer better protection. It’s expensive but it’s worth it in my opinion.

I also added PVC trim around the back and side walls coupled with a bead of silicone caulk between the PVC and wood stand in the event there would ever be a leak to help keep the water off the drywall.

C5694339-214B-4C64-8F57-BBD81BD2EF6C.jpeg


With the frag tank so close to the wall, I hung a sheet of 1/8” thick polycarb on the wall with stainless screws into drywall anchors to make wiping down any salt creep easy as well as protect the drywall from any damage. My son works at Lowe’s so he and I worked together to cut these pieces to length to wrap around the contour of the wall.

59A9881F-E198-4304-8EC6-25F1D59A9433.jpeg


As you can see in this photo below I have a 27” computer monitor hooked up to a Raspberry Pi that is connected to a Cat5e network cable going back to a switch on my network. This provides web access so I can have my Alex Fusion dashboard up for viewing as soon as I walk into the room. The monitor is plugged into a zWave smart switch that’s plugged into the outlet behind the monitor that is controlled by my Hubitat Elevation smarthome hub. In the picture, to the left of the one outlet high up on the wall, you’ll see a round disc. That is a zWave MultiSensor by Aeotec that detects motion, temperature, humidity, lux, and vibration. I’m using it to monitor the temp and humidity in the room as well as motion. When motion is detected it sends a signal to the switch to turn the monitor on and when no motion is detected it turns the monitor off after 10 minutes. The humidity in the room is controlled by this sensor and will activate my Lutron Caseta wall switch tied to my exhaust fan in the room to vent the room until the humidity level comes down to a preset level of my choice.

And the stand for the frag tank is done... or so I thought... more on that later...

711DEDBB-A460-4E0F-B628-F67422028111.jpeg


I also trimmed out the bottom of the stand on the outside with white PVC as a kick plate of sorts and to finish it off with a nicer look at the floor.

B9829E8A-9CB1-4621-8C16-3C2245D20DDF.jpeg

A27607D4-A7AF-48CF-AD29-DB4D19ED1E58.jpeg


Up next... time to plumb it all together!
Which brand sump is that? Do you by chance have dimensions and/or the amount of gallons it can hold?
 
OP
OP
I

inetjnky

Well-Known Member
View Badges
Joined
Nov 3, 2013
Messages
555
Reaction score
294
Location
Pennsylvania
Rating - 0%
0   0   0
Plumbing is complete to the tank. Fresh water added to the tank to provide weight on the styrofoam under the tank so there’s not added pressure on the piping and overflow box.

Tomorrow I’m draining the water and starting to scape it with dry rock. Once I have the scape I like I’ll start filling it with saltwater until full and then I’ll finally get to start running water through the system.

8390597F-0892-4A7E-9107-9B3DFAAAB6FF.jpeg


908871A1-22E3-4CD4-AB15-BDBEC94219B4.jpeg

D750126F-FF01-48F7-A23C-894F112A3755.jpeg

B09177D3-1A90-4BE0-91F1-F59B5FB094AF.jpeg

BEE94638-FCCF-4D91-86E5-AFF5B029750D.jpeg

9CE5CBB5-2B1B-492A-AB08-F4833E28046C.jpeg
 

drtechno

Active Member
View Badges
Joined
Aug 4, 2020
Messages
400
Reaction score
707
Location
boston
Rating - 0%
0   0   0
Excellent stuff. So here are some questions for you since our builds are eerily similar ;)

what buttons are you using for your BoB? Something you made or did you buy it?

The lighting for the upstairs / DT are running of off one 20a circuit? Seems like a lot of lights? My xr30s are quoted at 4amp a piece but not sure what the xr15s are? I wasn’t sure if 3 xr30s plus 2 Kessil 500x are too much since it would be about 20 amps if u believe the quotes figures. Plus the vortechs, that would put me over.

Moving your tank indoors freaked me out:). I’ll be happy when that part is over for me

Following along intently.
 
OP
OP
I

inetjnky

Well-Known Member
View Badges
Joined
Nov 3, 2013
Messages
555
Reaction score
294
Location
Pennsylvania
Rating - 0%
0   0   0
The lighting for the upstairs / DT are running of off one 20a circuit? Seems like a lot of lights? My xr30s are quoted at 4amp a piece but not sure what the xr15s are? I wasn’t sure if 3 xr30s plus 2 Kessil 500x are too much since it would be about 20 amps if u believe the quotes figures. Plus the vortechs, that would put me over.

Moving your tank indoors freaked me out:). I’ll be happy when that part is over for me

Following along intently.
So I’ve taken a look at this and I believe I’ll be ok on the amperage side of things.

6 Ecotech XR15 G5 Pro at 1.3a each for a total of 7.8a (and that’s running them at 100% which I don’t plan to do. The 4 MP60s run at .5a for each pump so at 100% on each pump that’s an additional 2a for a total of 9.8a. And 3 custom sized reefbrite XHO actinic blues to fit in my canopy are drawing at 100% around 3a per light for a total of 9a. Grand total amps is 18.8a which is above the recommended safety recommendation of a max 16a on a 20a circuit. The difference here is not everything will run at 100% and depending on par meter testing I may turn off the middle XHO when the radions are on which would keep that down even further. Definitely something to keep in mind though. I can tell you I have two XR30 G5 Pro and a single MP60 on my 48x24x12 frag tank and the lights are running around 40% max point intensity and the MP60 runs in reef crest at 75% max and I’m only hitting max .5 amps based on what my EB4 is graphing.

my buttons were made by Harry at Harry’s aquatics. I reached out to him and let him know what I was wanted and he quoted me the price and invoiced me through PayPal and I had them a week or two later.

moving my tank freaked me out too. I was so glad when that was over with. I wouldn’t have been able to get it up my staircase without the dolly.

Are you getting the ghost overflow like I did? If so, make sure you use two 45s to bring the pipe straight down out of the overflow to be able to mount it on a bracket to the back of the stand to support the pipe. picture for reference…

76C96350-542B-4E09-9FB6-E687E58BA85E.jpeg


You’ll get two gaskets with the overflow. One goes on the inside of the tank, and other goes on the outside. Coat both of them with molycote to keep them lubricated so they dont bind when you’re tightening everything down. Leak check your overflow before you mount it on the tank. Plug the bottom holes and fill it up and let it sit for a day or two. Don’t be afraid to tighten the box down real good once you get water flowing through the system. I’ve heard they may need tightened down more then you may be comfortable with. If I were doing it again I’d have probably opted for a glass overflow off the back. The tank is 6” off the wall anyway which I felt was good to be able to reach behind the tank if I need too.
 
OP
OP
I

inetjnky

Well-Known Member
View Badges
Joined
Nov 3, 2013
Messages
555
Reaction score
294
Location
Pennsylvania
Rating - 0%
0   0   0
Something else worth mentioning. Since I’ll have a BoB at the display for a button mounted inside the stand to turn off the return pump to the display when I need, I’ll also have a float switch mounted in the cap of the overflow box to shut down the return pump in the event that the overflow box gets too full to prevent a flood in my living room. I’ll also have a Temp and PH probe in this box as well to monitor the display.
 
Back
Top