Jason's 467 Gallon (120x30x30) Tank Build in SoCal

KingJason

Active Member
View Badges
Joined
Apr 27, 2014
Messages
263
Reaction score
232
Location
Seal Beach, CA
Rating - 0%
0   0   0
Hello All, I've been in the hobby since the late 90's and have had a variety of tanks along the way. I started with a 10g moving to a 40, then 60, then 200, then to 100 and now this! I'm kind of new to this forum but was a "{squat}" on Reefs.org back in the day and then moved over to Reef Central, Socali Reefs and now I'm here.

Like many of the builds in this forum, this was something I had always wished I could do for the last 20 years. However, life, work, space, time and money were always in the way. They are still in the way, but I'm older and my hearing isn't as good anymore ;)

I'll keep this first post updated with a current picture update as we go.

Will be a mixed reef w/ mainly SPS and LPS and lots and lots of beautiful fish.

As of today (4/27/17) the tank is being built and scheduled to ship sometime the middle of next month.

The tank will sit in our entertainment room w/ an equipment room on the other side of the wall. The tank will be wrapped in white cabinetry spanning the entire space of the room it's in.

I've purchased almost all of the equipment over the last several months gearing up for this project. Right now my garage is completely full of supplies for this build. So when the tank comes it will be a win-win to get my garage cleared out again and the new tank up.

So...here we go!

Equipment List:
Tank: 120x30x30 by A.G.E. 3 sides Starfire, PVC bottom
Overflow: 20″ Synergy Reef
Stand: Steal Stand, white powder coated that we will wrap in cabinetry
Sump: Custom 60x25x24 acrylic sump by Advanced Acrylic
Return Pump: Abyzz 200
Manifold Pump: EcoTech Vectra L1
Skimmer: LifeReef VS3-48
Internal Circulation: 2x Panta Rhei ECM 63
Lighting: 6x Radion XR30w G4 Pro
Sump Lighting: 1x MarsHydro Mars 300W LED Grow Light Full Spectrum
Calcium Reactor: DaStaco XtremA Model A-4
Controller: Apex w/ all the gadget and gizmos
Chiller: TBD...I have a JBJ 1/3HP but I'm not sure that's going to cut it. House is normally cooled w/ AC so we'll see.
UV: Pentair Smart High Output UV 80 Watt
Heaters: 2x 300w Jager
Macro Reactor: Pax Bellum ARID C36

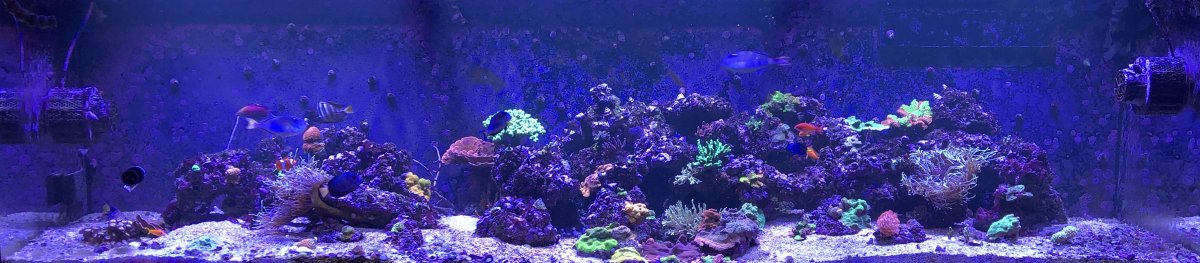
Current Tank Picture (1/3/19)
rev-2-jpg.934691


Older Picture (3/14/18):
Attachment-5.jpeg


Older Tank Picture (7/25/17):
z2.jpeg


Being Built at AGE:
IMG_0545.JPG
 
Last edited:

reef_ranch

Well-Known Member
View Badges
Joined
Mar 2, 2010
Messages
897
Reaction score
1,203
Location
Los Angeles
Rating - 100%
1   0   0
Looking forward to watching the build. You have a nice choice of equipment. I love the idea of the old school venturi skimmer, it looks like a beast. Do yourself a favor and get the Dastaco, you won't regret it.
 

Daniel@R2R

Living the Reef Life
View Badges
Joined
Nov 18, 2012
Messages
37,495
Reaction score
63,930
Location
Fontana, California
Rating - 100%
1   0   0
Cool! Following!
 
OP
OP
KingJason

KingJason

Active Member
View Badges
Joined
Apr 27, 2014
Messages
263
Reaction score
232
Location
Seal Beach, CA
Rating - 0%
0   0   0
Looking forward to watching the build. You have a nice choice of equipment. I love the idea of the old school venturi skimmer, it looks like a beast. Do yourself a favor and get the Dastaco, you won't regret it.
Thanks! The LifeReef VS3-48 is a big boy. I'll take some pictures in a bit. Since there will be a decent water volume I wanted to go with something with a lot of power. Given this guy runs external and has a some options (downward pump, recirculating) to increase bubble contact I thought this would be a good fit. I got the ozone option added so I can run it down the road as well. I can also increase the pump size and increase the height of the skimmer by buying an additional chamber(s) if needed. Jeff at LifeReef seems to know his stuff. I'm excited to get this running so I can see how it all works in the real world.

Do you run a Dastaco?

That will be some great swimming room. Do you have a stocking list yet?
Right now I want everything :) I'll have to dial this back a bit. Plenty of tangs and wrasse, I've always wanted a crosshatch or blue jaw pair. Thinking of trying some Angels once things get established down the road.
 
OP
OP
KingJason

KingJason

Active Member
View Badges
Joined
Apr 27, 2014
Messages
263
Reaction score
232
Location
Seal Beach, CA
Rating - 0%
0   0   0
I'm running a lifereef vs-3 72" on my new 540 build, which also handles the water from my 300 in the same sump. Love that skimmer! Simple design but built like a brick s@ithouse. I'm running it off a jabeo dcp18000 at full throttle.

e8693edd974c0080e01a82a8df62f948.jpg
That's bad butt
 

DrDNA

Community Member
View Badges
Joined
Nov 25, 2008
Messages
25
Reaction score
27
Location
Loomis, CA
Rating - 0%
0   0   0
Thanks Jason. I also got the ozone attachment for use with my 57w aqua uv ozone combo unit
 

DrDNA

Community Member
View Badges
Joined
Nov 25, 2008
Messages
25
Reaction score
27
Location
Loomis, CA
Rating - 0%
0   0   0
How is that working so far? I haven't decided how to run mine.
Good so far. I run it using the basic single pass, not counter current or recirc. The one thing it does that's annoying at times is that it will produce so much foam that it will actually lift the lid up and start "foaming at the mouth". I still love it though! It replaced my old deltec ap1003, which was expensive to run and maintain with three separate needle wheels!
 

DrDNA

Community Member
View Badges
Joined
Nov 25, 2008
Messages
25
Reaction score
27
Location
Loomis, CA
Rating - 0%
0   0   0
How is that working so far? I haven't decided how to run mine.
The other thing to note is that it's very sensitive to small adjustments on the gate valve. Once you get it set though you shouldn't need to adjust it
 
OP
OP
KingJason

KingJason

Active Member
View Badges
Joined
Apr 27, 2014
Messages
263
Reaction score
232
Location
Seal Beach, CA
Rating - 0%
0   0   0
Good so far. I run it using the basic single pass, not counter current or recirc. The one thing it does that's annoying at times is that it will produce so much foam that it will actually lift the lid up and start "foaming at the mouth". I still love it though! It replaced my old deltec ap1003, which was expensive to run and maintain with three separate needle wheels!

Awesome. How about with the UV and Ozone? I'd suspect that really helps with clarity.
 
OP
OP
KingJason

KingJason

Active Member
View Badges
Joined
Apr 27, 2014
Messages
263
Reaction score
232
Location
Seal Beach, CA
Rating - 0%
0   0   0
Been a while since my last post. Today was a big bittersweet day. I took down my old tank and moved all my inhabitants out to the garage in the temporary home. The tank is scheduled to arrive Thursday so I'm getting pretty excited! While I'm excited for the new tank, the task of taking down the old was haunting me. As anyone that has done this knows...it's a crazy big project and hard on the body!

My temporary housing for my fish and coral consists of a plastic bin that measures 42x29x28 - (http://www.globalindustrial.com/p/storage/bins-totes-containers/bulk/forkli-able-bulk-container-1) as well as an old sump that I plumbed in to basically house everything else. I drilled a 1" bulkhead in the top of the plastic bin which I plumbed back to the sump. I can run the sump almost like a normal setup using the bin. I lucked out and my old MP40's fit between the groves on the bin. Although I'm not sure I'm getting enough flow for all the SPS so I might pickup something else to make sure I get all the areas of the bin. I have also noticed that I'm not getting much turnover with just one 1" bulkhead so I'll probably add another tomorrow so I can push more flow from sump to bin.

I hooked up 2 of the Radion XR30w G4 Pro's and hung them over using the RMS kit. This is my first time using the hanging and RMS kit and man are they easy and awesome. I highly recommend this if you have to hang lights. I'm using the 90.5 track right now that will go over the new tank with just two lights on it. I'll probably switch this out for a smaller one so I can hang this over the new tank when it arrives.

I was surprised how well this all worked out! It was a heck of a lot of work moving everything into the bin, but I didn't run into any problems, no major floods and all done in 1 day. I'm happy to report that I planned this part well!

Here are some pics of the temp setup.

IMG_0609.JPG
IMG_0610.JPG


Over the last month I've been working on the tank room as well as laying some cement slabs to reinforce the floor.

I'll post some details on the floor reinforcement once I get pictures. I forgot to take pictures when I was under the house and I'm not excited to go back under there at the moment.

The challenge I had in the tank room was that my old tank was still running and the new sump and new equipment will go in the same place as the old equipment. So I had to run about 15ft of PVC for the overflow and return pipes so I could relocate the old sump before taking it down. I wanted to wait to the last minute to take down the old tank so this allowed me to do all the painting, electrical, stand, cut the hole in the wall where the new overflow will go, etc. Here is a pic of that work this morning before I took down the old tank. You'll see the lights from the old tank through the new hole in the wall. My old tank had standard overflows with plumbing under the tank where the new tank will have a Ghost overflow and the required plumbing towards the top of the tank. The tank sites on a raised floor in our house which is why the hole is so high. You'll also see the 3 pipes running over the new tank room shelves and the old sump is about 5ft behind where I'm standing. The wires in the picture are some power I had to run over to the temp setup as well as RO/DI for top off and Ethernet for APEX.

Most of the work was just building the stand and a lot of painting/sealing. Everything in the tank room has at least 3 coats of Perma-White Mold and Mildew-Proof Semi-Gloss Interior Paint (bottom, top, side, etc). We also did 2 coats of Sherwin Williams Harmony on the interior side of the house where the tank will be.

IMG_0606.JPG


As of this evening all the old plumbing has been removed and I patched the hole in the wall. Tomorrow's goal will be to get a final coat of paint on the wall where the patch was and get the new sump up on it's stand.
 

High pressure shells: Do you look for signs of stress in the invertebrates in your reef tank?

  • I regularly look for signs of invertebrate stress in my reef tank.

    Votes: 41 32.0%
  • I occasionally look for signs of invertebrate stress in my reef tank.

    Votes: 29 22.7%
  • I rarely look for signs of invertebrate stress in my reef tank.

    Votes: 25 19.5%
  • I never look for signs of invertebrate stress in my reef tank.

    Votes: 33 25.8%
  • Other.

    Votes: 0 0.0%
Back
Top