Very nice ! Who is the ,America’s of the new aquarium , stand?
Navigation
Install the app
How to install the app on iOS
Follow along with the video below to see how to install our site as a web app on your home screen.
Note: This feature may not be available in some browsers.
More options
You are using an out of date browser. It may not display this or other websites correctly.
You should upgrade or use an alternative browser.
You should upgrade or use an alternative browser.
Kyle's Reef
- Build Thread
- Thread starter Kyl
- Start date
- Tagged users None


Do you mean the builder? If so, it's Concept Aquariums in Calgary, Canada.
Yes I️ am sorry I️ meant the aquarium builder. Sorry about that.

A few surprises, half good, half bad.
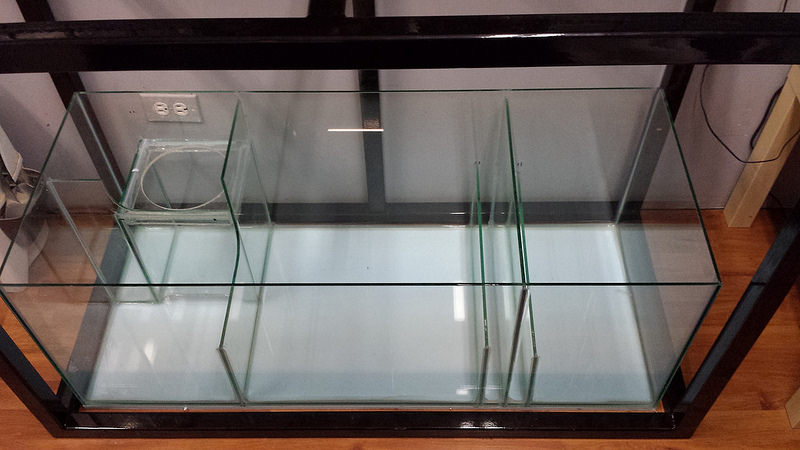
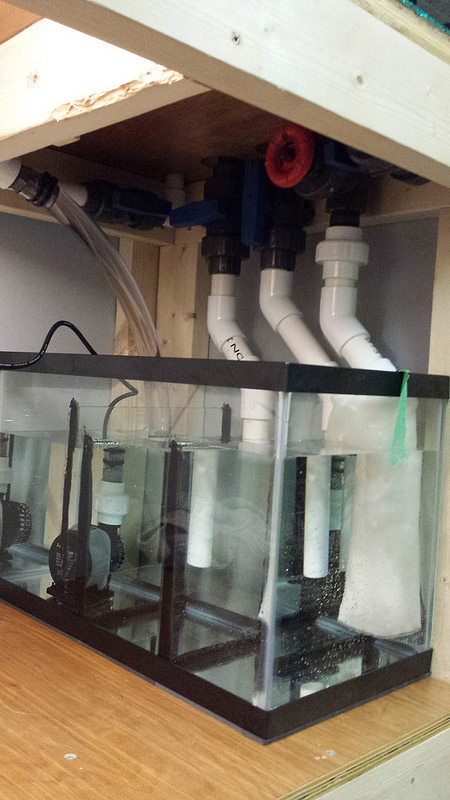
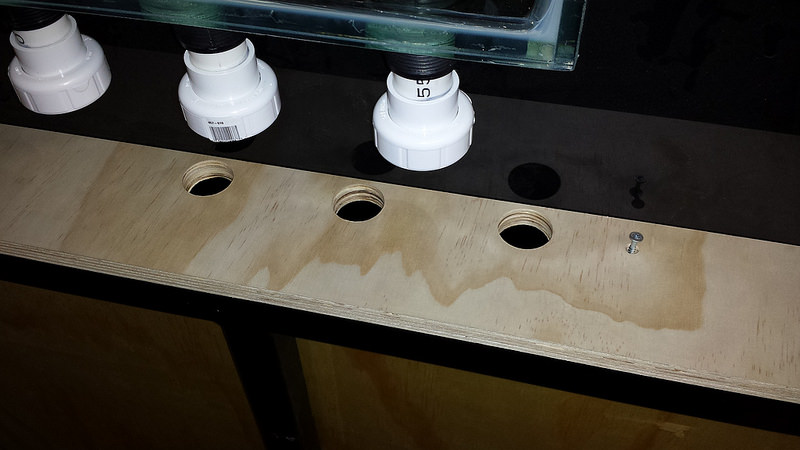
The sump isn't exactly as I wanted it so I'm going to have to do some modification, namely the bulkhead tie-in wasn't done, the skimmer / refugium baffles weren't blacked out with acrylic, and they're an inch or so lower than I wanted. The frag tank was given dual 3/4 returns and a bean-animal overflow (as I had originally wanted), but was told it would be a two-hole herbie overflow. It fits the closet perfectly, really well done.
The display tank itself is still crated, I need some more muscle power to show up. The sump nearly killed me, it is heavy, I should have waited for a third person. I need to pick up some thick plywood for the bottom, and I didn't realize both tanks would be built on a piece of plywood, so that part is taken care of for the display. Had I realized that though, for the frag tank at least, I would have asked for a sheet of black vinyl on the bottom first..
All in all, I'm pretty happy initially with what I received today. I haven't gotten a good look at the main tank yet to check all the seams, but the sump and frag tank look fine.
The sump isn't exactly as I wanted it so I'm going to have to do some modification, namely the bulkhead tie-in wasn't done, the skimmer / refugium baffles weren't blacked out with acrylic, and they're an inch or so lower than I wanted. The frag tank was given dual 3/4 returns and a bean-animal overflow (as I had originally wanted), but was told it would be a two-hole herbie overflow. It fits the closet perfectly, really well done.

The display tank itself is still crated, I need some more muscle power to show up. The sump nearly killed me, it is heavy, I should have waited for a third person. I need to pick up some thick plywood for the bottom, and I didn't realize both tanks would be built on a piece of plywood, so that part is taken care of for the display. Had I realized that though, for the frag tank at least, I would have asked for a sheet of black vinyl on the bottom first..
All in all, I'm pretty happy initially with what I received today. I haven't gotten a good look at the main tank yet to check all the seams, but the sump and frag tank look fine.
Last edited:
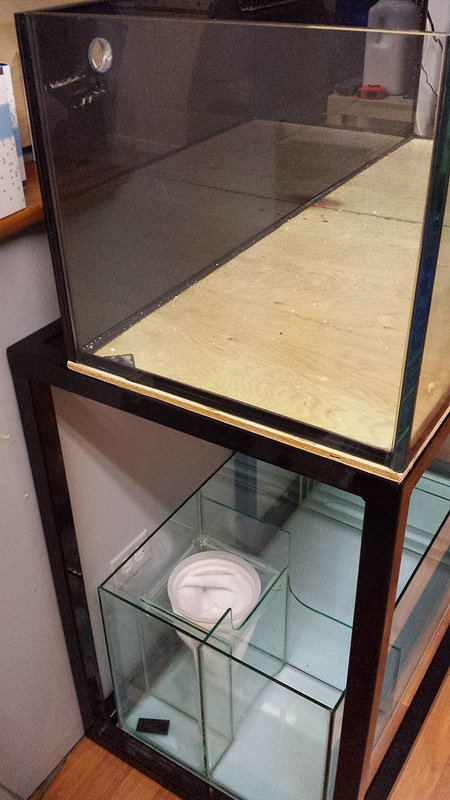
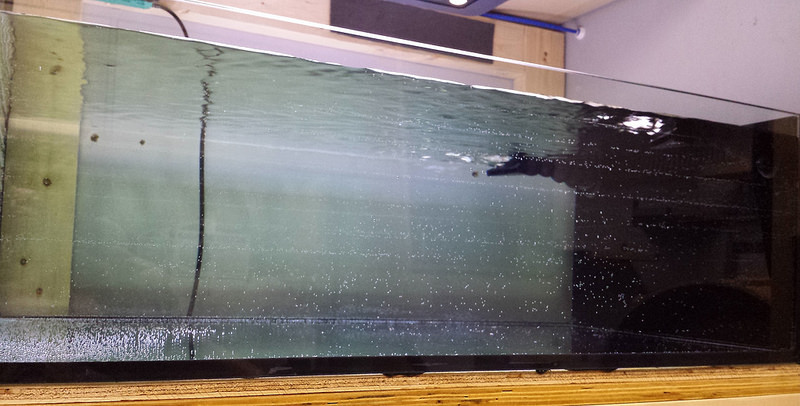
Finally got the tank on the stand! Between work and it being dark by the time I got home, delayed things a couple days. I had some family show up and honestly the tank felt lighter than the sump (though it's thicker glass).
Anyway, big black Friday buys to equip two new tanks. Two gyres, two light fixtures, two returns, some jebao SW-4's, skimmers and a bunch of plumbing fittings. LFS was completely out of 1" slip/slip bulkheads so I had to order them in, will be about a week.
The bad news is I'll have to modify the sump slightly as I really want that bulkhead fixture area before the fitler sock like in my drawings, so I'm going to get a piece of glass cut and try and drill some clean holes into it. If it works, it works, if not I may silicone in an acrylic piece and block it in with strips of glass. As well, the baffle leading from the refugium I want to get a slotted piece of black / smoke acrylic cut like the overflow to block chaeto pieces from the return, and to keep light spill out.
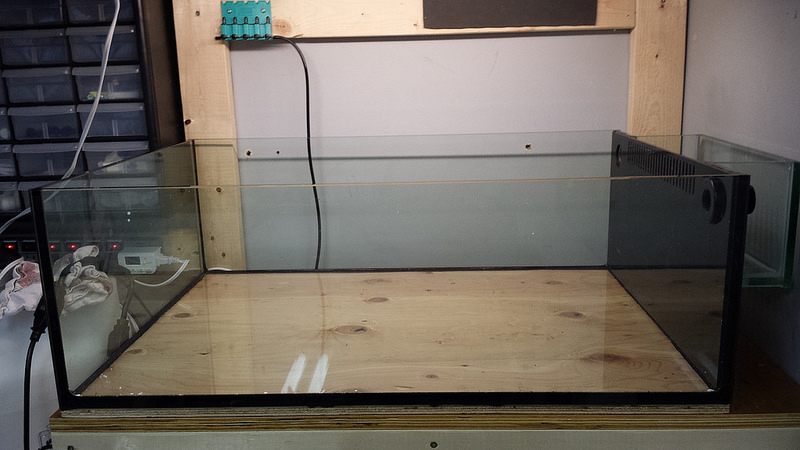
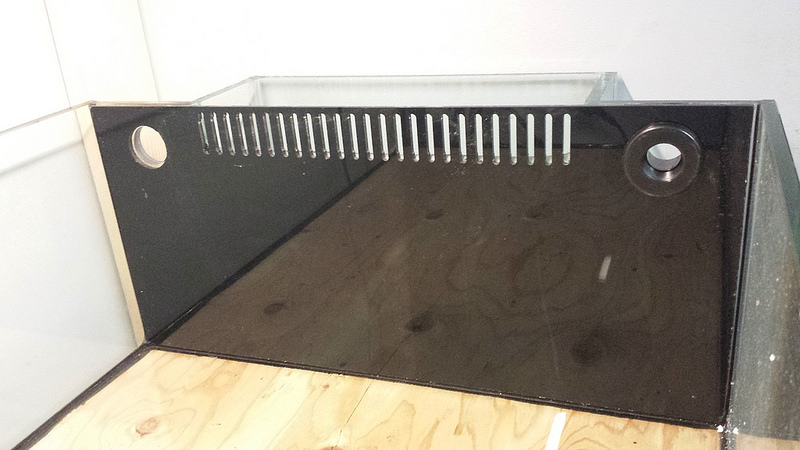
All the seams look great, and I'm so happy with the job they did on the laminated black glass rear panel. Originally it was going to be a large acrylic insert, but the cost difference was less than 10% of the tank and I'll never have to worry about it warping or anything else happening. If the teeth break the overflow guard can be replaced and just re-siliconed in if ultimately needed. Just have to make sure anything I mount on the rear can handle 18mm / 3/4" glass thickness")
I have a decent bit of room behind the tank and under the overhead cabinets, debating putting the electronics there and getting a smoked piece of acrylic to cover it. Then I never need to bend under the tank, or run something off to the side, etc. The ATO reservoir and dosing containers will be going in an Ikea cabinet right next to the tank.
Anyway, big black Friday buys to equip two new tanks. Two gyres, two light fixtures, two returns, some jebao SW-4's, skimmers and a bunch of plumbing fittings. LFS was completely out of 1" slip/slip bulkheads so I had to order them in, will be about a week.
The bad news is I'll have to modify the sump slightly as I really want that bulkhead fixture area before the fitler sock like in my drawings, so I'm going to get a piece of glass cut and try and drill some clean holes into it. If it works, it works, if not I may silicone in an acrylic piece and block it in with strips of glass. As well, the baffle leading from the refugium I want to get a slotted piece of black / smoke acrylic cut like the overflow to block chaeto pieces from the return, and to keep light spill out.
All the seams look great, and I'm so happy with the job they did on the laminated black glass rear panel. Originally it was going to be a large acrylic insert, but the cost difference was less than 10% of the tank and I'll never have to worry about it warping or anything else happening. If the teeth break the overflow guard can be replaced and just re-siliconed in if ultimately needed. Just have to make sure anything I mount on the rear can handle 18mm / 3/4" glass thickness
I have a decent bit of room behind the tank and under the overhead cabinets, debating putting the electronics there and getting a smoked piece of acrylic to cover it. Then I never need to bend under the tank, or run something off to the side, etc. The ATO reservoir and dosing containers will be going in an Ikea cabinet right next to the tank.


Last edited:
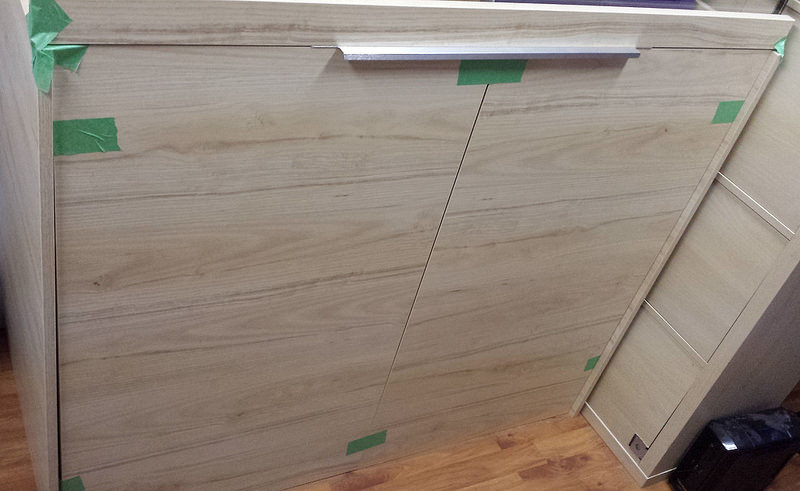
The next part of the project to figure out is skinning the stand. I had intended to use some 40" Ikea kitchen cabinet doors and cut them down for the front and sides, but they went and discontinued the birch colour this fall.. I still want to go down the same route, and have started to read up on the best way to mount all of this. Magnets would be the easiest way and require no drilling into the stand, but I'm not sure how they would handle something like swinging doors on the front. Or do I just go with removable panels and forget about hinged, again not completely sure. I think buying a single panel, cutting it down and securing it with magnets first will be the best way to test which method to go with.

Not a whole lot of progress so far with the build. The lack of a table saw is really slowing things down as I have to ferry things to the shop at work to cut down. I'm still waiting on the gate and ball valves to come in, along with the WeldOn clear cement/primer.
60g_stand_skin1 by Kyl, on Flickr
 60g_stand_skin3 by Kyl, on Flickr
 60g_stand_skin2 by Kyl, on Flickr
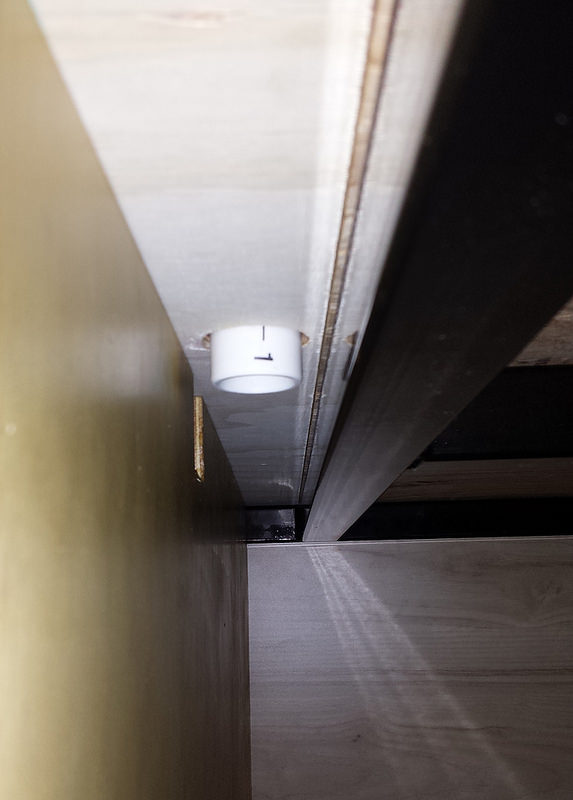
As noted earlier, the skinning of the steel frame is being done with Ikea kitchen cabinet doors, mounted via magnets. I'm debating having a top strip above the doors so they will be easier to keep in place, and to hide the top of the pull handles. Only using one to mock up with so far since I don't want to scratch the glass as the panels haven't been cut down to size yet. The magnets have 22lbs of pull force and will be epoxy'd into a hole created by a forstner bit.
60g_stand_skin2 by Kyl, on Flickr
As noted earlier, the skinning of the steel frame is being done with Ikea kitchen cabinet doors, mounted via magnets. I'm debating having a top strip above the doors so they will be easier to keep in place, and to hide the top of the pull handles. Only using one to mock up with so far since I don't want to scratch the glass as the panels haven't been cut down to size yet. The magnets have 22lbs of pull force and will be epoxy'd into a hole created by a forstner bit.
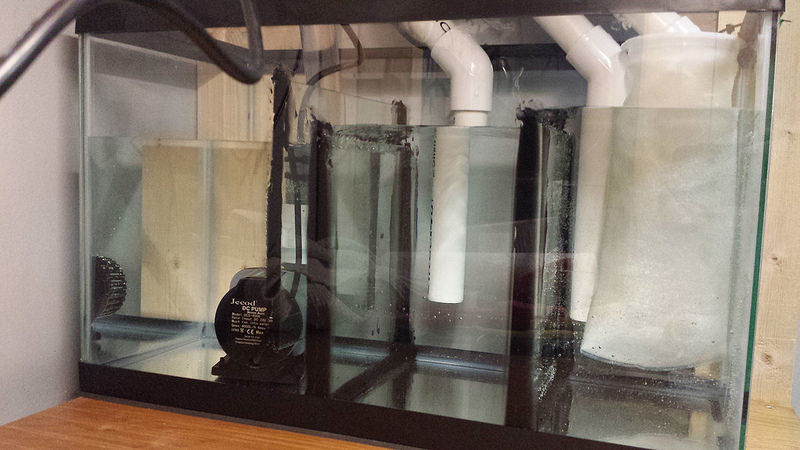
The frag tank is also waiting on equipment and plumbing, though hopefully by the end of the week it should at least have some water in it. The closet stand has been reinforced, but the QT tank will have to be juggled around for a bit or the Midas blenny put in the frag tank while I get the sump set up. I did pick up a 10 gallon for the sump, and since there won't be fish in it the return is just going to run sockless. Skimmer, pond matrix and the carbon reactor from this tank, should be all it needs.
Busy times at home, work and of course the Christmas season still to come!
60g_stand_skin1 by Kyl, on Flickr
60g_stand_skin3 by Kyl, on Flickr60g_stand_skin2 by Kyl, on FlickrThe frag tank is also waiting on equipment and plumbing, though hopefully by the end of the week it should at least have some water in it. The closet stand has been reinforced, but the QT tank will have to be juggled around for a bit or the Midas blenny put in the frag tank while I get the sump set up. I did pick up a 10 gallon for the sump, and since there won't be fish in it the return is just going to run sockless. Skimmer, pond matrix and the carbon reactor from this tank, should be all it needs.
Busy times at home, work and of course the Christmas season still to come!
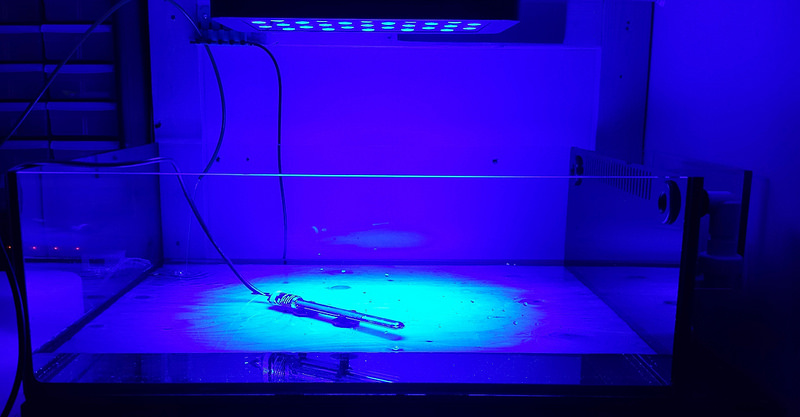
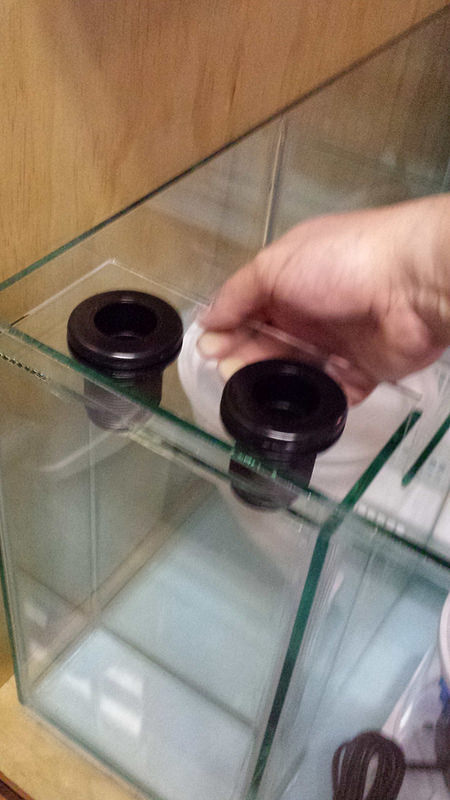
The 10g frag tank sump baffles are siliconed in, and the black box light and all my plumbing supplies have arrived. I've gotten the plywood for the stand cut to size and started to seal it with spar varnish, and the first of the cabinet doors was also trimmed down. The 4” x 8” piece of glass for the sump bulkheads was also cut, just need to attempt drilling the holes this weekend.
There’s a bit of limited vertical space above the frag tank for the lighting, so I found some angled power adaptors on Ebay to route the power cords along the top of the unit flat instead of sticking up. Wire hanging won’t work for this, there’s only 5” of light clearance from the water line using them, so some brackets will have to be used to attach it on the bottom of the shelf and raise about 4” higher. The mailman also delivered some DIY CO2 bottle caps I had ordered months ago to raise baby brine shrimp with, so I may get that project started during the Christmas break if the tanks are both running. Moreso as a treat for the tank, I like the idea of a live food once and a while to get everyone in a frenzy.
I’ve been watching Amazon since I missed a big price dip on a refugium light last month, as soon as it does again I’ll be picking one up. I haven’t run a refugium on the 20, so it won’t be critical for the start of the tank transfer. There is one area I am not sure of, and that is transferring the sand directly or to rinse it first. Obviously there is a lot of funk trapped up in the sand, but also a lot of microfauna that I don’t just want to dump via fresh water. Another option is to mix a bucket of salt up and strain the sand in that to get rid of most of the detritus while keeping everything alive and avoiding a bit of a cycle.
DT: Plywood for the sump floor and rear wall has been sealed with three coats of spar varnish and installed. Tomorrow I'm going to start on the magnet mounts for the first side panel, cement in the bulkhead connections and get started on the top plate for the rear gap on the stand. The goal of not drilling the stand should work perfectly as I can use the rear of the tank to hold in place the cap, which is screwed into the rear panel, which is bracketed to the bottom from behind. Progress wise it has been very slow for two weeks, but once the plumbing kicks into gear, I'm hopeful by next weekend it should be getting a bath, cleaning and then start the fill. Still need to pick up some Marco rock pieces, and figure out how much sand I need to order in. Going to stick with fiji pink again, I've loved it for the nano tank.
Frag tank:
frag_tank_testfill by Kyl, on Flickr

frag_light1 by Kyl, on Flickr
frag_light2 by Kyl, on Flickr

frag_light3 by Kyl, on Flickr

frag_overflow_plumb1 by Kyl, on Flickr
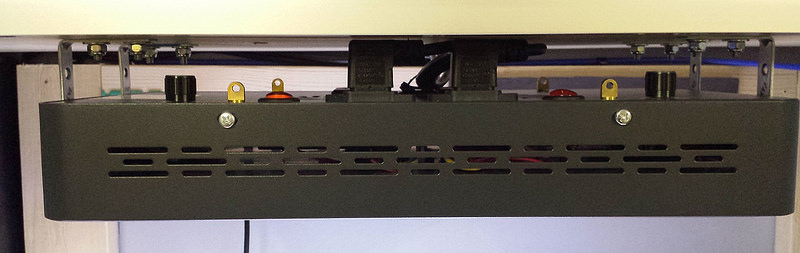
MarsAqua light is mounted, cables cleared perfectly with some brackets from home depot. Still debating if I want to mod the unit for apex control or just let it run with a static intensity. Overflow and return bulkheads have been installed and cemented with unions, and this weekend the tank will be filled to below the overflow and have an Aquaclear 70 HOB running off the side for the next little while. The last time I used the Momentive RTV silicone it stunk awful for days, so the sump is sitting in storage for now while the off-gassing / curing takes place.
Livestock wise, I'm going to try mixing the Midas and Tailspot blennies, and add the social wrasse to this tank. I picked up an acclimation box from OctoAquatics, so will definitely be putting it to use soon.
Frag tank:
frag_tank_testfill by Kyl, on Flickr
frag_light1 by Kyl, on Flickr
frag_light2 by Kyl, on Flickr
frag_light3 by Kyl, on Flickr
frag_overflow_plumb1 by Kyl, on Flickr
Livestock wise, I'm going to try mixing the Midas and Tailspot blennies, and add the social wrasse to this tank. I picked up an acclimation box from OctoAquatics, so will definitely be putting it to use soon.
Last edited:

Well I'm finding out that even flush, the 3/4 22lb pull force magnets I picked up are nowhere near strong enough to keep the panel aligned. At the hobbyist store the clerk had mentioned that if you use the metal seating cups with them it makes the magnets even stronger, but maybe that's not the right route to take. Perhaps some small brackets attached to the panels, to rest on the bottom lip of the sump will work the best, and avoid drilling the stand. Still undecided, I may just bite the bullet and try the cups out on the one panel, though it will double the magnet install costs. Really kicking myself for not getting gussets or mounting tabs put on the stand now.
Welp :science:, the metal cups for the magnets are holding in place perfectly, much stronger shear resistance. Now to get them expoy'd in, and see if it's enough to hold from the on / off force the front panels will be under regularly.
Daniel@R2R
Living the Reef Life
View Badges
Staff member
Super Moderator
Reef Squad
Partner Member 2024
Excellence Award
Photo of the Month
Article Contributor
Hospitality Award
Article Administrator
Reef Pumpkin Carver
R2R Secret Santa 2023
My Tank Thread
Looking good! Following!

Thanks! I'm treating this as mostly a journal for myself so there are a lot of line updates, much easier than trying to keep notes and other written musings.Looking good! Following!
I was waiting to see what the Neptune return would end up releasing at up here, but I doubt the thing is going to ship anytime soon and for less than $500. Instead I've picked up another Jebao return, a DCP 8000 for this tank. As well, the H150 Magenta that was on price watch finally dipped again so I picked it up for essentially half-price. Still need to pick up the diamond hole bit and attempt the overflow bulkhead mounts for the glass sump pieces I had cut, and really need to get started on plumbing up the DT. Just so much going on, and a very mischievous cat to add to the mix has meant I need to get the stand skinned first to keep him out, else he's always sitting in the sump. The last thing I need is him getting hurt on the glass..
Then for the frag tank, I'm seeing water skirting up behind the acrylic panel and hoping that isn't going to leak past the bulkhead, as it seals against the acrylic which is against the glass. Might have to silicone the bulkhead on there if it does leak, no other way I can see around it. Thankfully I used threaded bulkheads on the return lines, so it can be removed quite easily in the future should it ever be required. Hoping the pressure of the bulkhead flange pulling both together makes it a non-issue.
Always something, and I got two going at once.
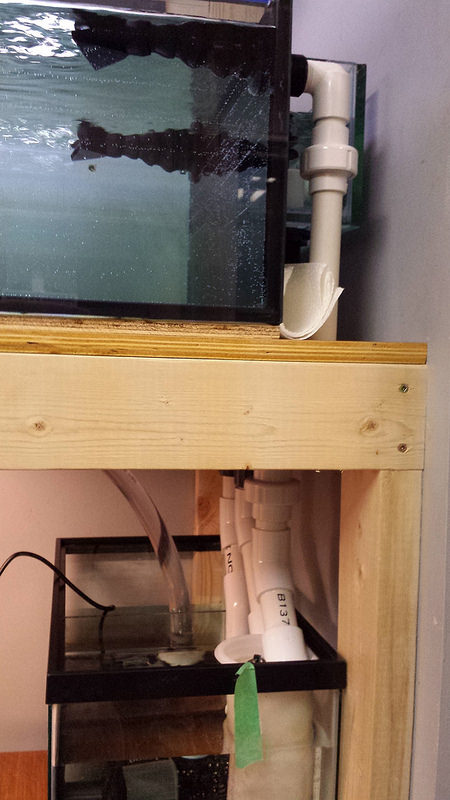
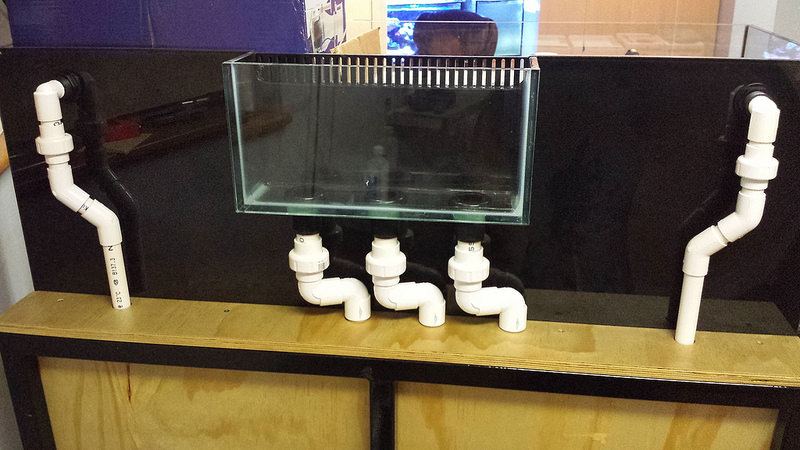
And another bit of a snag as I progress in the build. The stand was designed to allow for the tank to sit away from the wall, but have the stand extend all the way towards the wall. This way I could route the plumbing from the external overflow and the return lines through bulkheads on the top of the stand, down into the tank sump area. I planned it like this partially to add rigidity to the plumbing from the overflows, as I've found bulkheads that get wiggled from pipe movement (like turning valves) tend to leak. It appears that the builder had the stand made with just enough clearance for the pipes to fit through the slot, but we both didn't account for the fact I would have plywood on the back of the sump, but sitting inside the frame. As well, a 1" bulkhead will just barely fit directly below the overflow hole, but the nut can't be spun as there's about 1/4" of room missing, so the first plan won't work. I do still have another piece of the 3/4 plywood, so a decision will need to be made that I either cut out slots for the sch40 pipe to fit against the back of the sump wall, and run another piece of plywood behind it, or try using some spa-flex PVC to get the pipe routed ~1/2" out and away from the wall, with plain drilled holes to route through.
I still haven't decided on a plan, only noticed it last night while installing the bulkheads with unions. Leaning towards sticking with the sch40 piping, as I don't entirely trust spa-flex. Nothing is ever completely to plan with this hobby..
In good news, all the equipment for the tank has now arrived. The H150 Magenta light is so bright, haha, don't look directly into it I can tell you that much. The fan on it is a bit loud, but I'm hoping as it breaks in it will quiet down, else I'll pull it and see about re-greasing the bearing. Hoping this weekend I can really shot-gun a lot of the plumbing on both tanks and finish up the doors. Just waiting on the last panel to expoxy the magnets in, then seal up the cut lines with some of the spar varnish I've been using on the plywood.
It's been a stressful few days since I had much time to work on things with the holidays and an unfortunate situation taking place at the same time. Anyway, I'm off until Christmas now and have spent last evening and today to get the frag tank plumbed. It seems like forever for such a small amount of plumbing, but the tank is wet, is dead silent while running and.. no leaks!
The pump I picked up (Jebao DCS4000) is almost too powerful for the tank at the lowest setting, but is working out so far. It's running with tap water and some vinegar right now to clean off all the funk, will be drained tomorrow and get the proper 180º overflow fittings on.
frag_flow_1 by Kyl, on Flickr

frag_flow_2 by Kyl, on Flickr
frag_plumbing by Kyl, on Flickr
frag_sump_1 by Kyl, on Flickr
frag_sump_2 by Kyl, on Flickr
The filter sock is just to catch any initial build funk floating around, I don't plan on running one since the tank won't have any fish in it. The middle chamber will house some Seachem Pond Matrix and be seeded with some extra that's been cooking in the front display of the 20 for the past month. I also learned that the Aqueon silicone in a squeeze tube is completely awful to work with, and not having my previous magnetic holders to keep the baffles in place made a mess of things.
Eventually the frag system will get its own EB8 and PM1 that are currently running my Fusion 10 (home to a social wrasse for the new tank), I just need to pick up a ~30 foot USB cable first. I also don't foresee much of a cycle being required on the frag tank, but will run with an alert badge for the first month or so.
This tank thankfully was meant to be function over form, though I'm very happy that the builder got me to get the glass beveled and polished, it looks pretty slick.
Now to focus on getting the DT plumbed, I really want to get it wet before the end of the year.
The pump I picked up (Jebao DCS4000) is almost too powerful for the tank at the lowest setting, but is working out so far. It's running with tap water and some vinegar right now to clean off all the funk, will be drained tomorrow and get the proper 180º overflow fittings on.
frag_flow_1 by Kyl, on Flickr
frag_flow_2 by Kyl, on Flickr
frag_plumbing by Kyl, on Flickr
frag_sump_1 by Kyl, on Flickr
frag_sump_2 by Kyl, on Flickr
The filter sock is just to catch any initial build funk floating around, I don't plan on running one since the tank won't have any fish in it. The middle chamber will house some Seachem Pond Matrix and be seeded with some extra that's been cooking in the front display of the 20 for the past month. I also learned that the Aqueon silicone in a squeeze tube is completely awful to work with, and not having my previous magnetic holders to keep the baffles in place made a mess of things.
Eventually the frag system will get its own EB8 and PM1 that are currently running my Fusion 10 (home to a social wrasse for the new tank), I just need to pick up a ~30 foot USB cable first. I also don't foresee much of a cycle being required on the frag tank, but will run with an alert badge for the first month or so.
This tank thankfully was meant to be function over form, though I'm very happy that the builder got me to get the glass beveled and polished, it looks pretty slick.
Now to focus on getting the DT plumbed, I really want to get it wet before the end of the year.

Great build thread. I love reading all the detail. Looking forward to the main tank having water in it!
Thanks! Haha, I've had the tank a month now and yeah, it's getting a bit trying having to walk by it in pieces every day. At least I've figured the plumbing route and picked up all the fittings that are required before the Spears supplier closes for a week. Also implementing a work-around for the clearance issue in using two street slip 90's directly from the overflow lines, so at least that problem is dealt with. I'm still stuck on if I want to split off the 1-1/4" return just above or below the stand top..
If things continue to go well, judging by the time it took to plumb the frag tank, fingers crossed this should have at least a leak test fill on Monday.
If things continue to go well, judging by the time it took to plumb the frag tank, fingers crossed this should have at least a leak test fill on Monday.
I think tomorrow is going to be the big visual progress day. The stand panels got two coats of spar varnish this evening to seal all the cuts, still miffed at Ikea for discontinuing the solid birch doors and replacing it with these ash particle board ones. The topside plumbing is done and just waiting for the cover panel to dry from varnish as well.
For the return line I've decided to tee the 1-1/4 return line from below to keep the top back of the tank clear, though it also required a couple couplings to angle into place. The primary overflow is also plumbed in pieces for most of the run, some spacers will need to be made so the pipe can be braced against the back plywood with pipe brackets. Hopefully I can also get around to drilling the bulkhead holes in the 4" x 8" pieces of glass that were cut a few weeks back. The only problem has been it's winter so the outside hose can't be used, nor did I want a bunch of glass dust going down the sink. I found an old flush pump while cleaning up the past week and will try using it in a basin to spray water over the drill site so it can be done indoors.
The frag tank is 90% set-up, it's 1.026 sg @ 78º F, but the pump has this rather loud whine coming from it today that wasn't there yesterday with fresh water. I'm hoping as the system slimes up it goes away, else that will have to be changed for something else. As well, the seeded media will be moved in tomorrow after picking up a few small plastic baskets that are going to hold the Seachem Pond Matrix.
The Apex components will have to wait till the DT is running, as the fusion 10 they're on has a super bad green water problem, and I want to heavily clean up both probes and the Tunze ATO sensor so that garbage doesn't transfer to the frag tank. When the display is running the Apex USB line will have to travel about 25' total to connect the frag system. I may just bite the bullet and pick up one of the Neptune 30' male/male cables, though they're horrendously overpriced, and save having to hide an ugly male/female connection in the middle of the wall/ceiling.
And there's one more piece of the puzzle showing; the vendor with the Greenbanded Gobies has them in stock again, but raised the price 25%. Given they're two provinces over, and this time of year, I think they have to be given up on. I don't trust livestock being over-nighted up here, and wouldn't want four fish dying for nothing should something hit a snag. That and raising them to almost $50 a fish, yeah..
For the return line I've decided to tee the 1-1/4 return line from below to keep the top back of the tank clear, though it also required a couple couplings to angle into place. The primary overflow is also plumbed in pieces for most of the run, some spacers will need to be made so the pipe can be braced against the back plywood with pipe brackets. Hopefully I can also get around to drilling the bulkhead holes in the 4" x 8" pieces of glass that were cut a few weeks back. The only problem has been it's winter so the outside hose can't be used, nor did I want a bunch of glass dust going down the sink. I found an old flush pump while cleaning up the past week and will try using it in a basin to spray water over the drill site so it can be done indoors.

The Apex components will have to wait till the DT is running, as the fusion 10 they're on has a super bad green water problem, and I want to heavily clean up both probes and the Tunze ATO sensor so that garbage doesn't transfer to the frag tank. When the display is running the Apex USB line will have to travel about 25' total to connect the frag system. I may just bite the bullet and pick up one of the Neptune 30' male/male cables, though they're horrendously overpriced, and save having to hide an ugly male/female connection in the middle of the wall/ceiling.
And there's one more piece of the puzzle showing; the vendor with the Greenbanded Gobies has them in stock again, but raised the price 25%. Given they're two provinces over, and this time of year, I think they have to be given up on. I don't trust livestock being over-nighted up here, and wouldn't want four fish dying for nothing should something hit a snag. That and raising them to almost $50 a fish, yeah..

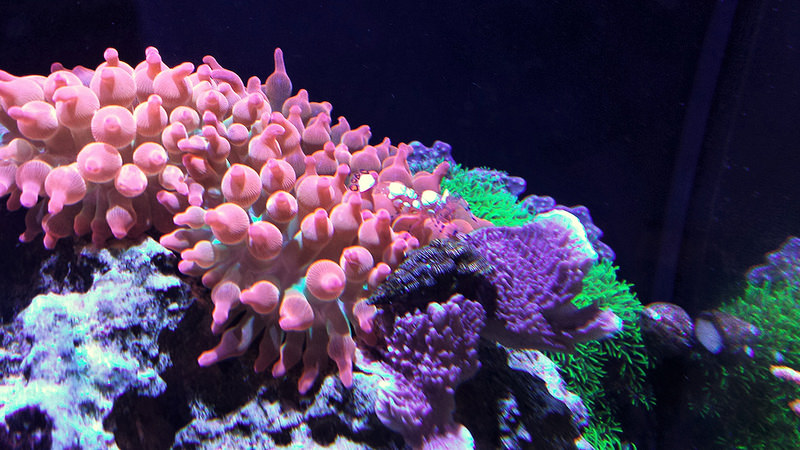
For an actual livestock post, there's still a king of the anemone, and he has no queen (unless it is a female, then she has no king).

anemone_king1 by Kyl, on Flickr
anemone_king2 by Kyl, on Flickr
The clowns sulk underneath the anemone most of the time, still, after months. The funniest part is when the shrimp leaves the anemone at night, as it hides under the purple monti next to it, the clowns host overnight and then leave again when it expands the next day.
And to the glass guy that told me 'no way you can drill that';

sump_bulkhead_drilled by Kyl, on Flickr
Then I went to check how it fits, and it will need about 1/8" taken off, since I didn't factor in 1/16" on each side for the silicone bead. Going to see if another shop will be able to just sand it down for me for a couple bucks, else I need to re-visit the original naysayer.. For now I'm just going to temporary plumb things where the bulkheads will be.
sump_bulkhead1 by Kyl, on Flickr
anemone_king1 by Kyl, on Flickr
anemone_king2 by Kyl, on Flickr
The clowns sulk underneath the anemone most of the time, still, after months. The funniest part is when the shrimp leaves the anemone at night, as it hides under the purple monti next to it, the clowns host overnight and then leave again when it expands the next day.
And to the glass guy that told me 'no way you can drill that';
sump_bulkhead_drilled by Kyl, on Flickr
Then I went to check how it fits, and it will need about 1/8" taken off, since I didn't factor in 1/16" on each side for the silicone bead. Going to see if another shop will be able to just sand it down for me for a couple bucks, else I need to re-visit the original naysayer.. For now I'm just going to temporary plumb things where the bulkheads will be.
sump_bulkhead1 by Kyl, on Flickr
Last edited:
As always, what you lay out in your head doesn't usually end up matching reality. The left return line will have to go out and around the overflow lines, and the 1-1/4 run from the pump will be pretty short. Going to make due with what I have on hand, but in the new year when the Spears supplier is open again I'll need to re-do a section of the plumbing with the proper fittings.
The rear plumbing is done, all the fascia is ready, the emergency line and primary siphon line are done. Just waiting on the cement to off-gas a bit more and I can get the secondary drain laid out, and finish up on the far left return line. Might actually get water in this thing to leak test tomorrow.
rear_plumbing by Kyl, on Flickr
I'm definitely keeping a list of the mistakes I've made with this design and build so far, especially with the stand. The lack of an inch has caused all the 45/90 usage, though I guess at the end of the day any flow loss is minimal at best and doesn't really matter for performance. The other major thing is to remember to slip on the union connector ring before cementing the fitting.. I didn't realize it on one of the last return connections and had to pry a ~10 minute glued fitting apart. It seemed to clean up well and visually all the seams on both ends seem to have sealed, so here's hoping.
I don't foresee picking up any fish on our Boxing day sale at the LFS, but I'm hoping salt, sand and dry rock go on sale. Thinking about just picking up another 50lb box of Marco rock rather than trying to cherry-pick and paying double per pound, and will pick up a couple boxes of Instant Ocean. Inverts I know will be discounted, aiming for some trochus snails, scarlet hermits and a couple more conchs.
All this on top of the family stuff and other things going on, feels like I've been working forever on these tanks!
Similar threads
- Replies
- 34
- Views
- 1,268
- Replies
- 1
- Views
- 97

New Posts
-

-

-
 Utah Lighting Drygoods Tunze Eco Refugium Waterproof Lights
- Latest: Z Burn's Reefing


