Looking for improvements to my 1st Commerc. Sump, PlasmaSumps P-150

Mason Michalski

Active Member
View Badges
Joined
Oct 28, 2018
Messages
228
Reaction score
124
Location
Kentwood
Rating - 0%
0   0   0
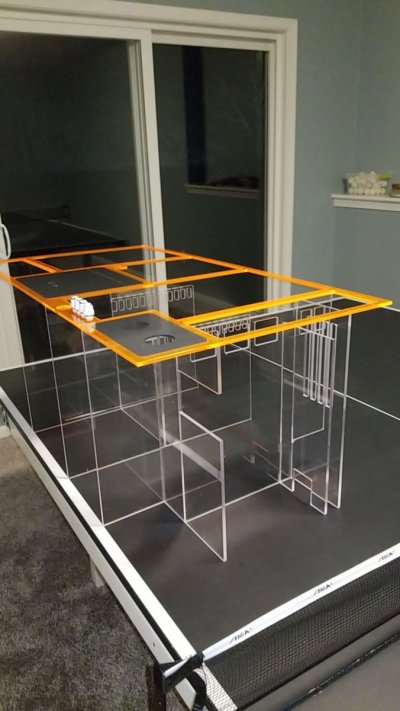
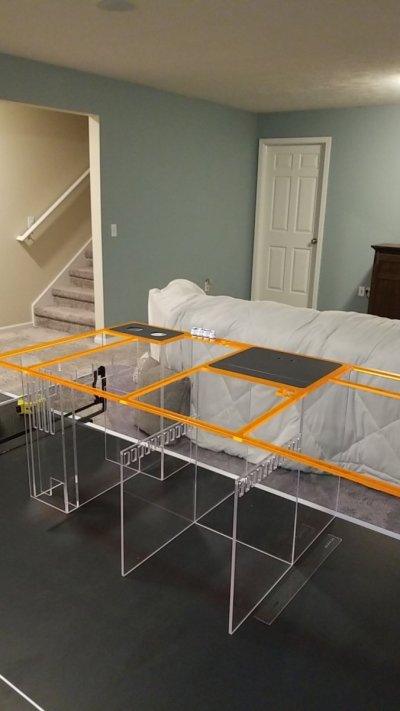
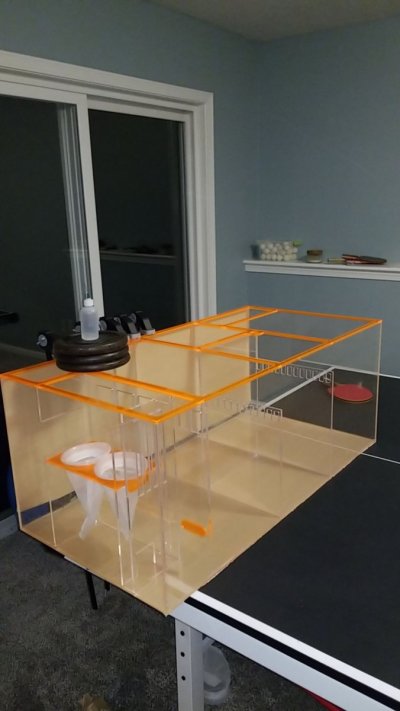
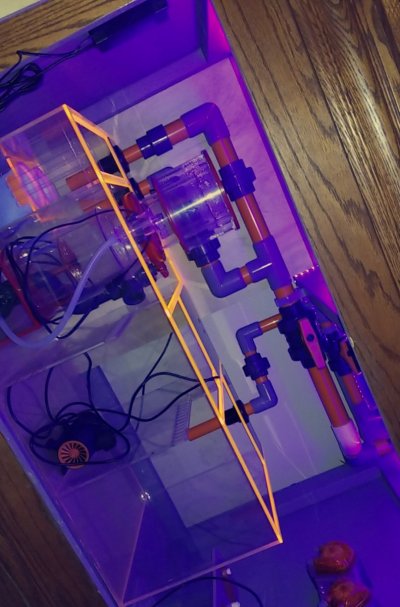
Hey guys, I just finished up my two month long build process, from 2D Design, 3D design, sourcing Acrylic during an Acrylic shortage, sourcing a reliable CNC shop for my product, and designing a logo. I've designed and built everything myself, and wanted to share with you guys my finished product. I am definitely looking for constructive criticism as I have two local shop display orders to fulfil by late spring mid summer as well as some at cost testers. I will be running a quality test for 6 months, but I am very happy to say the bonding with Weld on 4 went spectacular and I have mirror finish clear bonds all the way around. Water Test was a success.

It really is stunning in person, I will get my DSLR and take some accurate pictures later, not tacky at all!

First build post:

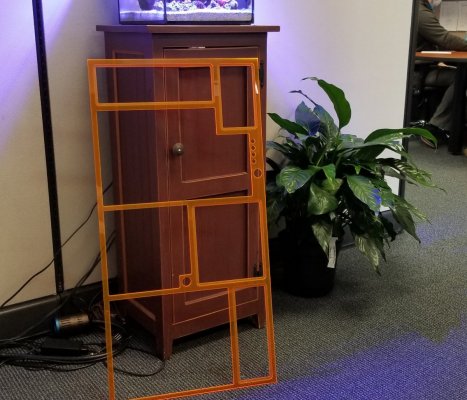
Customizable in design and color (I have Blue, Green, Orange, Yellow, Red, and Purple) This current one for my 150, is an Apex themed sump with a rim that will glow orange once a low wattage UV led strip is installed in cabinet (This won't affect the growth of algae, even a simple refugium light would reflect light all inside the rim). Along with that, opaque grey lids to match the Apex Neptune aesthetic. I've got a pending trademark for "PlasmaSumps" to start a trial production of these sumps with a local glass/acrylic manufacturer to fit a demand for sumps under or in the $500-$600 range (UPDATE: I made it well below this and I am in the $400 retail price range, at cost for those who want to get a test run will be lower priced). I will be working on a Nano option next. This sump will be entirely made of Domestic Cell Cast Acrylic of reputable brands, either Polycast, Polyone, Arkema ( I went with this), or Reynolds R for its quality and strength. REMINDER: This is a personal project for my 150, I would not be upset if this idea actually took off and people actually wanted one as I am going through my first prototype.

UPDATE: ALL my baffles and the Rim are made out of 1/4" Domestic Cell Cast

This build has 3 x 1" bulkheads

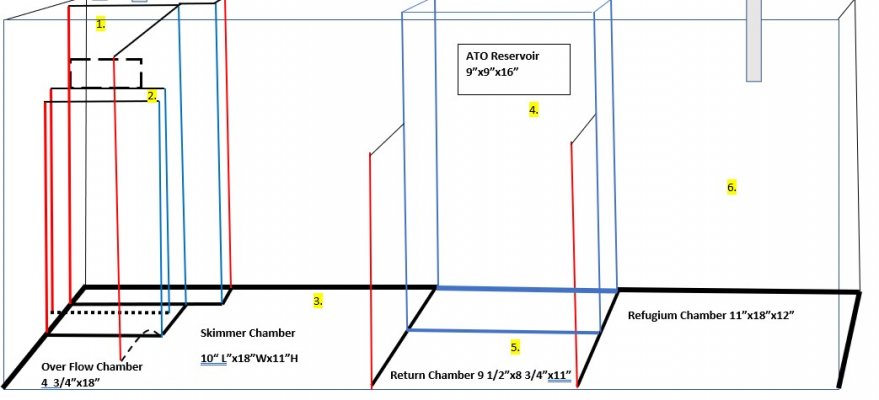
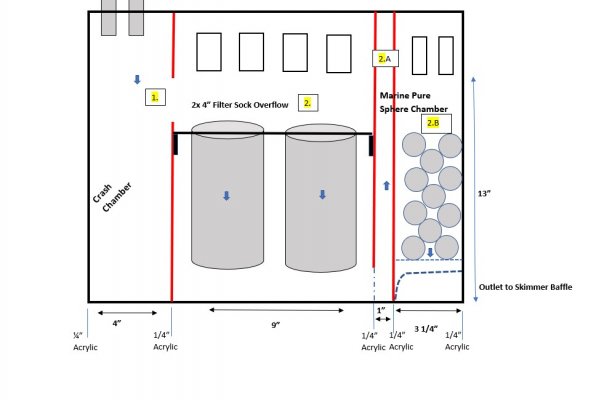
1. Crash area/drain from DT ( top right of the rim, has two bulk heads built into removable lid)
2.Filter Sock Chamber, goes through the filter socks, down through a panel, up through a bubble trap, through some slits and goes down a marine pure ball chamber, or biological media of your choice) second chamber highlighted by the rim on the second far left section. PLATE FOR FILTER SOCKS IS REMOVABLE.
3. Skimmer, Media Reactor, dosing chamber
4.Ato tank is the top middle section (Holds 5 Gallons with several inches of space left)
5. In front of the ATO Chamber is the return pump ( I could move these two chambers to the end, but I wanted my refugium on the end so that I can split the flow 75/25 from the DT, 25% goes to the refugium)
6/7. Refugium. 10 gallons filled

I figured having it go mechanical filtration (socks), biological filtration (marine pure balls), and then the mechanical/chemical filtration (skimmer/reactor) picking up excess bacteria and fine waste particles would make for a clean sump/system. All chambers including the holder for the filter socks, and marine pure balls are accessible for cleaning.

Skimmer chamber is large enough for several brands like Eshop, Reef Octopus, Aquavitros new skimmer, etc. Return area is 9"x9"x11", plenty of room for most return pumps that would be needed on a 55-250 gal. A lot of time went into the planning too. The prototype is running for 6 months but I am fairly confident in the bonding as every edge came out with a mirror finish when the weld on 4 was applied, all it comes down to is running it so any changes I have to the files, I can make them within that time frame.

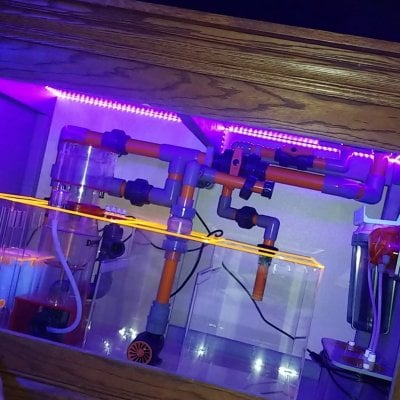
The colored part is an 1" wide, it doesn't inhibit any maintenance. I have a pretty average cabinet space and was able to work fairly easy removing and replacing skimmer, and I do have a fairly large skimmer, working on the return pump, removing compartments like the sock holder, all lids removed, fairly easy. I listed all of the chambers in the first page incase you care to look
Reef2reef sump blueprint.jpg Sump Alpha.jpg Sump.jpg Snapchat-1836297349.jpg Snapchat-1628328767.jpg Snapchat-635825423.jpg IMG_20210110_215823_914.jpg 20210111_093023.jpg Sump Rim.jpg Plasma.jpg
 
Last edited:

don_chuwish

Smells something fishy
View Badges
Joined
Mar 21, 2012
Messages
3,013
Reaction score
3,386
Location
A better place
Rating - 0%
0   0   0
Beautiful - but if I were in the market I would want the refugium section separated from everything else by a black panel. Don't want light bleed into the return pump section. Also not really sure you need a bubble trap after the filter socks. Is the lip for the socks' plastic rings recessed?
 

tricky_tran

Well-Known Member
View Badges
Joined
Oct 4, 2020
Messages
766
Reaction score
2,870
Location
Los Angeles
Rating - 0%
0   0   0
Looks pretty nice, i wouldnt mind trying one out, but i just got done setting up my 75 Gal with a hand me down Adavanced Acrylic sump. following along to see more updates
 
OP
OP
Mason Michalski

Mason Michalski

Active Member
View Badges
Joined
Oct 28, 2018
Messages
228
Reaction score
124
Location
Kentwood
Rating - 0%
0   0   0
Beautiful - but if I were in the market I would want the refugium section separated from everything else by a black panel. Don't want light bleed into the return pump section. Also not really sure you need a bubble trap after the filter socks. Is the lip for the socks' plastic rings recessed?
Yes I am working on that right now, as I agree with the light bleed from the refugium, no doubt about that! And you could be correct about the bubble trap being overkill, I need to see how it functions fully operational during the testing phase before I make any changes to the final product. The socks sit on a 4" holder with a 1/8" recessed in them. Thank you again :)
 
OP
OP
Mason Michalski

Mason Michalski

Active Member
View Badges
Joined
Oct 28, 2018
Messages
228
Reaction score
124
Location
Kentwood
Rating - 0%
0   0   0
Looks pretty nice, i wouldnt mind trying one out, but i just got done setting up my 75 Gal with a hand me down Adavanced Acrylic sump. following along to see more updates
No worries! I will be posting updates, issues I encounter (hopefully people will understand as I address them, this is my first go at making anything of this magnitude) and quality of life things like cleaning, day to day maintenance ease, etc. I appreciate the support :)
 

sharpimage

Active Member
View Badges
Joined
Aug 14, 2016
Messages
439
Reaction score
373
Rating - 0%
0   0   0
It doesn't look like a bubble trap at the return pump. Also, the ATO reservoir in the back would not work for me, How would you fill it?
 
U

User1

Guest
View Badges
Ping pong table for a work bench ;)

Looking at the photos it looks clean. Your display and test unit has good seams. Great job.

My comments are not really improvements but design issues so it wouldn't be a sump for me. I mean that it doesn't have what I'm looking for. In fact that is the crux of the issue of many sumps that are shrink wrap or pre-built. Right away for me the deal breaker is that it does not have 3 overflow bulk heads. I'm biased and only run Bean Animal overflows so two would limit me or make me modify your beautiful work (for example). To give you another example Trigger systems - most of their sumps are 1" bulk head and only 2 of them similar to yours. It isn't until you hit the 44" emerald line that you get a 1.5" x 3 configuration and that now runs you 600 bucks.

  1. I'm not a fan of filter socks - so this is something that should be optional
  2. Do not run the media bio ball / brick things. Placement is a issue due to high water volume and it breaking them down
  3. Refugium technically should be off the drain lines then filter into return pump area. Algae reduces nutrients and you want the pods to return to display
  4. Lids to reduce salt spray and salt creep
  5. You don't want your customers paying for things they are not going to use - that optional thing is a tough nut...
As I said it looks really clean and well built. I think you are on the right track but may need to do some research to see what gap you are trying to fill to make a few extra dollars. It is a crowded area.

All the best.
 

tricky_tran

Well-Known Member
View Badges
Joined
Oct 4, 2020
Messages
766
Reaction score
2,870
Location
Los Angeles
Rating - 0%
0   0   0
Ping pong table for a work bench ;)

Looking at the photos it looks clean. Your display and test unit has good seams. Great job.

My comments are not really improvements but design issues so it wouldn't be a sump for me. I mean that it doesn't have what I'm looking for. In fact that is the crux of the issue of many sumps that are shrink wrap or pre-built. Right away for me the deal breaker is that it does not have 3 overflow bulk heads. I'm biased and only run Bean Animal overflows so two would limit me or make me modify your beautiful work (for example). To give you another example Trigger systems - most of their sumps are 1" bulk head and only 2 of them similar to yours. It isn't until you hit the 44" emerald line that you get a 1.5" x 3 configuration and that now runs you 600 bucks.

  1. I'm not a fan of filter socks - so this is something that should be optional
  2. Do not run the media bio ball / brick things. Placement is a issue due to high water volume and it breaking them down
  3. Refugium technically should be off the drain lines then filter into return pump area. Algae reduces nutrients and you want the pods to return to display
  4. Lids to reduce salt spray and salt creep
  5. You don't want your customers paying for things they are not going to use - that optional thing is a tough nut...
As I said it looks really clean and well built. I think you are on the right track but may need to do some research to see what gap you are trying to fill to make a few extra dollars. It is a crowded area.

All the best.

For #3, OP is splitting the drain from the DT 75 Filter Socks/25 Fuge.

If there was a way to make things more modular, like different covers with different bulk heads for different applications, that would be cool.

@Mason Michalski I see there is a check valve right above the return pump, are there any other check valves?
 
OP
OP
Mason Michalski

Mason Michalski

Active Member
View Badges
Joined
Oct 28, 2018
Messages
228
Reaction score
124
Location
Kentwood
Rating - 0%
0   0   0
It doesn't look like a bubble trap at the return pump. Also, the ATO reservoir in the back would not work for me, How would you fill it?
I definitely will look into the bubble trap after the skimmer, didn't take into account of how much bubbles it might produce. Will keep an update on this! As for the ATO, it's fairly simple, I just run a float valve through the lid hole with an RODI line hooked right into it, ATO pumps right out the other hole. BUT, rest assured, I am making one without an ATO too. Taking my P150 2D models and editing them to fit other demands is quite easy :) Thanks for the good feedback!
 

don_chuwish

Smells something fishy
View Badges
Joined
Mar 21, 2012
Messages
3,013
Reaction score
3,386
Location
A better place
Rating - 0%
0   0   0
My comments are not really improvements but design issues so it wouldn't be a sump for me. I mean that it doesn't have what I'm looking for. In fact that is the crux of the issue of many sumps that are shrink wrap or pre-built.
I have the same dilemma with every sump I look at. Always something that I don't like or want. On the other hand I'd probably have a hard time designing my perfect sump from scratch. So it comes down to options - how to package some flexibility into the ordering & fulfilling process.
 
OP
OP
Mason Michalski

Mason Michalski

Active Member
View Badges
Joined
Oct 28, 2018
Messages
228
Reaction score
124
Location
Kentwood
Rating - 0%
0   0   0
Ping pong table for a work bench ;)

Looking at the photos it looks clean. Your display and test unit has good seams. Great job.

My comments are not really improvements but design issues so it wouldn't be a sump for me. I mean that it doesn't have what I'm looking for. In fact that is the crux of the issue of many sumps that are shrink wrap or pre-built. Right away for me the deal breaker is that it does not have 3 overflow bulk heads. I'm biased and only run Bean Animal overflows so two would limit me or make me modify your beautiful work (for example). To give you another example Trigger systems - most of their sumps are 1" bulk head and only 2 of them similar to yours. It isn't until you hit the 44" emerald line that you get a 1.5" x 3 configuration and that now runs you 600 bucks.

  1. I'm not a fan of filter socks - so this is something that should be optional
  2. Do not run the media bio ball / brick things. Placement is a issue due to high water volume and it breaking them down
  3. Refugium technically should be off the drain lines then filter into return pump area. Algae reduces nutrients and you want the pods to return to display
  4. Lids to reduce salt spray and salt creep
  5. You don't want your customers paying for things they are not going to use - that optional thing is a tough nut...
As I said it looks really clean and well built. I think you are on the right track but may need to do some research to see what gap you are trying to fill to make a few extra dollars. It is a crowded area.

All the best.
Bahaha sorry that had more depth then our 4 foot work bench so to save clutter towards the end I opted for a ping pong table :D Thank you for the build compliments! You have already helped me a bunch in the DIY thread.

Responding to your list, these are great. ALSO, it does have 3 bulkheads at 1", 2 on the crash and one on the refugium :)

1. Yes I am working on a roller mat option next, opting out of that whole first chamber area and allowing for a modular roller mat area, or nothing at all.
2. Yeah this was more of an experimental thing, I don't know if it will workout in the long run as I operate under 10x turnover. Will keep the thread updated with positive and negative experiences with this.
3. Looks like this was answered, trust me I am torn on this too. I just went with the refugium on the end as I wanted more room for plumbing.
4. It does have lids! On the Crash Chamber, on the whole Filter sock Area, on the refugium, and on the ATO! Went with PVC Sheet as it does not warp like Acrylic (pretty sure you helped me on this actually)
5. Do you think I can address this by creating different models to fit different needs?

You are right and it is very daunting, if it flops at least I got to make exactly what I want :)

Thank you Saf, always a pleasure talking to you
 
OP
OP
Mason Michalski

Mason Michalski

Active Member
View Badges
Joined
Oct 28, 2018
Messages
228
Reaction score
124
Location
Kentwood
Rating - 0%
0   0   0
I have the same dilemma with every sump I look at. Always something that I don't like or want. On the other hand I'd probably have a hard time designing my perfect sump from scratch. So it comes down to options - how to package some flexibility into the ordering & fulfilling process.
Well I always do custom builds :) This fit what I want so I am not against making what others want. My method was to make different models to fit different needs, HOPEFULLY. But yeah I spent a lot of hours getting this right to the fraction on size, it was a headache and stressor at times.
 
Last edited:
OP
OP
Mason Michalski

Mason Michalski

Active Member
View Badges
Joined
Oct 28, 2018
Messages
228
Reaction score
124
Location
Kentwood
Rating - 0%
0   0   0
For #3, OP is splitting the drain from the DT 75 Filter Socks/25 Fuge.

If there was a way to make things more modular, like different covers with different bulk heads for different applications, that would be cool.

@Mason Michalski I see there is a check valve right above the return pump, are there any other check valves?
More modular would be more of a different model thing for me, the current one has 3 bulkheads to accommodate for different drain types, different models would allow me to take a broader approach at addressing wants.

What do you mean different covers with different bulkheads, like sizes? Good idea!

Yes that is the only check valve on my current system, should I add another for redundancy?
 

tricky_tran

Well-Known Member
View Badges
Joined
Oct 4, 2020
Messages
766
Reaction score
2,870
Location
Los Angeles
Rating - 0%
0   0   0
More modular would be more of a different model thing for me, the current one has 3 bulkheads to accommodate for different drain types, different models would allow me to take a broader approach at addressing wants.

What do you mean different covers with different bulkheads, like sizes? Good idea!

Yes that is the only check valve on my current system, should I add another for redundancy?
Looks like you have a manifold after the check valve, before the DT. That worked well for me till I turned on my manifold for my carbon reactor.
 
OP
OP
Mason Michalski

Mason Michalski

Active Member
View Badges
Joined
Oct 28, 2018
Messages
228
Reaction score
124
Location
Kentwood
Rating - 0%
0   0   0
Oh man I can't believe I missed that! My manifold hooked up to where that empty union is, will gravity siphon through my carbon reactor and fill the sump. I will have to move some stuff around, thank you for the foresight!
 

tricky_tran

Well-Known Member
View Badges
Joined
Oct 4, 2020
Messages
766
Reaction score
2,870
Location
Los Angeles
Rating - 0%
0   0   0
your marine pure sphere chamber, will there be a basket for the balls to make for easy cleaning?

The ATO in the back of the sump would be difficult to fill/clean (especially if you put Kalkwasser in the ATO chamber)
 
Last edited:

Oberst Hajj

Well-Known Member
View Badges
Joined
Dec 23, 2012
Messages
978
Reaction score
852
Location
Colorado
Rating - 0%
0   0   0
Right away for me the deal breaker is that it does not have 3 overflow bulk heads. I'm biased and only run Bean Animal overflows so two would limit me or make me modify your beautiful work (for example). To give you another example Trigger systems - most of their sumps are 1" bulk head and only 2 of them similar to yours. It isn't until you hit the 44" emerald line that you get a 1.5" x 3 configuration and that now runs you 600 bucks.

This was actually an issue I was running into when looking around for a sump for my new build (and I'm still actually looking). Three drain bulkheads are a must for the Bean Animal overflows. While 1.5" drain lines is typically used on larger tanks, not everyone has the space/funds to get a 40"+ sump that costs $600-$1000.

The other "issue" I'm finding with pretty much all off the shelf sumps is that they make the return pump section to narrow. Most are 4"-6" wide and that makes it pretty hard to easily service the pump(s).

I mentioned it in the other thread, but I'd look at how you have the water flow into the sock area some more. Also, as saf1 pointed out, some people do not like to run socks, so making that part modular is a good idea and pretty easy. Just make a shelf in that section that would accommodate a sock holder or other mechanical filtrations (floss) or nothing at all. Fiji Cube does something like this.

The three 1.5" drains and 7" wide return chamber are why the Fiji Cube 44 is currently the front runner in my sump search, but at just under $600 it is more than what I would like to spend.

PS
I sent you a PM about some acrylic sources, not sure if you saw it or not.
 
OP
OP
Mason Michalski

Mason Michalski

Active Member
View Badges
Joined
Oct 28, 2018
Messages
228
Reaction score
124
Location
Kentwood
Rating - 0%
0   0   0
This was actually an issue I was running into when looking around for a sump for my new build (and I'm still actually looking). Three drain bulkheads are a must for the Bean Animal overflows. While 1.5" drain lines is typically used on larger tanks, not everyone has the space/funds to get a 40"+ sump that costs $600-$1000.

The other "issue" I'm finding with pretty much all off the shelf sumps is that they make the return pump section to narrow. Most are 4"-6" wide and that makes it pretty hard to easily service the pump(s).

I mentioned it in the other thread, but I'd look at how you have the water flow into the sock area some more. Also, as saf1 pointed out, some people do not like to run socks, so making that part modular is a good idea and pretty easy. Just make a shelf in that section that would accommodate a sock holder or other mechanical filtrations (floss) or nothing at all. Fiji Cube does something like this.

The three 1.5" drains and 7" wide return chamber are why the Fiji Cube 44 is currently the front runner in my sump search, but at just under $600 it is more than what I would like to spend.

PS
I sent you a PM about some acrylic sources, not sure if you saw it or not.
I am actually working on extending it to 40"L x 20"W x16"H for a larger model that goes from 3x 1" bulkheads like the current to 3 1 1/2" bulkheads, no doubt my cost would be right at or below around $350. Would move the return and ATO to the end and refugium to the middle after skimmer chamber w/ bubble trap

My return section is 9" x 9" x 11", should I opt to go even bigger?

Actually to address an earlier comment you made, it seems to dirty the socks at an equal rate with the way it is set up, but they do need to be raised a little and that was modified in the file for the post prototype build, would be easy for me to modify the chambers a bit more to fit in a roller mat or nothing at all. The filter sock holder is already removable quite easily, I do it every 2 days so far.

Good to know the Fiji is what I should be living up to, I have a 3 x 1" drains and a 9" return chamber so far, I will check to see what I can possibly improve without out right stealing someones design

Yes thank you for the PM! I got into contact with a local vendor on some of the colored acrylic, just waiting back on them

You've been a huge help pushing improvements, thank you! I do genuinely appreciate it
 
Last edited:
OP
OP
Mason Michalski

Mason Michalski

Active Member
View Badges
Joined
Oct 28, 2018
Messages
228
Reaction score
124
Location
Kentwood
Rating - 0%
0   0   0
your marine pure sphere chamber, will there be a basket for the balls to make for easy cleaning?

The ATO in the back of the sump would be difficult to fill/clean (especially if you put Kalkwasser in the ATO chamber)
I have had it up and running for a couple days now, I am working on a basket instead of it's current removable holder for the marine balls. Also, the ATO wasn't too difficult to fill, I did have the lid fitted with a second 1/2" hole for a float valve to be fitted to a quick disconnect for an RODI line, manual filling it isn't too hard either. Still opting to move the return and ATO to the end.

Not to be a snob because I used to do this the same and understand the appeal, but I will never use Kalk in my ATO again ((did for a year) and tell others now not to. I dealt with my tunze 3155 dosing different amounts every day, being used more than normal on a hot summer day, and it caused a huge alk spike on 2 different occasions. The day I went with All for Reef one part from Tropic Marine, I saw growth on my sps within weeks that I had for years from Reefapalooza. Kalk should only be used in a reactor, just my personal opinion though and that does not mean anyone who chooses to do this is wrong :) Just lost some of my favorite coral to that and wanted to improve.
 
Last edited:
Back
Top