Navigation
Install the app
How to install the app on iOS
Follow along with the video below to see how to install our site as a web app on your home screen.
Note: This feature may not be available in some browsers.
More options
You are using an out of date browser. It may not display this or other websites correctly.
You should upgrade or use an alternative browser.
You should upgrade or use an alternative browser.
Mehaffy's 1100+ gallon Plywood display in North Alabama
- Monster Build
- Thread starter mehaffydr
- Start date
- Tagged users None
The tank assembly has started I got the window holes cut in tonight and so far the fist corner is screwed and glued. To assemble the corners I am installing stainless steel screws every 1 1/2" and also using water proof wood glue.

Very impressed with your progress. Looking forward To seeing more
I should have used the term Water Resistant. I am using Gorilla Glue Exterior wood glue. I don'Do you mind being more specific with the waterproof wood glue?
- Joined
- Mar 30, 2020
- Messages
- 273
- Reaction score
- 622
Gotcha, I figured you meant water resistant. Its probably too late now and its a been a while since I watched the video but wood by Wright on YouTube does a fantastic (if very long) couple of videos on wood glue under different conditions.
So tonight I was able to get 1 side and the front attached to the bottom which in a picture looks impressive but there still a lot to do building the plywood structure. I glued the 3 seams I joined and then predrilled and countersunk every 1 1/2" (that's a lot on a 10' length) and screwed together with stainless steel screws. I've already used 150 screws and I'm just getting started but I tend to overbuild and with about 8000lbs. of water better safe then sorry. Hopefully I'll have most of this assembly done over the weekend.

I checked out the Wood by Wright on you tube that guy has some cool stuff I love woodwork. I did find the glue video Thank you for the suggestion I still need to buy a lot of glue and looks like I'm buying titebond for the remainder of this build.Gotcha, I figured you meant water resistant. Its probably too late now and its a been a while since I watched the video but wood by Wright on YouTube does a fantastic (if very long) couple of videos on wood glue under different conditions.
I received my fiberglass today i actually just bought an entire roll about 70 lbs. Hopefully this will be enough for the whole project. That's a big roll of fiberglass. I also got 5 gallons of resin. So once the box is complete I'll be ready to go directly into the fiberglass. I have not ordered my pond armor yet as I'm still trying to decide on Blue or Black if anyone has experience and suggestions on that Id love to hear them.

- Joined
- Mar 30, 2020
- Messages
- 273
- Reaction score
- 622
Glad you liked it, he does have at least 2 of those glue videos and thankfully I'm pretty sure excell spread sheets that you can look at independent of the videos IIRC. Titebond is fantastic stuff and for the majority of things you don't even need the II or III versions, but weldbond plastic resin was the best for exterior conditions which he talks about in the second video.I checked out the Wood by Wright on you tube that guy has some cool stuff I love woodwork. I did find the glue video Thank you for the suggestion I still need to buy a lot of glue and looks like I'm buying titebond for the remainder of this build.
Last edited:
Was able to make a little progress tonight after work. I put in the 2nd layer of plywood for the bottom. The bottom and all side are going to be doubled up 3/4" plywood. I just wanted to really strengthen as much as possible. Maybe not needed but sure won't hurt. I bought a gallon of Titebond 3 glue Thank You @NautiTang for the tip. I first carefully checked the fit as the second layer has to fit within the sides and with 1 side and the back not on yet I had to be sure there is space for them to sit on top of the 1st bottom layer. After a little trimming I was happy with the fit so I spread the glue on the bottom layer of plywood and laid the top layer on then screwed it down. I am now working on the right end and tomorrow I will install the back. After that I will double the front back and sides. maybe I will start fiberglass by Sunday but not sure as there is a lot of work to drilling and installing all of the screws.

Was able to make a little progress tonight after work. I put in the 2nd layer of plywood for the bottom. The bottom and all side are going to be doubled up 3/4" plywood. I just wanted to really strengthen as much as possible. Maybe not needed but sure won't hurt. I bought a gallon of Titebond 3 glue Thank You @NautiTang for the tip. I first carefully checked the fit as the second layer has to fit within the sides and with 1 side and the back not on yet I had to be sure there is space for them to sit on top of the 1st bottom layer. After a little trimming I was happy with the fit so I spread the glue on the bottom layer of plywood and laid the top layer on then screwed it down. I am now working on the right end and tomorrow I will install the back. After that I will double the front back and sides. maybe I will start fiberglass by Sunday but not sure as there is a lot of work to drilling and installing all of the screws.

Love it!
Can you please provide some more close-ups of where you're screwing it down
I had a good weekend of tank building. All I need to do before starting fiberglass is to fill the screw heads with wood filler and sand. I have use almost 700 stainless steel screws and almost a gallon of wood glue. I'll start buy showing some of the detail of the corners and glass pockets.
These are the corner joints the bottom has a similar configuration. These are glued and then screwed from both directions.


I left a 1 1/2" rabbet for the glass to sit in.

These are the corner joints the bottom has a similar configuration. These are glued and then screwed from both directions.
I left a 1 1/2" rabbet for the glass to sit in.
I will now fill all the screw heads with wood filler and sand smooth before starting the fiberglass. My plan is to fiberglass the entire inside and then paint with epoxy. I may use pond armor but my son in law works for Sherwin Williams so I have him looking into what they have available. I left a channel around the entire top for euro bracing and some cross braces but I think I'm going to do the fiberglass work before install as that top bracing would make the fiber glassing very difficult.

One thing I am struggling with is getting water from tank to sump. I've look at different options for overflows and also thought about DIY I like what @AlexG did on his build. But today I was at Tractor Supply and just wandered through the plumbing area and came across these components. Any opinion on if this will work and any potential problems. These are 2" pipe so 2-3 should allow plenty of water flow but concerned about noise and control. I will go through the back of the tank with a bulkhead. One thing I need to figure out is how many gallons a 2" drain pipe will flow any help with that is appreciated. I'm thinking I want about 500 gallons an hour as that will flow 12000 gallons a day through the sump. I think thats plenty for filtration heating and supplements. I will concentrate most of my water movement within the tank with powerheads and maybe a closed loop system.

Last edited:
@mehaffydr Here is a useful pipe flow chart https://flexpvc.com/Reference/WaterFlowBasedOnPipeSize.shtml . The pipe flow chart does not account for fittings but ca give you some estimates. The place in the link is a good source for lots of plumbing parts that can be hard to find. I will let you know ahead of time my DIY drains were by no means silent as noise was not considered in the design. If you are looking for silence I would make an internal or external overflow box with a bean animal setup. This tank is coming along great. I will hopefully be back in building mode myself in a few weeks 
Thanks Alex that link is great. I guess you must have gotten moved if your already getting prepared to start building again. Great to hear your building again.@mehaffydr Here is a useful pipe flow chart https://flexpvc.com/Reference/WaterFlowBasedOnPipeSize.shtml . The pipe flow chart does not account for fittings but ca give you some estimates. The place in the link is a good source for lots of plumbing parts that can be hard to find. I will let you know ahead of time my DIY drains were by no means silent as noise was not considered in the design. If you are looking for silence I would make an internal or external overflow box with a bean animal setup. This tank is coming along great. I will hopefully be back in building mode myself in a few weeks
I don't need complete silence as i an building walls around this tank so that the back and one side will be in the equipment room and the front and other viewing side will be the main viewing area. I just don't want Niagara Falls either.
Thanks Alex that link is great. I guess you must have gotten moved if your already getting prepared to start building again. Great to hear your building again.
I don't need complete silence as i an building walls around this tank so that the back and one side will be in the equipment room and the front and other viewing side will be the main viewing area. I just don't want Niagara Falls either.
If you want to test out the sound put the overflow in a bucket with a bulkhead and test it out. for sound. I did that to test the overflows I designed which really helped make sure they would work before the tanks were ready. I only have one move completed to my temporary home but I am just a few short weeks away from the new house.
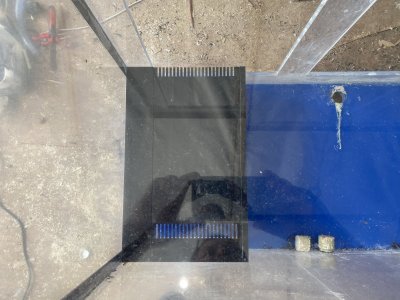
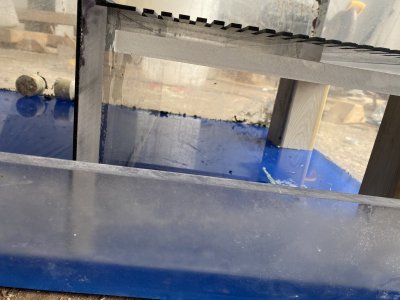
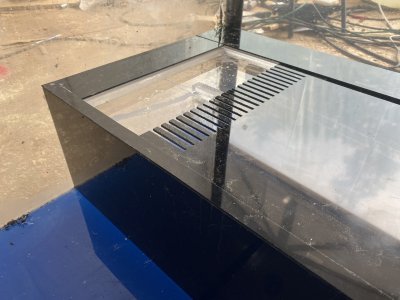
I’ve used overflows like Alex’s but the flaws with them is they only take water from the surface and also they are almost impossible to make silent. Wnen I set the 560 gallon I made a few years ago up again I designed a new overflow box that made is so I not only get surface water but also water from the bottom of the tank going to the sump. I also was able to have 2 pipes going to the sump. One is full siphon and the other has just a tiny trickle and acts as an emergency overflow. I didn’t take any pics of the plumbing but did take some pics of the boxes I made. There’s a slot that allows wAter to get sucked into a grate at the bottom of the overflow box and rise to the top to spill into the box itself. Water also goes in through the top slots to spill into the box. Hopefully you understand. Anyway. Here’s some pics. The boxes are made from 3/4 and 1/4 acrylic. I also included a pic of my old overflows that I made from 1.5-4” abs coplers. I’m so glad I made the overflow boxes this time. With the bottom intakes it makes filtering the tank so much easier not having to rely on the dirt getting to the surface to be removed. And the tank is dead silent


Similar threads
- Replies
- 101
- Views
- 2,640
- Replies
- 9
- Views
- 275
New Posts
-
-
When did the BUYER become responsible for shipping delays?
- Latest: EeyoreIsMySpiritAnimal
-


