New (to me) Planet Aquarium 125 Rimmed

creativeballance

Active Member
View Badges
Joined
Feb 23, 2020
Messages
297
Reaction score
422
Rating - 0%
0   0   0
I was originally planning to buy an aqua Japan 150. I was informed by the vendor after waiting for two weeks that the tank was no longer available and would be 6 to eight weeks away. Next I put an order in for a proclear ProStar 150. A week later, the tank shows up at the shop. When the employees unpack it they discover that the corner has a big huge gigantic crack broken into it. Getting a replacement? Another 6-8 weeks.

Mind you, my current 125 has bubbles in the seams and they are progressively getting worse.

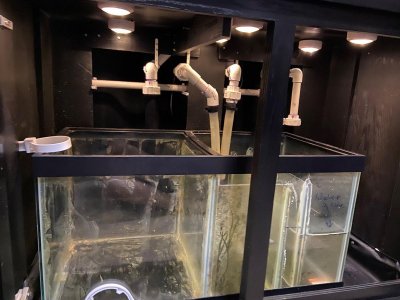
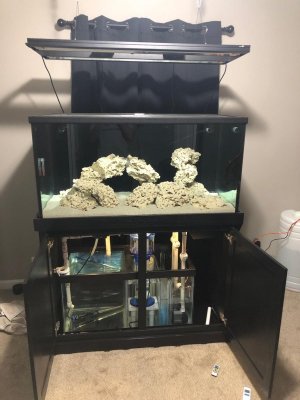
So in the LFS's used section they had a Planet Aquarium rim 125 with a stand and custom sump. External low profile overflow box. The sump appears to be a 55 gallon with glass baffles.

The original owner of the tank had owned it only for a few months , and they were selling it because they were moving out of state - so lucky me, right?
Some photos of the tank before they broke it down:
IMG_1788.jpg IMG_0059.jpg

Plus - most of the plumbing is done. I just need to hook my pump up and reconnect the pipes.

However, I'm unsure about the sump design...I dont see a holder for filter socks. Theres not really a spot for a fuge, unless I'm missing something?

Drains appear to be Bean Animal...except that the pipe that I think is the emergency drain is not positioned above the water level - and appears to be almost at the bottom of the sump?

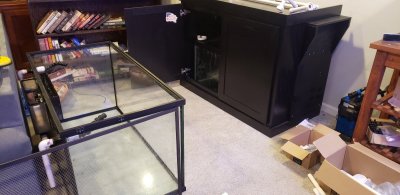
Pictures below of the tank and stand sitting in my office:
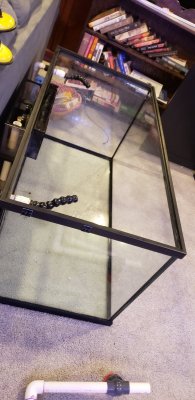
20200603_191630.jpg 20200603_191604.jpg

Any suggestions for how to tackle the sump and drain piping would be appreciated - I'm not sure how the previous owner utilized it.

I'm planning to do any changes Thursday 6/4 and Friday 6/5 before filling.
 
Last edited:
OP
OP
C

creativeballance

Active Member
View Badges
Joined
Feb 23, 2020
Messages
297
Reaction score
422
Rating - 0%
0   0   0
Did some plumbing after work.
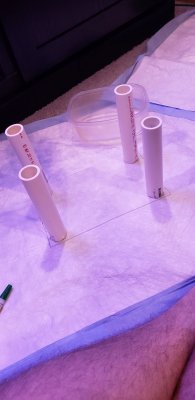
When the other owner broke the tank down, they sawed through the pipes to separate the tank from the bottom.
20200604_204605.jpg

I've glued part of the unions to every pipe to make it faster to connect the sump.

20200604_204035.jpg


I put together a manifold for future connections to a reactor or scrubber - I dont know what I may add at a later time. But it's better to have it easier to connect now rather than taking it all apart later just to add a valve.

20200604_201002.jpg


For the pump, I'm using a Simplicity 2100 DC pump.

20200604_204344.jpg


I've put unions on the drain pipes. Again, the idea is to give it a day for the solvent to set, so I can start transferring the stuff from the old tank by Saturday!
20200604_204125.jpg
 
Last edited:
OP
OP
C

creativeballance

Active Member
View Badges
Joined
Feb 23, 2020
Messages
297
Reaction score
422
Rating - 0%
0   0   0
20200605_145015.jpg

Finished plumbing. I need to find a few more hangers for the main return that are long enough. I also need to see of I made it long enough - it goes about 2 inches below the expected water level, so hopefully it works right!

This is my first time doing my own plumbing, so hopefully it works!

20200605_144552.jpg

I moved my freshwater tank out of the way for now. It's going to eventually sit where my "old" saltwater is.
On a good note, my wifey made it clear that she hated how my planted tank looked, so she is going to take it over! Im keeping my fingers crossed that she stays interested!

Going to get some RODI into the return chamber after dinner to test the return plumbing, and then off to the store to get larger S hooks for my light fixtures
 
OP
OP
C

creativeballance

Active Member
View Badges
Joined
Feb 23, 2020
Messages
297
Reaction score
422
Rating - 0%
0   0   0
Transfer completed last night.
20200606_102332.jpg

Water was super cloudy until this morning.
20200606_142244.jpg

Heres the overflow chamber, containing rubble and sand from the old fuge.
15914690844193382580227025593060.jpg

To combat nitrates and other "problems" I added some Seagel and Purigen to the last chamber before the return.

Building a "table" for my Skimmer to sit on...
15914693394661404495006888822634.jpg

And that reminds me...those puppy pads are great for keeping the carpet from getting drenched! 20200606_142122.jpg
 
OP
OP
C

creativeballance

Active Member
View Badges
Joined
Feb 23, 2020
Messages
297
Reaction score
422
Rating - 0%
0   0   0
Did the first water test for this tank.
20200607_152609.jpg

1.025 SG/
12ppm no3 / 0.1 po4 / 8.15 ph / 9.3 kh / 930 mag / 425 cal

No3 is higher than I've ever seen it. It typically runs around 2-5 from the old tank.

All of the animals look happy though - my Anemone looked ticked off yesterday, until I guided him to a spot out of the flow. Hes now safely buried himself.
15915581917835020914057547582708.jpg


I think I'm going to keep the scape for now. I have some water-weld on order.
15915582599056988627296417024077.jpg
 
OP
OP
C

creativeballance

Active Member
View Badges
Joined
Feb 23, 2020
Messages
297
Reaction score
422
Rating - 0%
0   0   0
Other equipment....
Filtration:
Have a small (cheap) wavemaker I've added from the old tank. It's set to push water from the right side of the tank to the left side. My LTA DID NOT like it! I saw it climbing out of its sand hole after a couple of minutes.I had to prop up a rock next to him to block the flow!
On the back wall are a couple JPL-100 power heads.

In the sump, I'm now running the Eshopps S200 skimmer the original tank's over had. I normally would not be able to afford something like that for my tank, but I got a really good deal from my LFS. I'm still dumping the (humongous) collection cup daily. I do say that I'm loving the drain at the bottom of the collection cup. I do wonder if it would be worth it to have a hose going to a bucket or something, at least until the cup stops filling up daily?

Today I finished another project I've felt inspired to do. I've repurposed my old pump and a couple trash cans to hold and pump water. I'm excited to say that I have a hose long enough for siphoning water into my basement drain, and another to pump water (salt or RODI) directly to my sump! Needless to say, my (very) skeptical wife was excited when she saw I could do my water changes without dripping water everywhere!
20200612_234524.jpg

(pardon the mess...still need to organize and get everything off the floor!)
 
OP
OP
C

creativeballance

Active Member
View Badges
Joined
Feb 23, 2020
Messages
297
Reaction score
422
Rating - 0%
0   0   0
So...lights.
20200614_163914.jpg

I've taken a piece of aluminum channel from work (36" long) and drilled holes for my current light fixtures to hang from. One is a Luxebird CBB. I seem to get good coral growth out of it. The other is a LedZeal light that a friend gave me. He got it at a sample, and he indicated that he had an opportunity to import them to the USA. Currently, LedZeal only makes grow lights from what I can see.
The ledzeal has a simple controller that ramps each of its four channels.

I work in LED signage, so my next goal is to build a new light fixture and controller from components...I've got practically everything I need except the LEDs themselves - and I can probably order enough "samples" to make a few fixtures!
 
OP
OP
C

creativeballance

Active Member
View Badges
Joined
Feb 23, 2020
Messages
297
Reaction score
422
Rating - 0%
0   0   0
Its been a while since the last update.

Update #1
I restarted my phyto tank. I bought some Tetraselmis phyto from Mercer of Montana. I'm going to do my best to keep that strain going. I added 16 oz. to 5 gallons of water on Thursday. The water is already extra dark-green - especially considering that I did not do the recommended 1:1 starting ratio.
20200628_130611.jpg

The lights are excellent - 12 hour timer, and adjustable brightness. There are 3 strips, so it's easy to broadcast light to both sides of the tank
Light link on Amazon

Update #2
I've added some stock. No photo yet, but I added a Spotted Mandarin on Thursday. I was able to do some light repairs for my LFS, in exchange for some store credit.

Yesterday, I purchased 4 Mollies. I spent 10 hours drip acclimating them to salt. Unfortunately, I found one molly floating on the top of the tank this morning, and one of them is missing. The other two do not seem to be doing spectacularly well. I hope they pull through, I need something to help keep the GHA under control.
20200628_130428.jpg
 
Last edited:
OP
OP
C

creativeballance

Active Member
View Badges
Joined
Feb 23, 2020
Messages
297
Reaction score
422
Rating - 0%
0   0   0
Tank and progress look great. (Please tell me you didn‘t opt to use that metal hose clamp, if you did you should replace it with the plastic cinch clamps)
Thanks for the compliment, and thank you for following along!
The metal one is above the water at the top. The submerged ones are plastic cinch. Do you think it will still be a problem?
 

Rick.45cal

2500 Club Member
View Badges
Joined
Jan 14, 2016
Messages
3,693
Reaction score
9,213
Location
Lakeland Florida
Rating - 0%
0   0   0
Thanks for the compliment, and thank you for following along!
The metal one is above the water at the top. The submerged ones are plastic cinch. Do you think it will still be a problem?

It might not be a problem, but I personally would still replace it with a plastic cinch just to be safe. ;)
 
OP
OP
C

creativeballance

Active Member
View Badges
Joined
Feb 23, 2020
Messages
297
Reaction score
422
Rating - 0%
0   0   0
20200628_210959.jpg


Not sure if the clowns are being hospitable or if they're just confused...

So this pair of mollies has made it through the day. They aren't eating much. They're spending most of the time sticking in the same spot in the front of the tank. No harassment from the other fish yet either.
 
OP
OP
C

creativeballance

Active Member
View Badges
Joined
Feb 23, 2020
Messages
297
Reaction score
422
Rating - 0%
0   0   0
Came home today and saw only one molly hanging out with the Clowns
20200629_174603.jpg


Thought...oh no! The other one died!

Went to change my filter sock, and look who was in the sump:
20200629_174343.jpg

..and no, that isnt cyano. It's my fuge light.
 

Being sticky and staying connected: Have you used any reef-safe glue?

  • I have used reef safe glue.

    Votes: 49 86.0%
  • I haven’t used reef safe glue, but plan to in the future.

    Votes: 3 5.3%
  • I have no interest in using reef safe glue.

    Votes: 2 3.5%
  • Other.

    Votes: 3 5.3%
Back
Top