I was curious to see if you’ve purchased a solution for your display. I was leaning towards your PC solution but the Hydros Wave Engine display I don’t believe supports windows. The Hydros dashboard and the Aoex Fusion dashboard are both “must displays” for me.I too am researching a permeant display for my Apexfusion screen. Most setups show a tablet, but I have another idea. Large touchscreen monitor, to a dedicated PC.
A Dell 24" monitor, in landscape position is only $360. That's a much bigger display, than any cheap tablets. power with an old out of date laptop (free), or the cheapest Intel NUC computer you can get on the web ~$400-450.
- Dell 24 Touch Monitor - P2418HT
- Old laptop or Intel NUC (or Equiv) uber small PC
Not Free, but cheaper than an Ipad Pro (largest size). That's my current thoughts.

Navigation
Install the app
How to install the app on iOS
Follow along with the video below to see how to install our site as a web app on your home screen.
Note: This feature may not be available in some browsers.
More options
You are using an out of date browser. It may not display this or other websites correctly.
You should upgrade or use an alternative browser.
You should upgrade or use an alternative browser.
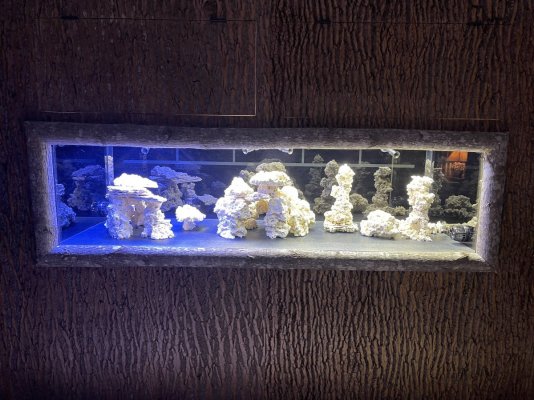
Project Patriot’s Serenity - Where The Lake Meets The Ocean (365 Gallon Reef Tank)
- Large Build
- Thread starter Karliefish
- Start date
- Tagged users None


I have not pulled the trigger yet. In your case, if Hydros dashboard doesn't work on windows... this isn't your option. (I'm not familiar with Hydros at all)I was curious to see if you’ve purchased a solution for your display. I was leaning towards your PC solution but the Hydros Wave Engine display I don’t believe supports windows. The Hydros dashboard and the Aoex Fusion dashboard are both “must displays” for me.
Aquascaping Completed
Well after three weeks of multiple designs and lots of rock smashing, chiseling and gluing, my wife and I have completed last month the aquascaping for our new 365G reef tank. We are really happy with the result not only because of the look we created, but the ”look” represents our diving hobby (more on that later). Back on post #90, I mentioned that after much analysis we decided to go with dry marco rock and the reasons behind that decision - so I won’t repeat those reasons in this post. I will warn everyone upfront that this is a very comprehensive post that describes in great detail how we went about our aquascaping a 365G tank.
We were surprised on just how many boxes of rock was delivered and how heavy Marco Rock is.

Here is the list of Marco Rock we ordered from BRS:
235lbs: Reef Saver Aquarium Dry Live Rock
30lbs: Reef Saver Shelf Aquarium Dry Live Rock
9lbs: Reef Saver Frag Mount Dry Live Rock
Qty 3: Reef Saver Pedestal Aquarium Dry Live Rock - Natural Top
Qty 3: Large Foundation Reef Saver Dry Live Rock
Qty 3: Medium Foundation Reef Saver Dry Live Rock
Qty 3: Small Foundation Reef Saver Dry Live Rock
Total approximate weight of rock ordered: 325lbs. We wanted a little less than one pound per gallon (365G of actual water between DT and Sump). We estimate that we ended-up using 285lbs in our final build and we’ll use the remainder in the sump, QT and a future Angel Fish Only Tank (but that is a WHOLE separate post for someday)
We used the floor in front of the tank to layout all the rock.

To protect the floor during the aquascaping build work we cut a piece of plywood that measured the inside dimensions of our tank, so we had a good way of always knowing if we were building to-close to the front/bank/sides of the DT glass.

Finally, before starting the design work, we separated all the rock into various size groups.


We knew we wanted to create three islands and we wanted these islands to have three distinctly different looks. Other design requirements:
- two of the islands needed to have large shelf overhangs
- two of the islands needed to have deep caves for our more shy fish
- we wanted large swim lanes between each island and multiple entry/exit points for the two islands with caves
- two of the islands needed to be no taller than 16-17” high to allow for long term coral growth (we are being optimistic) Our tank height is 26”
- no rock structure could be any closer than 6-7” inches from the DT glass. We want glass algae cleaning to be an easy experience.
- we wanted some stand alone rocks between the islands for varying the look and these rocks would also be a great place to glue corals that we don’t mixing (or over taking) other corals. We call these rocks “The Islands of mis-fit corals”.
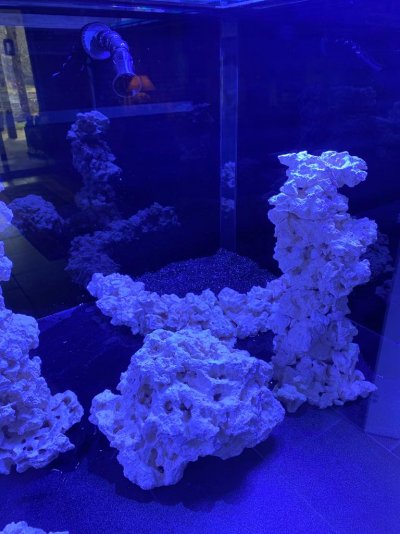
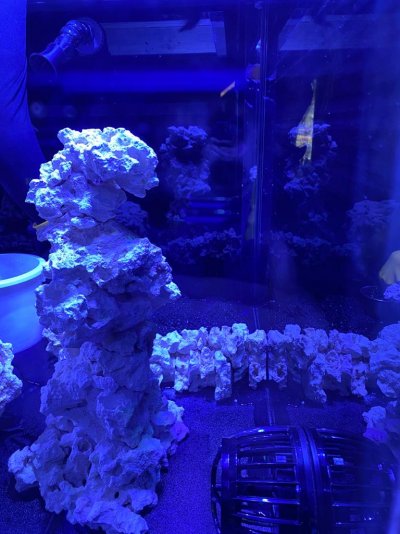
- one of the islands needed to accommodate what we called our “Barrier Beach”. Given that we are going with a bare-bottom DT, we recognized that if we were going to have certain varieties of wrasses and other sand dwellers, that we were going to need to create a dedicated space that could accomodate these types of fish. So I came-up with the idea of creating a rock barrier (got the idea from my early days of living in Long Beach, CA) that could hold 25 pounds of Hawaiian black-sand. The barrier needed to be built in a manner that would keep the sand from going all over the tank. The dimensions for the “barrier beach” are 12 inches out from back glass panel and 20 inches rounded to the side glass panel. I include a picture later that shows ”Barrier Beach”.
- Finally, and most important, we wanted to create an aquascape that represented places where we had dived/snorkeled around the world. The three places we chose were: Hawaii, Bonaire and the Red Sea.
We decided to first do a rough layout of each island and then go back later and do all the detail cutting/chipping/drilling/glue work. Here is an example of one of the islands being designed on the plywood.


My wife had a really great “design-eye” and so we made a good team - she was the primary designer and I was the primary engineer. BTW...in the final design that top “mushroom” looking rock was removed as it did not look natural. Also the four legs of this island are made-up of over 40 small pieces of marco rock cut/chiseled into small pieces to create the detail look.
After each island was completed, we took portions of structure apart and moved it into the DT and reassembled. The trick was trying to do as much of the glue work as possible on the plywood, but also not making the rock structure so heavy that it would be risky to try and lift a large portion into the tank. Our fear was that some portion would break apart and damage the glass. Reassembling the islands in the DT was maddening work as it never looked quite the same as it did on the plywood. My wife would be the director letting me know which direction to turn rocks, as I had no view from the back of the tank (remember it‘s a in-wall tank so the back glass panel is black).
Here is a picture showing how I had to lean over into the tank to reasamble one of the islands

Here is that same Island (Bonaire) that was earlier shown on the plywood now inside the main display tank.

You might be wondering why we had red moving blankets inside the DT. Well it turns-out, that paddle moving blankets were perfect for protecting the back and side panels of glass as I was lifting the Island structures into place.
Here is a picture that shows how we used the moving blankets to protect the back of the DT glass.

Here are a couple of picture that shows the first Island (Bonaire) and second Island (Hawaii) moved into the display tank.


The pictures really don’t give you a full appreciation for the size of these island structures. It helps to remember that this tank is 96” long x 34” wide x 26” high. Those two islands are constructed using approximately 200lbs of rock.
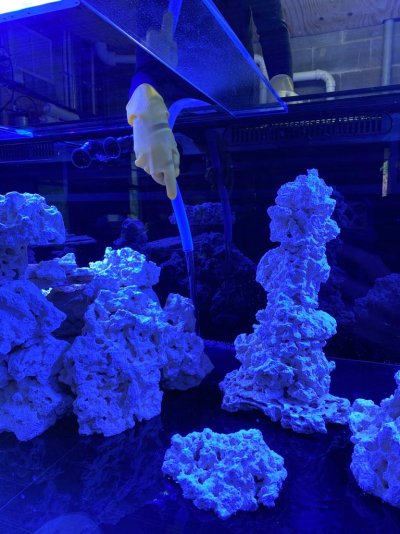
The first two Island structures were actually built and moved into the DT in under two weeks. It was the third Island (Red Sea) that really gave us lots of head-aches and redos. Our first version of the third Island kept looking like a variant of the the other two Islands. So we ended up taking the third island completely apart and just walked away from the aqusacping for a few days hoping we would get some fresh inspiration. We debated the ideas of creating a large rock arch and then connecting the arch to the middle island. We scraped that idea as these are suppose to be three distinctly different islands from different parts of the world. So we went back and look at our diving/snorkeling Red Sea pictures and remembered the massive pillars with thousands of anthias fish hovering around them along with massive boulders near the base of the pillars. So it was that inspiration that led us to decide to go with a radically different look for the third island - two tall pillars with a large boulder in-between with the “Barrier Beach“ behind the pillars and boulder.
Here are a couple of pictures that show me building the “Barrier Beach”. As you can see this was a total family affair and we even had the dog helping us.


and here is a picture that shows one of the pillars being built. If you look carefully you’ll see “Barrier Beach” in the background.

Next is a picture pouring the Hawaiian black sand into “Barrier Beach”. And then a couple pictures of “Barrier Beach“ with the pillars in the foreground. Each of the pillars is approximately 21” tall and took 4 hours each to build - hard to tell from the picture, but each pillar has over 50 pieces of rock.


...and then we were done!!! Here are a few pictures of the final aquascaping


Next step was to fill the tank with tap water and do a multi-day cleaning with the pumps going at full-speed.


So here are our top 15 learnings & tips from aquascaping a 365G tank:
1) Buy more rock that you’ll need. You’ll appreciate having lots of choices and if you buy your rock through BRS they’ll work with you on trying to accommodate any special request you have. In our case we wanted a couple of very large shelf pieces - BRS did a great job.
2) Buy lots and lots of glue! I really wanted to use the BRS Thick Gel Superglue, but unfortunately at time we were ordering our rock the glue was out-of-stock. So we ended-up going with Bob Smith’s product.

We ordered 15 packs of three and when we were all done we only had 1 1/2 tubes left! Also be sure to order 2-3 bottles of Super Glue accelerator. Using this in conjunction with the IC-Gel makes the adhering process SO much easier.

 www.bulkreefsupply.com
3) this one is pretty obvious, but I’m still adding it to my list....WASH YOUR ROCK. especially the small rubble pieces. It makes the gluing and adhering process so much easier.
4) Speaking of small rocks, you will be shocked on how much small rubble pieces you will need during aquascaping. We probably broke 5-7 5lb rocks into rubble pieces. This is especially useful if you are meticulous about wanting to create detail features with your rock structures.
5) Smash a few pieces of small rocks into dust. Use this dust to sprinkle on places where you have glue showing - really does a great job in covering-up the “glue look”
6) If possible don’t do the prototype aquascaping inside the tank. Moving large rocks in-and-out of your tank increases your chances of having a really bad day with your DT glass. Use a piece of plywood or durable plastic sheeting to layout the prototypes and heavy duty padded blankets in your tank.
7) taking pictures of your rock structure prototypes on a piece of plywood, workbench etc., before moving them into your DT is quite helpful in reconstructing your rock structures. Take pictures from multiple angles.
8) I would recommend doing a fresh water wash of your aqusacping before dumping in your saltwater and starting your new tank cycle. We were able to suck-out so much gunk (white powder from the Marco Rock) out of the tank by running the system a few days with tap water.
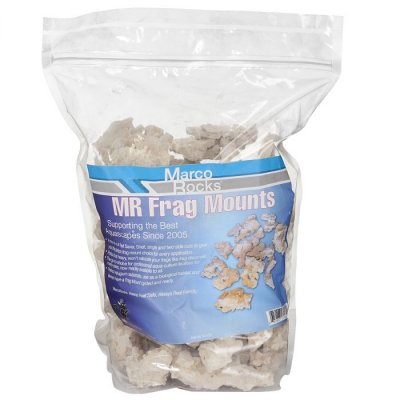
9) If you are going to use Marco Rock and you need a good selection of small flat pieces, buy the 9lb bag of frag mounts:

It was this bag of rock that really helped us build ”Barrier Beach” and help to keep all the black sand from seeping out of the barrier.
10) Have a good chisel - really an awesome tool when working with Marco Rock
11) Using 1/4” clear acrylic tubes can be really helpful when building tall rock structures. We used these from BRS to help build the Red Sea Isand pillars. This also means you’ll need a portable drill with a very long drill bit.

 www.bulkreefsupply.com
12) Use durable rubber gloves for two reasons (i) Marco rock can be really rough on your hands (ii) keep the nasty super glue and accelerator glue off you skin - trust me on this one!
13) beware when working with accelerator spray glue - you do not want that stuff in your eyes!
14) When placing your rock structures in the tank, think about where pumps will be located and look for dead-spots where detritus will accumulate. For example, when we built the middle island (Hawaii) it has some really cool caves, but also a couple of places where detritus would eventually accumulate. So when we designed this rock structure, we knew that a MP40 Powerhead would be placed on the back glass panel that would be strategically pointed at a side hole (on the back side of the island) to blow out the detritus a few times a day.
15) Finally, research aquascaping pics on Reef2Reef and other internet sites. But in our opinion, design something that is original and represents YOU. We thought that we wanted to copy some cool aquascape designs we found on the internet, but feel so much better that we created our own unique design.
Hope some of you found all this detail helpful. We are curious to hear now from all of you on your thoughts and impressions. Thanks!
Well after three weeks of multiple designs and lots of rock smashing, chiseling and gluing, my wife and I have completed last month the aquascaping for our new 365G reef tank. We are really happy with the result not only because of the look we created, but the ”look” represents our diving hobby (more on that later). Back on post #90, I mentioned that after much analysis we decided to go with dry marco rock and the reasons behind that decision - so I won’t repeat those reasons in this post. I will warn everyone upfront that this is a very comprehensive post that describes in great detail how we went about our aquascaping a 365G tank.
We were surprised on just how many boxes of rock was delivered and how heavy Marco Rock is.
Here is the list of Marco Rock we ordered from BRS:
235lbs: Reef Saver Aquarium Dry Live Rock
30lbs: Reef Saver Shelf Aquarium Dry Live Rock
9lbs: Reef Saver Frag Mount Dry Live Rock
Qty 3: Reef Saver Pedestal Aquarium Dry Live Rock - Natural Top
Qty 3: Large Foundation Reef Saver Dry Live Rock
Qty 3: Medium Foundation Reef Saver Dry Live Rock
Qty 3: Small Foundation Reef Saver Dry Live Rock
Total approximate weight of rock ordered: 325lbs. We wanted a little less than one pound per gallon (365G of actual water between DT and Sump). We estimate that we ended-up using 285lbs in our final build and we’ll use the remainder in the sump, QT and a future Angel Fish Only Tank (but that is a WHOLE separate post for someday)
We used the floor in front of the tank to layout all the rock.
To protect the floor during the aquascaping build work we cut a piece of plywood that measured the inside dimensions of our tank, so we had a good way of always knowing if we were building to-close to the front/bank/sides of the DT glass.
Finally, before starting the design work, we separated all the rock into various size groups.
We knew we wanted to create three islands and we wanted these islands to have three distinctly different looks. Other design requirements:
- two of the islands needed to have large shelf overhangs
- two of the islands needed to have deep caves for our more shy fish
- we wanted large swim lanes between each island and multiple entry/exit points for the two islands with caves
- two of the islands needed to be no taller than 16-17” high to allow for long term coral growth (we are being optimistic) Our tank height is 26”
- no rock structure could be any closer than 6-7” inches from the DT glass. We want glass algae cleaning to be an easy experience.
- we wanted some stand alone rocks between the islands for varying the look and these rocks would also be a great place to glue corals that we don’t mixing (or over taking) other corals. We call these rocks “The Islands of mis-fit corals”.
- one of the islands needed to accommodate what we called our “Barrier Beach”. Given that we are going with a bare-bottom DT, we recognized that if we were going to have certain varieties of wrasses and other sand dwellers, that we were going to need to create a dedicated space that could accomodate these types of fish. So I came-up with the idea of creating a rock barrier (got the idea from my early days of living in Long Beach, CA) that could hold 25 pounds of Hawaiian black-sand. The barrier needed to be built in a manner that would keep the sand from going all over the tank. The dimensions for the “barrier beach” are 12 inches out from back glass panel and 20 inches rounded to the side glass panel. I include a picture later that shows ”Barrier Beach”.
- Finally, and most important, we wanted to create an aquascape that represented places where we had dived/snorkeled around the world. The three places we chose were: Hawaii, Bonaire and the Red Sea.
We decided to first do a rough layout of each island and then go back later and do all the detail cutting/chipping/drilling/glue work. Here is an example of one of the islands being designed on the plywood.
My wife had a really great “design-eye” and so we made a good team - she was the primary designer and I was the primary engineer. BTW...in the final design that top “mushroom” looking rock was removed as it did not look natural. Also the four legs of this island are made-up of over 40 small pieces of marco rock cut/chiseled into small pieces to create the detail look.
After each island was completed, we took portions of structure apart and moved it into the DT and reassembled. The trick was trying to do as much of the glue work as possible on the plywood, but also not making the rock structure so heavy that it would be risky to try and lift a large portion into the tank. Our fear was that some portion would break apart and damage the glass. Reassembling the islands in the DT was maddening work as it never looked quite the same as it did on the plywood. My wife would be the director letting me know which direction to turn rocks, as I had no view from the back of the tank (remember it‘s a in-wall tank so the back glass panel is black).
Here is a picture showing how I had to lean over into the tank to reasamble one of the islands
Here is that same Island (Bonaire) that was earlier shown on the plywood now inside the main display tank.
You might be wondering why we had red moving blankets inside the DT. Well it turns-out, that paddle moving blankets were perfect for protecting the back and side panels of glass as I was lifting the Island structures into place.
Here is a picture that shows how we used the moving blankets to protect the back of the DT glass.
Here are a couple of picture that shows the first Island (Bonaire) and second Island (Hawaii) moved into the display tank.
The pictures really don’t give you a full appreciation for the size of these island structures. It helps to remember that this tank is 96” long x 34” wide x 26” high. Those two islands are constructed using approximately 200lbs of rock.
The first two Island structures were actually built and moved into the DT in under two weeks. It was the third Island (Red Sea) that really gave us lots of head-aches and redos. Our first version of the third Island kept looking like a variant of the the other two Islands. So we ended up taking the third island completely apart and just walked away from the aqusacping for a few days hoping we would get some fresh inspiration. We debated the ideas of creating a large rock arch and then connecting the arch to the middle island. We scraped that idea as these are suppose to be three distinctly different islands from different parts of the world. So we went back and look at our diving/snorkeling Red Sea pictures and remembered the massive pillars with thousands of anthias fish hovering around them along with massive boulders near the base of the pillars. So it was that inspiration that led us to decide to go with a radically different look for the third island - two tall pillars with a large boulder in-between with the “Barrier Beach“ behind the pillars and boulder.
Here are a couple of pictures that show me building the “Barrier Beach”. As you can see this was a total family affair and we even had the dog helping us.
and here is a picture that shows one of the pillars being built. If you look carefully you’ll see “Barrier Beach” in the background.
Next is a picture pouring the Hawaiian black sand into “Barrier Beach”. And then a couple pictures of “Barrier Beach“ with the pillars in the foreground. Each of the pillars is approximately 21” tall and took 4 hours each to build - hard to tell from the picture, but each pillar has over 50 pieces of rock.
...and then we were done!!! Here are a few pictures of the final aquascaping
Next step was to fill the tank with tap water and do a multi-day cleaning with the pumps going at full-speed.
So here are our top 15 learnings & tips from aquascaping a 365G tank:
1) Buy more rock that you’ll need. You’ll appreciate having lots of choices and if you buy your rock through BRS they’ll work with you on trying to accommodate any special request you have. In our case we wanted a couple of very large shelf pieces - BRS did a great job.
2) Buy lots and lots of glue! I really wanted to use the BRS Thick Gel Superglue, but unfortunately at time we were ordering our rock the glue was out-of-stock. So we ended-up going with Bob Smith’s product.
We ordered 15 packs of three and when we were all done we only had 1 1/2 tubes left! Also be sure to order 2-3 bottles of Super Glue accelerator. Using this in conjunction with the IC-Gel makes the adhering process SO much easier.
Insta-set Super Glue Accelerator
Insta-set accelerator will help speed up the set time of any cyanoacrylate super glue. The most frustrating thing about fragging coral is the time you need to wait for the glue to set, or the frag may simply just fall over and get glue all over. With the accelerator that time spent waiting will...
www.bulkreefsupply.com
3) this one is pretty obvious, but I’m still adding it to my list....WASH YOUR ROCK. especially the small rubble pieces. It makes the gluing and adhering process so much easier.
4) Speaking of small rocks, you will be shocked on how much small rubble pieces you will need during aquascaping. We probably broke 5-7 5lb rocks into rubble pieces. This is especially useful if you are meticulous about wanting to create detail features with your rock structures.
5) Smash a few pieces of small rocks into dust. Use this dust to sprinkle on places where you have glue showing - really does a great job in covering-up the “glue look”
6) If possible don’t do the prototype aquascaping inside the tank. Moving large rocks in-and-out of your tank increases your chances of having a really bad day with your DT glass. Use a piece of plywood or durable plastic sheeting to layout the prototypes and heavy duty padded blankets in your tank.
7) taking pictures of your rock structure prototypes on a piece of plywood, workbench etc., before moving them into your DT is quite helpful in reconstructing your rock structures. Take pictures from multiple angles.
8) I would recommend doing a fresh water wash of your aqusacping before dumping in your saltwater and starting your new tank cycle. We were able to suck-out so much gunk (white powder from the Marco Rock) out of the tank by running the system a few days with tap water.
9) If you are going to use Marco Rock and you need a good selection of small flat pieces, buy the 9lb bag of frag mounts:
It was this bag of rock that really helped us build ”Barrier Beach” and help to keep all the black sand from seeping out of the barrier.
10) Have a good chisel - really an awesome tool when working with Marco Rock
11) Using 1/4” clear acrylic tubes can be really helpful when building tall rock structures. We used these from BRS to help build the Red Sea Isand pillars. This also means you’ll need a portable drill with a very long drill bit.
1/4" Clear Acrylic Tube -16" Long
Why does BRS recommend this? Acrylic tubes have many different purposes. Using these for DIY projects like kalkwasser drippers, feeding tubes and they even can be used to help add support small aquascapes, it is always a good idea to have extra acrylic tubing on hand. 16" of clear acrylic tube...
www.bulkreefsupply.com
12) Use durable rubber gloves for two reasons (i) Marco rock can be really rough on your hands (ii) keep the nasty super glue and accelerator glue off you skin - trust me on this one!
13) beware when working with accelerator spray glue - you do not want that stuff in your eyes!
14) When placing your rock structures in the tank, think about where pumps will be located and look for dead-spots where detritus will accumulate. For example, when we built the middle island (Hawaii) it has some really cool caves, but also a couple of places where detritus would eventually accumulate. So when we designed this rock structure, we knew that a MP40 Powerhead would be placed on the back glass panel that would be strategically pointed at a side hole (on the back side of the island) to blow out the detritus a few times a day.
15) Finally, research aquascaping pics on Reef2Reef and other internet sites. But in our opinion, design something that is original and represents YOU. We thought that we wanted to copy some cool aquascape designs we found on the internet, but feel so much better that we created our own unique design.
Hope some of you found all this detail helpful. We are curious to hear now from all of you on your thoughts and impressions. Thanks!
Attachments
-
 2551E79C-053A-4E49-9E17-F12036086433.jpeg274.2 KB · Views: 39
 -
 C4CB03E9-DCFD-492F-83B2-6EB78CDFF69E.jpeg55.4 KB · Views: 45
 -
 358A4A9B-C765-4215-8C01-7CFD54A2C629.jpeg102.3 KB · Views: 43
 -
 54A3776D-0308-4185-B3D4-25267C930D8B.jpeg108.4 KB · Views: 47
 -
 6EAC06B3-FA4D-403A-84E6-98924589948A.jpeg115 KB · Views: 48

Hey really nice aquascape, including the “Barrier Beach.“ Your future wrasses will love it. Thanks for the fascinating read and learned helpful tips.
The Stratons put out some serious PAR -running then at 50%. I was hoping to get some shimmer when adding the Kessils, but it is almost non-existent. Honestly the verdict is still out on the Stratons.How are you liking the kessil shimmer combined with your Stratons?
Have you posted an update on how this system is running overall? Is it up and running, has your equipment choices worked out, and most importantly - what livestock choices you've made, how are they doing, and ... a few photos. ")
Hey everyone thanks for asking about the tank. To say the least, I’ve gotten way behind on updating this site as I have been full-out consumed with bringing this large project online. The tank has been up and running now for overall 9 months and I have a number of lessons to share ranging from the use of dry rock, to my coral/fish selection and observations on some equipment. I’m going to do my best to get the site updated…,so much to share!!
Similar threads
- Replies
- 21
- Views
- 581
- Replies
- 32
- Views
- 1,224


