Quality Rimless 120 Gallon Build on a $2,500 budget

vanpire

Valuable Member
View Badges
Joined
Apr 26, 2016
Messages
1,182
Reaction score
1,321
Location
Phoenix
Rating - 0%
0   0   0
I have really loved and admired the work and attention to detail of the tanks built by some local reefers like @Sisterlimonpot, @jporter17, @SawCJack00 and others. I have also seen so many gorgeous tank builds here on R2R that I would love to emulate.

This current build will be my second tank, and I was inspired to build it after seeing jporter17's tank (and my wife telling me I could have a second tank). I want to emulate that Jimmy's, Jeff's and Bill's builds, but I do not have their skilset or budgets. I do aspire to someday. But for today, I am going to see if try to build a tank quality tank inspired by them but on a budget that I can afford. Of I will have to make compromises, but still striving to have similar quality, and if not quality, similar functions. Note that I said similar but not the same. I think there are at least some on this forum that are in the same boat so I thought I would document this journey.

My budget is $2,500. Let's see how close I can get to the quality and budget goal.

I got the tank from another local reefer. He had it on sale for a while but no one bought so I bought it for about $300 (from memory) and stored it in my garage. I actually hid it from my wife and she didn't even know it was there a year or so. It is a LeeMar 120 with 48" wide, 20" tall and 30" deep. Just happened to be a similar dimensions to jporter17's tank, which is the tank that inspired to do this build. Normal LeeMar quality, standard glass with black silicon. But nicely done and most importantly it holds water.

47114670-EDA1-4455-9D18-2957CAA178B7.jpeg


Here, tank is not much to look at but then, I got it cheap.


1E417CD9-DEC2-4A64-BD9A-5DCA9D064682.jpeg

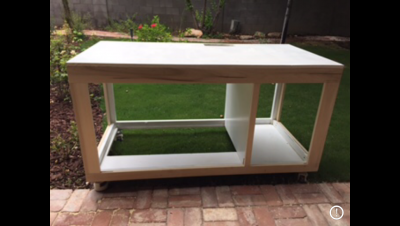
The steel for the stand I got from a neighbor's work table with old wood and some rust on the steel and she was throwing it away. I cleared away everything except for the steel cage. See below. Steel cage: free
 
Last edited:
OP
OP
vanpire

vanpire

Valuable Member
View Badges
Joined
Apr 26, 2016
Messages
1,182
Reaction score
1,321
Location
Phoenix
Rating - 0%
0   0   0
Sorry about the pics. I attached the pics. Jimmy, you are awesome for offering. I might just take you up on it.
 
OP
OP
vanpire

vanpire

Valuable Member
View Badges
Joined
Apr 26, 2016
Messages
1,182
Reaction score
1,321
Location
Phoenix
Rating - 0%
0   0   0
First job was to take care of the frame. I cut the bottom legs, sanded it and painted it.

8FA67473-429B-4021-9B94-F881E45C6118.jpeg


I bought a bunch of corals from a local reefer taking down his tank and he gave me this tank for free. It was originally used to hold fish at a LFS and you can see the slots built in the tank. It took the dividers out and if you look closely you can see some left over black acrylic that broke off. Needs cleaning and sanding, and I can use it as a sump. Again, free. No reason to throw things away, just repurpose.

9E0284E1-DBB9-4691-B307-5474933DD78C.jpeg
 
Last edited:
OP
OP
vanpire

vanpire

Valuable Member
View Badges
Joined
Apr 26, 2016
Messages
1,182
Reaction score
1,321
Location
Phoenix
Rating - 0%
0   0   0
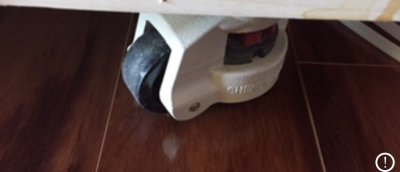
Worked on building the stand. Added heavy duty wheels that I can also use the level the tank.

A1D796A3-B9F0-410A-834A-409E905B619C.png 5645B394-C1EF-4AE5-8296-2B513A0FDC45.jpeg

The wheels I got from amazon.

1603607995469.png


If you are curious to why I cut a hole in the bottom of my stand. It is because I want the have the sump on the floor and not on the stand itself. I got this idea from jporter17's build. The sump is not actually on the floor but sits on 4 very small casters. This enables more space above the same so it is easier to work.
 
Last edited:
OP
OP
vanpire

vanpire

Valuable Member
View Badges
Joined
Apr 26, 2016
Messages
1,182
Reaction score
1,321
Location
Phoenix
Rating - 0%
0   0   0
I love where this is heading and think waiting for the good free things to come is genius!
The free stuff wasn't that obvious, especially the stand frame. I didn't show its original life as as table. And you have to put in a lot of work to get it to its useable condition. You also have to make compromises. The steel frame is also 60" long x 30" wide. While the width is perfect, the length is 12" longer than my tank. I had to compromise to use the steel frame, but in the end, it turned out nicely.

For the sump, there are holes on the two sides that i had to patch up. Had to do some cutting and sanding, and there are the marks from where they had dividers, but this is a sump. As long as it serves its purpose well, it is good.

Even the tank, I had to compromise. I didn't like the overflow size and location, and there are only two holes drilled inside. I considered taking out the existing overflow and using a ghost overflow, but that would have been a lot of working and the benefit really wasn't there.

Only two holes so I can't won't be able to make a super quiet drain. Quiet enough but I wanted an overflow(s) with 4 holes or at last 3 holes for a return and a super quiet overflow.


79D44550-9547-4C69-9585-75CE3959F6DC.jpeg


But this is to show that you can take something that others would just overlook and turning into to something pretty and useful.
 

InvaderJim

Chillin
View Badges
Joined
Jan 26, 2007
Messages
888
Reaction score
1,025
Location
High Springs, FL
Rating - 0%
0   0   0
That stand is looking amazing so far. As far as drains go you could always run a herbie and run your return over the back of the tank if seeing that little piece of pipe wouldn't bother you. That's what a bunch of people, myself included, do with corner overflows.
 
OP
OP
vanpire

vanpire

Valuable Member
View Badges
Joined
Apr 26, 2016
Messages
1,182
Reaction score
1,321
Location
Phoenix
Rating - 0%
0   0   0
Cleaned the tank. Fresh water tested the tank and made sure no issues with stand supporting the weight with the casters with water for a few weeks. Skinned the stand.
 
OP
OP
vanpire

vanpire

Valuable Member
View Badges
Joined
Apr 26, 2016
Messages
1,182
Reaction score
1,321
Location
Phoenix
Rating - 0%
0   0   0
I had intended to use T5 with LEDs as lighting and I even got a 36" ATI T5 hybrid when I bought a frag tank (48" x 30" x 14") from a local reefer. It is being used as a combination sump/frag tank for my current display tank.

BUT after seeing Jeff Porter's tank which is lit by metal halides with LED strips, I knew I had to use metal halides on this tank. So I bought a 48" Geisemann Infinity from another local reefer. I believe I paid $400 for it and it is in excellent condition. I really wanted a Spectra but couldn't find one.

54AE4F21-5C81-4E03-93DF-69D8F7BD8824.jpeg
 
Last edited:
OP
OP
vanpire

vanpire

Valuable Member
View Badges
Joined
Apr 26, 2016
Messages
1,182
Reaction score
1,321
Location
Phoenix
Rating - 0%
0   0   0
ahhh!! you should've went Radions...

That would have totally blown my budget. And I loved how Jeff's tank looked with MH. Of course, his aquascape, corals and fish also amazed me, but the tank lighting reminded me so much of the coral reefs when I went diving in the South Pacific, especially the reefs of Sipadan.
 
OP
OP
vanpire

vanpire

Valuable Member
View Badges
Joined
Apr 26, 2016
Messages
1,182
Reaction score
1,321
Location
Phoenix
Rating - 0%
0   0   0
This is an LED lit tank from Timfish. If I were to go the LED route, I might do something like this. I love the look of the tank.


* Note: I added the youtube link from the "share" link. I don't think this is breaking copyright rules, but let me know if I am and I will delete.
 
OP
OP
vanpire

vanpire

Valuable Member
View Badges
Joined
Apr 26, 2016
Messages
1,182
Reaction score
1,321
Location
Phoenix
Rating - 0%
0   0   0
Looking awesome! My infinity fixture should be arriving tomorrow.
It is a great fixture. I liked it more than I thought I would. It is one heavy fixture though, but then, I should have known that since it is German-made.
 

Being sticky and staying connected: Have you used any reef-safe glue?

  • I have used reef safe glue.

    Votes: 76 86.4%
  • I haven’t used reef safe glue, but plan to in the future.

    Votes: 6 6.8%
  • I have no interest in using reef safe glue.

    Votes: 3 3.4%
  • Other.

    Votes: 3 3.4%
Back
Top