Red Sea Reefer 625XXL - "The Big One"

Smirkish

Well-Known Member
View Badges
Joined
Apr 28, 2021
Messages
995
Reaction score
6,882
Location
United States
Rating - 0%
0   0   0
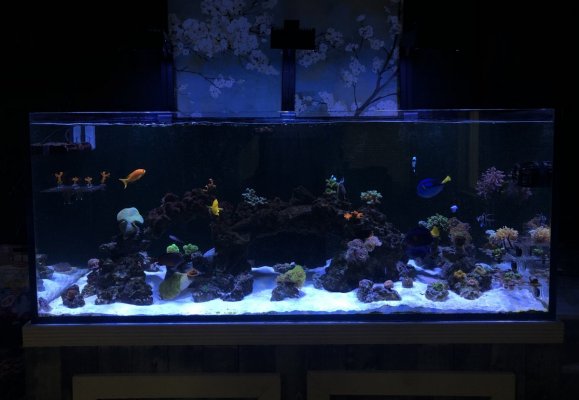
Red Sea Reefer 625XXL
System Volume: 169g
(on 6/11/21)
15C04BB9-285F-4E9A-8466-3D47D0A579B2.jpeg


Welcome to my build thread for my RSR, affectionately known around our household as, “the Big One”.
(You know, when someone asks, “Which tank?”)

I will continue to update this post with a current photo of the tank and what my setup includes. Feel free to comment, any input is welcome.

Inhabitants
* indicates ID or morph still uncertain
Fish
*Phantom Clownfish (x2 original)
*Snow Storm Clownfish (x2 original)
Naso Tang (original)
Purple Tang (original)
Orange-Shoulder Tang (original)
Twospot Surgeonfish (original)
Lyretail Anthias (original)
Bangaii Cardinalfish (x2 one original one added)
Elegant Firefish (x1 original)
Blue Mandarin (original)
Spotted Mandarin (original)
Lawnmower Blenny (original)
Pygmy Angelfish (added)
Sharknose Goby (added)
Niger Trigger (added)

CUC/Inverts
Nassarius Snails (x5 original)
Mexican Turbo Snails (x3 one original two added)
Blue Leg Hermit Crab (added)
Emerald Crab (added)
Peppermint Shrimp (x2 added)
Bubble Tip Anemone (x3 one original two added) - *rainbow, green, POTO Sunset Strip
*ticked off bubble-tip Anemone A.K.A. Condy (added) MIA
Flame Scallop (added)

Coral
Brown Star Polyp (original)
Green Star Polyp (original)
Firework Cloves (original)
Kenya Tree (x2 original)
Frogspawn (x2 one original one added)
Hammer (added)
Duncan (x2 added)
Acan Lord (x3 one original two added)
Miami Vice Chalice (original)
Hollywood Stunner Chalice (x2 original)
Tequila Sunrise Chalice (added)
Alveopora (x2 one original one added)
Candycane (x3 added)
Green Toadstool Leather (added)
Carnation Tree (added)
Atomic Sympodium (added)
Mayan Sun Favia (added)
Fungia Plate (added)
Cyphastrea (original)
*Reverse Superman Montipora (original)
*Birdsnest Coral (x2 one original one added)
Digitata (x1 one original)
Acropora (x1)p
Ricordea Florida (several three original, others added)
Ricordea Yuma (several added)
Bouncing Yuma (added)
Utter Chaos Palythoa (added)
Rasta Zoanthid (added)
Red Hot Setosa (added)
Sunkist Bounce Mushroom (added)

Equipment
AI Hydra 26 HD (x3)
IM ChaetoMax Refugium LED 18W
AI HMS Mounting Kit (x3)
EcoTech Vortech MP40w ES
Jebao CP-90 25W Crossflow
Jebao DCP-6500 Sine Wave Return
Fiji-36 Advanced Reef Sump
Bubble Magus Curve 7 Skimmer
Aqua Ultraviolet 15W Classic UV
BRS Dual GFO & Carbon Reactor
Aquatop 400W Titanium Heater
(?lb) CaribSea Life Rock
CaribSea Arag-Alive Fiji Pink Live Sand (60lb added to existing bed which looked like Oolite)

Feeding
I feed twice a day. Frozen is w/ juice. Corals and anemone get spot fed as needed. Return gets shut off for three minutes. Fish eat in less than two. Skimmer is off for 30 to allow it to circulate. Anemone get raw shrimp at least once a week.

12:00 pm
1 cubes of Spirulina Mysis
1 cube of Spirulina Brine
1 cube of Coral Gumbo
Mix in Reef Blizzard-A every three days.
Nori - 1/2 sheet cut into thin strips on multiple clips

6:00 pm
1 cube of Spirulina Mysis
1 cube of Spirulina Brine
30 ml phyto

Parameters
(on 5/7/21)
Alkalinity: 8.7
Ammonia: 0
Calcium: 477
Magnesium: 1470
Nitrate: 20
Nitrite: 0
pH: 8.2
Phosphate: .17
Salinity: 1.024
Temperature: 78

Backstory:
In January this year we got into looking at saltwater systems, and wound up purchasing a Fluval Evo 13.5 new for about half price. I’d had the tank for about two months, and we were quickly realizing that it was going to be too small for what I wanted. So we started shopping!

Needless to say piecing together a tank is very expensive! :0 Go figure. We started looking through FB to see if we could find any deals, and we eventually came across “the big one”.

The tank was far bigger than I had planned on, the equipment looked good, and the livestock came “for free”, coral, fish, everything, due to FB having a policy against selling live animals. He had the tank since July of 2020, and was preparing to be restationed (Army), so he was getting rid of it all.

I literally talked myself out of buying it fifty different times, but then I saw it and all of that flew right out the window (along with the rest of my sanity).

This is a shot of the tank the night we broke it down and moved it;
(That’s the guy in pic- he was soooo helpful it was insane.)
5A226FA6-6A4B-442C-ACC6-8C5C491725BF.jpeg


And the “guts” that night;
6E22E600-801F-42A1-A3F1-75157EF88314.jpeg

156985CA-29D9-475D-8F1E-AFC293CA3709.jpeg
541D8C32-06D4-43A8-B31D-E8EFDB1A9DE2.jpeg


(Notice the return is located before the refugium?)

C976FBC5-F19E-4EC9-981B-57CA86FEB2A8.jpeg
182A1395-D9E1-483F-B2E8-667ADACA5360.jpeg


I think my biggest concern, though, was the condition of the livestock. The flow was down lowwww (there was only the one vortech power head and you can see what it is set at above), rocks were coated in thick mats of algae on sand, and he said he was running the lights on “a basic setting”.

Now, here is how we moved it:
U-Haul truck, which we picked up in the city that the tank was in. Joe drove this, and the tank was “strapped” inside using a large ratchet strap minus the ratchet. We put the largest containers with water/sand/rock around it for bracing as well. I wish I took pictures of this, but it was dark, and we were in a hurry!​
Our CRV​
Loaded with lights wrapped up in the front passenger seat, cooler in the back seat, and the fish buckets in the wayyyyy back. Also loaded the more delicate equipment and plumbing in this car.​
Multiple battery operated bubblers​
* I don’t use bubble stones, I just tape the line down inside the bucket/container.​
1-gallon Ziploc Bags (with zippers)​
*Double bagged in case of leaks.​
Various hard plastic Tupperware containers w/ lids​
- For hard corals or anything attached to rock.​
(2x) New 44 gallon Rubbermaid Brute garbage cans​
- For water and large live rock.​
(7x) New Food Grade 5 gallon buckets with lids​
- For fish.​
* I have a few smaller salt buckets with lids that I used as well. Knowing that tangs are notoriously sensitive fish, susceptible to ich and other marine diseases, I was hoping to keep their stress levels as low as possible, and hope for the best. They were removed from the tank after the corals and some of the rock work and kept inside the guy’s house with bubblers and lids (still open) until we were ready to leave. I ran the heat in my vehicle to maintain the temperature in these buckets and the cooler.​
(5x) 18 gallon heavy duty storage tubs​
- For sand and live rock with some water.​
(1x) 27 gallon heavy duty storage tote with lid​
- For sand and the largest arch rock.​
(1x) Igloo Marine 120-quart insulated ice chest​
- For corals in bags and tupperware containers.​
* I cut several styrofoam pieces to make dividers to fit my cooler perfectly, so that I could separate the corals somewhat to keep them stationary.​

We started to break down the tank around 10:00 that night and didn’t leave his place till after 1:00AM. It was after 3:00 by the time we got home, and it was definitely one of the most anxious drives I’ve ever taken. We stayed on the phone the entire time nearly, and left the dang doors to the stand at the guy’s house, so he was following us for a little while too!

The tank actually ended up having to ride ON the stand because we couldn’t separate it off of the self leveling mat. I think it weighed around 600 lbs when we moved it, since the sump was also still in the stand. Fortunately our house is about level with the back of the truck, or we would have had a nightmare getting it down the ramp.

9838116A-F0D3-45BE-943E-825E04C44518.jpeg
B2327E70-5302-4BF4-A547-9B91C6911645.jpeg

(Ignore the chaos.)

Part of the water was added into the holding tank (55g Acrylic), then the fish, and then the coral.

2DBEF898-6545-4369-969D-80CEE383CD11.jpeg
C1CC1A6B-CB95-486B-90E2-EA46A7E66DFC.jpeg

(I will not tell a lie: I had no time for identifying corals and rocks and trying to separate things here. I wish I had known he had so many different corals and fish, or I would have probably set up two holding tanks (one for sps and one for lps, and so I could have separated the more aggressive fish).

The fish and coral could finally rest! I, however, could not- I started working on setting the Reefer back up, and Joe headed off to work. (We are idiots, yes.)

BF21A9B0-804C-4C9D-8F17-C749FE637F0C.jpeg
67763FAE-1EE2-4280-B05F-4E3A020E354E.jpeg


Let’s call this chapter, “Day 1”.
 
Last edited:

KingTideCorals

2500 Club Member
View Badges
Joined
Apr 18, 2020
Messages
2,713
Reaction score
6,699
Rating - 0%
0   0   0
Awesome write up! Really enjoyed checking out this thread and really like the stand! Going to be really cool to see this reef up and going and to check in and see updates on this thread!

What are your most excited about with the build now?
 
OP
OP
S

Smirkish

Well-Known Member
View Badges
Joined
Apr 28, 2021
Messages
995
Reaction score
6,882
Location
United States
Rating - 0%
0   0   0
Thank you! So glad I kept notes. It’s come a good way since then, so I’ll try and get caught up to the present on here as soon as I have time to type it all out. I’ll list the equipment and inhabitants in the next update.

The previous owner built the stand, too, actually. My only complaint is the doors. I’m more of a soft-close person and he used standard hinges with magnetic closures.

Right now I’m trying to really focus on growing out the corals I have, and it’s been crazy to see the changes in them daily. I’m also working on the refugium a good bit lately, trying to keep phosphates in check. Super stoked to watch everything fully recover and fill in.
 
OP
OP
S

Smirkish

Well-Known Member
View Badges
Joined
Apr 28, 2021
Messages
995
Reaction score
6,882
Location
United States
Rating - 0%
0   0   0
are you guys planning on keeping the tank and stand on the cart? or is that just temporary?
It was just on the carts to move it. All of this took place back in March when we bought the tank. I should probably try and date everything for clarity. I wanted to start from the beginning with the build instead of introducing everyone in at the middle of the story. That doesn’t seem quite fair, as you don’t know how I got to where I am, then.
 

Sleeping Giant

Proud Canadian Reefer
View Badges
Joined
May 22, 2020
Messages
5,798
Reaction score
14,881
Location
Northern Ontario, Canada
Rating - 0%
0   0   0
It was just on the carts to move it. All of this took place back in March when we bought the tank. I should probably try and date everything for clarity. I wanted to start from the beginning with the build instead of introducing everyone in at the middle of the story. That doesn’t seem quite fair, as you don’t know how I got to where I am, then.
ok, that makes sense. You could date posts, but either way you will have a build thread that is and will be growing. I was just curious if you were keeping it, cause i don't think your wheels and floor will get along once the tank is loaded with water, sand and rocks, lol
 
OP
OP
S

Smirkish

Well-Known Member
View Badges
Joined
Apr 28, 2021
Messages
995
Reaction score
6,882
Location
United States
Rating - 0%
0   0   0
Day 2: Joe helped me get the tank off the carts and into position before he left for work so I could fill it while he was gone. Plan was to have fish back in the water before he got home. ;)

I hooked up all of the wiring that would be difficult to access once it was against the wall before we moved it into place. There is a decent gap between the wall and the tank because of my base moulding, so it isn’t impossible to reach behind, but it isn’t easy.

Then I got to setting up the lights. Mounted arms and attached the three Hydra 26s. I ended up having to make a lot of adjustments to these over the next few weeks, and I actually ordered 3D printed visors from Treasure Corals for them, which should be here this coming week.

F4EB5E7D-F87C-4887-A309-889A481DBA86.jpeg
C8B6B85D-1278-4F68-99E8-F33E52E2EBAB.jpeg


I may have spent a few minutes playing with the lightning after I got them on...

ED80C06D-2B48-4313-8FA3-13DE8B676E36.png


Next, was shims. Our kitchen/den used to be a kitchen/porch back in 1900, so the floor slopes dowwwwn towards the old porch for water shed. There are three massive heart pine joists under the house directly below the tank, and it’s a load bearing wall. But it’s UNLEVEL. Get out your shims!

57106222-AA53-47BE-9EB1-193F345F6A8D.jpeg


We keep a lot of shims around. It took me longer to do this than it took to set up all three of the lights, and I’ve still got to cut them off. I’ll probably trim out the bottom to hide the gap with a piece of quarter round at some point.

After this I finished hooking the plumbing back up (the sump just had the light on and bubblers hooked up to it at this point), made sure I had electrical ready for power when I got the tank filled, and cleaned up the inside of the tank.

Then it was time for rock. I spent about twenty minutes setting up the scape on the floor in front of the tank before I felt comfortable with how I was going to position the rocks. I was really nervous about the arches and wanted to be sure they wouldn’t budge. I had to use a piano bench, but I managed to lug every single bit of live rock back into the tank.

The base rocks are on the bottom glass, and there are three large arches- the largest of which is between 24” and 30”. The highest arch is on the left side of the tank and they cascade down towards the right side of the tank where the Euphylia and Ricordea are.

The rocks do not touch the back wall at all, as I wanted to be able to utilize the back of the reef as well as the front for coral placement, and keep as few dead zones as possible.

Once the rock was in place I started to add back the sand and water in the brute cans and other containers that had been sitting in the hallway with heaters and bubblers. I had 50g of the tanks water in my holding tank, so I knew I was going to have to make some water regardless, and I was figuring on about a 10% loss from the move. I was going to be short around 80g if I didn’t use the holding tank water as well.

At this point I was looking at the corals and fish and wondering if it was wise to do that large of what was essentially a water change after already stressing them so much. The parameters could be drastically different and I didn’t have time to test. Too much to do.

So, I decided to mix up 10% of my estimated water volume, around 18g and I started moving coral into the tank a few at a time, lightly acclimating as I went in specimen containers so I could observe everything before it went in. Once the corals were placed, I began to drain the holding tank and slowly add that back into the Reefer. About 1/3 of the way through I stopped and began to add fish, acclimating them in the same way I had the corals. I added all the water from the holding tank and enough from the new mix to reach the overflow.

At this point I knew I needed to get my flow going and I had to get my sump level set. So filled the sump till I was about 2” below the top with remaining new saltwater. I got the return powered up and watched in sheer terror as the water began to return and level out.

Not sure why, but this was the most nerve wracking thing to watch as a new reefer who has never set up a sump before. I had read extensively about setting my sump level and how to find my maximum fill line, but something about pumping water into an already full tank just made me feel panicked.

I cut the return again to simulate a power failure and watched the water rise back to two inches below the top of the sump. HUGE SIGH OF RELIEF. Powered her back up, and called it a day. (Or a break, anyway.) :p

(on 3/19/21)
C1F98AB8-E435-485A-ACFA-B3AE31FA9B72.jpeg
 
Last edited:

Staghorn

Original Reef Gangster
View Badges
Joined
Feb 12, 2013
Messages
876
Reaction score
1,592
Location
West Palm Beach FL
Rating - 0%
0   0   0
Beutiful! I have to say for this being your first reef tank you really thinking things through and doing allot of stuff that most first timers wouldn’t. You must have some other aquarium experience? Or you have done allot of research. Regarding the hinges in the stand. There may be a soft close option post a picture of a hinge. Also have you guys has a good look at those 100 year old beams under the house. I know here in Florida for instance there’s only a handful of materials used back then that have been able to hold up to the moisture and insects.
 
OP
OP
S

Smirkish

Well-Known Member
View Badges
Joined
Apr 28, 2021
Messages
995
Reaction score
6,882
Location
United States
Rating - 0%
0   0   0
Beutiful! I have to say for this being your first reef tank you really thinking things through and doing allot of stuff that most first timers wouldn’t. You must have some other aquarium experience? Or you have done allot of research. Regarding the hinges in the stand. There may be a soft close option post a picture of a hinge. Also have you guys has a good look at those 100 year old beams under the house. I know here in Florida for instance there’s only a handful of materials used back then that have been able to hold up to the moisture and insects.
Thank you for your comments and taking a look at everything! I am new to saltwater but have been keeping aquariums for twenty years now. I have three planted freshwater systems currently, with severum, angels, silver dollars, tetra, cory cats, catfish and pleco. I also have an axolotle. Many of these fish are seven to ten years old. I’ve always kept fish and plants, so keeping coral seemed like the next obvious step, as it appears to take a knowledge of both to be successful with reefs.

I learned long ago that when learning a new skill, research and observation are essential if you want to succeed. Like I said, I had the Evo for about two months prior to purchasing the Reefer, and I had already spent hours reading and taking notes. I honestly needed something mentally challenging, so I took to it like a dry sponge to water. There is no replacement for experience, of course, so I found myself here quite often, as well

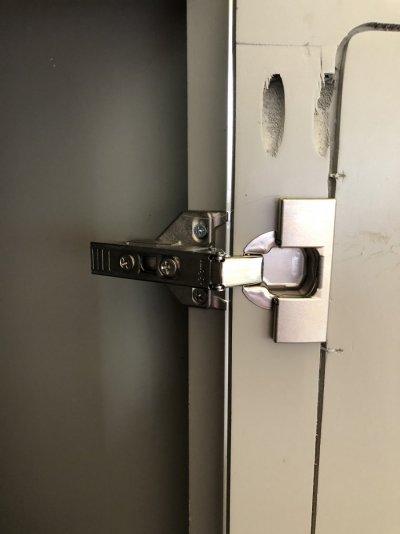
Here are the horrible hinges.
(The stand needs a revamp, methinks.)
B795465D-0BFB-49E5-B792-BF1A2049BE76.jpeg


And below are what I have on a stand that we built. They aren’t soft close but they are quick release. I want both for this tank. I can get the hinges, it’s just a matter of if I want to get them before or after I redo the stand.
76E24731-361F-4525-B590-6DDDB0AFA0EA.jpeg

As for the joists, can confirm that they are solid. Everything original in the house that is wood is heart pine. I’ll crawl under the house and get a shot of where the tank sits. No concern about termites or moisture really- nothing out there I know of is going to chew into this wood.
 

Staghorn

Original Reef Gangster
View Badges
Joined
Feb 12, 2013
Messages
876
Reaction score
1,592
Location
West Palm Beach FL
Rating - 0%
0   0   0
Thank you for your comments and taking a look at everything! I am new to saltwater but have been keeping aquariums for twenty years now. I have three planted freshwater systems currently, with severum, angels, silver dollars, tetra, cory cats, catfish and pleco. I also have an axolotle. Many of these fish are seven to ten years old. I’ve always kept fish and plants, so keeping coral seemed like the next obvious step, as it appears to take a knowledge of both to be successful with reefs.

I learned long ago that when learning a new skill, research and observation are essential if you want to succeed. Like I said, I had the Evo for about two months prior to purchasing the Reefer, and I had already spent hours reading and taking notes. I honestly needed something mentally challenging, so I took to it like a dry sponge to water. There is no replacement for experience, of course, so I found myself here quite often, as well

Here are the horrible hinges.
(The stand needs a revamp, methinks.)
B795465D-0BFB-49E5-B792-BF1A2049BE76.jpeg


And below are what I have on a stand that we built. They aren’t soft close but they are quick release. I want both for this tank. I can get the hinges, it’s just a matter of if I want to get them before or after I redo the stand.
76E24731-361F-4525-B590-6DDDB0AFA0EA.jpeg

As for the joists, can confirm that they are solid. Everything original in the house that is wood is heart pine. I’ll crawl under the house and get a shot of where the tank sits. No concern about termites or moisture really- nothing out there I know of is going to chew into this wood.
For the “horrible hinges!” As long as your doors are al least 5/8” think you can bore them 1 3/8” hole , 15/16” on center from the edge of the door and get some Face frame compact hinges that are the correct overlay for your door(the distance the door overlaps the frame it’s attached to). They make overlays from 1/4”-1 1/2” one of them should work. And they come in soft close. As for the other hinges Blum makes a clip on soft close device that should fit right on your hinges.
 

Attachments

  • 4E789D47-D95F-4BDB-A9EA-1D9222E99456.png
    4E789D47-D95F-4BDB-A9EA-1D9222E99456.png
    478.4 KB · Views: 164

Red_Beard

Valuable Member
View Badges
Joined
Feb 17, 2019
Messages
1,220
Reaction score
1,490
Location
Utah
Rating - 0%
0   0   0
Thank you for your comments and taking a look at everything! I am new to saltwater but have been keeping aquariums for twenty years now. I have three planted freshwater systems currently, with severum, angels, silver dollars, tetra, cory cats, catfish and pleco. I also have an axolotle. Many of these fish are seven to ten years old. I’ve always kept fish and plants, so keeping coral seemed like the next obvious step, as it appears to take a knowledge of both to be successful with reefs.

I learned long ago that when learning a new skill, research and observation are essential if you want to succeed. Like I said, I had the Evo for about two months prior to purchasing the Reefer, and I had already spent hours reading and taking notes. I honestly needed something mentally challenging, so I took to it like a dry sponge to water. There is no replacement for experience, of course, so I found myself here quite often, as well

Here are the horrible hinges.
(The stand needs a revamp, methinks.)
B795465D-0BFB-49E5-B792-BF1A2049BE76.jpeg


And below are what I have on a stand that we built. They aren’t soft close but they are quick release. I want both for this tank. I can get the hinges, it’s just a matter of if I want to get them before or after I redo the stand.
76E24731-361F-4525-B590-6DDDB0AFA0EA.jpeg

As for the joists, can confirm that they are solid. Everything original in the house that is wood is heart pine. I’ll crawl under the house and get a shot of where the tank sits. No concern about termites or moisture really- nothing out there I know of is going to chew into this wood.
Love the new hinges, those look like the blum hinges I used. The quick detach is super handy! If you have them close to your skimmer or sump inlet, you may want to hit them with some clear spray paint or something to seal them up as mine rusted within a year.
 
OP
OP
S

Smirkish

Well-Known Member
View Badges
Joined
Apr 28, 2021
Messages
995
Reaction score
6,882
Location
United States
Rating - 0%
0   0   0
For the “horrible hinges!” As long as your doors are al least 5/8” think you can bore them 1 3/8” hole , 15/16” on center from the edge of the door and get some Face frame compact hinges that are the correct overlay for your door(the distance the door overlaps the frame it’s attached to). They make overlays from 1/4”-1 1/2” one of them should work. And they come in soft close. As for the other hinges Blum makes a clip on soft close device that should fit right on your hinges.
It’s really not the hinges fault...they’re trying their best. The doors are a touch small. Won’t have enough overlap to install the compact hinges.

42163160-F664-4E24-939E-DEBACCBF81B4.jpeg


I will likely be redoing the doors and trim. The finish doesn’t bother me, though I prefer easier to clean surfaces. I actually used to work in cabinetry. I was a painter, but drilling doors out was part of it- can’t count on the carpenters to prep your work for you. Lol.

I didn’t realize they made a soft close add-on, though! Definitely going to be doing that until I can figure out how I want to change up the stand. It’s likely going to be a while before I get around to it.
 
OP
OP
S

Smirkish

Well-Known Member
View Badges
Joined
Apr 28, 2021
Messages
995
Reaction score
6,882
Location
United States
Rating - 0%
0   0   0
Love the new hinges, those look like the blum hinges I used. The quick detach is super handy! If you have them close to your skimmer or sump inlet, you may want to hit them with some clear spray paint or something to seal them up as mine rusted within a year.
It’s ridiculous how much more convenient it is to work on some things without the doors in the way. I still have a lot more I want to add under the tank (dosing, ato, battery backup, various controllers), and I’m literally in the cabinet, so every inch counts.

Great advice on sealing them. I’ll definitely do that too. I didn’t think about corrosion from the salt.
 

Red_Beard

Valuable Member
View Badges
Joined
Feb 17, 2019
Messages
1,220
Reaction score
1,490
Location
Utah
Rating - 0%
0   0   0
It’s ridiculous how much more convenient it is to work on some things without the doors in the way. I still have a lot more I want to add under the tank (dosing, ato, battery backup, various controllers), and I’m literally in the cabinet, so every inch counts.

Great advice on sealing them. I’ll definitely do that too. I didn’t think about corrosion from the salt.
Totally! My tank is near the hallway and with the doors open it is an obstacle course getting to the bathroom to dump wastwater, being able to remove them easily was a game changer! Also, mine are the soft close. Those have been awesome with my 2 yr old who loves the "pink light" over the fuge. Keeps the doors from slamming hard when i catch her peeping in there. :)
You are welcome on the rust tip. I wouldn't have thought they would have rusted as quick as they did. Wish i had coated them with something beforehand.
 
OP
OP
S

Smirkish

Well-Known Member
View Badges
Joined
Apr 28, 2021
Messages
995
Reaction score
6,882
Location
United States
Rating - 0%
0   0   0
@Staghorn, I didn’t get around to crawling under the house today to examine the joists, btw. Maybe tomorrow. I can’t remember the size of the joists now and it’s bothering me hahaha. I’m pretty sure they’re in good condition, but not I want to be positive!

Anyhow, here are where the joists are located below the tank. The arrows indicate nail heads visible in the wood, which is how I knew where to position the tank when we took it off the carts. Easy to see if you know what you are looking for. I knew that the joists had to run perpendicular to the load bearing wall, and a couple of raps on the floor told me I was right about where they were. I “chalked” it out today, though, and they are approximately 20” center to center.

8E1A87B3-2299-4404-A889-97F9B9CC6295.jpeg
25BE6ADF-3CBC-41EB-852B-9EDA83AA5041.jpeg
 

Staghorn

Original Reef Gangster
View Badges
Joined
Feb 12, 2013
Messages
876
Reaction score
1,592
Location
West Palm Beach FL
Rating - 0%
0   0   0
Honestly your probably ok. I just have witnessed 100 year old beams failing and have had to crawl into tiny crawl space to jack up a house that was sinking with no 1000lb aquarium to help. In south Florida those old houses some times used some lumber called dade county pine that is rock hard and moisture and insect resistant. The reclaimed wood from old homes sell for upwards of $45 per board foot. But not all woods are the same and I have witnessed some that didn’t survive. I wish you all the good vibes in the universe on you aquarium , your home your beams, and your family. Nice job so far.
 
Back
Top