Chee-tomorpha

Active Member
View Badges
Joined
Oct 5, 2017
Messages
427
Reaction score
255
Location
Hugo, MN
Rating - 0%
0   0   0
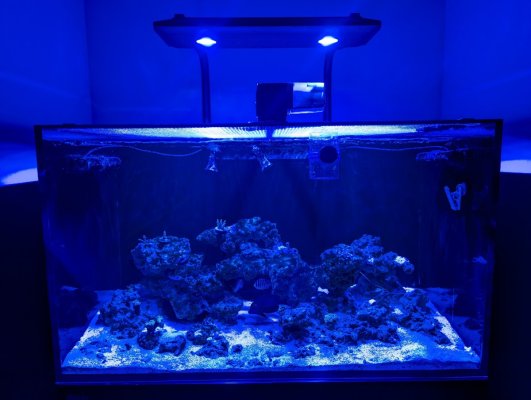
Hello fellow reefers! This is my first ever post and will also be a build post too. A little intro about me. I started getting into reefing about 8 years ago, before that I was into freshwater aquariums and kept angelfish, had some breeding projects as well. I got interested in reefing after my wife asked me to downsize from the 10+ tanks I had to just one. I picked up a Reefer 250 second-hand and have been burning money since then killing a lot of fish and coral. It hasn't kept me away from one day creating a reef I'm proud of.

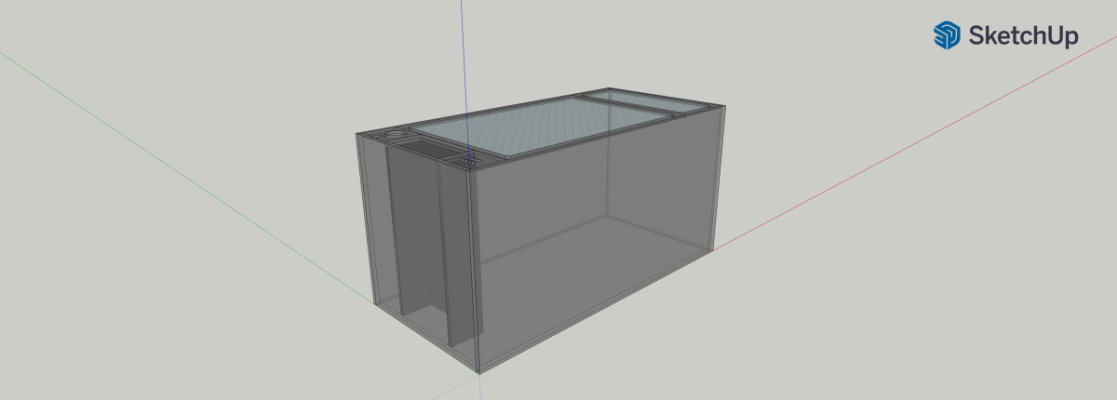
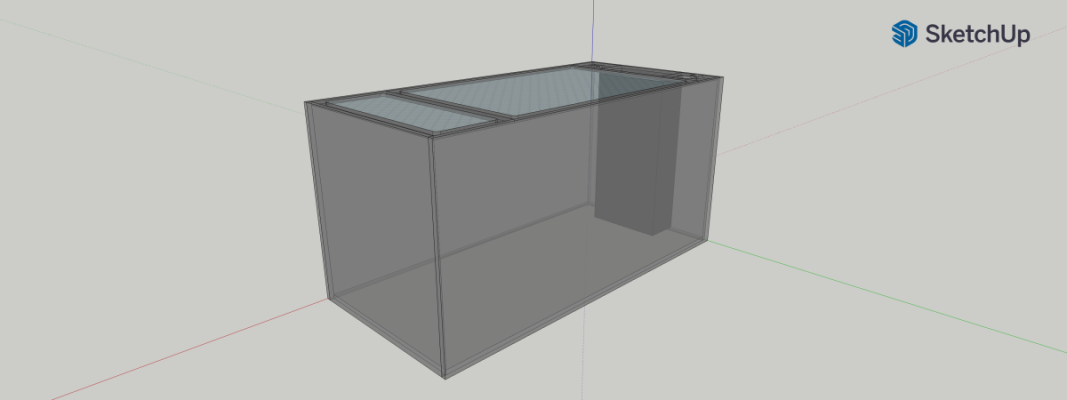
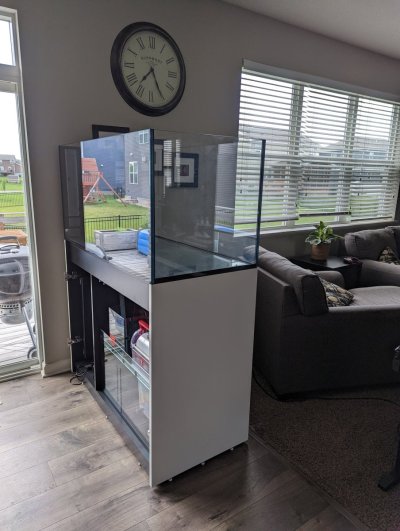
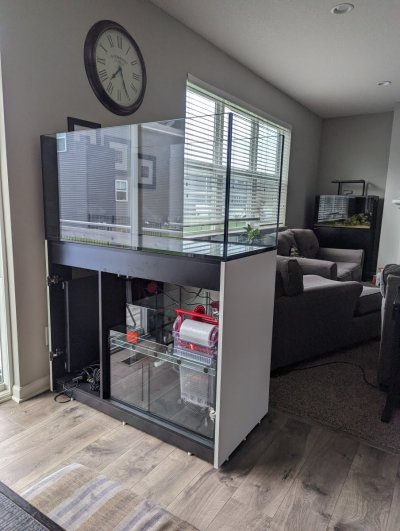
Anyways I'm starting a build post to share the progress of a new tank my wife and kids surprised me with. It was a week before father's day and I came home to a little treasure hunt put on by them. A Red Sea Peninsula 500 Deluxe kit was at the end of the hunt. However, as I opened the crate it turned out that the tank delivered was not a peninsula but rather a Reefer 425 G2. Had to work with Red Sea to get the correct tank redelivered - took about a week. I had a great experience with the rep. and received the correct tank on Father's Day.

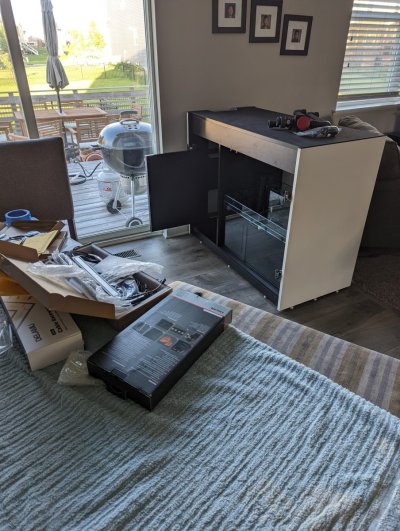
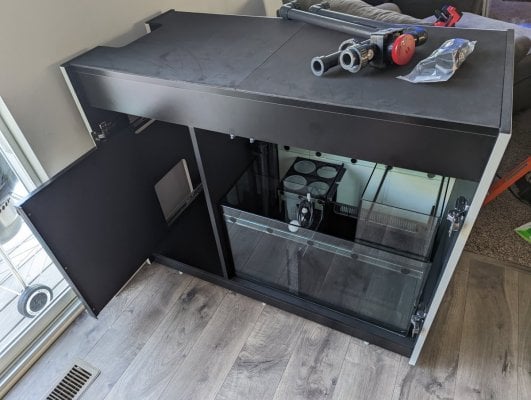
As I began opening the boxes for the cabinets. To my dismay, I found out 4 of the 6 exterior panels were cracked at one corner. Submitted another ticket with Red Sea in hopes to get this resolved as soon as possible.

Needless to say, my build is on hold. I have a half-built cabinet sitting in the dining room, a huge pile of reefing equipment next to the front door, and another pile with the crate in the garage.

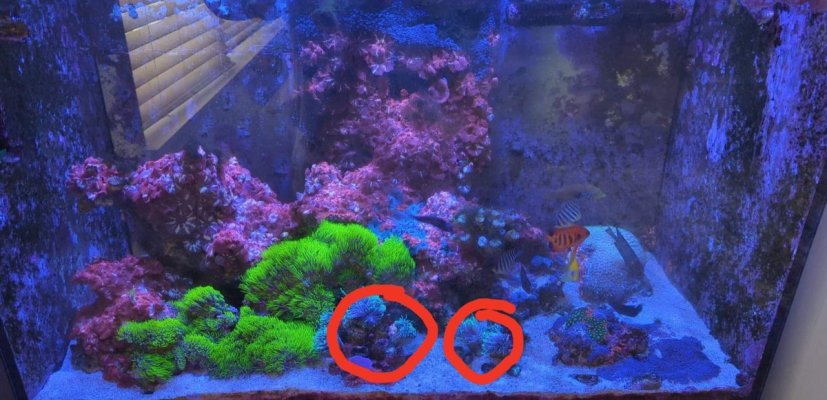
I'm itching to get the cabinet built and the tank put in place. It will be a while yet before water is put in, let alone rehoming the fish and coral from the 250.

For this build, I've gone with all Red Sea equipment - wherever possible. I appreciated the quality of the 250 and the simplicity of their supplements like reef energy and colors programs. I have many more products to try out now that I have a better understanding. With their recent dive into a smart ecosystem. I thought I'd use their equipment on this new build. Most of the tech reflects what I've become used to. I had Maxspect gyre pumps and Kessil lighting on the 250. So their systems wouldn't be too different.

Build contents:
Red Sea Reefer Peninsula 500 with white cabinet
4x ReefLED 90 with trays and white pendant
3x ReefWave 45
2x ReefDose 4
ReefMat 1200
Reefer Skimmer 600
Slide-out control panel 60
1x each of ReefDose colored tube kits

Sicce Syncra SDC 9.0
Ink Bird smart wifi temp controller
2x Aquael 200w heaters

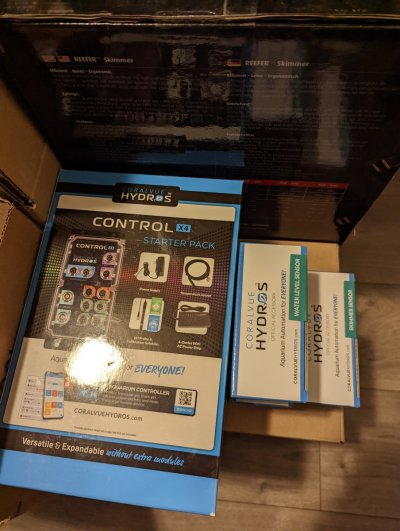
For controllers I decided to go with a CoralVue Hydros Control 4 Starter pack - on order. I decided on this controller as it provided the flexibility with the smart controls already available with the Red Sea stuff. I plan to use the Hydros as a third fail safe for the heaters if they stick on and the Ink Bird malfunctions, shutoff skimmer of skimmate overfills, ATO shutoff if the Tunze osmolator float switch fails, and as a shutoff for the return pump should something clog the drains.

In my 8 years of reefing, I've been fortunate enough to not have any catastrophic failures, aside from my own user error. The failsafe I am putting in place should help with my user errors.

I hope Red Sea gets back to me soon about the cabinet doors. For now here's some pix of my progress, or current mess, and the goodies. I had to lay out all the Red Sea equipment.

PXL_20220623_014111487.jpg PXL_20220622_214048922.jpg PXL_20220622_214125471.jpg PXL_20220622_214253137.jpg PXL_20220622_214107738.jpg
 
Last edited:
OP
OP
Chee-tomorpha

Chee-tomorpha

Active Member
View Badges
Joined
Oct 5, 2017
Messages
427
Reaction score
255
Location
Hugo, MN
Rating - 0%
0   0   0
Oh and here's a pic of my current 250. I had recently restarted the whole tank after having mushrooms overtake the tank - due to my neglect and after multiple unsuccessful attempts at controlling it's spread. I kept just the torches.
 

Attachments

  • PXL_20220623_020044146.jpg
    PXL_20220623_020044146.jpg
    148.8 KB · Views: 149
  • received_1330327047381415.jpeg
    received_1330327047381415.jpeg
    165.4 KB · Views: 150
OP
OP
Chee-tomorpha

Chee-tomorpha

Active Member
View Badges
Joined
Oct 5, 2017
Messages
427
Reaction score
255
Location
Hugo, MN
Rating - 0%
0   0   0
Got some more goodies in today. The Hydros Control 4 Starter kit. I grabbed a skimmer sensor and two water level sensors to provide the extra failsafes as mentioned before.

Also, Red Sea is sending out new cabinet panels. Fingers crossed I could have an empty tank and stand put together, between dinning room and family room, by end of next week.

In the meantime, I'm looking at tank covers as I do fancy myself wrasses. I would also like to collect more pygmy angelfishes.

Current fish in the 250:
2x multibar angelfish
1x flame angelfish
1x coral beauty
1x leopard wrasse
1x ornate leopard wrasse
1x melanurus wrasse
1x tomini tang
1x yellow eye cole tang
1x fire fish

I had an older flame and lemon peel angelfish that randomly died shortly after the tank reboot. Not sure what happened, just found the flame angelfish at the bottom of the tank swishing around by the current. The the lemon peel 2 weeks later did the same thing. Fish were hearty and eating and suddenly found dead. For the lemon peel I notice that it stopped eating right before discovering it's demise.

Is it possible that the two deaths were of old age? The two specimens we're fairly large when I got them.

However, I speculate possible ammonia poisoning due to new tank syndrome from the reboot. About half of the Matrix bio media dried up during the reboot. Tests did indicate measurable amounts, <= 0.4 before dropping to what I presume is zero. The tests with Red Sea test kit continues to show a 0.1 ammonia level after 4 months.

With the larger tank, I'm hoping to collect a few new members:
1x black leopard wrasse
1x adorned wrasse
1x golden angelfish
And some other utilitarian type members, blennies and gobies.
 

Attachments

  • PXL_20220624_044613129.jpg
    PXL_20220624_044613129.jpg
    189.2 KB · Views: 169
OP
OP
Chee-tomorpha

Chee-tomorpha

Active Member
View Badges
Joined
Oct 5, 2017
Messages
427
Reaction score
255
Location
Hugo, MN
Rating - 0%
0   0   0
So I've been searching around the forum for ideas for a lid. My current 250 has a Red Sea DIY lid kit and has built up some salt creep at each connection point. Although it is working well at keeping suicide jumpers, it is a bit flimsy and can be aesthetically unpleasing when the salt creep builds up again. I see there are a few reefers here mentioning ClearView lids. I am leaning towards them as they do look really clean.

What are your long-term experiences with them?
Do they get salt creep?
Which design/style do you prefer and why?
Anyone with photos on a peninsula 500?
What would you do differently now vs when you first built it? (as far as feeding ports, and other cutouts)


I will have two gyres placed vertically beside the weir and a third gyre placed horizontally on the opposite end blowing back. I don't plan on any more cables going into the tank. I would like to get a cutout for an Ehiem auto feeder.

With the gyre pump configuration:
What would be an ideal layout for the lid? - how many cutout(s) and location.
What size should the cutout be for the auto feeder?
Where would be a good spot for the auto feeder cutout?
 
OP
OP
Chee-tomorpha

Chee-tomorpha

Active Member
View Badges
Joined
Oct 5, 2017
Messages
427
Reaction score
255
Location
Hugo, MN
Rating - 0%
0   0   0
Finally made some progress. Red Sea has been very helpful in making sure things are right. My wife has been losing some patience though as she started the order for me almost a month ago and hasn't been happy about the delays. I've been pretty chill, I mean I got a Peninsula 500!

Anyways, I received the new exterior panels - undamaged and looking sweet. I got that cabinet finished, placed into the desired spot and leveled - will recheck again when tank is put on top. Also put the sump and reservoir in, and installed the pull out panel.

I will be installing the cabinet lighting next, then begin stripping out the filter sock holder area for the ReefMat - should have done it when it was out, but wanted to see how things fit before doing so. I'm hoping to utilize the reservoir and still have room for the ReefMat and skimmer along the back so I can get a refugium going in the front chamber. I'm thinking a macro show tank vs tumbling chaeto - will see what macro alae are available to get.
 

Attachments

  • PXL_20220701_005433908.jpg
    PXL_20220701_005433908.jpg
    253.9 KB · Views: 142
  • PXL_20220701_005415750.jpg
    PXL_20220701_005415750.jpg
    184.6 KB · Views: 134
OP
OP
Chee-tomorpha

Chee-tomorpha

Active Member
View Badges
Joined
Oct 5, 2017
Messages
427
Reaction score
255
Location
Hugo, MN
Rating - 0%
0   0   0
Removed the filter sock holders and baffles and got the sump layout figured out. I couldn't get the layout I initially wanted without losing the quick filter change feature of the ReefMat and keeping the reservoir. So I went with Red Sea suggested placement for left side door which still worked out. The extra sump space will be filled with Marine pure bio cubes.

I am thinking I could drill the reservoir to convert to a refugium like I have in my 250. I think this may work out better since I'm planning on having sand with macro algae. And, I thought it could be ideal as an isolation tank or even hospital in a pinch since it is a lot bigger than in the 250.

I also got the cabinet lighting installed and liking the way it works. I believe it's is an optical sensor so it's electrical so there's no clicking when it switches on/off. It also plugs right into the under cabinet lighting I got so no wire splicing. I added a master mechanical on/off switch to bypass the sensors completely.

Thinking I will put the tank on and start water leak tests before going any further. Suction cups should be here on Sunday.

Let me know what you guys think so far. Any tips at this stage or if I'm doing something out of order.

PXL_20220703_015832540.jpg PXL_20220703_015824281.jpg
 
OP
OP
Chee-tomorpha

Chee-tomorpha

Active Member
View Badges
Joined
Oct 5, 2017
Messages
427
Reaction score
255
Location
Hugo, MN
Rating - 0%
0   0   0
The tank is on the stand, the sump is soft plumbed to the return pump, and both will be water tested soon.
 

Attachments

  • PXL_20220706_122425602.jpg
    PXL_20220706_122425602.jpg
    187.2 KB · Views: 179
  • PXL_20220706_122451236.jpg
    PXL_20220706_122451236.jpg
    198.7 KB · Views: 213

Pntbll687

Valuable Member
View Badges
Joined
Oct 4, 2017
Messages
2,088
Reaction score
2,604
Rating - 0%
0   0   0
So I've been searching around the forum for ideas for a lid. My current 250 has a Red Sea DIY lid kit and has built up some salt creep at each connection point. Although it is working well at keeping suicide jumpers, it is a bit flimsy and can be aesthetically unpleasing when the salt creep builds up again. I see there are a few reefers here mentioning ClearView lids. I am leaning towards them as they do look really clean.

What are your long-term experiences with them?
Do they get salt creep?
Which design/style do you prefer and why?
Anyone with photos on a peninsula 500?
What would you do differently now vs when you first built it? (as far as feeding ports, and other cutouts)


I will have two gyres placed vertically beside the weir and a third gyre placed horizontally on the opposite end blowing back. I don't plan on any more cables going into the tank. I would like to get a cutout for an Ehiem auto feeder.

With the gyre pump configuration:
What would be an ideal layout for the lid? - how many cutout(s) and location.
What size should the cutout be for the auto feeder?
Where would be a good spot for the auto feeder cutout?
Things are looking good and I hope Redsea gets you the panels quickly. I actually like when people use one brand of product across the tank, it looks clean and uniform.

I have a peninsula tank and I would just go with the two gyres by the overflow to start, or maybe just 1. No need to obstruct that far end with a pump if you don't need to. I believe @Reef Builders has a redsea peninsula that has a single vertical mounted gyre and it grows acros just fine.

I would put the auto feed on the wall side with a piece of acrylic tubing or pvc extending into the water right below it. This way the food hits the water and goes into the water column instead of floating and going down the overflow.
 
OP
OP
Chee-tomorpha

Chee-tomorpha

Active Member
View Badges
Joined
Oct 5, 2017
Messages
427
Reaction score
255
Location
Hugo, MN
Rating - 0%
0   0   0
I plan on using a UV sterilizer and a reactor, potentially in the future. I have not used these in the past but wanted to try and so I got an oversized Sicce SDC 9.0 to help with a manifold if it becomes the case. I think I will need at least a three-way manifold. One to feed the refugium, one for carbon/gfo/bio pellets, and one for UV sterilizer. From what I gathered, it is important to take your time and plan out the hard plumbing before buying anything. Since this is new to me, here are two rough drafts I am thinking about doing. Let me know your thoughts?

Note: The open space between plumbing and skimmer/filter mat will be utilized for the reservoir. For now, I plan to convert it to a refugium and feed it with a separate DC pump, and will be drilling the reservoir with a 1" overflow drain.

Red:
1 - 1" flow meter
2 - 1" ball valve
3 - 1" Tee
4 - 1" barb
5 - 3/4" elbow
6 - 3/4" elbow
7 - 3/4" elbow
8 - 3 way manifold
9 - outlet x3 (ball valve and barb/slip) - flat with the top

Blue:
1-6 is the same as red
7 - 3/4" elbow
8 - 3/4" elbow
9 - 3 way manifold
10 - outlet x3 (ball valve and barb/slip) - flat with the top
 

Attachments

  • PXL_20220706_122313868.jpg
    PXL_20220706_122313868.jpg
    143.5 KB · Views: 219
  • PXL_20220706_123601916.jpg
    PXL_20220706_123601916.jpg
    194.4 KB · Views: 179
OP
OP
Chee-tomorpha

Chee-tomorpha

Active Member
View Badges
Joined
Oct 5, 2017
Messages
427
Reaction score
255
Location
Hugo, MN
Rating - 0%
0   0   0
Things are looking good and I hope Redsea gets you the panels quickly.
Red Sea sent me the exterior panels last week. I've not put the doors on just yet as I anticipate a lot of work to be done in the sump area still.

I actually like when people use one brand of product across the tank, it looks clean and uniform.
I agree. I am excited to see what their ecosystem has to offer. I have a lot of smart devices in my house. If I can integrate the Red Sea ecosystem - that would awesome! The link you provided to ReefBuilder had an article about Sicce adding voice-activation through Google assistant to their SDC line of pumps. That got me excited - haha.

I have a peninsula tank and I would just go with the two gyres by the overflow to start, or maybe just 1. No need to obstruct that far end with a pump if you don't need to. I believe @Reef Builders has a redsea peninsula that has a single vertical mounted gyre and it grows acros just fine.
That is good to know. I had purchased three ReefWave 45 with the intent to put one on the far end. I will move the third unit into the sump area due to the way I have the ReefMat positioned now. I think it would a good job to push water around into the back corner and skimmer.

I would put the auto feed on the wall side with a piece of acrylic tubing or pvc extending into the water right below it. This way the food hits the water and goes into the water column instead of floating and going down the overflow.
I was thinking the same. It would be out of the way too. I haven't ordered mine yet. Is there anything else I should consider for the lid?
 
OP
OP
Chee-tomorpha

Chee-tomorpha

Active Member
View Badges
Joined
Oct 5, 2017
Messages
427
Reaction score
255
Location
Hugo, MN
Rating - 0%
0   0   0
Had found a leak in my reefer 250 two days ago when I went to refill my Alk, Ca, and Mg. It turned out to be a cracked sump. Got it patched up for now. It has been two days and still dry, hoping it'll stay dry until I can transfer everything over to this build.

Anyways,
I got my new 3-stage DI installed two days ago and produced zero ppm RO water for the first time in the hobby. It has been 2-4 ppm RO water with the 3-stage RO kit I bought a long time back. I'm hoping zero ppm water will help me be more successful now. With the new water going, I added water into the weir and sump to begin some leak tests. Been a good day since having water in and it is looking good.
PXL_20220706_143730682.jpg


PXL_20220708_200301492.jpg


PXL_20220708_200317651.jpg


In the meantime, I had started sketching up ideas for the aquascape. I went with BRS's HNSA-style scape on my reefer 250 rebuild. This time I wanted to expand more on that by incorporating more "housing" areas inside the scape. I found the fish really enjoyed having someplace to claim to go to bed. They would often fight since I didn't give them enough places to do so. It will be a challenge since this time it is a peninsula and viewable from all three sides.

I started with the rule of thirds and I want to have a lot of depth from all viewing sides. I also took advice on not going any more than halfway up to allow SPS to grow and drew in a boundary around the edges to allow cleaning of the glass. I also drew a couple of slope lines to guide the height back to the weir. In the top view (bottom sketch) I want to be able to see through the scape at the diagonal channels in hopes this will create the depth I want in the aquascape.
PXL_20220708_201018783.jpg


In this next sketch, I tried to block the layout. My main structure would be offset from the middle. I have a secondary structure to the front with a small island shaped into a cove. Then a third structure around the base of the weir. I saw Devin's, from ReefDudes, WB Peninsula. I liked how he had rock right up on the weir - I always want to encrust my weir with a Monti, so I incorporated his design into mine. I also wanted to include a cleaning station in the back as well so I added an overhang for my two skunk cleaner shrimps.
PXL_20220708_201031350.jpg


This step is just me killing some time making the design look pretty.
PXL_20220708_201050604.jpg
 

Pntbll687

Valuable Member
View Badges
Joined
Oct 4, 2017
Messages
2,088
Reaction score
2,604
Rating - 0%
0   0   0
Had found a leak in my reefer 250 two days ago when I went to refill my Alk, Ca, and Mg. It turned out to be a cracked sump. Got it patched up for now. It has been two days and still dry, hoping it'll stay dry until I can transfer everything over to this build.

Anyways,
I got my new 3-stage DI installed two days ago and produced zero ppm RO water for the first time in the hobby. It has been 2-4 ppm RO water with the 3-stage RO kit I bought a long time back. I'm hoping zero ppm water will help me be more successful now. With the new water going, I added water into the weir and sump to begin some leak tests. Been a good day since having water in and it is looking good.
PXL_20220706_143730682.jpg


PXL_20220708_200301492.jpg


PXL_20220708_200317651.jpg


In the meantime, I had started sketching up ideas for the aquascape. I went with BRS's HNSA-style scape on my reefer 250 rebuild. This time I wanted to expand more on that by incorporating more "housing" areas inside the scape. I found the fish really enjoyed having someplace to claim to go to bed. They would often fight since I didn't give them enough places to do so. It will be a challenge since this time it is a peninsula and viewable from all three sides.

I started with the rule of thirds and I want to have a lot of depth from all viewing sides. I also took advice on not going any more than halfway up to allow SPS to grow and drew in a boundary around the edges to allow cleaning of the glass. I also drew a couple of slope lines to guide the height back to the weir. In the top view (bottom sketch) I want to be able to see through the scape at the diagonal channels in hopes this will create the depth I want in the aquascape.
PXL_20220708_201018783.jpg


In this next sketch, I tried to block the layout. My main structure would be offset from the middle. I have a secondary structure to the front with a small island shaped into a cove. Then a third structure around the base of the weir. I saw Devin's, from ReefDudes, WB Peninsula. I liked how he had rock right up on the weir - I always want to encrust my weir with a Monti, so I incorporated his design into mine. I also wanted to include a cleaning station in the back as well so I added an overhang for my two skunk cleaner shrimps.
PXL_20220708_201031350.jpg


This step is just me killing some time making the design look pretty.
PXL_20220708_201050604.jpg
The bottom drawing is pretty cool! The only tweak I would make is the bottom left leg of the main structure, make it a little shorter so you have a clear valley from one side to the other.
 
OP
OP
Chee-tomorpha

Chee-tomorpha

Active Member
View Badges
Joined
Oct 5, 2017
Messages
427
Reaction score
255
Location
Hugo, MN
Rating - 0%
0   0   0
Good catch, I'll adjust for that.

I will be looking at how the view opposite of the weir will look like too. I'm thinking the peaks of each structure will sway as it slopes down towards the smaller cove.

I hope to begin working on the main structure this weekend with some left over dry rock while I wait delivery of another box.
 
OP
OP
Chee-tomorpha

Chee-tomorpha

Active Member
View Badges
Joined
Oct 5, 2017
Messages
427
Reaction score
255
Location
Hugo, MN
Rating - 0%
0   0   0
The weekend didn't go as planned. The glue I ordered from Glue Masters isn't the same and made gluing very difficult. It turned out that the Thin glue (dark blue bottle) is not the same as the old Thin bottle I order a while back. The new thin is thicker and not like water so beads off the rock and especially the powder. Due to the glue issue, I didn't get very far.

Instead, I started planning the tank lid.
Tank Lid (3).png

I have some dosing and auto-feeder ports flanking the weir. Hoping I can replace the stock weir cover with a custom one. These three sections share the ridge of the weir to support themselves. The edges where they touch the weir will have an extra piece to support them on the weir edge.
Tank Lid (4).png

I left the outside perimeter blank as there are different ways the panels are hung - tabs or flange.
 

Attachments

  • Tank Lid (2).png
    Tank Lid (2).png
    70.6 KB · Views: 110
  • Tank Lid (1).png
    Tank Lid (1).png
    79.5 KB · Views: 114
OP
OP
Chee-tomorpha

Chee-tomorpha

Active Member
View Badges
Joined
Oct 5, 2017
Messages
427
Reaction score
255
Location
Hugo, MN
Rating - 0%
0   0   0
Made progress on other things since the scape has been on hold. Hooked up the Sicce return pump, the InkBird controller w/ heaters, and applied cable management to the sump area.

Before:
PXL_20220706_123601916.jpg


After: (more to be done)
PXL_20220719_141034497.jpg


I also drilled the reservoir and began running it with the sump to begin some kind of cycle. I put the MarinePure cubes in the reservoir for now. 1/3 of the cubes have been cooking in the existing 250 hoping to seed peninsula when I start cycling it. I got a small fountain pump feeding the reservoir/refugium and another one moving water around in it.

PXL_20220719_141045411.jpg


The glue should be here soon, hard plumbing parts are in order, and the lid design submitted to octoaquatics.com
 
OP
OP
Chee-tomorpha

Chee-tomorpha

Active Member
View Badges
Joined
Oct 5, 2017
Messages
427
Reaction score
255
Location
Hugo, MN
Rating - 0%
0   0   0
Worked late into the night and made some progress on the scape. After three iterations, and slightly moving away from the sketch, I've come to this. Going to sleep on it.

If I decide to go with this design tomorrow there will be some small tweaking to make to the back half as it's pretty open and needs more habitat.
PXL_20220721_044545581.jpg
PXL_20220721_044554948.jpg
PXL_20220721_044602847.jpg
PXL_20220721_044618376.jpg


PXL_20220721_044518454.jpg

PXL_20220721_044527337.jpg

PXL_20220721_044534908.jpg
 

Being sticky and staying connected: Have you used any reef-safe glue?

  • I have used reef safe glue.

    Votes: 98 88.3%
  • I haven’t used reef safe glue, but plan to in the future.

    Votes: 6 5.4%
  • I have no interest in using reef safe glue.

    Votes: 4 3.6%
  • Other.

    Votes: 3 2.7%
Back
Top