ReefSentinel’s 200g Mini Barrier Reef build.

OP
OP
ReefSentinel

ReefSentinel

Active Member
View Badges
Joined
Jan 11, 2020
Messages
207
Reaction score
357
Location
Sydney
Rating - 0%
0   0   0
This build has very elaborate and thought out planning. This whole tread is an inspiration when I build my "Forever tank" I will use this thread for help.. GREAT THREAD!!
Thanks for the comments,
I think my brain is starting to feel the elaboration,
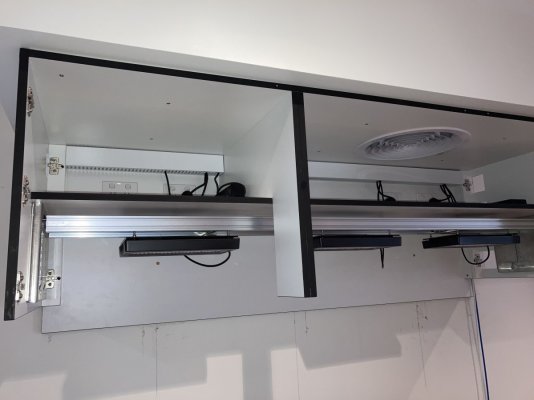
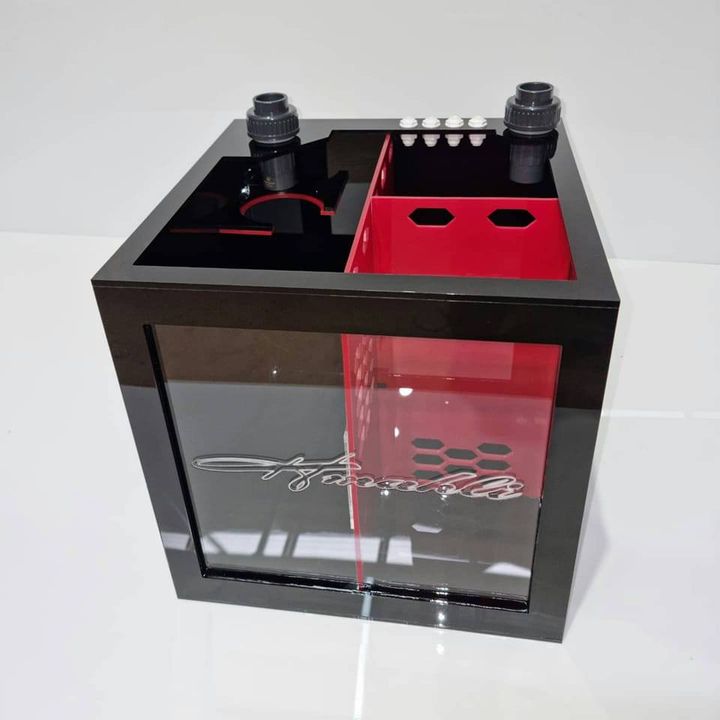
Plumbing is next and between the US fittings and what is available here in Australia I hope everything goes together and fits nicely without too many issues.
Unfortunately I am running a few months behind where I wanted to be as our summer is starting soon and I was hoping to QT fish over winter when I wouldn’t need to chill the water,
 
OP
OP
ReefSentinel

ReefSentinel

Active Member
View Badges
Joined
Jan 11, 2020
Messages
207
Reaction score
357
Location
Sydney
Rating - 0%
0   0   0
Man that sump is a work of art!
Thanks,
So far i think it looks a little clinical, however does have a crisp look about it.
I when with a lot of white so i could see what was going on in there and any build up of stuff, I think once it has plumbing, skimmer & refugium is done white will not be as strong.
From the pictures received the the sump looks to be coming along thanks to Eric at Hmahli Australia he puts a lot of care into the build and the customers requirements as I had a desing which was a little different most of his standard kind of sumps.
If anyone in Australia is interested the following links are for Hmahli Australia, I believe he will be so exporting, for the US based reefers the exchange rate may.

 
OP
OP
ReefSentinel

ReefSentinel

Active Member
View Badges
Joined
Jan 11, 2020
Messages
207
Reaction score
357
Location
Sydney
Rating - 0%
0   0   0
Hi All,
Quick update on the sump build, sump is all but finished, awaiting bulkheads and water test.
I should be able to pick it up next week some time, for now there are the latest pic's with the fitted LED lights on.

15-10-20 (1).jpg
15-10-20 (2).jpg
15-10-20 (3).jpg
15-10-20 (4).jpg
15-10-20 (5).jpg
15-10-20 (6).jpg
 
OP
OP
ReefSentinel

ReefSentinel

Active Member
View Badges
Joined
Jan 11, 2020
Messages
207
Reaction score
357
Location
Sydney
Rating - 0%
0   0   0
More shopping turned up today, nothing too exciting
IMG_9789.JPG

Filter socks for the Sump
Aquatic Experts Filter Socks 200 Micron - 4 Inch Ring by 10.5 Inch Long - Medium - Aquarium Felt Filter Bags, Custom Made in The USA


Additional Loc-line pieces so I can increase length if needed.
Loc-Line 3/4" N.P.T. ROBO-ARM Adjustable Dual Return Nozzle for Aquariums w/Flare Ends by A 2 Z Aquatics


Silicone Tubing for the return pump to sump bulkhead.
uxcell Silicone Tube 25mm ID x 31mm OD 3.3' Silicone Rubber Tubing Water Air Hose Pipe White for Pump Transfer


IMG_9790.JPG


and some imperial unions & fittings to match the Neptune FMK
IMG_9792.JPG
 
OP
OP
ReefSentinel

ReefSentinel

Active Member
View Badges
Joined
Jan 11, 2020
Messages
207
Reaction score
357
Location
Sydney
Rating - 0%
0   0   0
Shopping therapy today,
Picked up the brain of the system NEPTUNE APEX, on opening the package I was surprised to find the EB6 power board, for some reason I didn’t think it came with one, o well now I have 3.
Also purchase a light shade for the AI Fuge light.
Thought I would post some trial-pics of it in action.
D269B032-F6A6-4677-B70A-3B18A247F2A5.jpeg
26FA8948-F121-4E3A-A926-04BCE513584E.jpeg
EA5DBED1-BEC6-4306-A64E-20389D201124.jpeg
1629EE8C-1BBB-4F28-BFAC-27F547E52CA7.jpeg
5DC750AA-2503-4E00-8D2C-93B71366004B.jpeg
F284898D-0874-466B-9BDA-D8A843C90B92.jpeg
8BCEBE4A-D963-4352-963A-72880676FA6A.jpeg
B998C0EB-4484-4E62-AB73-045E717E698B.jpeg
 
OP
OP
ReefSentinel

ReefSentinel

Active Member
View Badges
Joined
Jan 11, 2020
Messages
207
Reaction score
357
Location
Sydney
Rating - 0%
0   0   0
Another weekend gone, but everything is coming together.
Vent for the chiller 95% finished, just need to silicon the outside top and sides, slow far it has worked out ok.
IMG_9847.JPG
IMG_9849.JPG
IMG_9846.JPG
IMG_9850.JPG
IMG_9852.JPG


Also starting on what I think is going to be one of the largest challenges of the built - "Plumbing"
Having seen some great examples of plumbing on reef2reef and I have a picture of how I would like it all to work and look, issue being is my anal-retentive side, I will try to do what I can.

Challenge being the following
- space and how everything I going to come together.
- Metric & imperial gear, what a nightmare, luckily I can have the items turned (on lathe) at works to make custom fittings.

IMG_9843.JPG

IMG_9844.JPG
 
OP
OP
ReefSentinel

ReefSentinel

Active Member
View Badges
Joined
Jan 11, 2020
Messages
207
Reaction score
357
Location
Sydney
Rating - 0%
0   0   0
Quick update between 60hr work and the weekly driving kids everywhere on the weekend.
Alum trays made for under chiller and Sump.
Chiller tray does drain but will have a leak sensor in it for a little safety.
Sump tray does have a small drain that will go outside, it's only a small diameter but can only help if something was to happen, plan to put sensor in this tray as well.
Both tray to be primed & painted white.
IMG_9863.JPG

IMG_9866.JPG

IMG_9867.JPG

Whilst working on the sump items during the week I was playing around with the Level float switches what I thought were water proof which they are for the float section but not to back where the wires go in.
A little research and found that when people wish to put these under water they normally screw the sensor in the end of a piece of pvc & seal to be able to place to complete sensor into the water.
As I wanted to use the sensor tree made for the sump I turned up two holders that extend the length of how far I place them under the water level, these are only about 4" long which is enough for what I need.
IMG_9870.JPG


IMG_9869.JPG

 
OP
OP
ReefSentinel

ReefSentinel

Active Member
View Badges
Joined
Jan 11, 2020
Messages
207
Reaction score
357
Location
Sydney
Rating - 0%
0   0   0
Standard busy week this week, been trying to get a few hours together to work on the built, spent a lot of time thinking about the plumbing arrangement, need to take the following into consideration.
- Position of FMM flow monitor
- UV being the only item after the 1" FMM flow monitor so I know the flow rate through the UV.
- Unions,
- Take offs for future items and chiller (chiller line to have 1/2" FMM

Also purchased a Waterbox 20 for the Fish Qt, still research the best QT method.
IMG_9881.JPG
IMG_9882.JPG
IMG_9888.JPG
IMG_9890.JPG
IMG_9891.JPG

I think this will be the final layout of the plumbing, looks like a mess, wait it is a mess but i have a rough plan on paper and in my head.
IMG_9902.JPG

Also added a skimmer air take line from outside, figured best to put one in the wall before the stand/tank is there.
IMG_9878.JPG
IMG_9879.JPG
IMG_9880.JPG
IMG_9903.JPG
 
OP
OP
ReefSentinel

ReefSentinel

Active Member
View Badges
Joined
Jan 11, 2020
Messages
207
Reaction score
357
Location
Sydney
Rating - 0%
0   0   0
Sorry for delay in updates, been very busy driving daughter around for sport trials.
This weekend’s plan was to bring stand ready for tank delivery possibly next week.
Stand and canopy are in, had issues with the canopy had the wall isn’t perfectly square and flat.
7EFDCA46-AEB1-402E-9037-25AD8924728F.jpeg

also fitted the light bracket and lights, of course I had to try the lights for the family.
0ECEEE8D-6FA8-4812-A53F-E84F223FCE51.jpeg

A220A92B-A96B-46F0-9337-F797DC07BD91.jpeg

Unfortunately while fitting the Radions i noticed that all 3 Ecotech Radion's have crack's on the front plastic panel around the screws, being in manufacturing myself these cracks are a result of the assembly line, over-tightening the screws.
They seem to work fine but it's poor to buy something of this quantity to end up with crap, with will advise supplier and see what happens.
A few pic's of what to look for if anyone buys these.
IMG_9928.JPG
IMG_9927.JPG
IMG_9929.JPG


On the bright side the light assembly bracket worked out well.

IMG_9945.JPG
 
OP
OP
ReefSentinel

ReefSentinel

Active Member
View Badges
Joined
Jan 11, 2020
Messages
207
Reaction score
357
Location
Sydney
Rating - 0%
0   0   0
Update on the Ecotech Radions cracks.
Emailed Ecotech distributor this morning and I had a reply within a hour or 2 advising they will send out “Rework kits” ASAP.
Cracks are disappointing but the service so far for a solution is 2nd to none. 5 Stars to the reseller here in Australia.
Will advise update once I receive the items.
Guessing it must be a known production issue from Ecotech to have a kit ready.
 
OP
OP
ReefSentinel

ReefSentinel

Active Member
View Badges
Joined
Jan 11, 2020
Messages
207
Reaction score
357
Location
Sydney
Rating - 0%
0   0   0
Ecotech Radion G5 update
Within 48hrs I have 3 x new replacement front panels from Australian Ecotech distributor, great service on the replacement items.
A little sad they let the product stay in the market knowing the issues, I guess cheaper for the customer to pull apart rather than bring all the product back to be fixed and repack.
 

Attachments

  • 4EA65D44-7259-40A0-9691-93DBA92E4F4E.jpeg
    4EA65D44-7259-40A0-9691-93DBA92E4F4E.jpeg
    193.7 KB · Views: 52

Cwentz758

Do you even Reef bro?
View Badges
Joined
Dec 18, 2019
Messages
1,290
Reaction score
904
Location
Pittsburgh, PA
Rating - 0%
0   0   0
Ecotech Radion G5 update
Within 48hrs I have 3 x new replacement front panels from Australian Ecotech distributor, great service on the replacement items.
A little sad they let the product stay in the market knowing the issues, I guess cheaper for the customer to pull apart rather than bring all the product back to be fixed and repack.
They ran into the same issues here in the US in the early stages. Looking great!
 

MPS

Active Member
View Badges
Joined
Apr 20, 2018
Messages
232
Reaction score
221
Location
Gilbert Arizona.
Rating - 0%
0   0   0
Mixing station update,
So it took a few nights to make up the RODI water due to the low water pressure, night time was the only time I could get the pressure near 50 PSI, day time was only 40PSI at best.
I was also getting alot of water which was fine as it when to the water tank however the supplier of the RODI unit advised I would go through the resin very quickly resulting in wasting money.
This wasn't going to be quick enough in case I had the need to make water quickly so i ordered a RO BOOSTER Pump upgrade kit.
Once fitted I can how get around 110PSI pressure & one night can almost fill my tanks:)
IMG_9418.JPG
IMG_9354.JPG
Great update. I struggled with the same. I didn’t like all the waste water from the standard setup so I added the 2nd RO membrane in addition to the booster, like the BRS Water Saver. That alone, doubled my output and cut waste in 1/2.
 
OP
OP
ReefSentinel

ReefSentinel

Active Member
View Badges
Joined
Jan 11, 2020
Messages
207
Reaction score
357
Location
Sydney
Rating - 0%
0   0   0
Great update. I struggled with the same. I didn’t like all the waste water from the standard setup so I added the 2nd RO membrane in addition to the booster, like the BRS Water Saver. That alone, doubled my output and cut waste in 1/2.
It certainly helps in making water a bit faster,
Thanks
 
OP
OP
ReefSentinel

ReefSentinel

Active Member
View Badges
Joined
Jan 11, 2020
Messages
207
Reaction score
357
Location
Sydney
Rating - 0%
0   0   0
Quick update, nothing major
Cabling tray added in canopy, stand top and form fitted ready for tank next week hopefully.
Also fitted Netgear 8 port switch as need 1 port for wired connection for Apex.
 

Attachments

  • 674E8F24-D463-47C9-9146-8CF755BCD9D9.jpeg
    674E8F24-D463-47C9-9146-8CF755BCD9D9.jpeg
    115.1 KB · Views: 54
  • C980D643-1406-4FF2-A335-7AF2D9548058.jpeg
    C980D643-1406-4FF2-A335-7AF2D9548058.jpeg
    104.5 KB · Views: 49
  • 026CAB0B-D135-4E4A-A1BD-46B9E46B3166.jpeg
    026CAB0B-D135-4E4A-A1BD-46B9E46B3166.jpeg
    126.1 KB · Views: 52
  • 1767C4BB-8CBD-484F-85BE-967132B8A042.jpeg
    1767C4BB-8CBD-484F-85BE-967132B8A042.jpeg
    149.1 KB · Views: 59
  • 152E2E16-D4D0-4B7B-8E28-7482D8F20A57.jpeg
    152E2E16-D4D0-4B7B-8E28-7482D8F20A57.jpeg
    111.5 KB · Views: 50
OP
OP
ReefSentinel

ReefSentinel

Active Member
View Badges
Joined
Jan 11, 2020
Messages
207
Reaction score
357
Location
Sydney
Rating - 0%
0   0   0
Quick update, not a big change but doors have been added/fitted to the canopy, tank due to be delivered next week, yes it has taken too long but it is coming together as last.

I always knew I would have a issue with the light coming through the gap between the door, plan is to stick black form in the corner and some plastic strip on the back of one door.

Doors open
IMG_9993.JPG


Doors closed
IMG_E9996.JPG


IMG_9992.JPG


view of inside.
IMG_9998.JPG
 
OP
OP
ReefSentinel

ReefSentinel

Active Member
View Badges
Joined
Jan 11, 2020
Messages
207
Reaction score
357
Location
Sydney
Rating - 0%
0   0   0
Ok, update time.
Well I have good news for the built and bad news to update,
Tank was delivered during the week. "GOOD NEWS"
6256FC92-5575-439B-9556-AAFD55D2275F.jpeg
IMG_0011.JPG


Now for the bad news, :mad: :mad: :mad: :mad: :mad: :mad: :mad: :mad: :mad: :mad: :mad: :mad:
During this built I have had many small changes and things not go to plan however have always found a workaround, don't think I can do much with this.
During cleaning the glass I have found a scratch on the front panel and of course if is in the middle of the front panel.
IMG_0042.JPG
IMG_E0044.JPG

IMG_0043.JPG
IMG_E0045.JPG


now to speak to tank builder... IMG_0011.JPG IMG_0044.JPG
 
Last edited:

Clear reef vision: How do you clean the inside of the glass on your aquarium?

  • Razor blade

    Votes: 161 61.7%
  • Plastic scraper

    Votes: 69 26.4%
  • Clean-up crew

    Votes: 90 34.5%
  • Magic eraser

    Votes: 44 16.9%
  • Other

    Votes: 69 26.4%
Back
Top