Rhoads238's 280 gallon reef with fish room

OP
OP
Rhoads238

Rhoads238

Well-Known Member
View Badges
Joined
Apr 21, 2014
Messages
572
Reaction score
2,425
Location
New Jersey
Rating - 0%
0   0   0
I'm really enjoying the build thus far. You've got a good eye with thr camera and your storytelling is spot on.
Thank you! So far all the photos have been with my phone but I'm going to break out the dslr again soon once i start getting more livestock
Beautiful build. Plumbing looks so clean.

Thanks!
 
OP
OP
Rhoads238

Rhoads238

Well-Known Member
View Badges
Joined
Apr 21, 2014
Messages
572
Reaction score
2,425
Location
New Jersey
Rating - 0%
0   0   0
Hey everyone!

Its been a few weeks so its time for another update on my build. Two weeks ago, I heard that my tank was shipping and I couldn't be more excited, after a few days, I received a call from the freight carrier who told me the tank would be delivered on Wednesday. Wednesday morning came and the truck was outside my house.

1616195409094.png


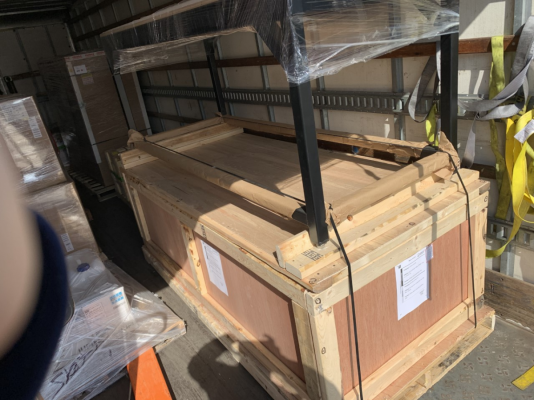
The the tank in the crate was larger than the lift gate, it was also wider than the box truck so it was a challenge getting it off. Definitely something i would not want to do again. We dragged the tank into my garage on a pallet jack and I took the top of the crate off. Everything looked fine so I signed for it and sent the driver on his way. As i took each side of the crate off the tank was looking great until I got to the front panel. There was a deep gash from a screw that had made it through the styrofoam.

1616195408661.png


Below is the offending screw that scratched the glass.

1616196672585.png


Needless to to say I was deeply disappointed by this. The tank was otherwise beautiful.

1616195470593.png


It was so disappointing. It completely ruined the moment that I had been looking forward to since the tank was ordered in November. I called Miracles about and they were great in offering to take the tank back and replace the scratched panel even though it had been signed for. They arranged for the tank to be picked back up the same day. I put the crate back together and waited for the truck to come back. It was quite the job getting it back onto the truck. Because of the angles involved, it was really difficult to get the tank in a position where the pallet jack would be able to pull onto the truck when the lift gate went back up. The tank was hanging off of the lift gate on an angle and there wasn't enough clearance for the crate to clear so all 900 lbs had to be shoved into position. Needless to say I'm still feeling it and this was last Wednesday. By now they should have the tank back and hopefully it is being worked on. Total turnaround should take around a month because it has to cure. Hopefully it will be perfect when it comes back.

This weekend I will be moving the stand into the house with a few friends so I will post some pictures of that when that is done. This really wasn't the update that I was hoping to make but what can you do.
 

Attachments

  • 1616194968663.png
    1616194968663.png
    1.4 MB · Views: 52
OP
OP
Rhoads238

Rhoads238

Well-Known Member
View Badges
Joined
Apr 21, 2014
Messages
572
Reaction score
2,425
Location
New Jersey
Rating - 0%
0   0   0
Hey everyone!

Today we moved the stand into place. I had three of my friends over to help get the job done and it was quick and easy.

1616353944069.png


The stand was brought down the alley between the houses, and waited there while we took the sliding door apart. Unfortunately the stand was half an inch wider than I was expecting and that meant that both sliders needed to come out for it to fit through.

1616354157870.png


We brought the tank through the door and put it into position. Here I am putting the last panel on the stand.

1616354342488.png


I think the stand looks great. Probably its going to show fingerprints but what can you do. I love the finish. it looks really great IMO.

1616354425349.png


It would have been great if the tank didn't arrive damaged and I could start putting the whole thing together but what can you do. I still have to come up with a plan as to how the inside of the tank will be finished. So this will give me some more time to figure that stuff out.

Thanks for viewing my build!
 
OP
OP
Rhoads238

Rhoads238

Well-Known Member
View Badges
Joined
Apr 21, 2014
Messages
572
Reaction score
2,425
Location
New Jersey
Rating - 0%
0   0   0
Hey everyone!

Time for a small update to my build. I finally ended up deciding on a skimmer and as luck would have it, bulk reef had it on sale! I got a bubble king 200 deluxe. I think this thing is going to be a beast. I was torn between this and one of the nyos skimmers. I ended up going with the bk because of the dc pump. I'm sure its going to work out great.

1616865282371.png


I've done some more work in the fishroom and its really starting to come together. I got some ikea furniture for extra storage and I got a hose hanger for my water change hose

1616865733075.png


I also want to do a small update on my coral QT. The tank is running really well, I think its been about 9 weeks since i started it. I'm starting to go through the uglies but so far not too bad. I'm thinking about adding some tester corals soon to add a little more biodiversity to the tank and maybe a few more snails.

1616865431096.png


Last thing I've worked on was I painted the back and sides of my fish qt tanks black. I think it looks good. I used acrylic paint for a base coat and then a few coats black enamel spraypaint.
1616865870744.png


1616866104324.png


Miracles has updated me on the tank and it is looking like it will ship back out late next week and will likely be delivered the week after.

I think thats about it for now. Thanks for viewing my build!
 

reefpizza

Active Member
View Badges
Joined
Oct 23, 2020
Messages
165
Reaction score
131
Location
italy
Rating - 0%
0   0   0
Wow, awesome build keep going! I feel bad for the tank, i know how much we desire that 5 glass thing :(
 

VanDalsenReef

Valuable Member
View Badges
Joined
Apr 1, 2021
Messages
1,029
Reaction score
1,101
Location
Wyoming, Michigan
Rating - 0%
0   0   0
If you're running the apex, I use the GRO for my refugium and two would be great for your refugium with that large brace and then you can send the kessil back or try to sell it if it really frustrates you.
 
OP
OP
Rhoads238

Rhoads238

Well-Known Member
View Badges
Joined
Apr 21, 2014
Messages
572
Reaction score
2,425
Location
New Jersey
Rating - 0%
0   0   0
Wow, awesome build keep going! I feel bad for the tank, i know how much we desire that 5 glass thing :(

Thank you!

If you're running the apex, I use the GRO for my refugium and two would be great for your refugium with that large brace and then you can send the kessil back or try to sell it if it really frustrates you.

I saw that they had just come out with that one. How long have you had it? Is your macro responding well? What were you using before?

Looking nice. Love the wood wrap. Will be considering miracles down the road, too.

Thanks! They were really good to work with. The other companies I got quotes from, reef savvy, tank me and my local planet aquariums dealer either were taking too long to get back to me or didn't respond at all. Which was surprising. Miracles was very responsive, I probably had more than 50 emails with them before I finally ordered. Aside for the fact that the tank was scratched it was beautiful and the glass was really nice quality. They were also really good about taking it back to fix it and I should be receiving it possibly next week or early the following.
 

VanDalsenReef

Valuable Member
View Badges
Joined
Apr 1, 2021
Messages
1,029
Reaction score
1,101
Location
Wyoming, Michigan
Rating - 0%
0   0   0
Thank you!


I saw that they had just come out with that one. How long have you had it? Is your macro responding well? What were you using before?


Thanks! They were really good to work with. The other companies I got quotes from, reef savvy, tank me and my local planet aquariums dealer either were taking too long to get back to me or didn't respond at all. Which was surprising. Miracles was very responsive, I probably had more than 50 emails with them before I finally ordered. Aside for the fact that the tank was scratched it was beautiful and the glass was really nice quality. They were also really good about taking it back to fix it and I should be receiving it possibly next week or early the following.
I have been using it for almost two weeks now. (Able to get it a little early) I was using an Amazon horticulture light (I think like 180 Watts but it really was like 50 and then 3 feet from the Chaeto because of a mangrove). It grows my chaeto really well but I have a course species of chaeto and I don't know if that would be different with a different species of chaeto. I love and I believe you would plus two would still be cheaper than one kessil h350x or whatever it's technically called.
 
OP
OP
Rhoads238

Rhoads238

Well-Known Member
View Badges
Joined
Apr 21, 2014
Messages
572
Reaction score
2,425
Location
New Jersey
Rating - 0%
0   0   0
Hey everyone,

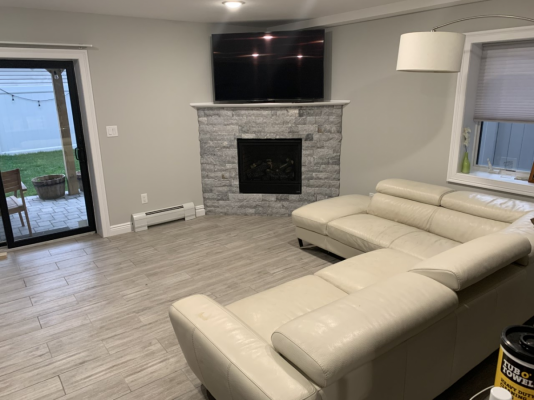
Small update on the the tank. It sounds like it should be arriving either late next week or early the following. More to come there. I also had made some changes in the room that the tank will be in that I think will make a big difference. There was a gas fireplace in the room that the tank is in. I felt that this was problematic for a few reasons. For one it forces us to put the TV on top of it, which for me makes it too high to be enjoyable. The other problem is because of the angle, the lights from the tank will reflect off of it and be less than ideal. Because of this, we decided to have the fireplace removed and I'm really pleased with the result. I think it makes the overall space work better and be more enjoyable to spend time with the tank.

Here is the before and during. The job will be finished tomorrow..

1618526902850.png


1618526902462.png


While I had a contractor in, I also had the outlets I just had put in moved about two feet to the right. I didn't realize it at the time but the position that they were in was going to be a problem because the return plumbing was going to end up going directly above the outlet. I was uncomfortable with the thought that salt water could drip directly onto the outlet and made the decision to play it safe and move the outlet.

I'm really looking forward to getting this room finished up, more to come as the build progresses.

Thanks for viewing my build!
 

Attachments

  • 1618526877690.png
    1618526877690.png
    986.9 KB · Views: 44
OP
OP
Rhoads238

Rhoads238

Well-Known Member
View Badges
Joined
Apr 21, 2014
Messages
572
Reaction score
2,425
Location
New Jersey
Rating - 0%
0   0   0
Hey everyone!

Time for another small update. Ive begun working on the inside of the stand. I needed to create a space to mount all of the equipment that will run the tank. I bought a few pieces of 3/4" plywood and got to cutting. I think the end result is going to look really clean and be very functional. So I'm happy.

This was the plan that i came up with.

1619610375804.png


Thankfully a friend was able to come to help out. I wouldn't have been able to get the plywood home in my car.

1619610434250.png


We did a test fit and i think its going to work out great. I'm going to paint it black to give it a more finished look. I left space at the top to have the pipes run out to the tank's external overflow and decided to leave space at the bottom for air flow.

1619610547962.png


I also meant to post that the fireplace project is finished and I think it came out really good.

1619610653644.png


The tank should be arriving this week. So hopefully I will be putting it onto the stand soon.

Thank you for viewing my build!
 
OP
OP
Rhoads238

Rhoads238

Well-Known Member
View Badges
Joined
Apr 21, 2014
Messages
572
Reaction score
2,425
Location
New Jersey
Rating - 0%
0   0   0
Hey everyone!

This weekend I finished building my stand. I'm really pleased with how it came out. Painting everything was quite a job but i managed not to make too much mess.

1619968675858.png


Yesterday i got everything installed. I have plenty of space to run the pvc out the back to the external overflow. I think it will also give good air flow to the sump to stop too much humidity from building up. I also like that all of the wood is off of the ground. That way if there is a spill, it should stop the wood from being damaged.

1619968033863.png


I built a controller board on the right end of the cabinet. It gives a fair amount of space. I'm not sure if everything is going to fit but we will see.

1619968263243.png


I put the sump underneath and installed some lights under the stand. I'm really happy with how this is coming out.

1619968434723.png


This week the tank is being delivered, so hopefully we will be putting it on the stand this Saturday. Im looking forward to seeing how the rest of the build progresses.

Thanks for viewing my build!
 
OP
OP
Rhoads238

Rhoads238

Well-Known Member
View Badges
Joined
Apr 21, 2014
Messages
572
Reaction score
2,425
Location
New Jersey
Rating - 0%
0   0   0
Hey everyone!

The tank finally arrived! Unfortunately there were some more issues but now its finally here. Hopefully I will be putting it on the stand this weekend.

Fortunately getting it off the truck was a lot easier this time.

1620733752400.png


I got the tank out of the crate and no scratches this time! we have a winner!!

1620733819681.png


1620733842379.png


1620733868308.png


I tried to lift it up and wasn't able to move it an inch. Hopefully it doesn't give us too much hassle bringing it into the house.
 
OP
OP
Rhoads238

Rhoads238

Well-Known Member
View Badges
Joined
Apr 21, 2014
Messages
572
Reaction score
2,425
Location
New Jersey
Rating - 0%
0   0   0
Hey everyone!

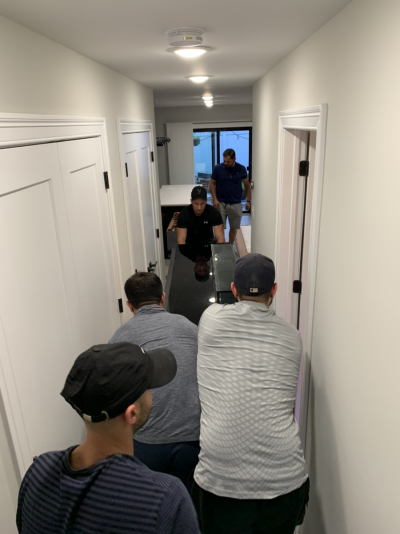
Last night was the move into the house. It went really well. I had five of my friends come over. It was really heavy but all the preparation and planning paid off. It's great to have friends that will help you with these kinds of things I couldn't have done it otherwise.

The tank was too wide to fit through the door so it had to be turned sideways and put onto its face. The two most difficult parts of the whole thing was getting it up the one step through the door way into the house and onto the stand. The rest was pretty easy.

1620993071954.png


1620993188047.png


1620993187709.png


Inspecting the alignment

1620993203283.png


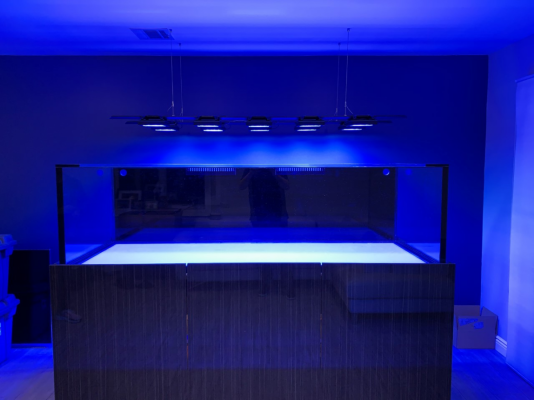
Im so happy to finally have the tank. The time from order till today took about six months. I have to say it feels really good to do a project like this. A lot of planning has gone into this project and I've learned so much in the process. It just feels great to have seen the tank go from a simple tape mark on the wall to the tank pictured below.

1620993838108.png


1620993838438.png


This weekend I will likely start plumbing the tank. I intend to do a mock setup first to get a general idea of how I want to do it. Orange pvc is too expensive to be throwing away bad cuts. After that I will do a leak test, then the tank will be pushed back into position and I will do the wiring. Once that's finished all thats left to do is aquascape it and start the cycle. Hopefully I will be up and rolling in another month or so.

Thanks for viewing my build!
 

Attachments

  • 1620993145867.png
    1620993145867.png
    876.1 KB · Views: 39
  • 1620993245005.png
    1620993245005.png
    838.2 KB · Views: 41
OP
OP
Rhoads238

Rhoads238

Well-Known Member
View Badges
Joined
Apr 21, 2014
Messages
572
Reaction score
2,425
Location
New Jersey
Rating - 0%
0   0   0
Today I started a rough draft of the plumbing. Just like my water change station, I'm doing it in white pvc before doing it in orange because its cheaper if I don't get my cuts right. I also figured it would be a good idea just so if i don't like the final product, it's not as wasteful to start over. I think so far its coming out pretty good. I'm hoping to squeeze a few more unions in but space is tighter than I had anticipated.

Take a look and let me know what you think! So far this is what I'm thinking for the drain lines. I'm running a double bean animal. The gate valves are going in back of the tank, this is really the only place there was space. Since I took the picture below, I made a slight change, Instead of having the emergency drain in the middle I moved it right one because that run lines up perfectly with the emergency bulkhead on the sump.

1621098187382.png


When I do the final setup I'm going to have to be careful to make sure none of the drain lines are running up hill. Right now some of them are slightly on an up grade. I also want make the way some of the unions are arranged a little neater, not that it really matters.

1621098330129.png


Tomorrow I might continue working on the return lines but first I need to get over to the hardware store and grab some more 1" pvc. I think snaking the left return line out is going to be pretty difficult. There's just not that much space. Hopefully i can work something out that will both look good and be functional.

I'm open to feedback on this design if anyone sees anything that i should change. This is the first time I've done something like this, so I welcome the comments.

And as always thank you for viewing my build!
 
OP
OP
Rhoads238

Rhoads238

Well-Known Member
View Badges
Joined
Apr 21, 2014
Messages
572
Reaction score
2,425
Location
New Jersey
Rating - 0%
0   0   0
Hey everyone!

Progress with the plumbing has been slower than I had hoped because of some delays. Some bumps in the road were caused from accidentally gluing things together wrong and wasting fittings because of this I had to order more. At this point all that is left to be done is to finish the return lines. I have to say I'm really looking forward to being done with this part of the build. Delays aside, I'm extremely happy with how this is coming out. I'm thinking by next week, I may be doing a leak test. Let's see how the next couple of days go.

1623513376336.png


1623513413698.png


1623513439890.png


Aside from plumbing, I have a few corals in my qt and a bunch of biomedia cooking in there. Once the tank is filled with saltwater, I'll transfer over the media thats been going since January. Hopefully this will give the tank a head start in terms of biological filtration since I'm using 100% dry rock.

1623514417741.png


Thats all i have for now. Thanks for viewing my build!
 

sdreef

Well-Known Member
View Badges
Joined
Dec 24, 2015
Messages
849
Reaction score
3,323
Rating - 0%
0   0   0
Progress with the plumbing has been slower than I had hoped because of some delays. Some bumps in the road were caused from accidentally gluing things together wrong and wasting fittings because of this I had to order more. At this point all that is left to be done is to finish the return lines. I have to say I'm really looking forward to being done with this part of the build. Delays aside, I'm extremely happy with how this is coming out. I'm thinking by next week, I may be doing a leak test. Let's see how the next couple of days go.

1623513376336.png


1623513413698.png


1623513439890.png


Aside from plumbing, I have a few corals in my qt and a bunch of biomedia cooking in there. Once the tank is filled with saltwater, I'll transfer over the media thats been going since January. Hopefully this will give the tank a head start in terms of biological filtration since I'm using 100% dry rock.

1623514417741.png


Thats all i have for now. Thanks for viewing my build!
Plumbing looks clean. Just wondering what size are the overflow lines and returns? How do you access the valves for adjustment on the overflow lines?
 
Last edited:
OP
OP
Rhoads238

Rhoads238

Well-Known Member
View Badges
Joined
Apr 21, 2014
Messages
572
Reaction score
2,425
Location
New Jersey
Rating - 0%
0   0   0
Plumbing looks nice. Is access easy to the gate valves on the overflow?

Plumbing looks clean. Just wondering what size are the overflow lines and returns? How do you access the valves for adjustment on the overflow lines?

Thanks!

There are five 1-1/2" drains setup in a double bean animal with a shared emergency. There are two 1"returns with two 2000 gph pumps.

The gates on the overflow are a little difficult to access but not terrible. The problem is that the return lines block me from reaching directly to the gate valves. Once the tank is in position, I'll have to stand on a stool to reach over the return line, down to where the gate is. Hopefully it doesn't need to be adjusted very often once its dialed in.
 
OP
OP
Rhoads238

Rhoads238

Well-Known Member
View Badges
Joined
Apr 21, 2014
Messages
572
Reaction score
2,425
Location
New Jersey
Rating - 0%
0   0   0
Hey everyone!

I've finished the plumbing over the past few days and filled the tank. There were a few small leaks, I had a few unions that weren't quite tight enough and I also had two connections that I guess i forgot to glue together. I got all of that stuff resolved and it seems like everything is working as it should be.

1624138989755.png


I spent some time today getting the overflow dialed in. When I first turned the pumps on the overflow was very loud because the durso standpipes were too low, which causes a low water level and a lot of splashing as the water falls over the weir. I raised up the two dursos and the emergency drain to raise the water level. I also drilled out the holes on top of the durso's to 1/4" which also helped keep the water level stable. Now the tank is running pretty quiet. I'll observe it over the next few days and I may try to dial it in some more.

1624139037298.png


The tank is really coming along now. Once I get the plumbing to where Im 100% happy with it, i will drain the tank and move it back into its final position, then i can start worrying about wiring and aquascaping the tank. After that we will be in business!
 
Back
Top