OP
OP
RobB'z Reef

RobB'z Reef

2500 Club Member
View Badges
Joined
Apr 23, 2020
Messages
2,783
Reaction score
5,773
Location
Eau Claire
Rating - 0%
0   0   0
No didn't miss it lol just figured you could rejigger things around a bit and do something like this...
Screenshot_20200713-195239_Samsung Internet.jpg


But I just noticed your furnace is right up against the wall so might not work depending on where the overflow sits. A floating canopy sounds really nice, can't wait to see it all come together!
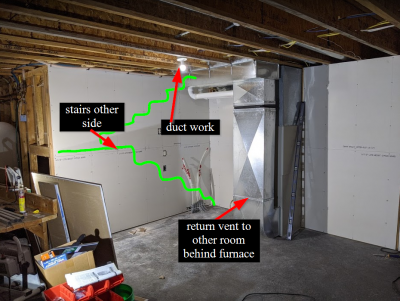
alas... it comes down to that stupid furnace lol. I truly wish i could put it in there tho... But the plumbing to it would become so janky to put it where my mixing station is right now that in the end it's just not worth it. Regarding this, there are only two inside walls to the mechanical room (the rest of the basement is finished with bedrooms/baths etc) one is stairs and the other has the furnace. Literally only one spot to put the tank if i want to take advantage of that room at all. So just working with my lot in life haha. All good thoughts tho, appreciate you considering it, sometimes a guy gets too close to a project and can miss things :)

1594736801398.png


1594736629978.png
 

Reefacist

Active Member
View Badges
Joined
Jun 26, 2020
Messages
435
Reaction score
332
Rating - 0%
0   0   0
Awesome Rob. Liking the design. I recently bought a house and I'm in the process of full remodel so will removing there in about a year (still waiting on permits) so hopefully once there I will def add a salt mixing station as well. But love the build thread and your bar
 
OP
OP
RobB'z Reef

RobB'z Reef

2500 Club Member
View Badges
Joined
Apr 23, 2020
Messages
2,783
Reaction score
5,773
Location
Eau Claire
Rating - 0%
0   0   0
Awesome Rob. Liking the design. I recently bought a house and I'm in the process of full remodel so will removing there in about a year (still waiting on permits) so hopefully once there I will def add a salt mixing station as well. But love the build thread and your bar
thank you sir, good luck with your new home! I know how remodeling those things are, I did that with my previous house. It's definitely a marathon effort. Those mad skillz apply so well to reefing on the infrastructure side I think. Just having fun here, will be watching your progression as well.
 
OP
OP
RobB'z Reef

RobB'z Reef

2500 Club Member
View Badges
Joined
Apr 23, 2020
Messages
2,783
Reaction score
5,773
Location
Eau Claire
Rating - 0%
0   0   0
Keep us posted, Great Build Thread! Crazy how a little 40G Breeder made you go Big. Any Pics from your tank builders?!
Derek from Miracles hasn't sent me anything yet, but I guess I haven't asked for any either. Not sure if that just annoys them or not haha. It was a great starter tank to get my feet wet on and by the time I knew i was hooked and loved it I just couldn't justify a larger tank at that time. The wife was churning out kids faster than I was advancing in the hobby lol. Now those are all grown so I can finally invest the time and $$ i really want to so that's why i went larger.
 
OP
OP
RobB'z Reef

RobB'z Reef

2500 Club Member
View Badges
Joined
Apr 23, 2020
Messages
2,783
Reaction score
5,773
Location
Eau Claire
Rating - 0%
0   0   0
Little Saturday afternoon project! A month ago I bought a Miro-4 LET T5 retro kit for sh!ts and giggles thinking if I ever got dimmable T5 fixtures I could use it as a burn in station or at the minimum use it over a second tank or QT setup etc.

I mean they're pretty cheap and I thought messing with one might be a good learning experience for me anyhow. At the time I bought two ATI Blue+ bulbs and thank God I did, because on Friday when I actually did pull the trigger and bought two 36" DX-18's from BRS there were no ATI Blue+ bulbs of that size to be found anywhere! How annoying...

Picked up a 4' T8 fixture from a building center for under $20 thinking I could bastardize it for a fixture using my retro kit. I still need to fabricate a cover for the ballast, but that's next week's problem :rolleyes:.

Later this weekend I'll post pictures from that effort showing how I did this. For now it's being gainfully employed giving light to my live rock so the corraline algae doesn't recede so much before my tank gets here. That's the theory anyhow. We'll see what reality nets me haha!

IMG_20200718_175608.jpg

MVIMG_20200718_175636.jpg
 

jk_s124

Valuable Member
View Badges
Joined
Sep 29, 2017
Messages
1,488
Reaction score
5,821
Location
Eau Claire, Wisconsin
Rating - 0%
0   0   0
Little Saturday afternoon project! A month ago I bought a Miro-4 LET T5 retro kit for sh!ts and giggles thinking if I ever got dimmable T5 fixtures I could use it as a burn in station or at the minimum use it over a second tank or QT setup etc.

I mean they're pretty cheap and I thought messing with one might be a good learning experience for me anyhow. At the time I bought two ATI Blue+ bulbs and thank God I did, because on Friday when I actually did pull the trigger and bought two 36" DX-18's from BRS there were no ATI Blue+ bulbs of that size to be found anywhere! How annoying...

Picked up a 4' T8 fixture from a building center for under $20 thinking I could bastardize it for a fixture using my retro kit. I still need to fabricate a cover for the ballast, but that's next week's problem :rolleyes:.

Later this weekend I'll post pictures from that effort showing how I did this. For now it's being gainfully employed giving light to my live rock so the corraline algae doesn't recede so much before my tank gets here. That's the theory anyhow. We'll see what reality nets me haha!

IMG_20200718_175608.jpg

MVIMG_20200718_175636.jpg
Nice work Rob!
 
OP
OP
RobB'z Reef

RobB'z Reef

2500 Club Member
View Badges
Joined
Apr 23, 2020
Messages
2,783
Reaction score
5,773
Location
Eau Claire
Rating - 0%
0   0   0
Hey all!

Hope everyone's weekend was good, summer is flying by in the most underwhelming fashion due to the zombie apocalypse. Get out there and make your own fun. I spent the day out on the water with my new kayak trying to teach myself how to roll. While not so successful on the roll part just yet I did manage to learn how not to fall out of the kayak while upside down and I no longer panic when hanging upside down under water (until i run out of air at least). I'll keep working on completing the roll. Something about that hip snap I'm not quite getting right yet. It was so nice to just be in the water, it's been so hot around here lately. Anyhoo...

I posted on saturday about building a DYI retro T5 kit from BRS. I think most ppl just slap a wooden hood/box together for these things and while that's perfect for most applications, I never bought this with the intention of permanently putting it over a tank for the most part. So I went looking for an el-cheapo fluorescent light fixture to hack into an useful hood for a burn-in temp fixture for general purposes. Nothing magical about this project other than just being creative about working within the limitations of space and equipment available to make something functional that was not intended for the purpose I was using for. This was what I bought

1595204849732.png


link to the 36" retro kit

i wanted to minimize the amount that extended past the bottom of the hood as it was pretty low profile so i ditched the end cap standoffs that came with the kit and decided to try my hand at mounting them directly to the housing. After laying out the location and size of the rectangular cut outs (roughly 3/4" x 1") I used a drill, dremel tool and a 'precision file' to create the cutouts for the end caps. While a bit tedious it wasn't too bad and only took me an hour or so.

1595205160077.png

1595205194024.png


All end caps mounted (they have spring clips built into them that were designed to hold them to the plastic standoffs they came with)

1595205272243.png


While at the hardware store, of course i forgot to pick up some rubber grommets to protect the wires from the steel housing so I improvised with some rubber tubing that ended up working quite well for the task.

1595205402087.png


I mounted the ballast on the top of the housing as there wasn't room and as a general practice you don't want to mount a ballast next to bulbs unless it's completely separated.

1595205508704.png


1595205538778.png


Instead of mounting the reflectors to the bulbs themselves directly using the standoff white metal clips as intended by the kit I reversed them and mounted them to the housing using the screws provided then pinched the clips together and slid them into the existing slots on the end of the reflectors as shown. This way I can change the bulbs without dorking around with the reflectors every time. This ended up working out very well and they are really secure using this technique.

1595205761263.png


I removed the OEM cord from the fixture and ran in the one provided from the kit next, secured it to the housing reusing the restraining clip from the housing.

1595205857297.png


Fully assembled

1595205896326.png


It's aliiive!!!


1595206024961.png


So all that's left is to come up with a cover for the ballast on the top of the housing. I'll give that some thought this next week. Let me know what you guys think.

 
Back
Top