Rudzbrewski's Journey to the Reef-er xl425 (V3 sump, Clarisea, plumbing w/ manifold)

OP
OP
Rudzbrewski

Rudzbrewski

Well-Known Member
View Badges
Joined
Jan 22, 2020
Messages
956
Reaction score
1,018
Rating - 0%
0   0   0
We officially have life in the "reef"! We are about 5 weeks into the cycle.

On Thursday (11/12/20), I stopped by the LFS and picked up some inverts to test the waters of sustaining life in the DT. I picked up the following:
10x Astrea snails
2x Peppermint shrimp
2x Emerald crabs

This adds a few hardy and cheap living creatures to the tank that can continue to develop the bacteria fauna and progress the cycle. There isn't much visible algae in the tank yet, so we didn't want to be too aggressive and add too much. I plan on feeding a small bit of food daily to supplement the CUC's diet in case there isn't enough algae and detritus yet and help the cycle along. We will continue to be patient and reassess in approximately 2 weeks to see what the next step is.

RSK600 update: skimmer seems to be breaking in nicely in terms of noise. Much improved since it was originally started. We will monitor its skimming as nutrients are expected to increase with the introduction of a minor bioload.
 
OP
OP
Rudzbrewski

Rudzbrewski

Well-Known Member
View Badges
Joined
Jan 22, 2020
Messages
956
Reaction score
1,018
Rating - 0%
0   0   0
Dry Side Build

I decided to construct a cabinet insert for the dry side in order to prevent any drilling or attaching to the RS stand. I used white PVC sheets from Home Depot instead of wood as it is more resistant to water and easy to clean. I used this material when constructing my deck and it was really easy to work with.

I plan on storing my ATO container in the dry side until I can figure out an aesthetically pleasing alternative for a larger container next to the tank. However, working with limited space in my home’s main living area makes this a bit tricky. The water container in the cabinet really drove the dimensions of the cabinet. After much consideration and looking through many build threads I decided to attach the front electronics panels via magnets as there wasn’t enough room for hinge operation or garage door style swinging.

Once I finish the installation I will go into more details and provide a parts list with links as I did with the plumbing. Here are pictures of progress so far:

63651887-3133-4C3C-99D2-F8DC8CD92B43.jpeg
2D318A3B-5BF8-4384-8B17-0E45ABE27E37.jpeg
58376915-8E01-45B7-BF84-21788BBD8B01.jpeg
023C1B49-120A-4089-ADC8-BED7360AC8B3.jpeg
 
Last edited:

tritonpower

Active Member
View Badges
Joined
Apr 26, 2020
Messages
429
Reaction score
528
Location
Temecula
Rating - 0%
0   0   0
After three big batches we have water! Total water volume is about 100-105 gallons. We have the 2 Reefwave 25, Vectra M2, and 2x Finnex heaters running. Hopefully we get to temp tonight and we can add the Zeovit additives to kickstart the cycle!

2E0DD8D1-2394-4DBE-9C6B-93ED8FE7592E.jpeg
How do you like the flow from the 2 reefwave 25s? I'm considering 1 45 vs 2 25s for my 425 build.
 
OP
OP
Rudzbrewski

Rudzbrewski

Well-Known Member
View Badges
Joined
Jan 22, 2020
Messages
956
Reaction score
1,018
Rating - 0%
0   0   0
How do you like the flow from the 2 reefwave 25s? I'm considering 1 45 vs 2 25s for my 425 build.

I don’t have much livestock in the tank yet, but I feel like the flow appears to be really nice and there is a ton of flexibility for adapting to whatever needs I will have. I have zero complaints about it so far. Very happy.
 
OP
OP
Rudzbrewski

Rudzbrewski

Well-Known Member
View Badges
Joined
Jan 22, 2020
Messages
956
Reaction score
1,018
Rating - 0%
0   0   0
Took advantage of some Black Friday sales to pick up a few more pieces of equipment this week. Perfect timing considering I have a week off coming up and plan on using this time to knock out a bunch of tank projects. Here is a list of things I plan on working on next:

1. Add the first fish
2. Finish dry side build panels
3. Cable management
4. Set up ATO - have to take the Tunze from my nano tank and build the DIY ato from a water bottle for the 10G setup
5. Set up DOS for automatic water changes from the water station in the basement
6. Run RODI lines and wires from basement to tank - custom conversion from DOS tubing to RODI tubing
7. Build Red Sea DIY tank cover - mostly done, need to add feeding port and improve cable cutouts
8. Continue with APEX calibration and programming - more than 1 feed more - maintenance feed mode, longer feed, water change
9. Develop plan for mounting Hydra 32's - originally was going to use tank mounts, but after extensive discussion with some people decided to build or utilize TV mounts from wall. Less in the way for a lid, won't get messy from SW splash, hopefully cleaner look, cheaper.
10. DIY dose containers from VOSS bottles
 
Last edited:

tritonpower

Active Member
View Badges
Joined
Apr 26, 2020
Messages
429
Reaction score
528
Location
Temecula
Rating - 0%
0   0   0
Took advantage of some Black Friday sales to pick up a few more pieces of equipment this week. Perfect timing considering I have a week off coming up and plan on using this time to knock out a bunch of tank projects. Here is a list of things I plan on working on next:

1. Add the first fish
2. Finish dry side build panels
3. Cable management
4. Set up ATO - have to take the Tunze from my nano tank and build the DIY ato from a water bottle for the 10G setup
5. Set up DOS for automatic water changes from the water station in the basement
6. Run RODI lines and wires from basement to tank - custom conversion from DOS tubing to RODI tubing
7. Build Red Sea DIY tank cover - mostly done, need to add feeding port and improve cable cutouts
8. Continue with APEX calibration and programming - more than 1 feed more - maintenance feed mode, longer feed, water change
9. Develop plan for mounting Hydra 32's - originally was going to use tank mounts, but after extensive discussion with some people decided to build or utilize TV mounts from wall. Less in the way for a lid, won't get messy from SW splash, hopefully cleaner look, cheaper.
10. DIY dose containers from VOSS bottles
I just got a used 425! Setting it up now. I started a build thread. How are you planning on a feeding port on the tank cover? I'm needing the same thing.
 
OP
OP
Rudzbrewski

Rudzbrewski

Well-Known Member
View Badges
Joined
Jan 22, 2020
Messages
956
Reaction score
1,018
Rating - 0%
0   0   0
I just got a used 425! Setting it up now. I started a build thread. How are you planning on a feeding port on the tank cover? I'm needing the same thing.

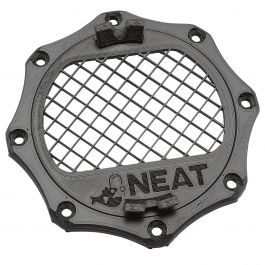
It has been really enjoyable setting up my xl425 and working on all the projects along the way. I have not installed it yet, but I am going to use the Neat Aquatics portal from BRS. I will post pictures of how it comes out once I finish it with links like I did for the plumbing. Here is the part:

 
OP
OP
Rudzbrewski

Rudzbrewski

Well-Known Member
View Badges
Joined
Jan 22, 2020
Messages
956
Reaction score
1,018
Rating - 0%
0   0   0
It has been really enjoyable setting up my xl425 and working on all the projects along the way. I have not installed it yet, but I am going to use the Neat Aquatics portal from BRS. I will post pictures of how it comes out once I finish it with links like I did for the plumbing. Here is the part:


Pictures to come later today, but I installed this last night and it was super easy. Less than 5 minutes.
 
OP
OP
Rudzbrewski

Rudzbrewski

Well-Known Member
View Badges
Joined
Jan 22, 2020
Messages
956
Reaction score
1,018
Rating - 0%
0   0   0
Red Sea DIY Mesh Top

In anticipation of adding the first fish to the tank I prioritized the completion of the lid. I used the Red Sea 60" DIY lid kit. I went with the larger kit in order to be able to construct a 2 piece top that would be less cumbersome to deal with than one large 4 foot top. I plan on mounting my lights from the wall in order to minimize salt splash and streamline the look. As a result, I could make 2 rectangular lid pieces with no cutouts because there are no mounts on the tank and the overflow sits below the rim. I just had to clip the corner pieces to allow for the wires from the 2 Reefwave 25s to come out of the tank. Overall, the kit is no where near as bad as reviews and others have said if you have reasonable expectations (of course it is not a Clearview, Top Lid, Octo Lid, etc). You also need plenty of patience and a bit of OCD. It is not a quick 1 hour project, but if you think it through, take your time, and be patient it looks great for the price.

Issues and advice:

-The holes that the clips create are not large enough for the wires to neatly leave the tank, so I used a dremmel to sand a bigger opening and stick two wire guides on the back of the tank to align them properly.
-I added a feeding port using the Neat Aquatics piece from BRS linked on the previous post.
-This was a custom tank design, so I did not use the measurements in the RS manual. Be very thorough in measurements and use mm instead of inches to make sure it is precise. Ensure you take into account the space taken up but the corners and connectors to get it to sit correctly. Cut with a hack saw and sand the cuts to look clean.
-The only real difficult process is installing the mesh. Since I used the larger kit and was making two smaller sections instead of one big one I was able to use areas that did not have creases from being folded. I was told by my LFS that the heat from a hair drier works well to smooth out if needed. The mesh is more plastic like than I expected, so there is very little stretch. It will easily tear if forced or nicked with the spline roller. I would definitely use a spare area of the netting and try putting a piece in and see how easy it is to tear and split with the spline roller before starting your real piece because it can easily be taken out once the practice is over.
-The BIGGEST TIPS I have is when installing the net with the spline. First, use the square line to help line up the net while installing to pull taught and stay on a straight line and square. Second, as you lay the spline to roll it into the groove give it a few twists because it is a hollow rubber piece that will help to shrink a bit to easily be rolled into the groove with the spline roller. Using any significant force with the roller will rip the net from stretching or the roller hitting it, which is worst case! Take your time to roll it in slow and if it is not going in semi easily with the roller then the net might be pulled too tight.
-The RS spline roller is not ideal, but would do the job. I had one already from repairing screens in the past, so a nicer one with a grooved wheel would make life easier. One of the "rocking" style ones might work well also.

IMG_5327.jpg
IMG_5328.jpg
 
OP
OP
Rudzbrewski

Rudzbrewski

Well-Known Member
View Badges
Joined
Jan 22, 2020
Messages
956
Reaction score
1,018
Rating - 0%
0   0   0
Went ahead and made some dosing containers from Voss water bottles to prepare for dosing KZ Coral System 1, 2, 3, 4 in the future. There are a plenty of Youtube videos on how to put these together, including one from BRS. Just have to decide if I want to paint the tops orange or leave grey. These were super easy to throw together and took about 10 minutes total. Unfortunately, Voss bottles are no longer glass. I cut the 16 inch acrylic rod in in half to make the inside section of the bottle, but probably should have used about 10 inches worth and 4 rods to get the piece closer to the bottom of the container without touching the bottom incase there's any precipitate in the solution.

IMG_5326.jpg
 
OP
OP
Rudzbrewski

Rudzbrewski

Well-Known Member
View Badges
Joined
Jan 22, 2020
Messages
956
Reaction score
1,018
Rating - 0%
0   0   0
Been working on the wire management in the dry side cabinet. It was finally time to move the Tunze from my 10G setup to the DT for layout and organization purposes. As a result, I made a DIY ATO from 2 club soda bottles for the 10G. It isn't ideal, or pretty, but it seems functional.

IMG_5330.jpg
 
OP
OP
Rudzbrewski

Rudzbrewski

Well-Known Member
View Badges
Joined
Jan 22, 2020
Messages
956
Reaction score
1,018
Rating - 0%
0   0   0
Neptune Apex DOS Conversion for RODI Tubing

It's been a busy week working of the xl425! The next project I completed was converting the DOS from standard to RODI tubing. The RODI tubing is more aesthetically pleasing, easier to run without wrinkles, and most importantly color coded for new salt water (blue) vs waste (black). I plan on keeping this color coding going with my dosing lines (orange) when I get to that point in the tank maturity.

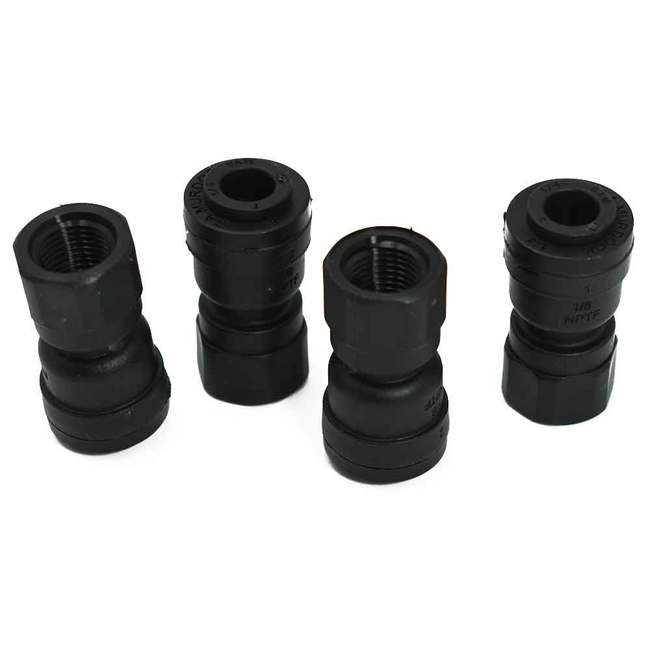
In order to complete the modification you need 1/4" RODI tubing, a utility knife, teflon tape, and a 1/4" x 1/8" nptf female adapter (white or black). It is a very easy and quick modification. This creates an airtight seal that reduces the risk of a gravity siphon compared to forcing the RODI tubing onto the fitting for DOS tubing (more safety redundancy coming with auto-water change installation).

1. Unscrew DOS tube cover, and cut the tip for the DOS tubing
2. Wrap with a few turns of teflon tape (I folded in half to keep it neat)
3. Screw on adapter

Link for adapter:

IMG_5323.jpg
IMG_5324.jpg
IMG_5325.jpg
 

tritonpower

Active Member
View Badges
Joined
Apr 26, 2020
Messages
429
Reaction score
528
Location
Temecula
Rating - 0%
0   0   0
Been working on the wire management in the dry side cabinet. It was finally time to move the Tunze from my 10G setup to the DT for layout and organization purposes. As a result, I made a DIY ATO from 2 club soda bottles for the 10G. It isn't ideal, or pretty, but it seems functional.

IMG_5330.jpg
how does that work?
 
OP
OP
Rudzbrewski

Rudzbrewski

Well-Known Member
View Badges
Joined
Jan 22, 2020
Messages
956
Reaction score
1,018
Rating - 0%
0   0   0
how does that work?

It is just an upside down bottle filled with water and a second bottle cut to hold it in place. The water doesn’t come out when the opening is submerged under water, so as the water in the tank evaporates below the level of the opening it releases water from the bottle to re-fill the tank to equilibrium.

Couple videos on YouTube on how to make it. Isn’t as great on a rimmed tank, but it works. Just have to be very careful not to knock it when working around the tank, and need to cap it when doing any tank work as waves break the seal. Not as nice or convenient as the ATO, but a cheap substitute.
 
OP
OP
Rudzbrewski

Rudzbrewski

Well-Known Member
View Badges
Joined
Jan 22, 2020
Messages
956
Reaction score
1,018
Rating - 0%
0   0   0
Yesterday was another productive day at the reef. The 4 different mounts I ordered from Amazon arrived. My other half and I selected the one that looks the best and should give the appropriate distance from the wall for mounting lights. We decided to use full motion TV mounts that I will modify to mount the lights to keep them off the tank, up out of the way, and have range of motion for flexibility and convenience. More to come once I dive into this project.

I also added the first fish to the tank about 8 weeks after adding water! I picked up a Midas Blenny from my LFS. He was very social in the shop, so once he comes out of his new favorite burrow I will try to get a nice picture of him. He is currently hiding in a nice hole in the rock work and is pretty entertaining how skeptical he is of coming out and diving right back in. Wish me luck!

Side note, I also moved a few of the snails from my DT to the 10G as I don't believe there is enough algae for them to thrive currently.
 
OP
OP
Rudzbrewski

Rudzbrewski

Well-Known Member
View Badges
Joined
Jan 22, 2020
Messages
956
Reaction score
1,018
Rating - 0%
0   0   0
Huge item crossed off the list! Was able to get the lights mounted and wires hidden by running them through the wall. I only have 1/2 lights installed due to the other being on my 10G until the corals are able to be transferred. I used two full motion TV mounts (link listed) instead of the AI mounts to keep them from getting splashed, allow for positioning flexibility, make fitting a lid easier, and a cleaner look. In addition, it is significantly cheaper. I simply took the TV mount portion off of the arm and replaced it with the AI Hyrda mounting bracket. The mounts are installed to the wall using 1/4” snap toggles as no studs were conveniently located. They are mounted 14” above the water as recommended by BRS investigates video optimized mounting height. I was not looking forward to this installation, but it went smooth and we love the look! Really happy we went with this over the standard mounting options.

TV mount:
ECHOGEAR Full Motion TV Wall Mount for TVs Up to 58" - Smooth Extention, Swivel, Tilt - Wall Template for Easy Install On 1 Stud - After Install Level & Hide Cables with Built-in Cable Management


41A13EA3-28DD-42D4-AEC0-B9C648DD3A62.jpeg
 
Last edited:

tritonpower

Active Member
View Badges
Joined
Apr 26, 2020
Messages
429
Reaction score
528
Location
Temecula
Rating - 0%
0   0   0
Huge item crossed off the list! Was able to get the lights mounted and wires hidden by running them through the wall. I only have 1/2 lights installed due to the other being on my 10G until the corals are able to be transferred. I used two full motion TV mounts (link listed) instead of the AI mounts to keep them from getting splashed, allow for positioning flexibility, make fitting a lid easier, and a cleaner look. In addition, it is significantly cheaper. I simply took the TV mount portion off of the arm and replaced it with the AI Hyrda mounting bracket. The mounts are installed to the wall using 1/4” snap toggles as no studs were conveniently located. They are mounted 14” above the water as recommended by BRS investigates video optimized mounting height. I was not looking forward to this installation, but it went smooth and we love the look! Really happy we went with this over the standard mounting options.

TV mount:
ECHOGEAR Full Motion TV Wall Mount for TVs Up to 58" - Smooth Extention, Swivel, Tilt - Wall Template for Easy Install On 1 Stud - After Install Level & Hide Cables with Built-in Cable Management


41A13EA3-28DD-42D4-AEC0-B9C648DD3A62.jpeg

I love the use of the TV mounts. Whatever works! How long until you add corals? I will be transferring all my corals and fish next weekend.
 
OP
OP
Rudzbrewski

Rudzbrewski

Well-Known Member
View Badges
Joined
Jan 22, 2020
Messages
956
Reaction score
1,018
Rating - 0%
0   0   0
I love the use of the TV mounts. Whatever works! How long until you add corals? I will be transferring all my corals and fish next weekend.

I am right around the 2 month mark. If I can keep being patient I am going to give it another 1-2 months to get a thorough cycle in before putting a tester Zoa in. However, sometimes waiting is easier said than done. I don’t think I’m currently ready yet as I have very little algae growth even, so we will see how things change with the light now.
 
OP
OP
Rudzbrewski

Rudzbrewski

Well-Known Member
View Badges
Joined
Jan 22, 2020
Messages
956
Reaction score
1,018
Rating - 0%
0   0   0
Another big accomplishment this past week! Cable management is finally under control. Took a lot of thinking, planning, and being in uncomfortable positions. It was worth it in the end. Cabinet is much more organized and easier to work in. Will have a few things to clean up once I get the ATO and auto-water change fully working and situated then once more when I get the FMM and 2x DOS down the line. Here is the current status:

IMG_5344.jpg


IMG_5345.jpg
 
OP
OP
Rudzbrewski

Rudzbrewski

Well-Known Member
View Badges
Joined
Jan 22, 2020
Messages
956
Reaction score
1,018
Rating - 0%
0   0   0
Another step complete! I finished running, organizing, labeling, and testing the RODI lines for the auto water change system using a DOS.

I added a solenoid on the waste water line from the tank that will be linked to high and low level water sensors from the FMM Module once I get those components. This will allow the solenoid to open and break any type of gravity syphon triggered by too much water removal if there was to ever be an issue with the seal. Another layer of safety and redundancy since my water mixing station is located in the basement.

Now I need to calibrate the DOS and program the AWC system. I plan on spending the time to really learn about Apex programming as a whole as the next step of my journey. I have said from the beginning that tank automation was a major part of my plan to make things less time consuming and allow for travel. Apex guide documents, here I come!
 

Being sticky and staying connected: Have you used any reef-safe glue?

  • I have used reef safe glue.

    Votes: 140 88.1%
  • I haven’t used reef safe glue, but plan to in the future.

    Votes: 9 5.7%
  • I have no interest in using reef safe glue.

    Votes: 7 4.4%
  • Other.

    Votes: 3 1.9%
Back
Top