OP
OP
sdreef

sdreef

Well-Known Member
View Badges
Joined
Dec 24, 2015
Messages
849
Reaction score
3,323
Rating - 0%
0   0   0
Tank is looking great!!!
Thank you! I'm trying to have patience to let the system mature. I feel like I'm transferring a new "tester" coral in the system daily now, but it is nice to see some flow and color in the system now.
 
OP
OP
sdreef

sdreef

Well-Known Member
View Badges
Joined
Dec 24, 2015
Messages
849
Reaction score
3,323
Rating - 0%
0   0   0
Although a fish room was not an option, there is a closet behind the tank with space to house the electronics. I mounted a few pieces of plywood and used a cable raceway to manage the cords. The cords go from behind the tank through a double gang pass-through to the closet.


IMG_2583.jpg
IMG_2632.jpg
IMG_2631.jpg
IMG_3057.jpg


The finished product
IMG_3063.jpg
IMG_3065.jpg
IMG_3064.jpg


I labelled most of the plugs as I went along. A little time consuming, but hoping it will save time in the future.
IMG_3067.jpg
 
OP
OP
sdreef

sdreef

Well-Known Member
View Badges
Joined
Dec 24, 2015
Messages
849
Reaction score
3,323
Rating - 0%
0   0   0
I never had a conductivity probe on my prior set up, but like the idea of being able to monitor the salinity with a probe.

From what I gathered reading other posts there are a few main pitfalls with the probe that affect its accuracy. Temperature compensation, microbubbles, and being adjacent to other electronic equipment. The probe was calibrated within a few feet of where it resides now with the temperature compensation set for 2.1%.

The probe is located in the refugium which is fed from a manifold after my return chamber and has very few if any microbubbles. The remainder of the probes are located in the skimmer chamber.

IMG_3071.jpg


In order to shield the probe from interference from the other electronics I routed the cable independently behind the tank. There are a lot of cords that converge at the pass-through to the electronics cabinet. The probe cord is routed through a pvc conduit through the passthrough. I split black 1/4" airline tubing and used this to additionally shield the cord. I'm not sure if this makes a difference.
IMG_3072.jpg
IMG_3074.jpg


Currently, the conductivity probe is spot on. Working to adjust the salinity to 35 ppt.
IMG_3070.jpg
IMG_3069.jpg
 
Last edited:

McPuff

Valuable Member
View Badges
Joined
Dec 11, 2018
Messages
1,332
Reaction score
1,523
Location
Plymouth, MI
Rating - 0%
0   0   0
It's coming along nicely!

Love the golden hawk. I'm actually putting one into my DT today... has been in QT for about 8 weeks and looking fat. :0)
 
OP
OP
sdreef

sdreef

Well-Known Member
View Badges
Joined
Dec 24, 2015
Messages
849
Reaction score
3,323
Rating - 0%
0   0   0
It's coming along nicely!

Love the golden hawk. I'm actually putting one into my DT today... has been in QT for about 8 weeks and looking fat. :0)
Thanks! He's one of my favorites. Still in my cube tank, but I've trained him to swim into the fish trap. He'll be in the new system soon.
 
OP
OP
sdreef

sdreef

Well-Known Member
View Badges
Joined
Dec 24, 2015
Messages
849
Reaction score
3,323
Rating - 0%
0   0   0
I added a juvenile chevron a couple days ago. I added him in the evening and the gem chased him a little, but all the fish are getting along well now.
IMG_3108.jpg


Yesterday the tank had a bacterial bloom and was very cloudy most of the day and so I decided to bring the UV on line.
IMG_3117.jpg


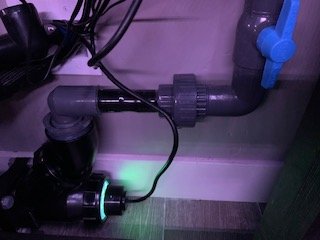
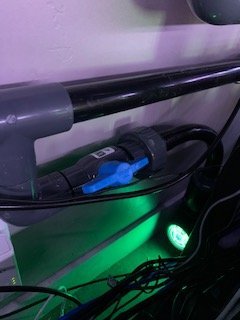
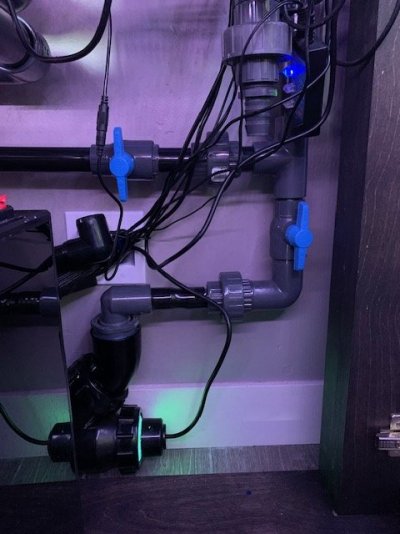
I am running the Lifegard Pro-Max 55Watt in line with one of my return lines. I am using a flow meter and am running the return line around 400-450 gallons per hour. I am targeting about 3x turnover for the tank through the sump. The UV may be slightly undersized based on the flow for protozoa. It's not too far off, and I haven't found an evidence based consensus on UV dosage. If I run into any issues I can always upsize to the 90 Watt version or run my return lines at different rates since each is independently controlled with a DC pump.

IMG_3122.jpg


The sterilizer is sitting behind the tank horizontally on the ground. There is sufficient space because of the dimensions of the external overflow box.

IMG_3134.jpg
IMG_3133.jpg


I placed a bypass valve that is closed (circled). During UV maintenance, I will open the bypass valve and close the other ball valves on either end of the UV. There is a union connected to a barb and flexible 1" tubing. I'll open the unions hopefully angle up enough to avoid spilling water and slide the unit out for maintenance. I like the counter on the units ballast. Will see how the maintenance goes in 365 days.

IMG_3135.jpg
IMG_3123.jpg IMG_3127.jpg IMG_3134.jpg
 
Last edited:
OP
OP
sdreef

sdreef

Well-Known Member
View Badges
Joined
Dec 24, 2015
Messages
849
Reaction score
3,323
Rating - 0%
0   0   0
I took some PAR measurements to help plan the layout of my corals and help plan as I transfer from my current system.

The light is suspended 12" from the water surface. I have three 250 Watt Radium bulbs with an IceCap electronic ballast set at 250 HQI. There are four 80 Watt ATI Blue Plus T5s. I also have two 72" Reefbrite Actinic XHOs set at 100% for the PAR readings.

PAR- Halide:T5:RB.jpeg


This second reading is with the T5s and Reefbrites set at 100%.
PAR- RB:T5.jpeg


I haven't settled on a lighting schedule, but I'm thinking Reefbrites 12 hours, T5s 10 hours, and work up to Halides 4-5 hours. I might also lower the intensity of the reefbrites while the Halides are on.
 
OP
OP
sdreef

sdreef

Well-Known Member
View Badges
Joined
Dec 24, 2015
Messages
849
Reaction score
3,323
Rating - 0%
0   0   0
Salt water mixing station part list

IMG_0907.jpeg


A- Spectrapure Mega MaxCap Performance Plus RODI UNIT
B- Neptune DOS
C- Quick Connect Adapter for DOS Qty: 4
https://www.freshwatersystems.com/products/john-guest-female-adapter-nptf-polypro-1-4-x-1-8-nptf

D- John Guest 1/4” RO Tubing- 500’ spool Qty 1-2 depending on distance


E- 125’ Aquabus Cable (Length due to distance from garage to apex base unit at display)
https://www.usbfirewire.com/parts/rr-apex-xx.html

F- Full Drain Inductor Tank & Stand 110 Gallon. Purchased locally Qty 2

G- 2” Male Pipe Adapter Schedule 80 , Qty 2

H- 2” Spigot to 1” slip reducing bushing, Qty 2

I- 1” Cepex Union Ball Valve, Qty 4

J- Pan World 50PX-X. Pump Qty 1

K- 1” Union Thread x Slip. Qty 2

L- Schedule 80 Reducing Bushing 1” Spigot x 3/4” Female Thread Qty 1

M- 3/4” Male Thread Quick Connect Cam Lever Coupling B Qty 1

N- 3/4” Female Thread Quick Connect Cam Lever Adapter A Qty 1

O- Schedule 80 3/4” Straight Barb Qty 1

P- 1” Bulkhead ABS Slip x Slip Qty 1

Misc- 1" PVC Tubing, Elbow, Tees, 45s. I ran the plumbing along the stem wall and utilized seven 90 degree elbows, two T's, and two 45 degree elbows to get the plumbing down from the stem wall to be in line with the pump.

IMG_0911.jpeg
IMG_0908.jpeg
IMG_3163.jpeg
IMG_0909.jpeg
 
Last edited:
OP
OP
sdreef

sdreef

Well-Known Member
View Badges
Joined
Dec 24, 2015
Messages
849
Reaction score
3,323
Rating - 0%
0   0   0
I ordered a custom sump from @geo. The sump offers a lot of little built in features for cord management, water management, and organization of the equipment and filtration. I'm very happy with the layout and quality of the sump.
IMG_3234.jpeg
FF62071B-5E6B-4CCD-8F09-A86D483796B8.jpeg


I like using mechanical filtration, but I hate changing it. This leads to me putting it off, so I decided to try the automatic filter rollers for the new build. Due to the range of flow, there are two Clarisea SK-5000's. There is a bypass hole that allows water to equalize in both chambers.

I'd like to minimize the filter roll changes as well, so currently I put them on a timer. When I started using the timer, the rollers were coming on only once a day. I monitored the overflow and have adjusted the frequency of the timer as my bioload, feeding, and flow have changed. This is the current state of the rolls after 5 weeks of operation, and currently they come on every two hours after 5am. I am interested to see how long I can make them last.

IMG_3230.jpeg
IMG_3237.jpeg


The skimmer is under sized based on recommendations, and due to the use of the roller fleece removing many of the organics before they have a chance to dissolve. I am using the Bubble King Deluxe 200. It's taken a couple weeks, but it's skimming effectively.

9BA6FCF5-2462-41A7-9758-68F2E9AE8493.jpeg
IMG_3228.jpeg


I have two media reactors that run off the individual return pumps. Currently I am only running carbon. Changing the media has been clean and simple. There are also integrated bulkheads for the ATO, AWC (water in/out), and one in the refugium that I will use for the calcium reactor effluent once it's running.

B81C2FB0-2F57-4950-A1FC-F8C7BBD31B62.jpeg
IMG_3232.jpeg


I like the design of the refugium post-return. It keeps the chamber a little cleaner focused on dissolved nutrients. Pods are less likely to be skimmed out which likely is not a significant issue, but I like it regardless. I also like the reefbrite strip with the light directed down into the chamber without light spill into the other chambers. I added some red ogo a few weeks ago and added my first batch of chaeto this week.

IMG_3231.jpeg


White 1/4" tubing line is the ATO connected to a spectrapure water exchange module (WXM) that is spliced into the Osmolator. There is float tree on an acrylic rod that holds the optical / float sensors in the return section. The WXM draws water from the reservoir in the garage with a 90-100' run of tubing between the reservoir and stand.

IMG_3233.jpeg


No water changes to date, but I'm thinking about getting the automatic water changes recalibrated. I've been manually dosing. I tried coralline in a bottle and I am transferring some encrusted rocks from the other system which should get things going. Once I see some coralline, I'll start adding some more sps corals.
 
Last edited:
OP
OP
sdreef

sdreef

Well-Known Member
View Badges
Joined
Dec 24, 2015
Messages
849
Reaction score
3,323
Rating - 0%
0   0   0


IMG_3312.jpeg

Transferred a gold torch. It seems to like the new placement after 24 hours. The alkalinity in both systems is around 7.8. Tempted to transfer more torches, but trying to give the system a chance to mature.
 
Last edited:
OP
OP
sdreef

sdreef

Well-Known Member
View Badges
Joined
Dec 24, 2015
Messages
849
Reaction score
3,323
Rating - 0%
0   0   0
The macros in the refugium have started growing. My nitrates a week ago were about 10 and phosphate measured 0.1. Today I'm down to nitrates 2-5, phosphate .02. I removed the ulva from the refugium as it was creating a matte on top and I didn't want to block light from the other macro algae. So now, just red ogo and Chaeto. Currently, light is on in the fuge 7pm to 7am.

IMG_3423.jpg
IMG_3422.jpeg


The other parameters have been stable, so some more transfers from the other system. I convinced myself there are some specks of coralline so I added a my first acro. The rocks have algae, but the tangs and snails are keeping it stable.


IMG_3426.jpeg
IMG_3425.jpeg
IMG_3431.jpeg

IMG_3439.jpeg
IMG_3432.jpeg
 
Last edited:
OP
OP
sdreef

sdreef

Well-Known Member
View Badges
Joined
Dec 24, 2015
Messages
849
Reaction score
3,323
Rating - 0%
0   0   0
I am getting ready to aquascape a 400 gallon so took alot of inspiration from yours thread. Another thing is the plumbing is top notch - Mines planned for simple as possible!
Thanks, I've gotten a lot of ideas and learned a lot by reading other people's builds. I'm happy to hear that it was helpful.

Trent from Crystal Dynamics put together most of the plumbing. I had some ideas and input, and he did a nice job with the clean plumbing.

Also, I thought this was an inspiring aquascape in case you haven't seen this video.
 
Last edited:
OP
OP
sdreef

sdreef

Well-Known Member
View Badges
Joined
Dec 24, 2015
Messages
849
Reaction score
3,323
Rating - 0%
0   0   0
Following! Nice setup :).
Thanks, I got a lot of ideas from your build thread. The pass through behind the light fixture was an idea from your thread, and that evolved into using the closet behind the tank for the electronics so thanks for taking the time to post so many details of your set up.
 

Rock solid aquascape: Does the weight of the rocks in your aquascape matter?

  • The weight of the rocks is a key factor.

    Votes: 10 8.8%
  • The weight of the rocks is one of many factors.

    Votes: 42 36.8%
  • The weight of the rocks is a minor factor.

    Votes: 34 29.8%
  • The weight of the rocks is not a factor.

    Votes: 27 23.7%
  • Other.

    Votes: 1 0.9%
Back
Top